

Master Suite Remodel - A Change in (Floor) Plans
I posted two weeks ago about our master suite remodel, including what we had demoed and the new floor plan. After that post, we were finally able to take some time and officially tape off the floor to REALLY get a feel for how the space would work. Unfortunately, we quickly realized there were some issues that we had to solve for.
Master Bedroom Renovation
Well, that was a quick change in plans…
I posted two weeks ago about our master suite remodel, including what we had demoed and the new floor plan. After that post, we were finally able to take some time and officially tape off the floor to REALLY get a feel for how the space would work. Unfortunately, we quickly realized there were some issues that we had to solve for.

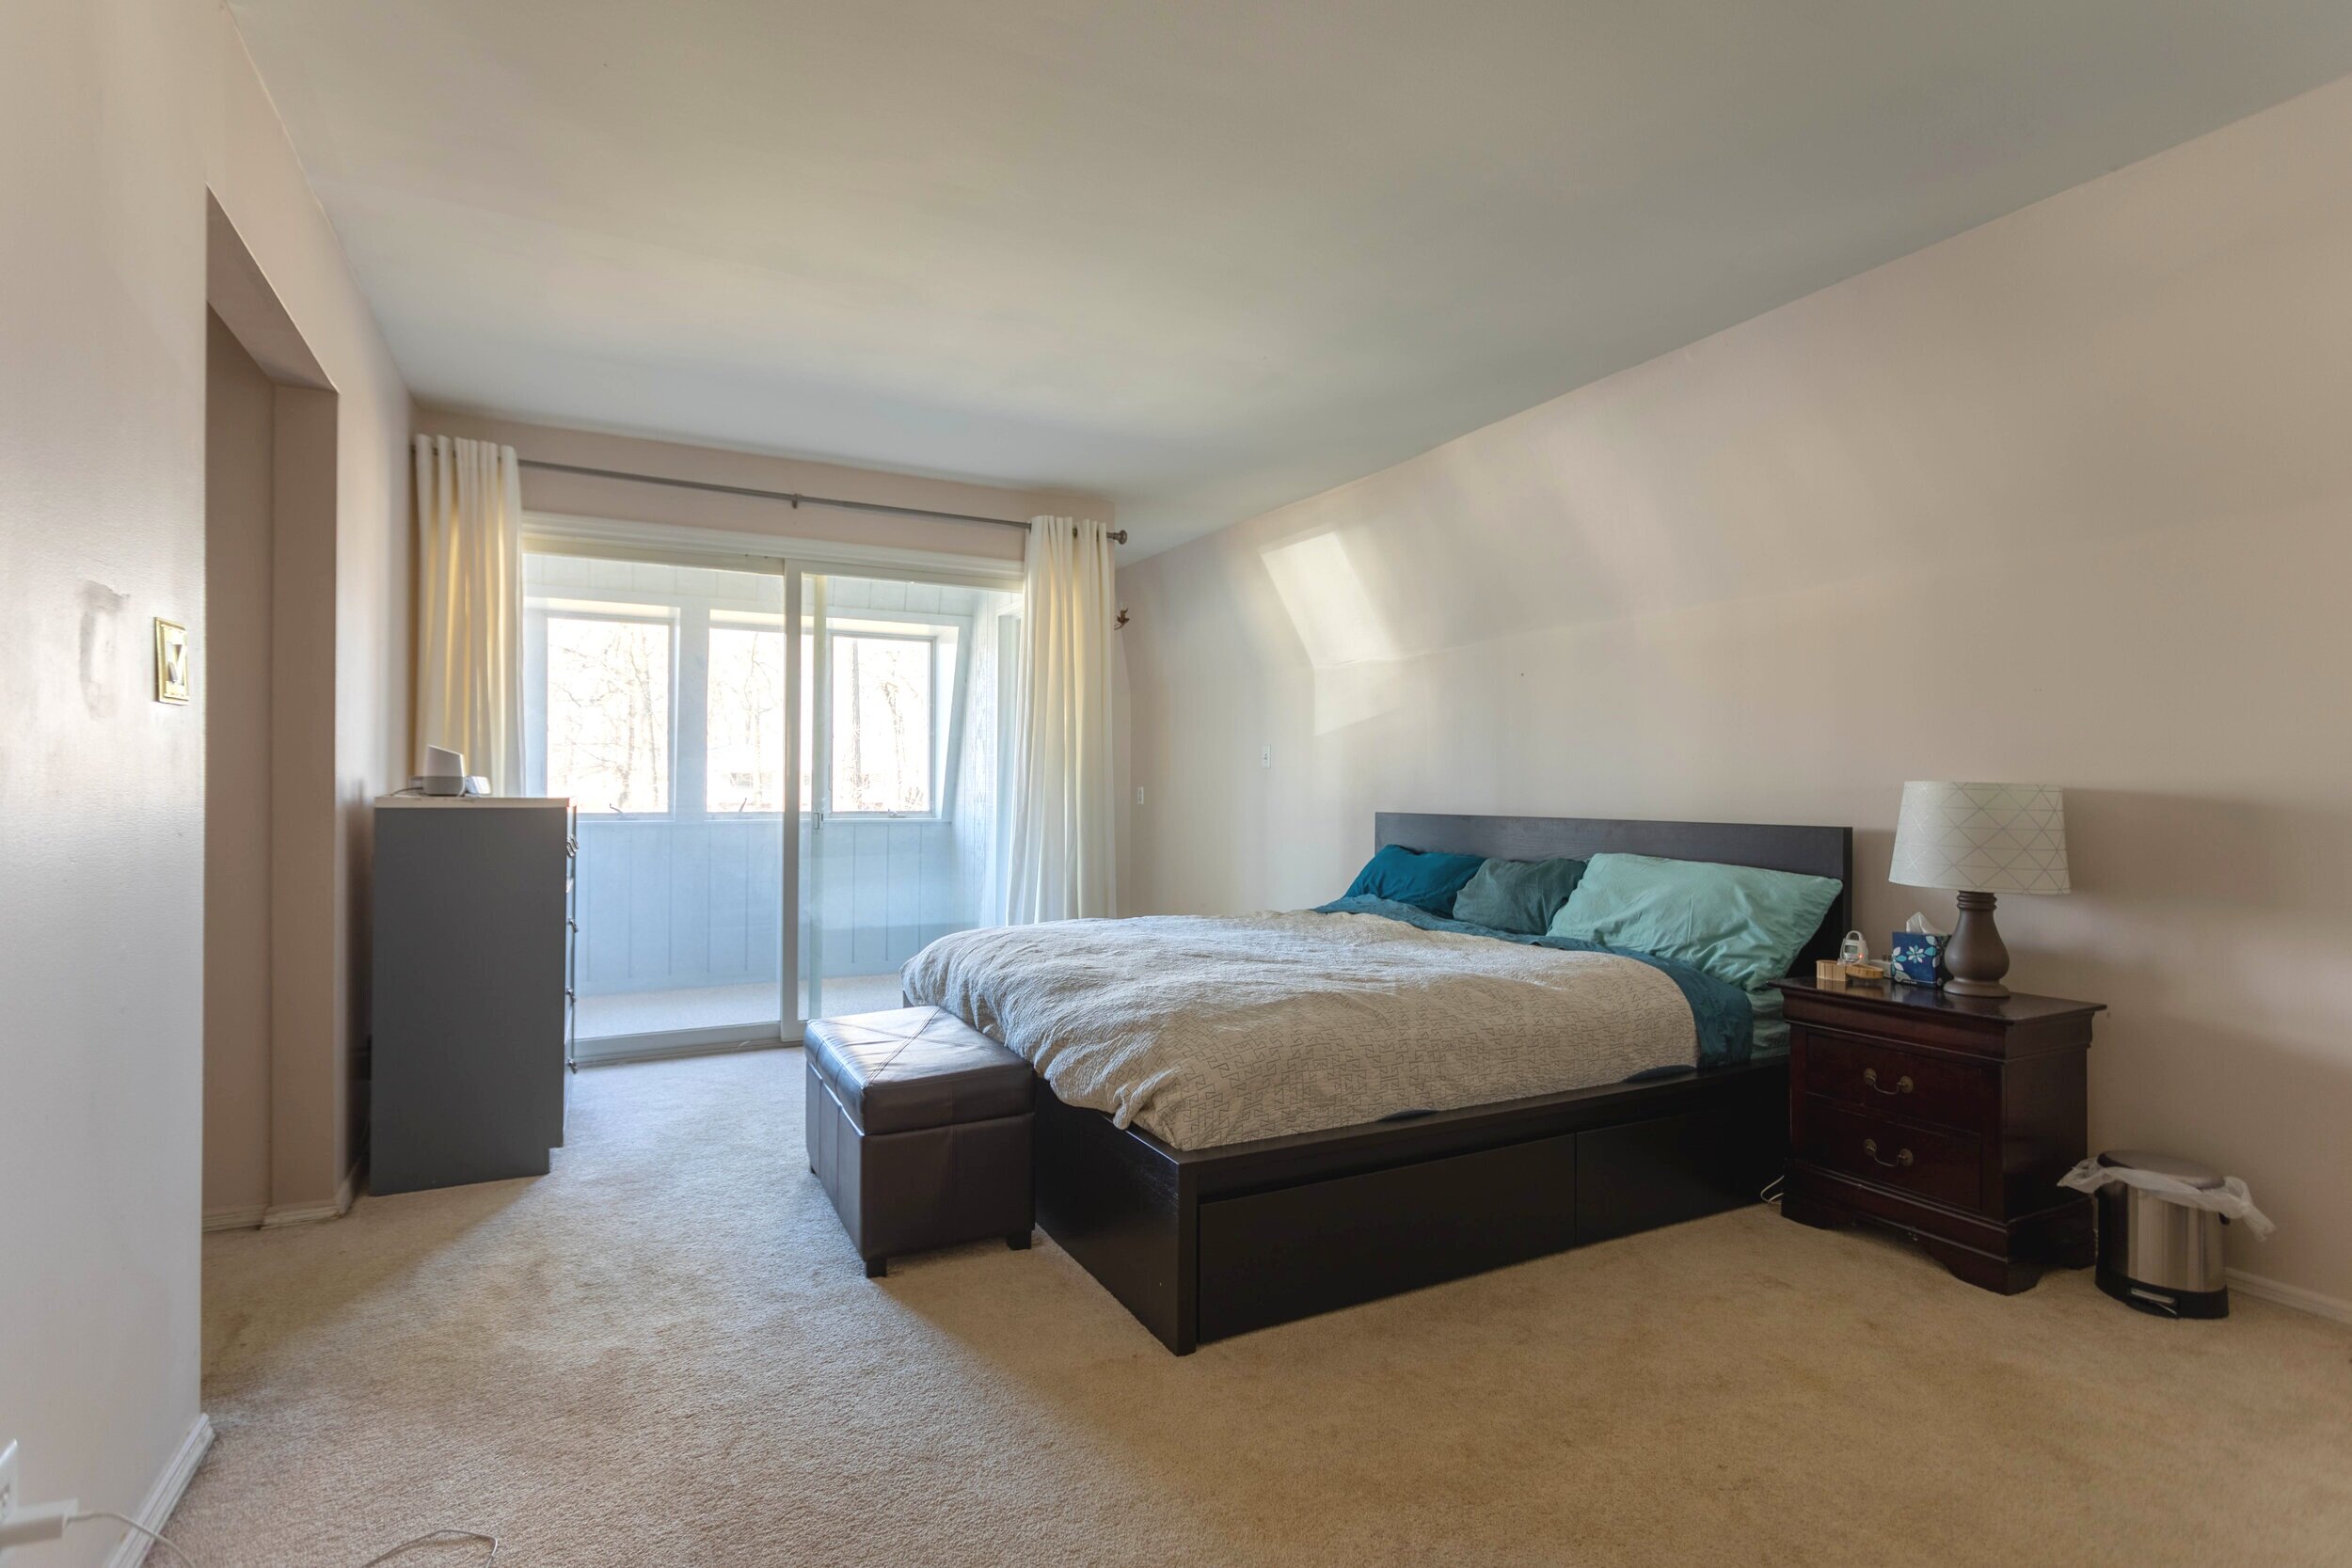
Before we get into the problems we encountered and how we’re working with and around them, as a quick refresher, this is what our master looked like before demo.

This was the floor plan we originally mocked up for our renovation.

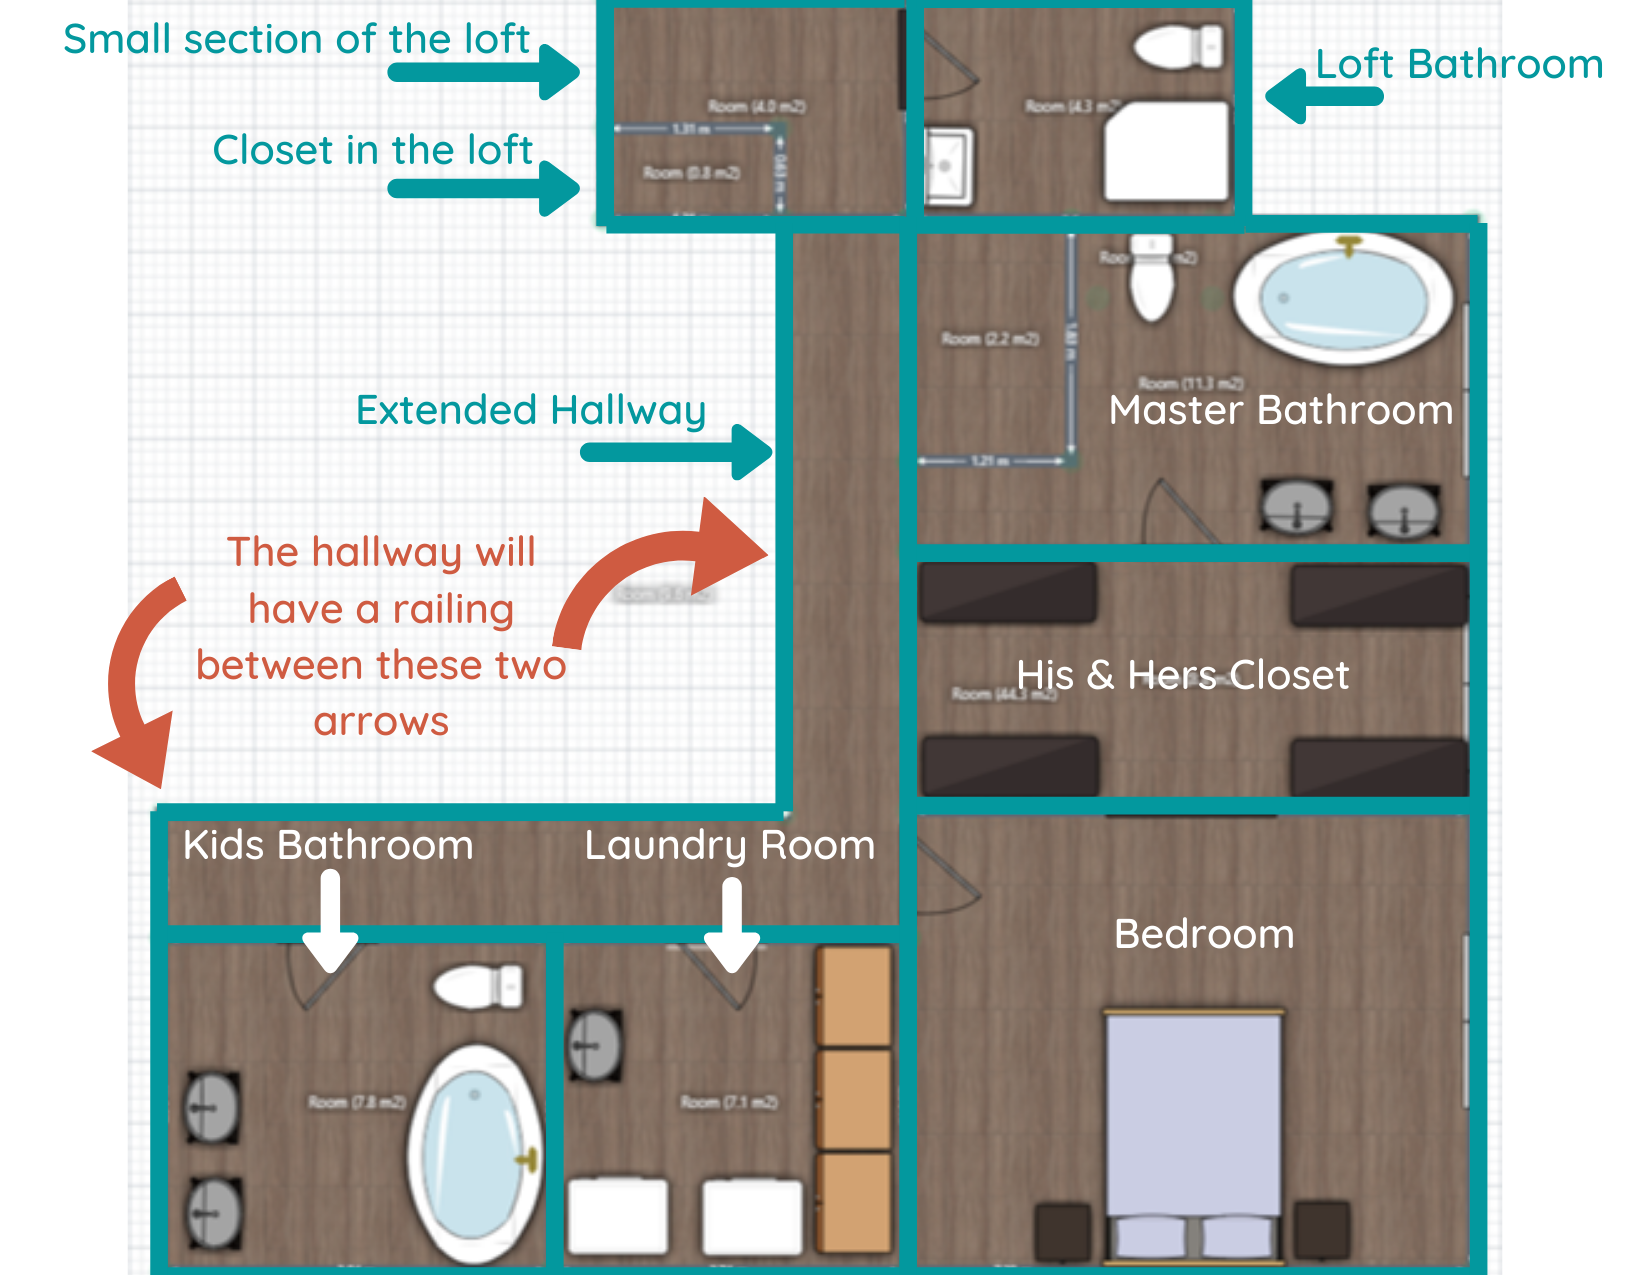
And this is our NEW new floor plan.

The biggest change is that the large, walk-through closet is being moved and split into two smaller closets. My closet will be where we were planning on moving the laundry room and Lucius’ closet will be separated and placed in the same vicinity that we originally planned to put our big joint master closet.
All caught up? Okay, now let’s get into the why we’re making this change!
I Suck at Measuring
Cut me some slack here - the floor planner I used had me converting meters to feet for every measurement!
Anywho, once we taped it out, I noticed that the space I envisioned as a laundry room would have been much smaller than what I was originally thinking. I could still make it work with the amount of space we would ACTUALLY have available to us, but I wouldn’t have been able to include the counter space I was hoping for, and that was definitely part of the appeal!

Not only that, but I mentioned in my previous post about this remodel that we didn’t know what we’d do with the current laundry room once we moved it upstairs. We could turn it into storage, but it would be a somewhat awkward space. Besides, Lucius didn’t seem too pumped up about the thought of moving the laundry room upstairs anyway.
While it’s a little bit of a bummer for me to have to lug the laundry up the stairs when it’s done (or, more realistically, continue to listen to Lucius complain about having to do it), we’re compromising by putting in a laundry chute!
Lucky for us, the current laundry room is right below our master suite area, so it shouldn’t be a big deal to install while we have all the walls opened up anyway. We had a laundry chute at our last house and LOVED it. Plus, the kids get a kick out of it too. Now, if only we could figure out where to install a dumbwaiter….
Window Placement
I love natural light, and this space has FIVE generously sized double windows.

Because the original layout was so weird with that sunroom/loggia built into the house, we were never able to really take advantage of the windows before. While we would have had access to more of the windows with our first layout design, we would have had to remove some of them to put up the walls for the closet.
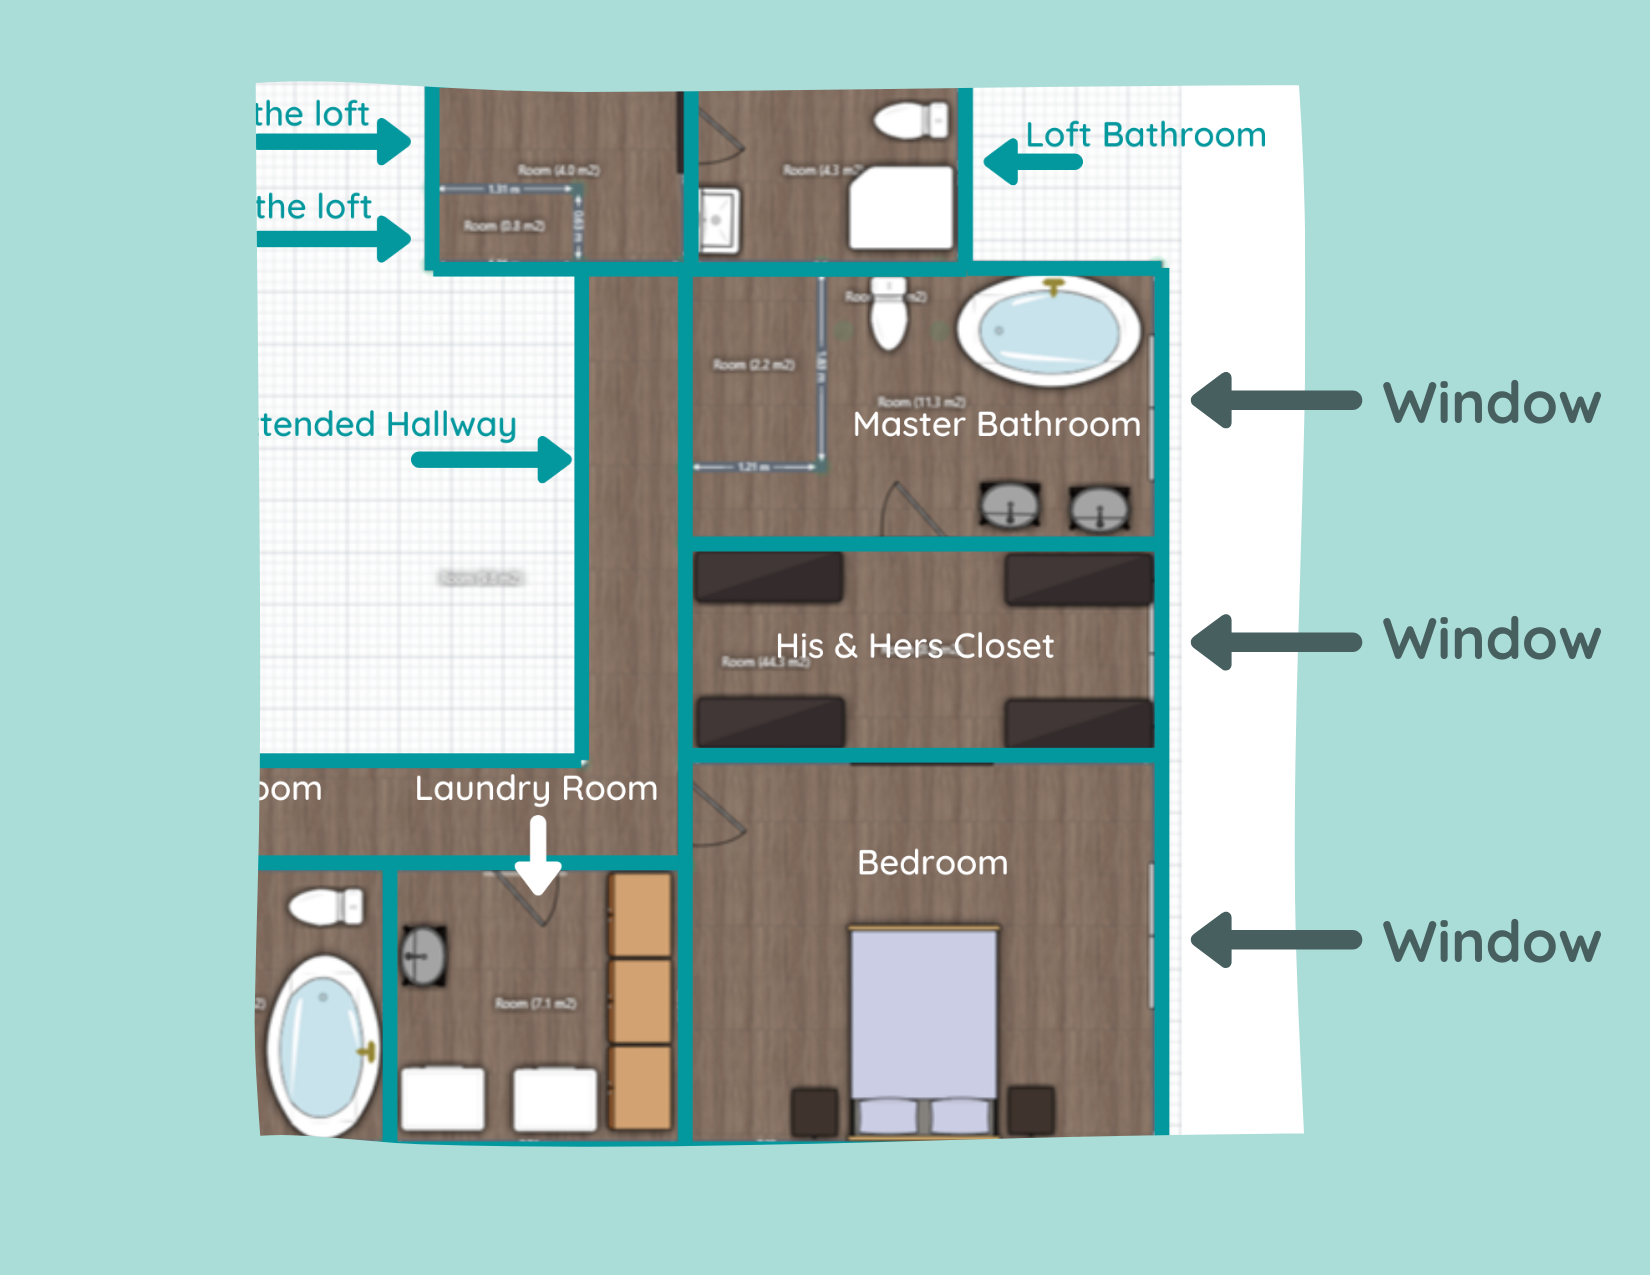
This concerned me for more than one reason: 1) I didn’t want to lose the natural light! and 2) the cost and all the unknowns about removing windows had me a little nervous.
But our new layout allows us to keep ALL the windows! Both Lucius and I are pretty happy about that. Especially me. I can just picture myself curled up on the floor with the cats in a big patch of sunlight. Mmm… livin’ the dream.

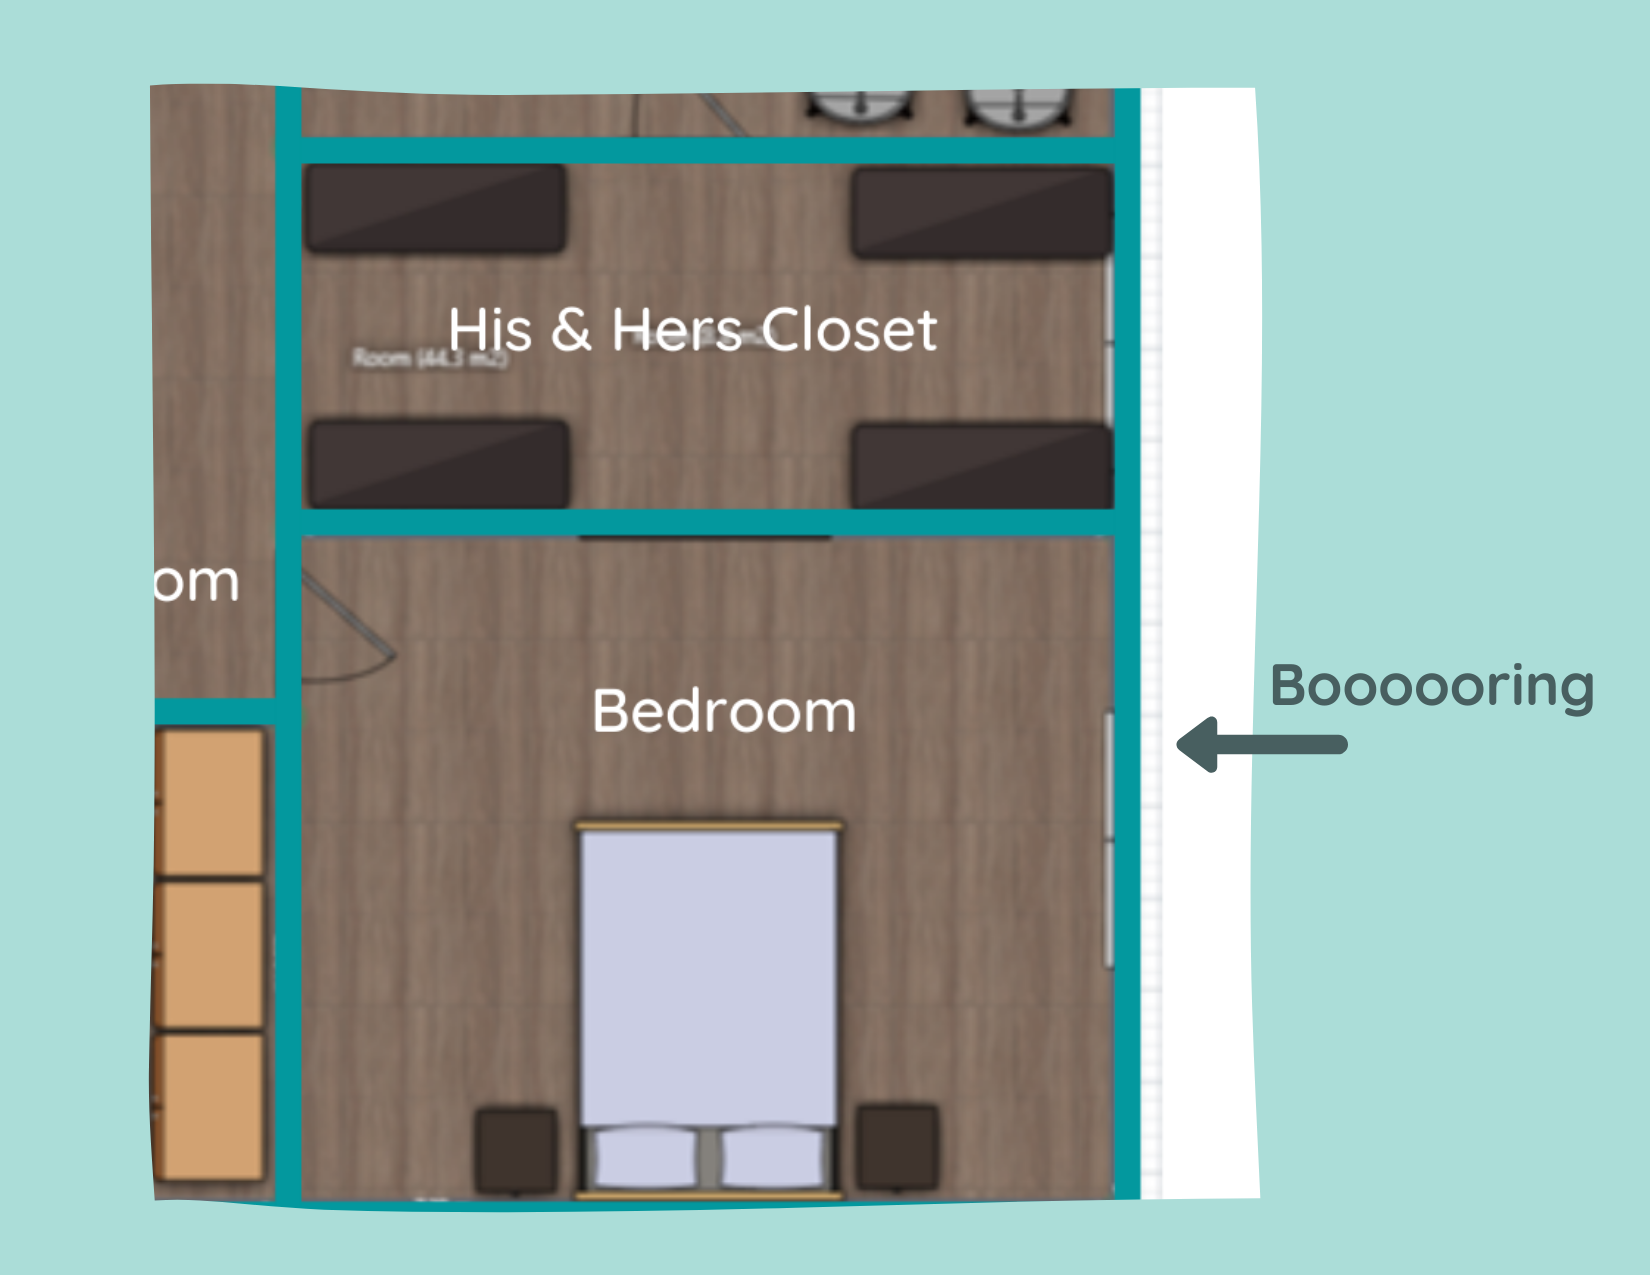
“Blah” Master Bedroom Floor Plan
With the previous floor plan, the only furniture in the bedroom would have been our bed and nightstands. While we were originally planning on having a large doorway to the walk-through closet to make it feel more integrated with the bedroom, it still seemed like it was going to be pretty boring.
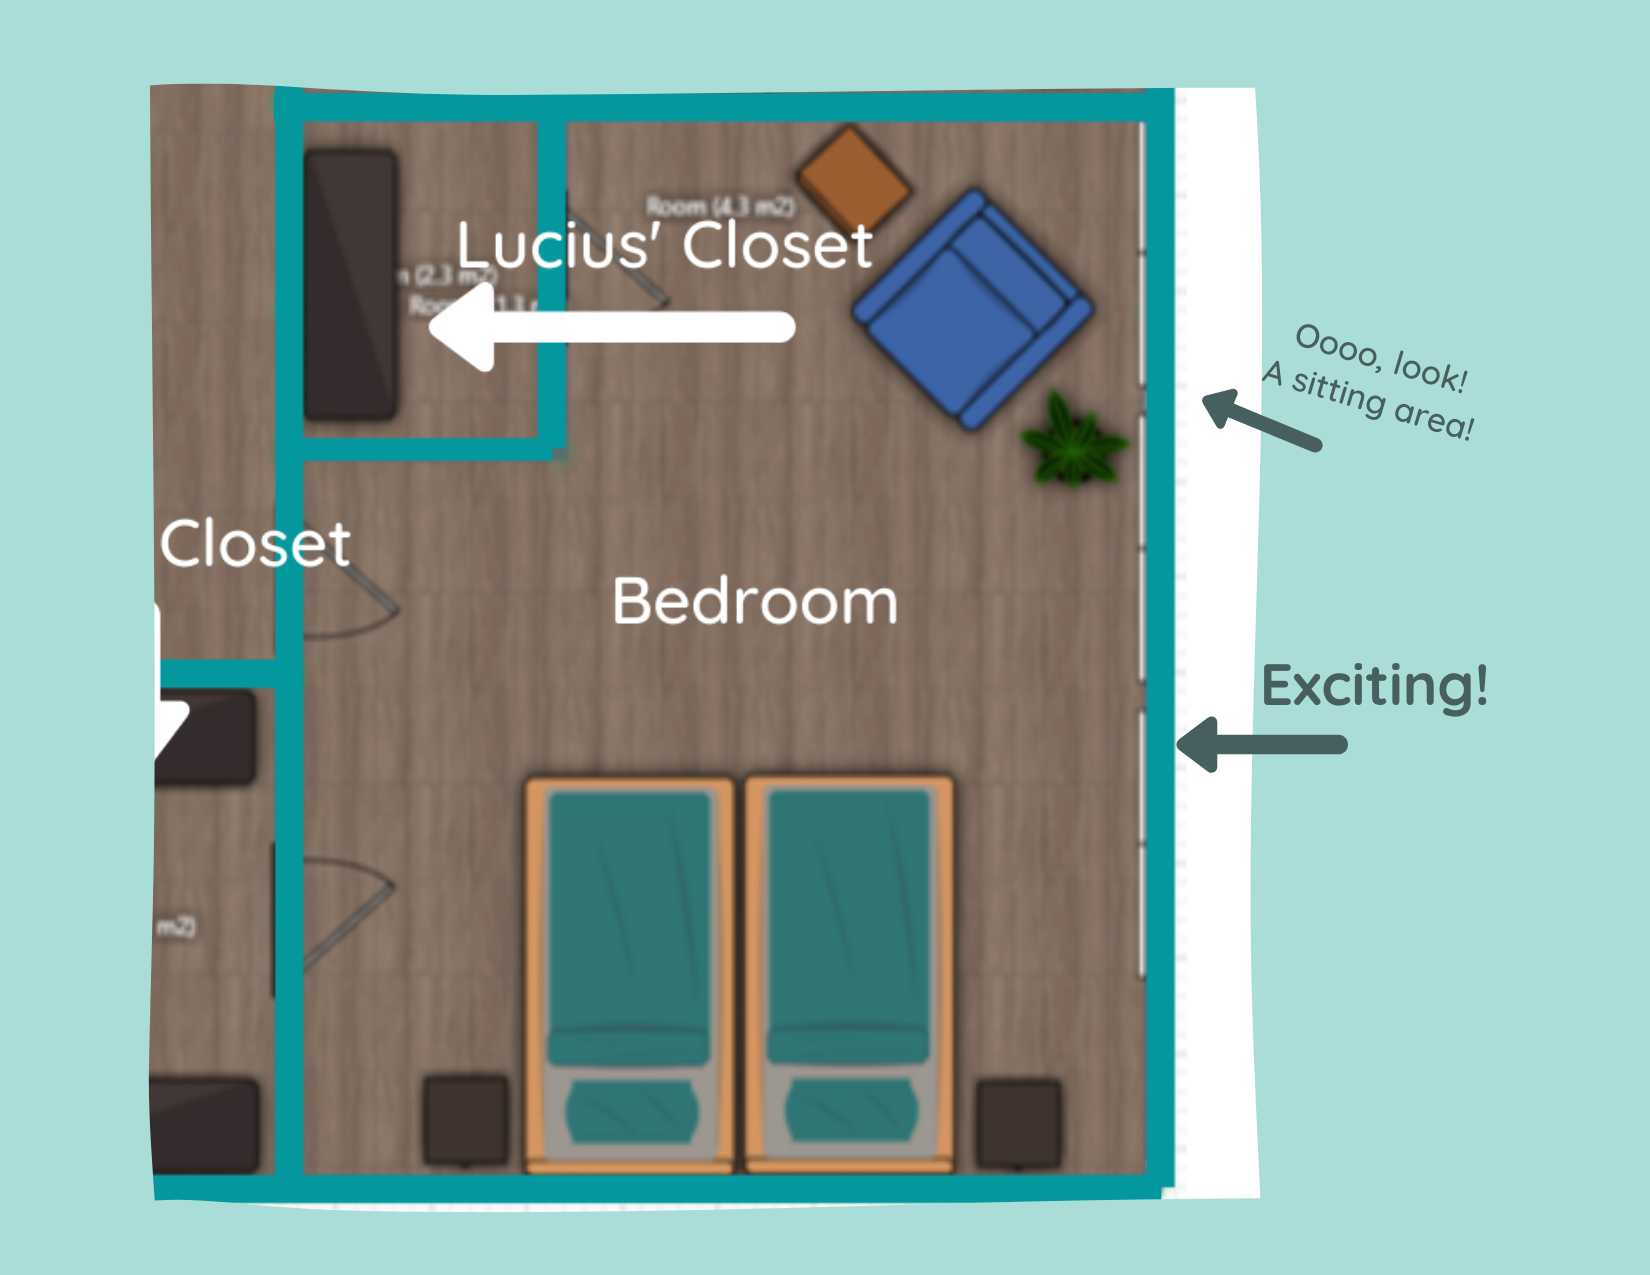
In the new floor plan, we’re able to expand the space to create a nice little sitting area right next to the windows that I’m really excited about. I think this is a good move to make the bedroom more inviting and another opportunity to really take advantage of those windows. Also, plants. Do you know how many plants I’ll be able to put in front of those windows!? SO MANY.
While our new layout has a lot of silver lining, I have to admit I’m a little sad to see my big walk-in closet go. Not to complain - my new closet will still be plenty big! However, I was dreaming about a closet like this or this. But that’s definitely something I’m learning as we do more and more renovations - you have to expect the unexpected and be flexible when curveballs come your way.
With that being said, I’m not making any promises this will be our last edit to the floor plan. We have a ways to go before anything is permanent and who knows what other game changers we’ll encounter. Now excuse me while I go find new inspo pictures for my closet…
Related Master Suite Renovation Posts:
Master Suite Floor Plans

Master Suite Remodel - Demo and Floor Plans, Oh My!
We have officially demoed our bedroom, bathroom, and closets!
Yes, it looks absolutely nuts. Yes, I’ve had more than a few “ohhhh noooo whatdidwedo!?” moments. But every time I walk into this space I get a jolt of excitement that easily puts those fears at bay. Also, LOOK AT ALL THAT NATURAL LIGHT!
Master Bedroom with Floor Plans
Several months ago, before we put our renovation shoes on, I shared a tour of the interior of our house. In that post, I talked about (and tried to show) how utterly weird the layout of our master suite was.
In fact, one of my hesitations with buying this house was that I knew we would want to reconfigure that space and it honestly intimated me. I mean, what if we couldn’t do it? What if we pulled up the floor and found termite damage? What if we got in over our heads!?
Enter Lucius, with his big dreams and dripping with confidence, who was quick to tell me exactly what I wanted to hear: that we could knock down this wall and that. That we could create a walk-in closet and the master bathroom of our dreams. Annnd as per usual I was hypnotized by the picture he painted.
Even several months ago, during the house tour, you could see pictures of where Lucius just couldn’t help himself and started tearing paneling off the wall in the sunroom (which I have learned is actually called a “loggia”). He’s been hinting at wanting to rip into the master suite more and more recently and finally, I caved. A few weeks later and our master looks like this:


We have officially demoed our bedroom, bathroom, and closets!
Yes, it looks absolutely nuts. Yes, I’ve had more than a few “ohhhh noooo whatdidwedo!?” moments. But every time I walk into this space I get a jolt of excitement that easily puts those fears at bay. Also, LOOK AT ALL THAT NATURAL LIGHT!
Since the pictures in the house tour are probably a little hard to follow (there’s a video in there too that explains the layout better, but still not perfectly), I’ve created a floor plan of what it looked like before demo, and how we’re thinking it’ll look when we’re done.
Before the Remodel

I’ve tried to outline each “room” to help it make more sense. Certain objects (vanities, the bed) aren’t to scale but are good placeholders to get the point across.
There are a couple of things that I want to point out before we get this “future plans” party started though.
First of all, you can now see how INSANELY DUMB this layout was. The “loggia” was the only source of natural light in the whole suite and it really wasn’t an inviting space - super long and skinny. I’d LOVE to talk to the architect and figure out whyyyyy they built the loggia at all. And then flick them in the forehead. Also, that little alcove at the end of the loggia in the corner of the room. What even is that!?
Secondly, the bathroom situation was all sorts of broken up craziness. Not only that, but we hated that the only way to get to the loft from this side of the house was to walk through our shower room. (Also, the fact that we had a shower room.)
Lastly, the floor plan doesn’t include our entire second story, but since this remodel actually impacts more than just the master suite, I’ve included snippets of the adjacent impacted areas. For instance, at the top of the layout, you’ll notice I labeled a small section of the loft. The loft is actually MUCH larger than that (it spans the entirety of our 3-car garage), but we’re only modifying a small corner of it for this project. You’ll also notice on the bottom left that I’ve labeled the hallway and kids’ bath. You’ll see why in the “after”.
Get excited! (I know I am!)
After the Remodel

Allow me to walk you through the changes because there are a lot!
Loggia Removal and Hallway Layout
One of the biggest improvements in the new layout is that we completely removed the loggia and pushed the master suite to the right. Now we’ll not only get to enjoy all the windows along this wall, but it’ll allow us to extend our current hallway so it runs past (rather than through) the master suite to the loft.
But don’t worry, the hallway won’t be a dark, closed-in tunnel. It will actually wrap around the staircase. We plan on putting up a railing, or at the very least a pony wall, all the way from where it starts on the left of the floor plan to the wall between our closet and bathroom. The orange arrows below should help you visualize.
Master Bedroom and Closet
Other significant changes - you’ll notice that the master bedroom is MUCH smaller in the new layout. Considering we’re gaining a decent amount of functional closet space (we plan on installing an IKEA PAX system with TONS of storage), and the only things we really need in the bedroom are the bed and a couple of nightstands, we weren’t concerned about losing the square footage.
Even if we wanted to expand the room some, we’d be limited since the wall between the bedroom and closet is a support wall. But we’re not concerned. Even with the reduction in size, our bedroom will still be about 12x15 feet!
Kids’ Bathroom and Laundry Room
A big chunk of the space off to the left of the bedroom will instead become a new laundry room. We have a laundry room downstairs currently, but with all the bedrooms being upstairs, and the fact that we have the space to do it, why not move it? We haven’t decided what we’ll use the current laundry room for just yet. Probably a storage closet of some sort.
You may also notice that the kids’ bathroom will get a little bigger. For being such a big house, this bathroom is oddly cramped! While the kids' bathroom and the laundry room are in the plan, they’re definitely a phase II project. The priority is getting our master suite back in order.
Master Bathroom and Loft Bathroom
Lastly, a brand-spankin’ new master bathroom is on the horizon! And it’ll all be in one room! (We’re innovators like that) Because we’ll have a decent amount of space, we hope to install a nice large vanity and a soaker tub. Oh, and that rectangle in the top left-hand corner of the bathroom? That’s a 4x6 walk-in shower!
And if you’ll notice, there’s no more shower room! That’s because we’re closing off that doorway and turning what was once the shower room into a bathroom for folks who are hanging out in the loft. I honestly don’t want another full bath, but that room might be so large it’ll look weird as a half-bath, so we’re going to have to play that by ear. Because that area isn’t an immediate concern, much like the kid’s bath and laundry room, it will also be a phase II type of deal.
Final Thoughts
At this point, demo is just about done. Once everything is cleared out, we can tape off the floor and REALLY get a feel for how the spaces will work. I’m so excited for that step! It’s difficult to visualize how each space will look and feel with walls and clutter in the way. Even looking at the floor plans, the scale can be off or not quite what you’re expecting in real life. With that being said, I’m keeping an open mind and am fully prepared to have to tweak our plan.
Once we determine our final layout, then comes the hard part: putting everything back together. We plan on starting with the master bedroom first as we’ve been displaced to the loft for the foreseeable future. Since our clothes have been relocated to the spare room, we’ll likely start on the closet next. Lastly, we’ll tackle the most challenging (and expensive room): the bathroom.
I love sitting in my office every day listening to the sweet, sweet sounds of demo as Lucius rips apart that side of the house, but it’ll be even more exciting to listen to it being put back together. Soon I’ll be able to really dig into the design and I can’t wait to share it with all of you! But there’s still quite of work to be done before I can get to that point.
