
Target Accent Cabinet Makeover - with Cane Webbing!
How to Upgrade a Cabinet with Cane Webbing
In my post outlining our home improvement goals for 2021, I mentioned I wanted to work on whipping the foyer into a better, more inviting space. So why not start by flipping a piece of furniture I already have in there!?

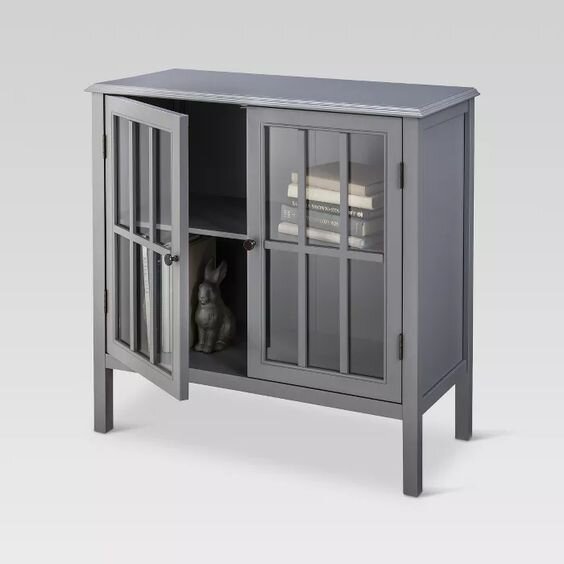
I got this wildly popular cabinet from Target as a Christmas present probably 7 or so years ago and in that time it has served us well, generally housing random tools that we use frequently enough to keep close by. Lucius and I have even lovingly taken to calling it “The Gray Thing” when referring to it.
As an Amazon Associate, I earn from qualifying purchases. This post may contain affiliate links, meaning I receive commissions for purchases made through those links, at no cost to you.
Right off the bat after putting this lil’ guy together I realized I didn’t necessarily like being able to see inside. I mean, random hammers, measuring tape, extension cords, and paint supplies aren’t exactly the most luxurious home decor. So I took some double-sided tape and stuck a couple of sheets of a patterned paper to the inside of the windows. And for a long time, that was that.

But once we moved into our most recent house, The Gray Thing just seemed to fall flat where it lives in our foyer. I was actually on the verge of buying a console table to replace it when I found this image:

I was immediately inspired. I love the contrast of the black paint with the warmth of the brass and cane.
In our foyer, I’m really drawn to the dark greens of the snake plant I have on the side of the staircase and how the black basket it sits in pops against the more neutral tones in this space, so I figured trying to balance that out by painting my cabinet a darker color was worth a shot. Plus, I was really excited about the prospect of incorporating cane webbing into my space! And if it didn’t work out… no loss. I was planning on replacing it anyway. So I got to work!

How I Flipped my Cabinet
Materials
These are the tools you’ll need for everything except the cane webbing installation (we’ll get to that down below):
- Drill
- Oscillating tool
- Box cutter
- Sandpaper
- Orbital sander (optional)
- Primer
- Paint
- Paintbrush
- Foam Roller
- Paint Tray
Remove Doors and Hardware
This step is pretty self-explanatory - just grab a drill and go to town!
Remove Glass from Doors
Although it looks like there are 6 panels of glass in each door of this cabinet, it’s actually one piece of glass per door. Unfortunately, I kinda jumped into this step really quickly and failed to take pictures, so I’ll explain what I did as best as I can.
Using my oscillating tool, I stuck the blade between the frame of the door and the wood that made up the “windowpanes”. Gently do this around each piece of wood and it’ll pop right off. You should then have one piece of glass, intact. Hopefully, the picture below helps explain a little better.

As you can see, the wood that made up the “panes” pops out in one piece.
Then, to remove the piping holding the glass in (I’m sure there’s actually a term for whatever that is, but I don’t know it), I took a box cutter and pried it out.

Sand, Prime, & Paint
Next, you have your general prep work - sanding, priming, and painting. I simply took my orbital sander and some 80 grit sandpaper and roughed up the surface of the cabinet. Then used a brush and small foam roller to apply a coat of primer. Lastly, I used my brush and foam roller to apply two coats of paint.
I painted my cabinet Jasper by Sherwin Williams. It’s a super dark, almost black, green. I used this same color on the interior of a couple of our kitchen cabinets and love it! I figured seeing it in another area of the house would tie the spaces together nicely.

Add Cane Webbing

Now, this is what I bet most of you are here for - cane webbing!
This material is all over the place right now, and rightfully so! It’s a beautiful material that easily brings a natural element to any space. I even wrote about how it was trending in this post a while back! And I was super excited when I realized I found a way to incorporate it into a DIY project.
I ordered mine from this shop on Etsy, but you can also find it on Amazon. I added it to the doors of my cabinet using a staple gun. Here’s how:
- Soak your cane webbing
- Soaking the cane webbing for about 30 minutes before you begin work makes it way more pliable.
- Gather your materials
- While your cane is soaking, grab the following items:
- Scissors
- Measuring tape
- Staple gun
- Staples (I used 1/4 inch)
- Needle nose pliers
- While your cane is soaking, grab the following items:
- Cut the cane webbing
- Measure the inside of the frame of the cabinet door and cut the cane webbing to size. It’s okay (and honestly, not a bad idea) if you cut it just a hair bigger than the opening.
- Staple it in place
- I was fully expecting the installation of the cane to be WAY harder. I bought spline expecting to push the cane into the notch around the edge of the door frame that held the glass. But before I tried that, I thought I’d at least have to use wood glue. Nope, not true. I didn’t use either of those. I simply stapled the cane to the lip on the interior of the cabinet door that held the glass panes.
- A few hints here:
- Remember how I said to cut the cane a hair bigger than you measured? This is why. The cane wants to unweave itself. Cutting it a little larger gives you some extra material to work with.
- Be liberal with your staples. As you’ll see below, I put my staples so close together, they even overlapped at times. It’s hard to aim with a staple gun, so using lots of staples helps ensure you’re grabbing the cane webbing all along the edge. And if a staple goes in a little wonky, just use your needlenose pliers to pull it out.
- After you staple the cane webbing to the door frame, it’ll look a little wavy. Have no fear! As it dries, the cane tightens up and straightens itself out.


And that’s it! Installing the cane webbing was as simple as that. Now you get to put it all back together!
Reinstall Hardware
Lastly, I decided to change up the knobs on my cabinet, but you could definitely keep the ones that came with it. I did end up using the same hinges that came with the cabinet though.
Final Thoughts
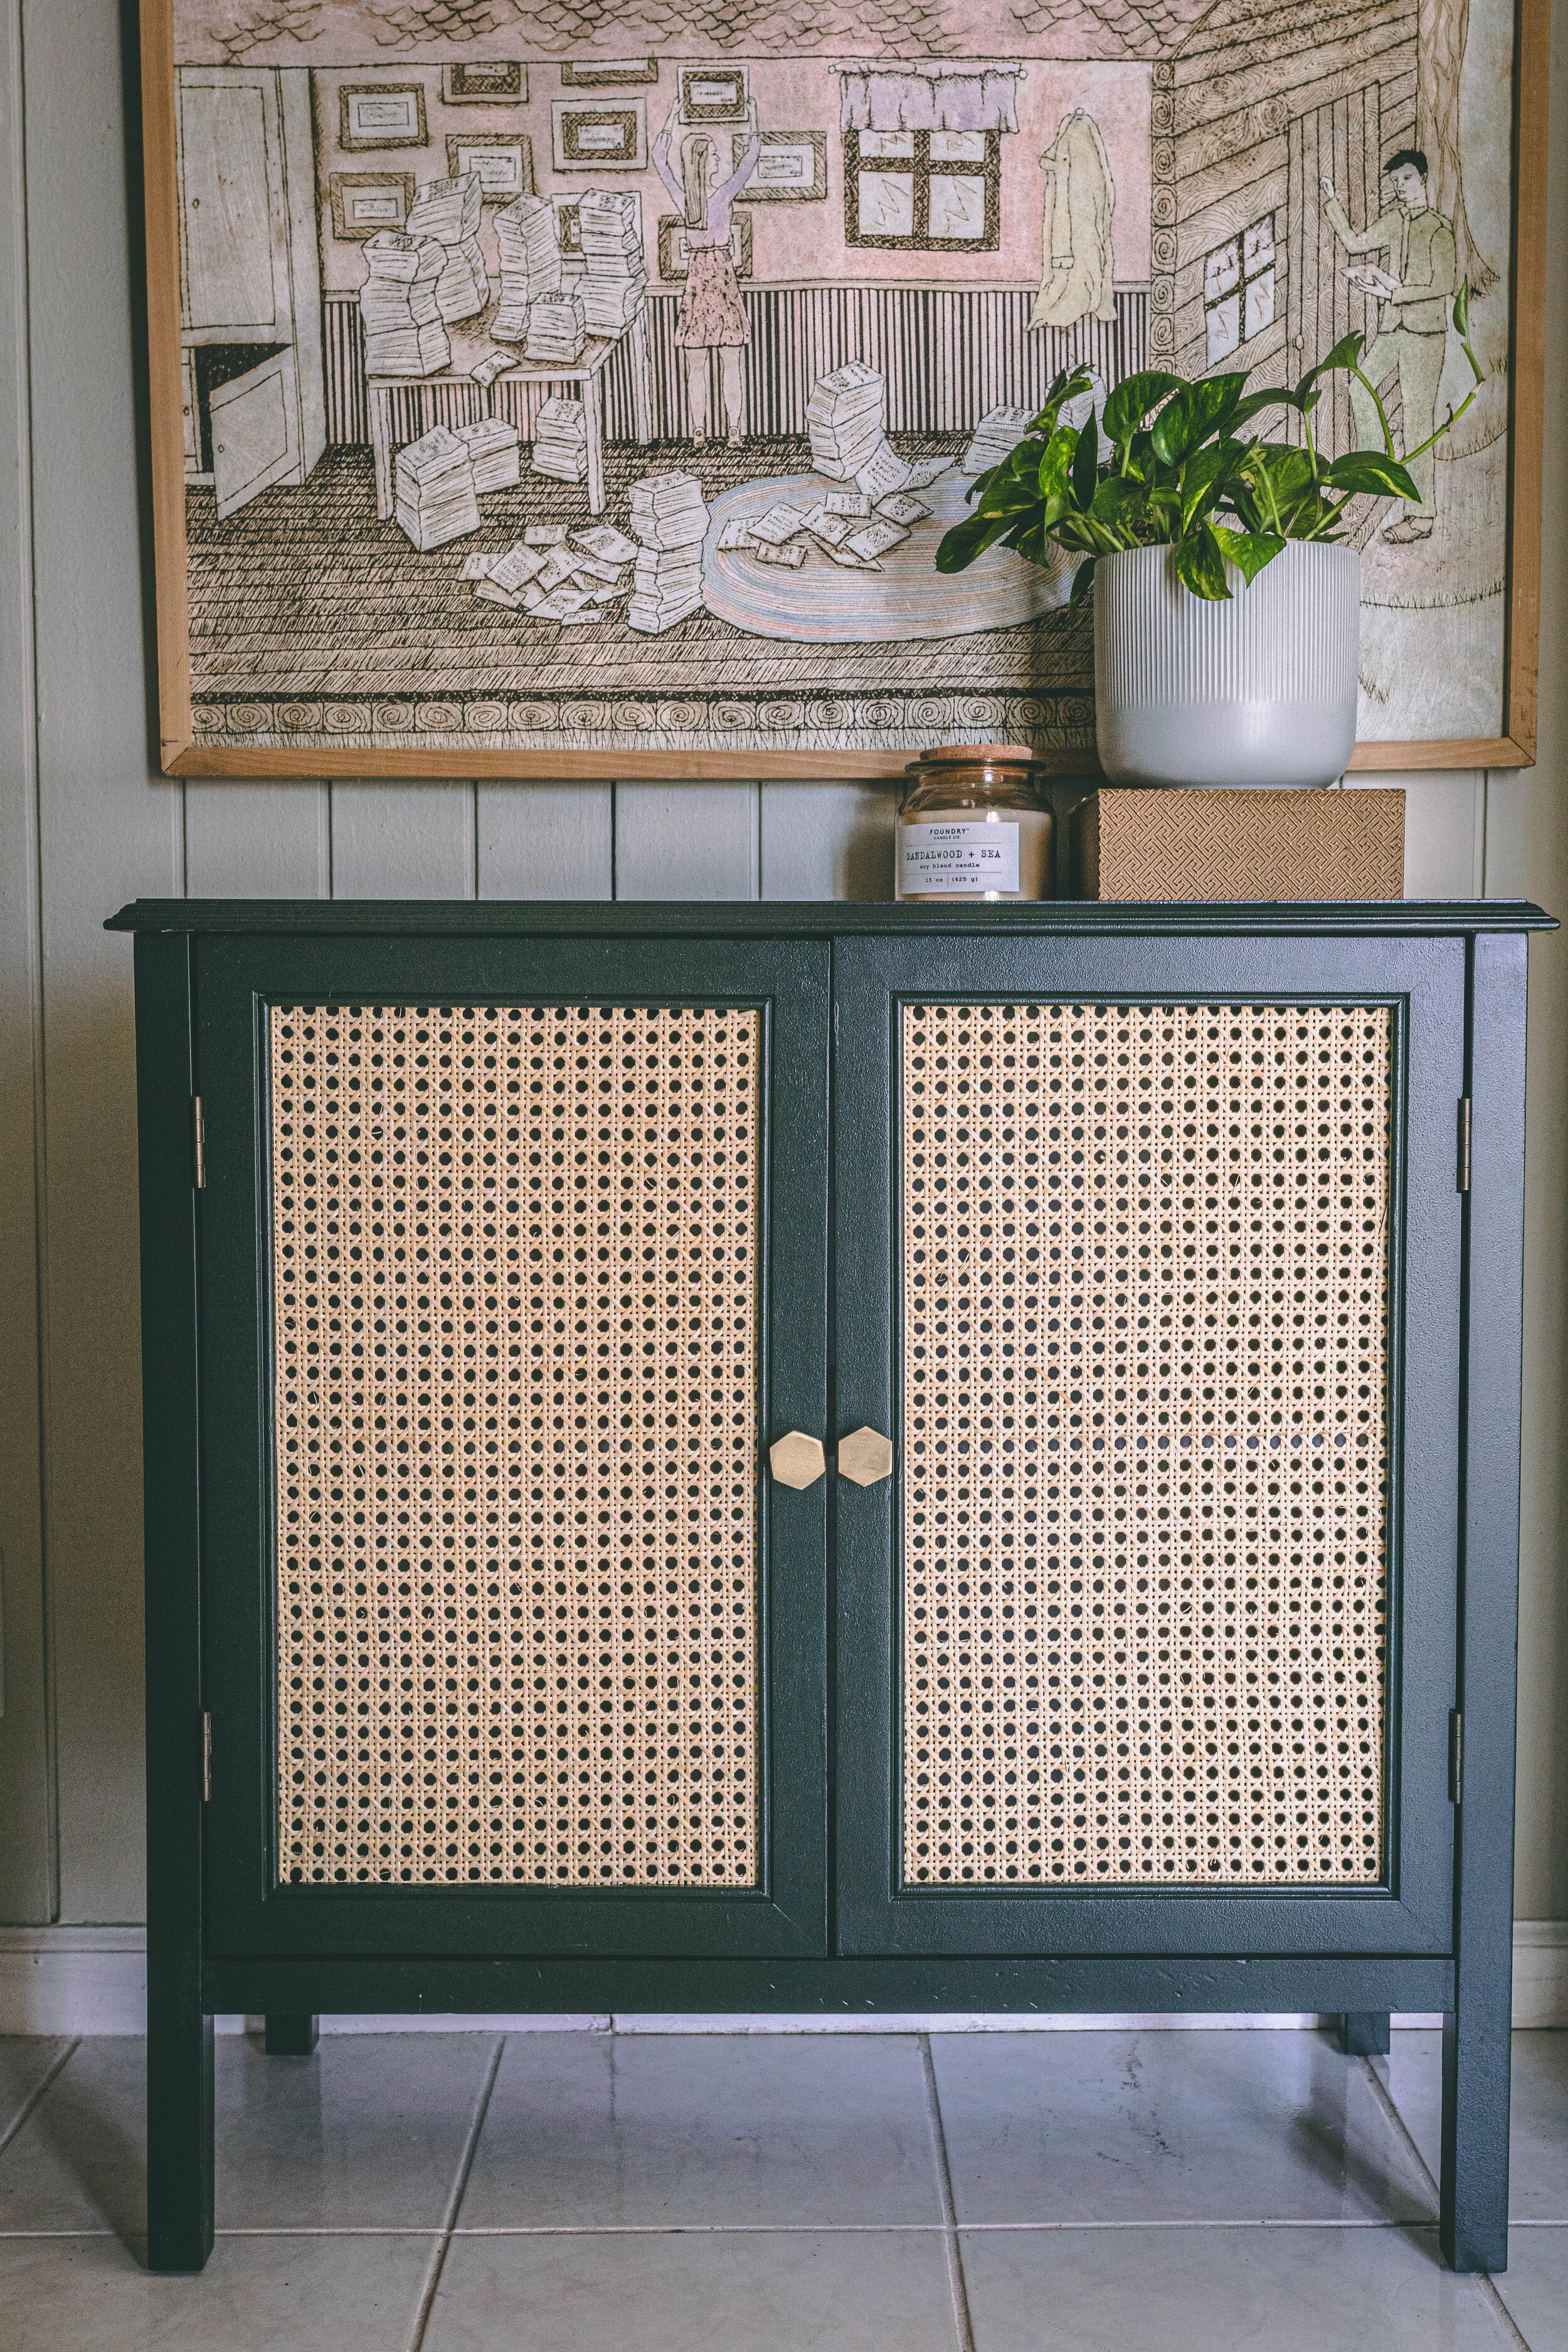

Aren’t these the best DIY projects? The ones that are low-risk and turn out exactly as you wanted? I feel like it rarely goes this smoothly in DIY so I’ll take this one as a win! Plus, I’m loving how my updated cabinet is helping to transform the foyer into a much more put-together entryway. There’s still some work to do in this area… obviously finishing the staircase is on the list but I’m also picturing a big rubber tree next to the cabinet (now renamed “Jasper” after the paint color it’s painted). More to come!
