

Master Suite Remodel - A Change in (Floor) Plans
I posted two weeks ago about our master suite remodel, including what we had demoed and the new floor plan. After that post, we were finally able to take some time and officially tape off the floor to REALLY get a feel for how the space would work. Unfortunately, we quickly realized there were some issues that we had to solve for.
Master Bedroom Renovation
Well, that was a quick change in plans…
I posted two weeks ago about our master suite remodel, including what we had demoed and the new floor plan. After that post, we were finally able to take some time and officially tape off the floor to REALLY get a feel for how the space would work. Unfortunately, we quickly realized there were some issues that we had to solve for.

Before we get into the problems we encountered and how we’re working with and around them, as a quick refresher, this is what our master looked like before demo.

This was the floor plan we originally mocked up for our renovation.

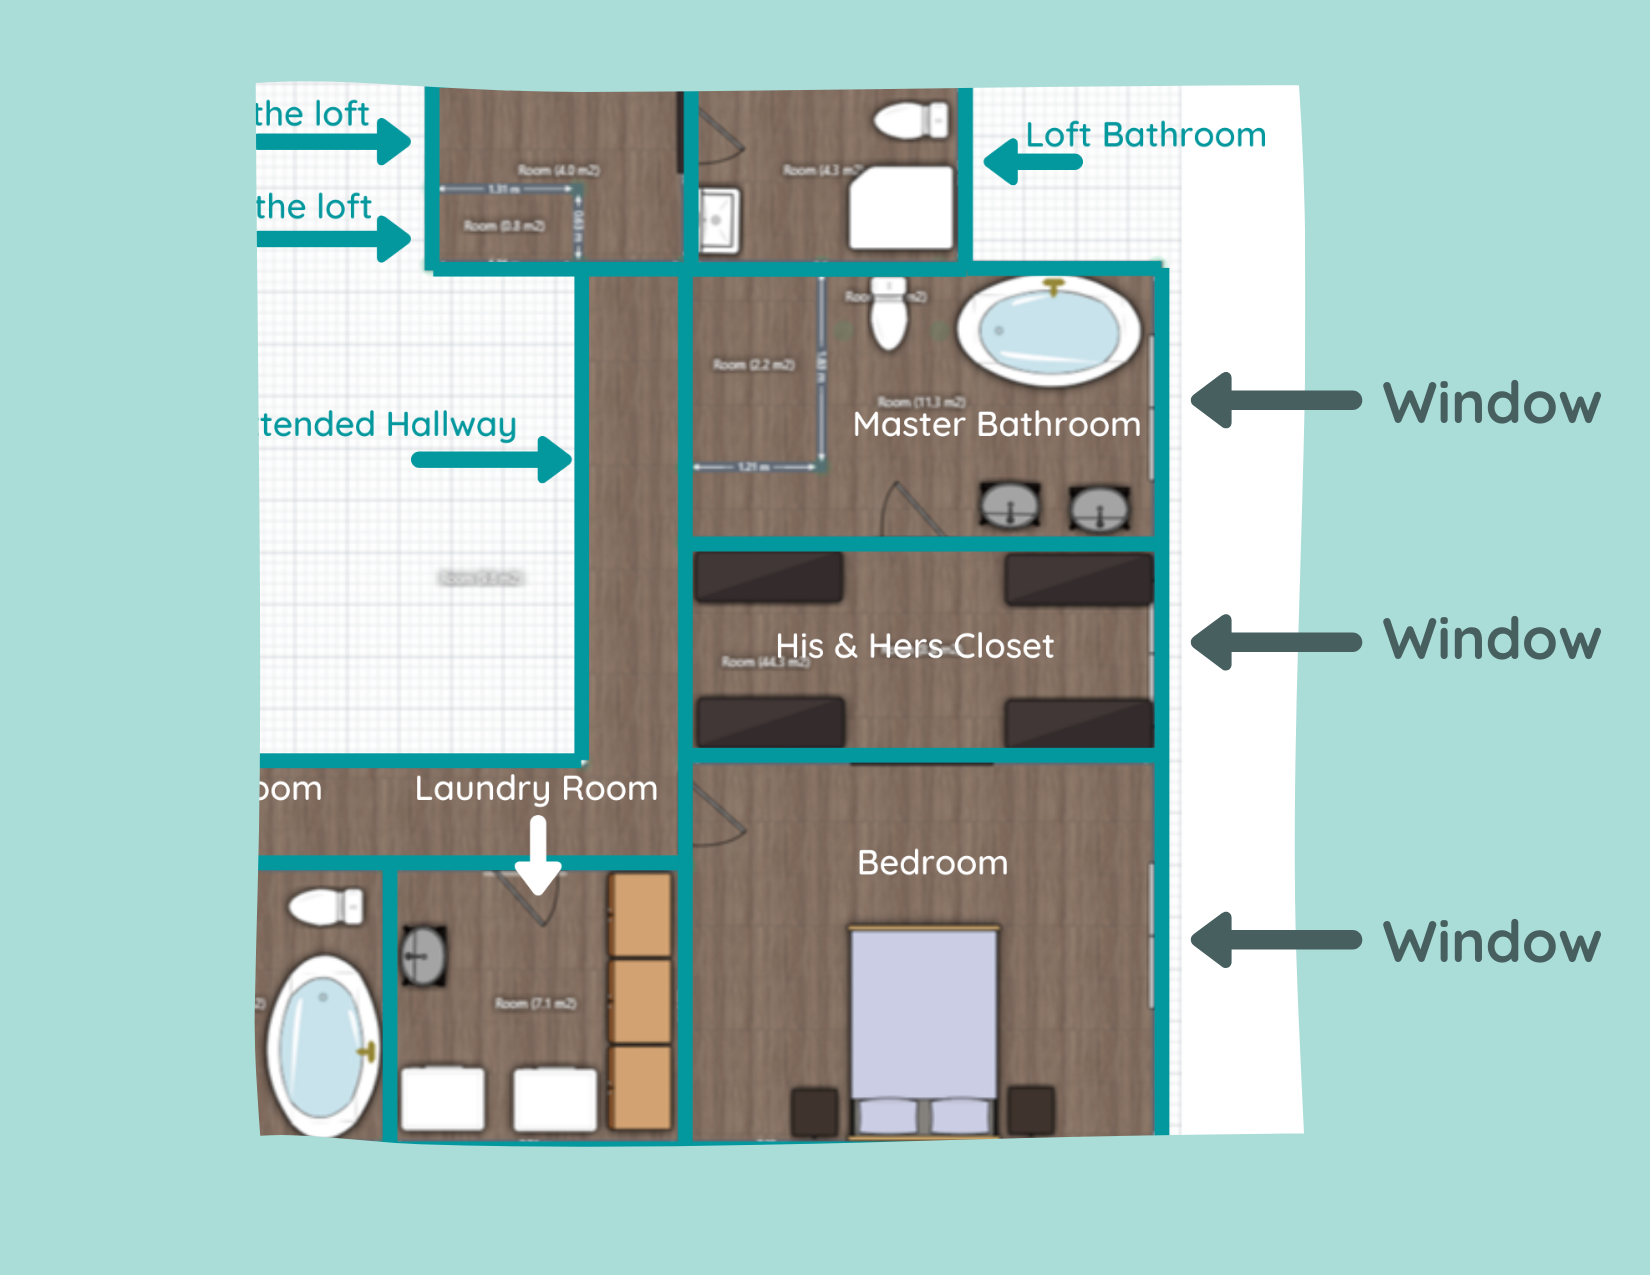
And this is our NEW new floor plan.

The biggest change is that the large, walk-through closet is being moved and split into two smaller closets. My closet will be where we were planning on moving the laundry room and Lucius’ closet will be separated and placed in the same vicinity that we originally planned to put our big joint master closet.
All caught up? Okay, now let’s get into the why we’re making this change!
I Suck at Measuring
Cut me some slack here - the floor planner I used had me converting meters to feet for every measurement!
Anywho, once we taped it out, I noticed that the space I envisioned as a laundry room would have been much smaller than what I was originally thinking. I could still make it work with the amount of space we would ACTUALLY have available to us, but I wouldn’t have been able to include the counter space I was hoping for, and that was definitely part of the appeal!

Not only that, but I mentioned in my previous post about this remodel that we didn’t know what we’d do with the current laundry room once we moved it upstairs. We could turn it into storage, but it would be a somewhat awkward space. Besides, Lucius didn’t seem too pumped up about the thought of moving the laundry room upstairs anyway.
While it’s a little bit of a bummer for me to have to lug the laundry up the stairs when it’s done (or, more realistically, continue to listen to Lucius complain about having to do it), we’re compromising by putting in a laundry chute!
Lucky for us, the current laundry room is right below our master suite area, so it shouldn’t be a big deal to install while we have all the walls opened up anyway. We had a laundry chute at our last house and LOVED it. Plus, the kids get a kick out of it too. Now, if only we could figure out where to install a dumbwaiter….
Window Placement
I love natural light, and this space has FIVE generously sized double windows.

Because the original layout was so weird with that sunroom/loggia built into the house, we were never able to really take advantage of the windows before. While we would have had access to more of the windows with our first layout design, we would have had to remove some of them to put up the walls for the closet.
This concerned me for more than one reason: 1) I didn’t want to lose the natural light! and 2) the cost and all the unknowns about removing windows had me a little nervous.
But our new layout allows us to keep ALL the windows! Both Lucius and I are pretty happy about that. Especially me. I can just picture myself curled up on the floor with the cats in a big patch of sunlight. Mmm… livin’ the dream.

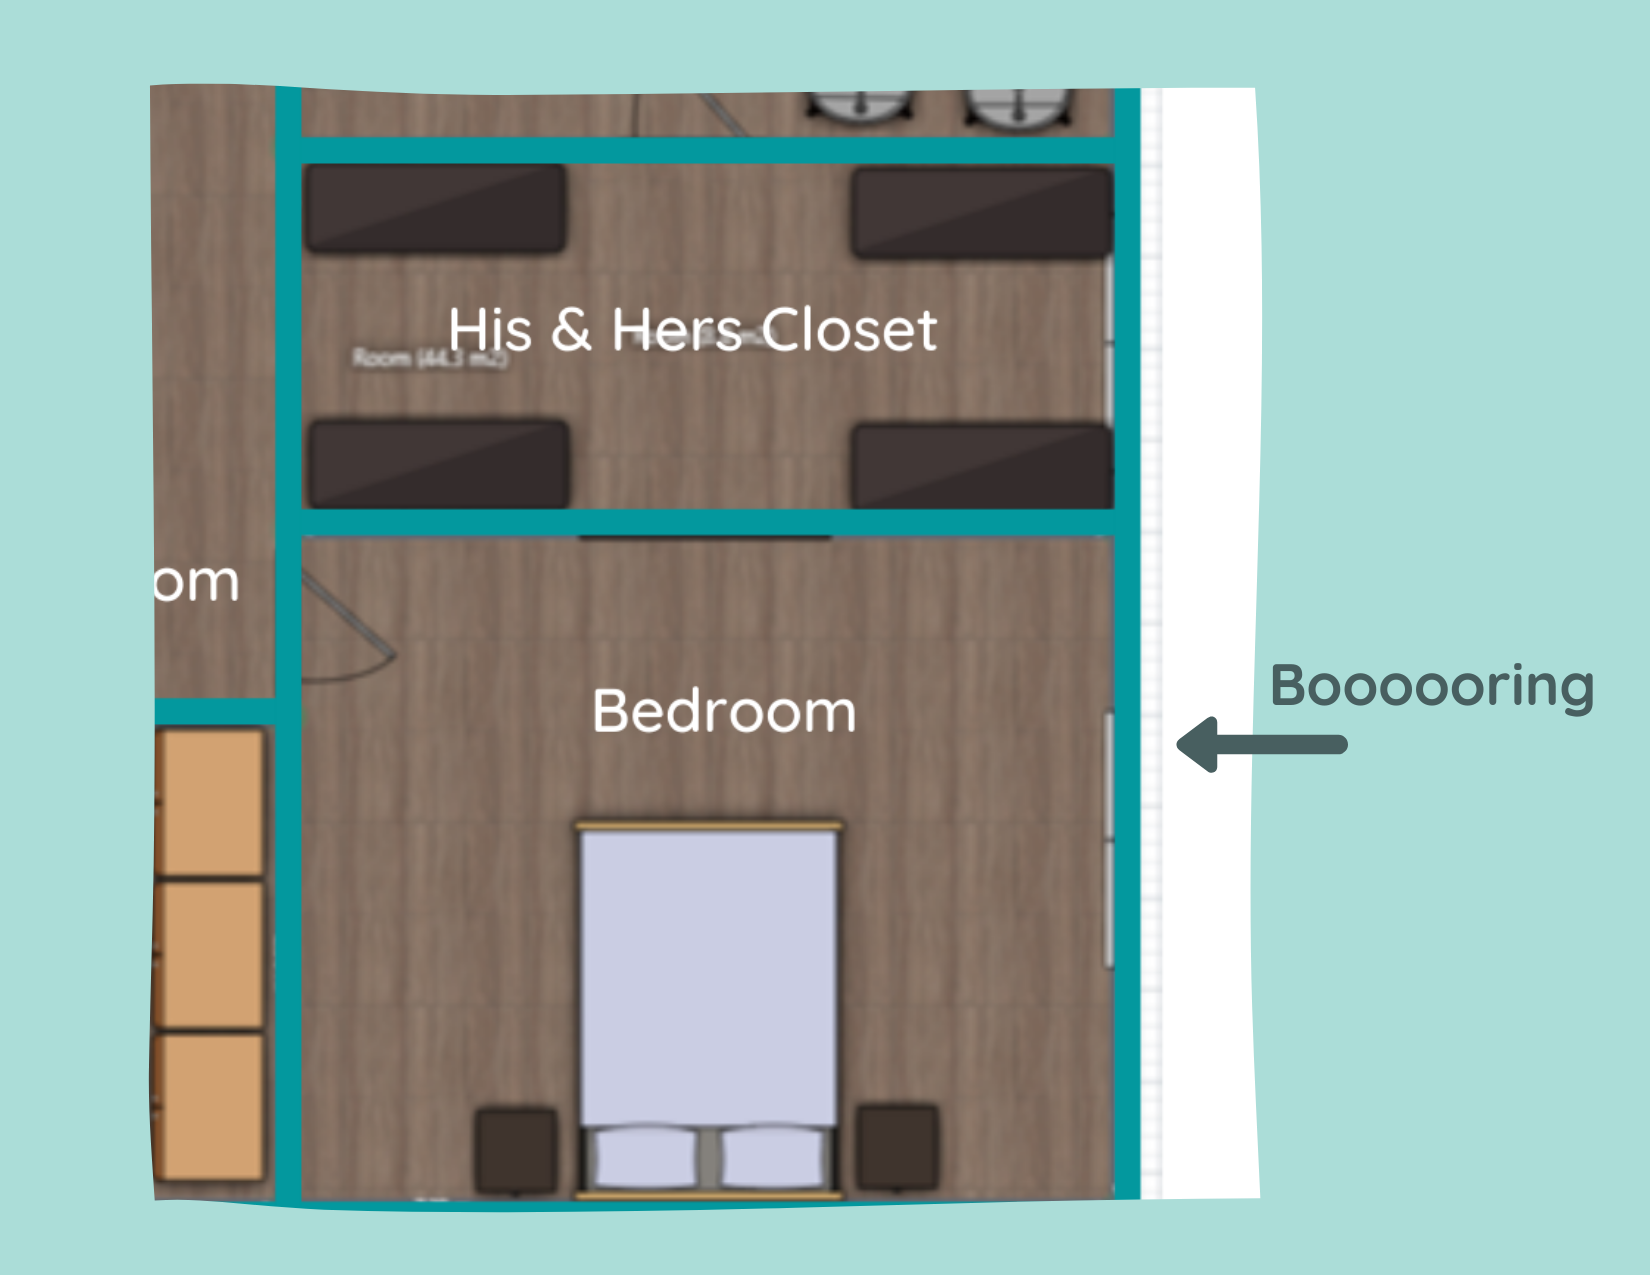
“Blah” Master Bedroom Floor Plan
With the previous floor plan, the only furniture in the bedroom would have been our bed and nightstands. While we were originally planning on having a large doorway to the walk-through closet to make it feel more integrated with the bedroom, it still seemed like it was going to be pretty boring.
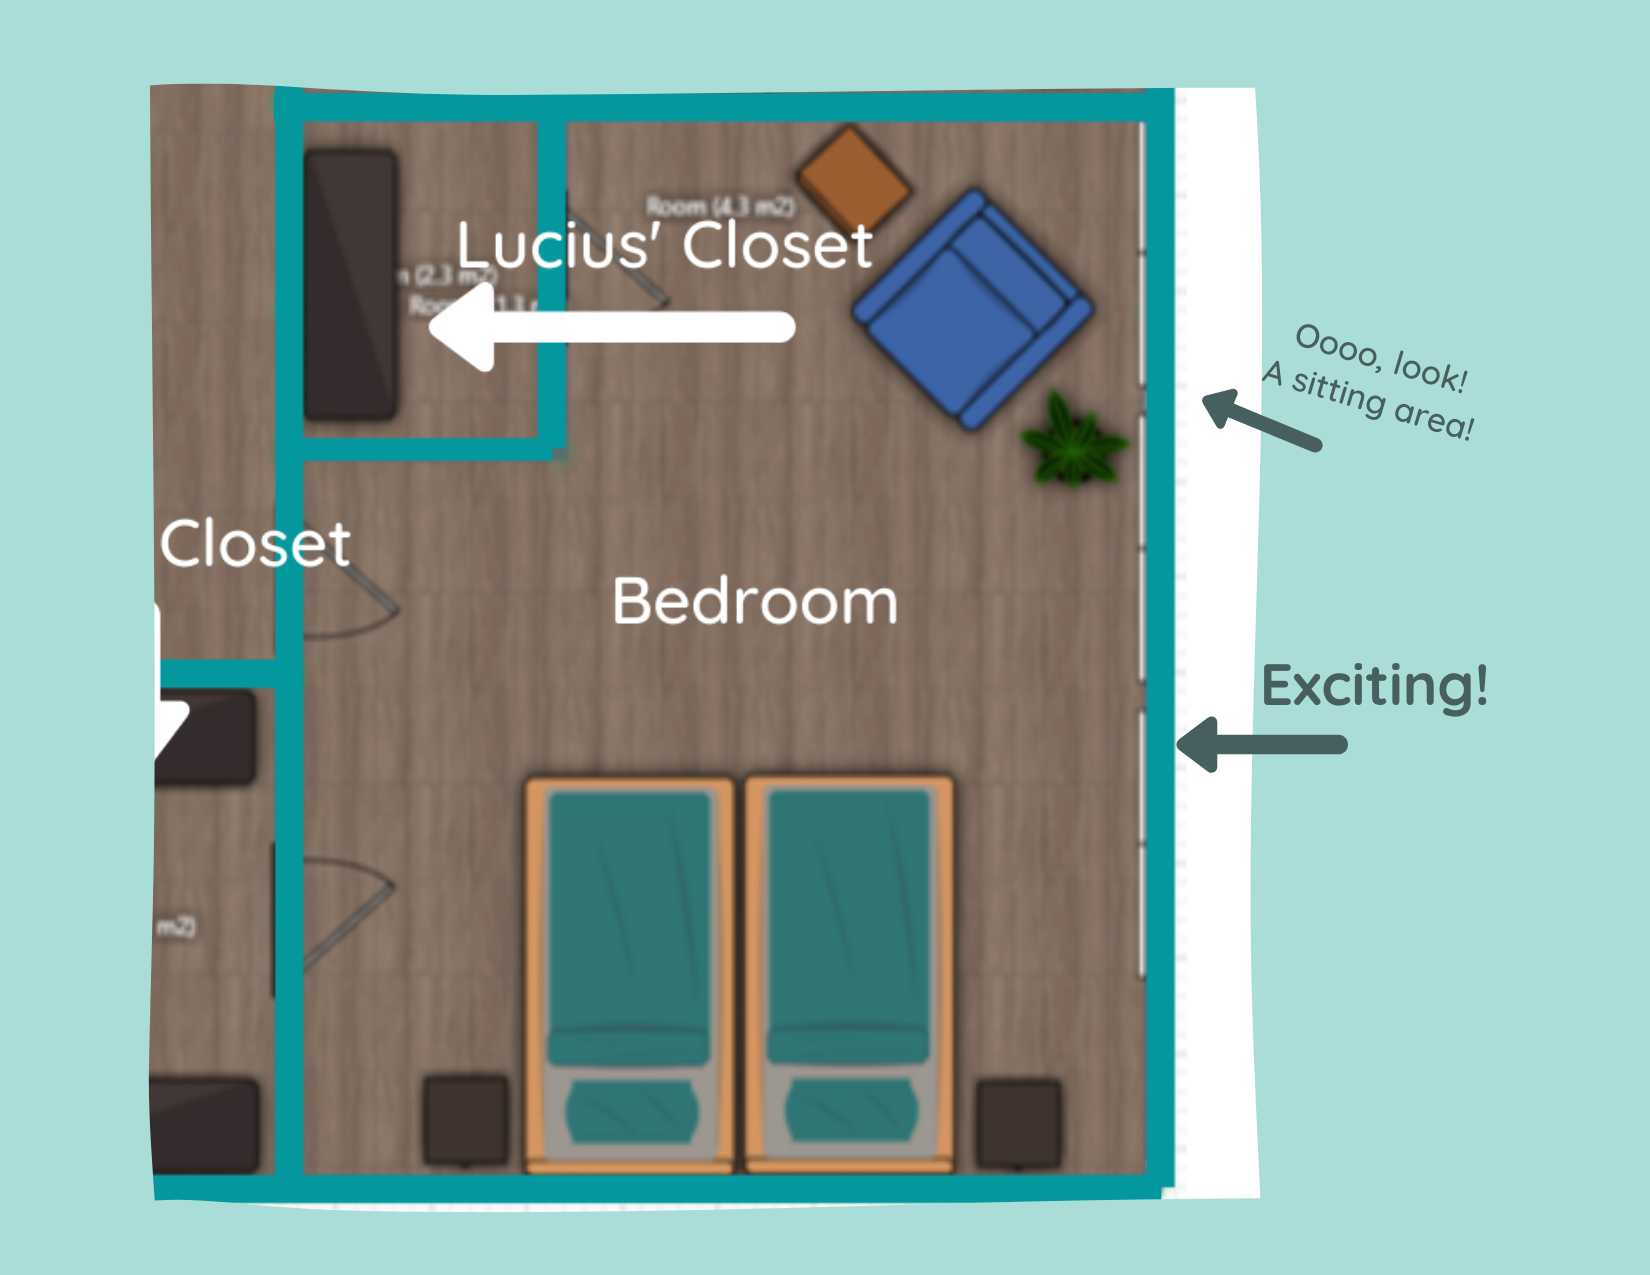
In the new floor plan, we’re able to expand the space to create a nice little sitting area right next to the windows that I’m really excited about. I think this is a good move to make the bedroom more inviting and another opportunity to really take advantage of those windows. Also, plants. Do you know how many plants I’ll be able to put in front of those windows!? SO MANY.
While our new layout has a lot of silver lining, I have to admit I’m a little sad to see my big walk-in closet go. Not to complain - my new closet will still be plenty big! However, I was dreaming about a closet like this or this. But that’s definitely something I’m learning as we do more and more renovations - you have to expect the unexpected and be flexible when curveballs come your way.
With that being said, I’m not making any promises this will be our last edit to the floor plan. We have a ways to go before anything is permanent and who knows what other game changers we’ll encounter. Now excuse me while I go find new inspo pictures for my closet…
Related Master Suite Renovation Posts:
Master Suite Floor Plans

Master Suite Remodel - Demo and Floor Plans, Oh My!
We have officially demoed our bedroom, bathroom, and closets!
Yes, it looks absolutely nuts. Yes, I’ve had more than a few “ohhhh noooo whatdidwedo!?” moments. But every time I walk into this space I get a jolt of excitement that easily puts those fears at bay. Also, LOOK AT ALL THAT NATURAL LIGHT!
Master Bedroom with Floor Plans
Several months ago, before we put our renovation shoes on, I shared a tour of the interior of our house. In that post, I talked about (and tried to show) how utterly weird the layout of our master suite was.
In fact, one of my hesitations with buying this house was that I knew we would want to reconfigure that space and it honestly intimated me. I mean, what if we couldn’t do it? What if we pulled up the floor and found termite damage? What if we got in over our heads!?
Enter Lucius, with his big dreams and dripping with confidence, who was quick to tell me exactly what I wanted to hear: that we could knock down this wall and that. That we could create a walk-in closet and the master bathroom of our dreams. Annnd as per usual I was hypnotized by the picture he painted.
Even several months ago, during the house tour, you could see pictures of where Lucius just couldn’t help himself and started tearing paneling off the wall in the sunroom (which I have learned is actually called a “loggia”). He’s been hinting at wanting to rip into the master suite more and more recently and finally, I caved. A few weeks later and our master looks like this:


We have officially demoed our bedroom, bathroom, and closets!
Yes, it looks absolutely nuts. Yes, I’ve had more than a few “ohhhh noooo whatdidwedo!?” moments. But every time I walk into this space I get a jolt of excitement that easily puts those fears at bay. Also, LOOK AT ALL THAT NATURAL LIGHT!
Since the pictures in the house tour are probably a little hard to follow (there’s a video in there too that explains the layout better, but still not perfectly), I’ve created a floor plan of what it looked like before demo, and how we’re thinking it’ll look when we’re done.
Before the Remodel

I’ve tried to outline each “room” to help it make more sense. Certain objects (vanities, the bed) aren’t to scale but are good placeholders to get the point across.
There are a couple of things that I want to point out before we get this “future plans” party started though.
First of all, you can now see how INSANELY DUMB this layout was. The “loggia” was the only source of natural light in the whole suite and it really wasn’t an inviting space - super long and skinny. I’d LOVE to talk to the architect and figure out whyyyyy they built the loggia at all. And then flick them in the forehead. Also, that little alcove at the end of the loggia in the corner of the room. What even is that!?
Secondly, the bathroom situation was all sorts of broken up craziness. Not only that, but we hated that the only way to get to the loft from this side of the house was to walk through our shower room. (Also, the fact that we had a shower room.)
Lastly, the floor plan doesn’t include our entire second story, but since this remodel actually impacts more than just the master suite, I’ve included snippets of the adjacent impacted areas. For instance, at the top of the layout, you’ll notice I labeled a small section of the loft. The loft is actually MUCH larger than that (it spans the entirety of our 3-car garage), but we’re only modifying a small corner of it for this project. You’ll also notice on the bottom left that I’ve labeled the hallway and kids’ bath. You’ll see why in the “after”.
Get excited! (I know I am!)
After the Remodel

Allow me to walk you through the changes because there are a lot!
Loggia Removal and Hallway Layout
One of the biggest improvements in the new layout is that we completely removed the loggia and pushed the master suite to the right. Now we’ll not only get to enjoy all the windows along this wall, but it’ll allow us to extend our current hallway so it runs past (rather than through) the master suite to the loft.
But don’t worry, the hallway won’t be a dark, closed-in tunnel. It will actually wrap around the staircase. We plan on putting up a railing, or at the very least a pony wall, all the way from where it starts on the left of the floor plan to the wall between our closet and bathroom. The orange arrows below should help you visualize.
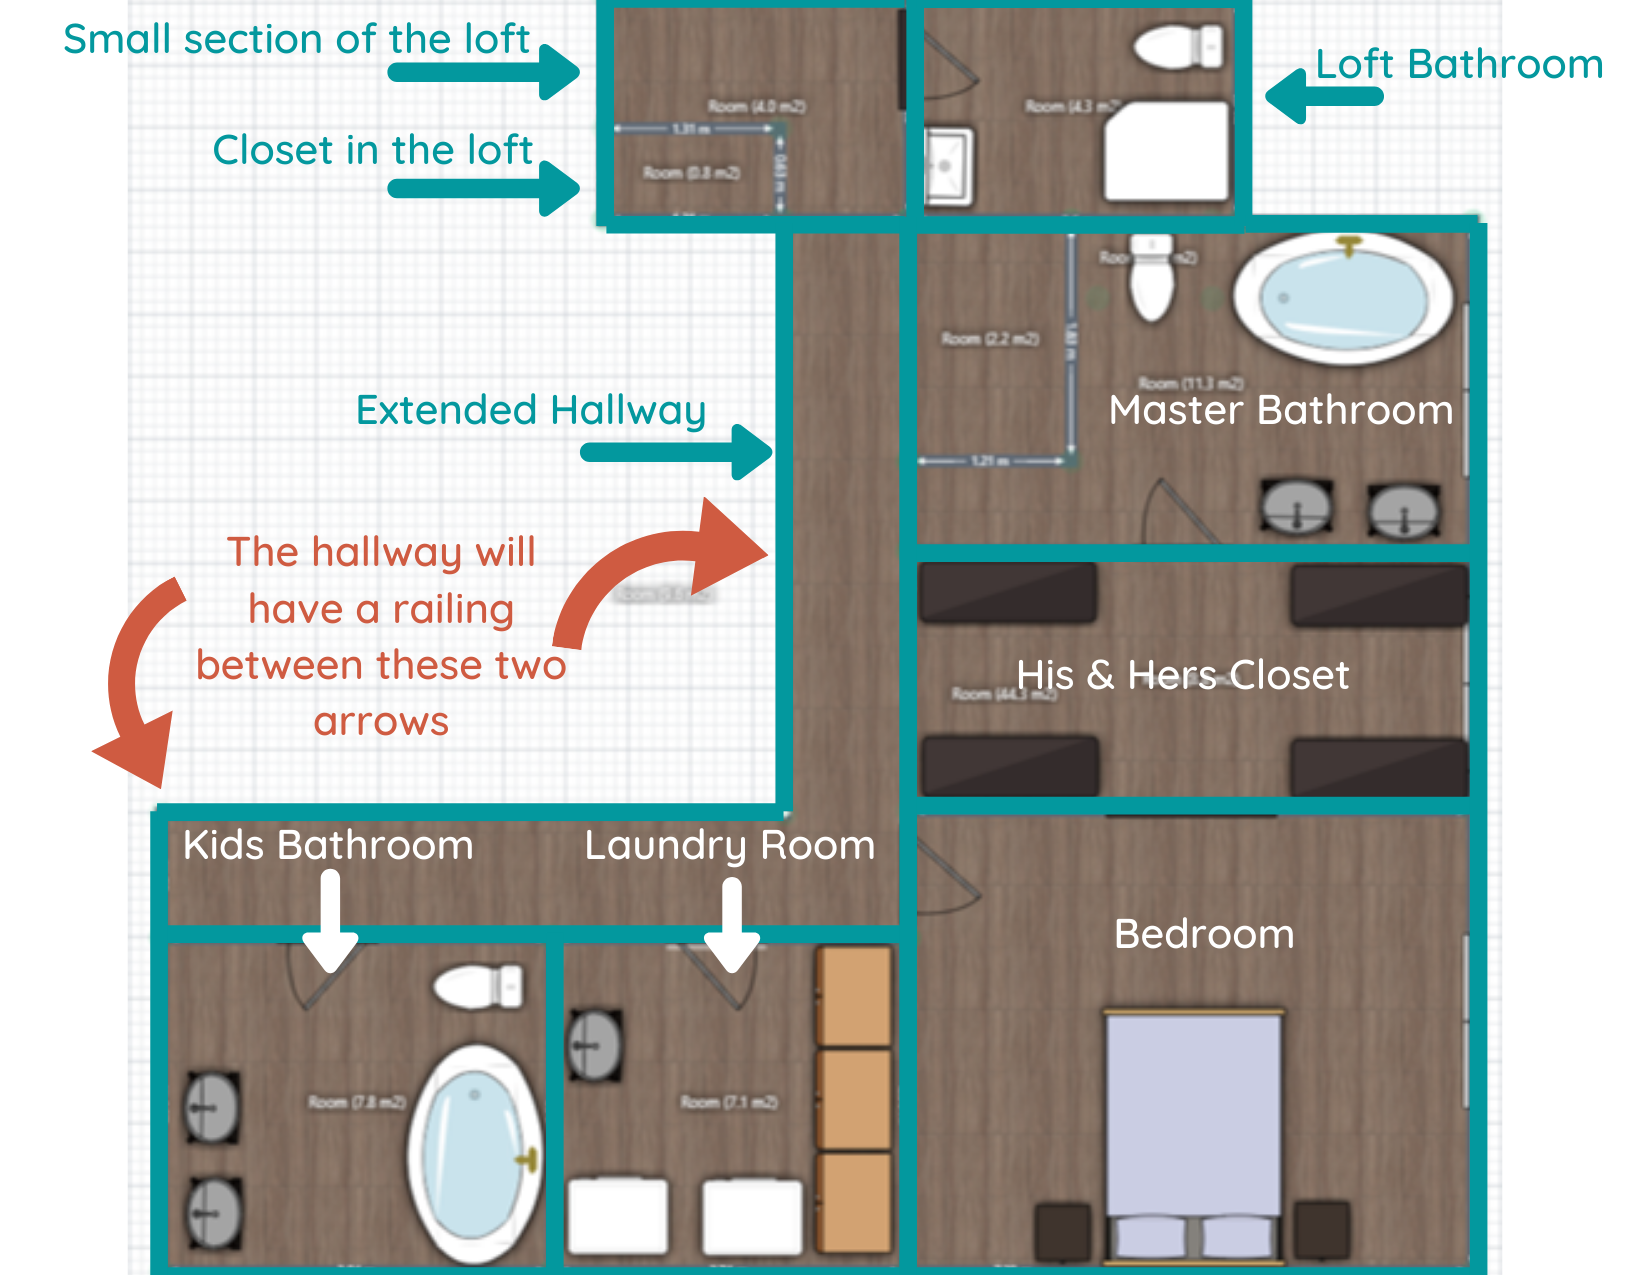
Master Bedroom and Closet
Other significant changes - you’ll notice that the master bedroom is MUCH smaller in the new layout. Considering we’re gaining a decent amount of functional closet space (we plan on installing an IKEA PAX system with TONS of storage), and the only things we really need in the bedroom are the bed and a couple of nightstands, we weren’t concerned about losing the square footage.
Even if we wanted to expand the room some, we’d be limited since the wall between the bedroom and closet is a support wall. But we’re not concerned. Even with the reduction in size, our bedroom will still be about 12x15 feet!
Kids’ Bathroom and Laundry Room
A big chunk of the space off to the left of the bedroom will instead become a new laundry room. We have a laundry room downstairs currently, but with all the bedrooms being upstairs, and the fact that we have the space to do it, why not move it? We haven’t decided what we’ll use the current laundry room for just yet. Probably a storage closet of some sort.
You may also notice that the kids’ bathroom will get a little bigger. For being such a big house, this bathroom is oddly cramped! While the kids' bathroom and the laundry room are in the plan, they’re definitely a phase II project. The priority is getting our master suite back in order.
Master Bathroom and Loft Bathroom
Lastly, a brand-spankin’ new master bathroom is on the horizon! And it’ll all be in one room! (We’re innovators like that) Because we’ll have a decent amount of space, we hope to install a nice large vanity and a soaker tub. Oh, and that rectangle in the top left-hand corner of the bathroom? That’s a 4x6 walk-in shower!
And if you’ll notice, there’s no more shower room! That’s because we’re closing off that doorway and turning what was once the shower room into a bathroom for folks who are hanging out in the loft. I honestly don’t want another full bath, but that room might be so large it’ll look weird as a half-bath, so we’re going to have to play that by ear. Because that area isn’t an immediate concern, much like the kid’s bath and laundry room, it will also be a phase II type of deal.
Final Thoughts
At this point, demo is just about done. Once everything is cleared out, we can tape off the floor and REALLY get a feel for how the spaces will work. I’m so excited for that step! It’s difficult to visualize how each space will look and feel with walls and clutter in the way. Even looking at the floor plans, the scale can be off or not quite what you’re expecting in real life. With that being said, I’m keeping an open mind and am fully prepared to have to tweak our plan.
Once we determine our final layout, then comes the hard part: putting everything back together. We plan on starting with the master bedroom first as we’ve been displaced to the loft for the foreseeable future. Since our clothes have been relocated to the spare room, we’ll likely start on the closet next. Lastly, we’ll tackle the most challenging (and expensive room): the bathroom.
I love sitting in my office every day listening to the sweet, sweet sounds of demo as Lucius rips apart that side of the house, but it’ll be even more exciting to listen to it being put back together. Soon I’ll be able to really dig into the design and I can’t wait to share it with all of you! But there’s still quite of work to be done before I can get to that point.

Related Master Suite Remodel Posts:
Master Suite Floor Plans

Feast Your Eyes on This 100-Year-Old Victorian Mansion
Each summer, our city has a festival in the historic district where homeowners open up their beautiful old houses for curious eyes like ours to stroll through. Well, one of those houses is for sale, and Lucius, being a local real-estate agent and all, is fortunate enough to be the listing agent! That means I have an “in” and absolutely HAVE to share this house with the world because it’ll BLOW YOUR MIND!
Home Tour - 1901 Victorian Mansion
If the fact that Lucius and I bought and updated a 1927 American Foursquare isn’t an indication that we love old houses, I don’t know what is. We simply swoon for them.
Each summer, our city has a festival in the historic district where homeowners open up their beautiful old houses for curious eyes like ours to stroll through. It’s certainly a treat to see all these gorgeous houses up close and personal - original woodwork and wallpaper galore! We love it.
We’ve wandered through loads of houses on that tour over the years, but some just stick in your mind more than others. Well, one of those houses is for sale, and Lucius, being a local real-estate agent and all, is fortunate enough to be the listing agent! That means I have an “in” and absolutely HAVE to share this 100-year-old Victorian mansion with the world because it’ll BLOW YOUR MIND!
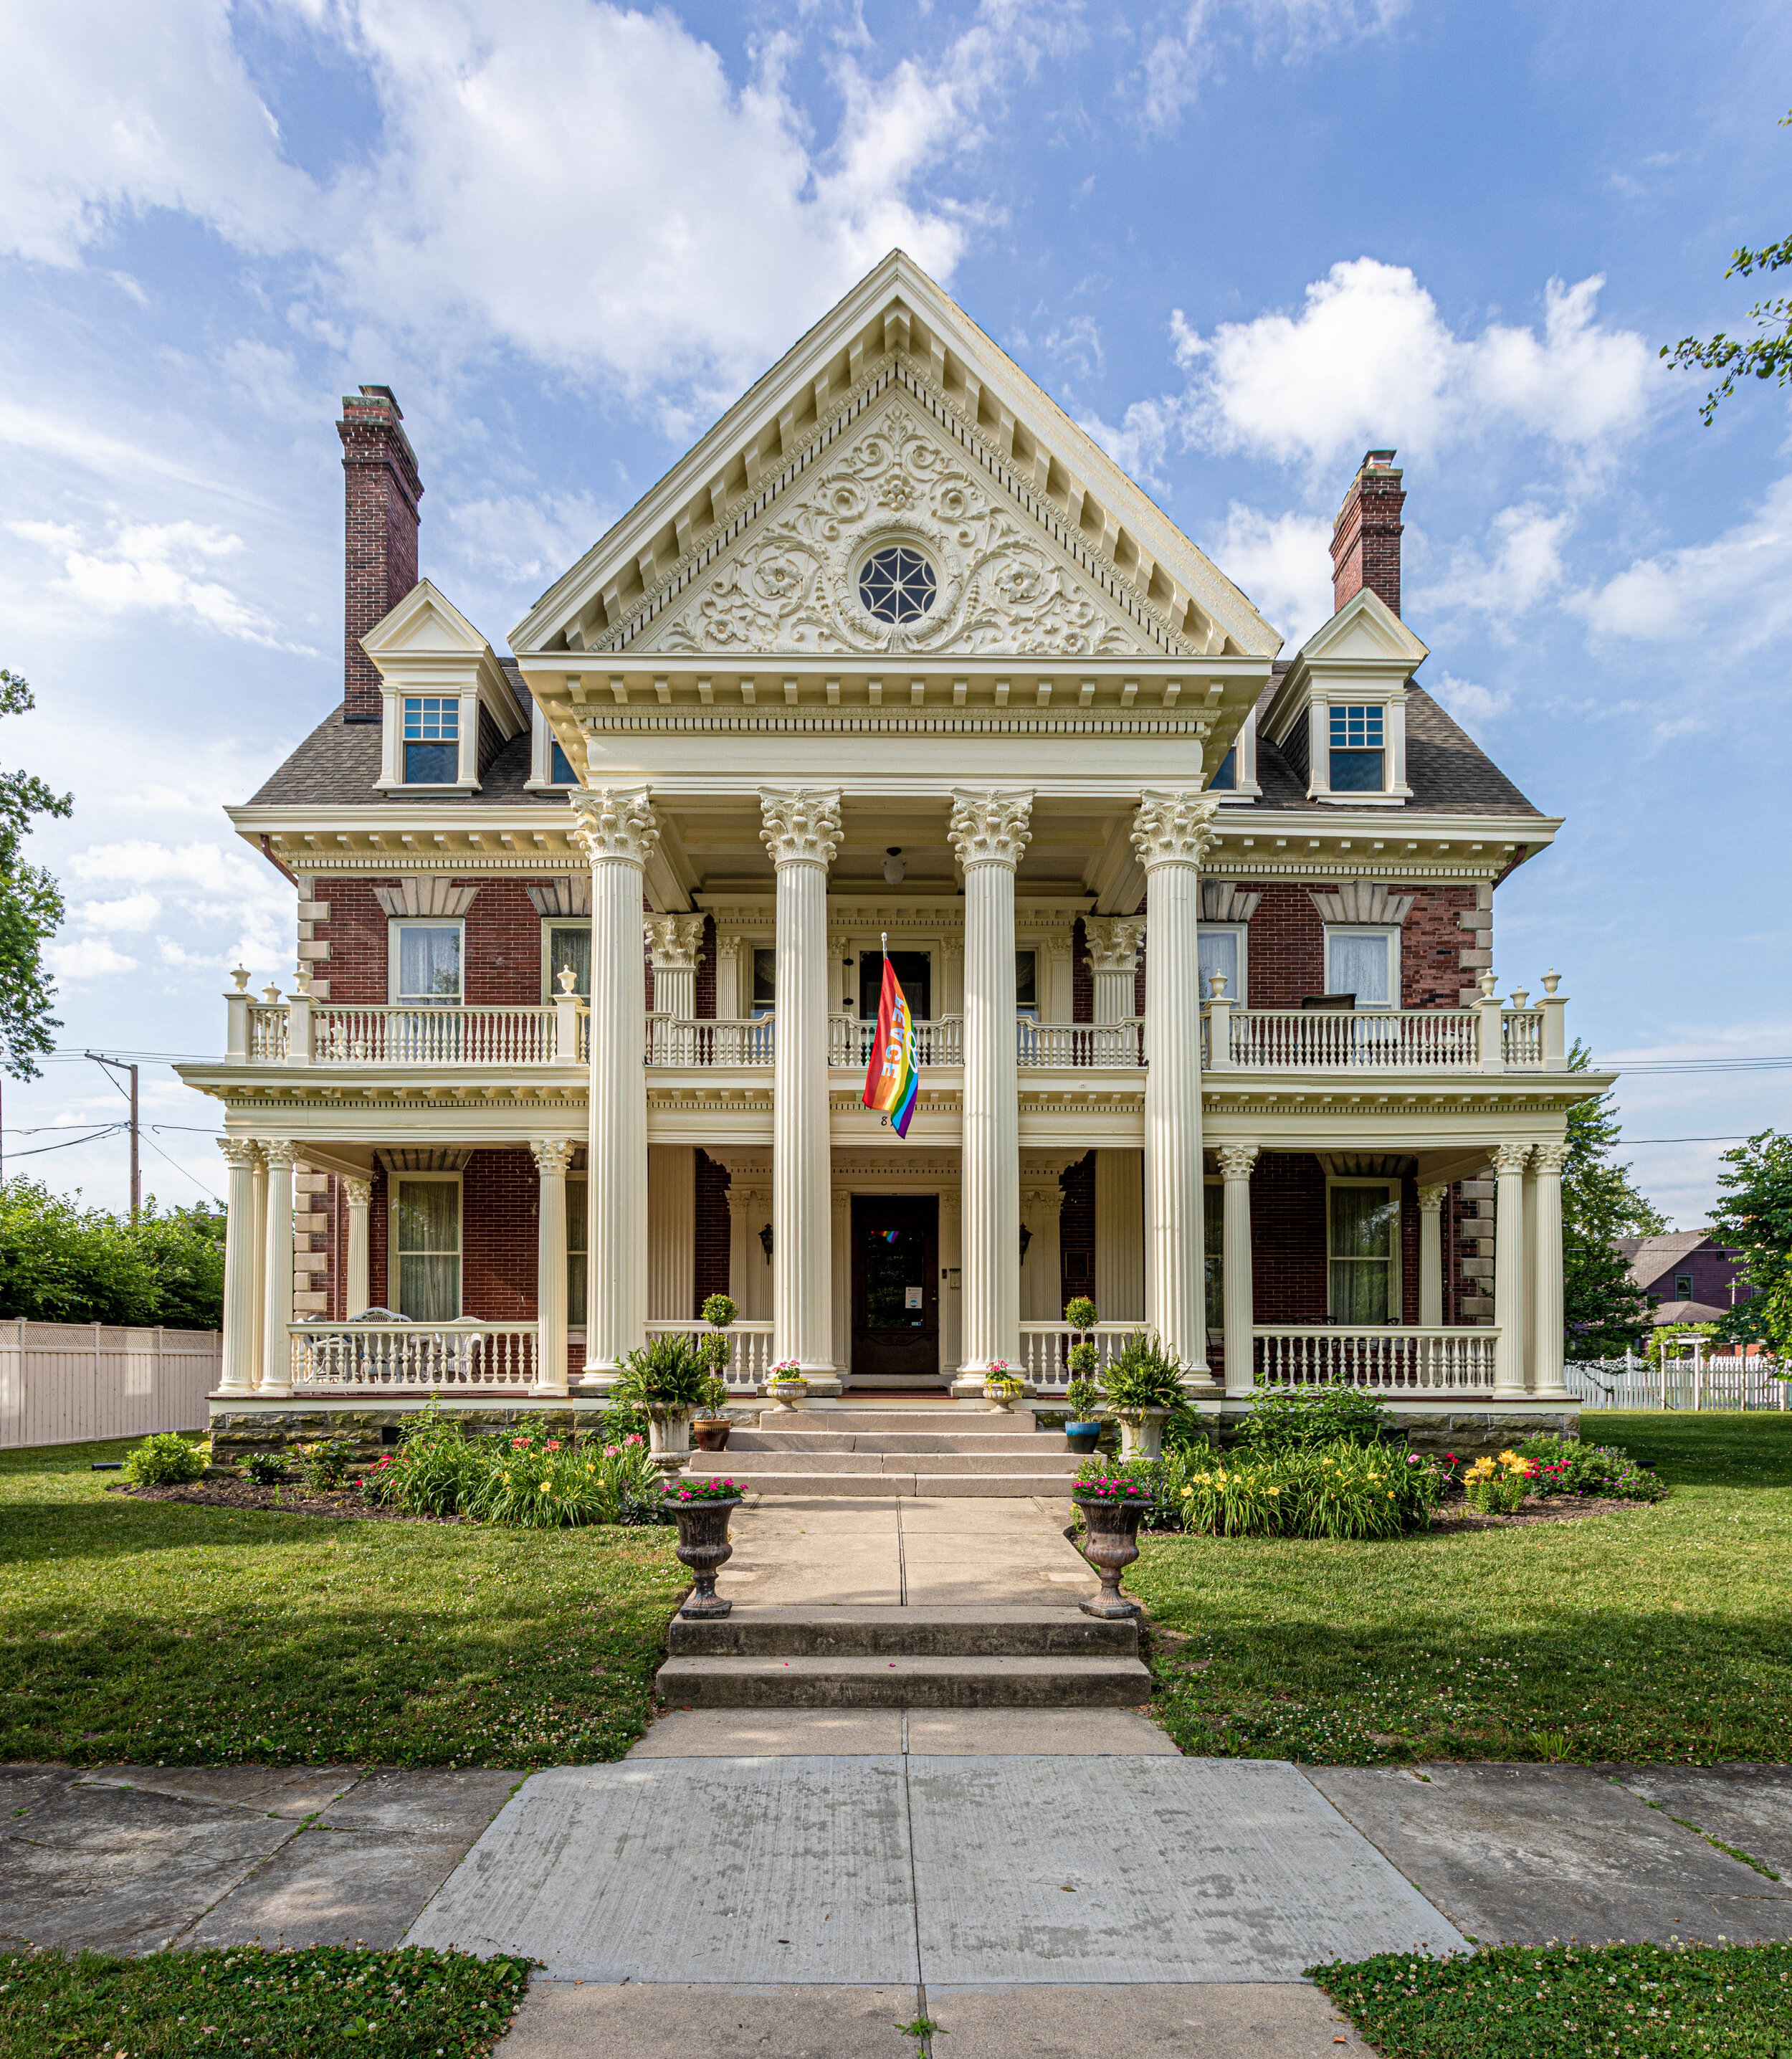
So without further ado, welcome to The Charles Over Mansion:

This incredible house was built in 1901 and is chock-full of original charm. It has 5 bedrooms, 3 bathrooms, more fireplaces than I can keep track of, 12,000 square feet, and is probably one of the most gorgeous historic homes I’ve ever seen.
I mean, just LOOK AT HER!
But before we dive in too deep, I’d like to introduce you to the homeowner, Jonathan.

Jonathan radiates creativity. He runs his own company right out of this house as a talented mask maker (many of which you can see as part of the decor around the house). He has put in countless hours of work restoring this house to its original glory after he bought it 5 years ago in a pretty neglected state. In fact, he handcrafted plaster molds for some of the exterior detail that was in disrepair!
Now, let’s head back to the tour so you can see some of the incredible details of this house and the sweet touches Jonathan has incorporated.
The Entryway and Foyer
First off, before you even walk through the front door, you’re greeted with this wildly spacious front porch. I mean, I can just TASTE the lemonade I would be sipping out here if I owned this place.

As soon as you step foot inside, you’re met with a giant foyer and an ultra-grand staircase. These features are only made grander by the 16-foot ceilings on the first floor! And that large doorway you see below? That’s one of many giant pocket doors that can be found throughout the house!

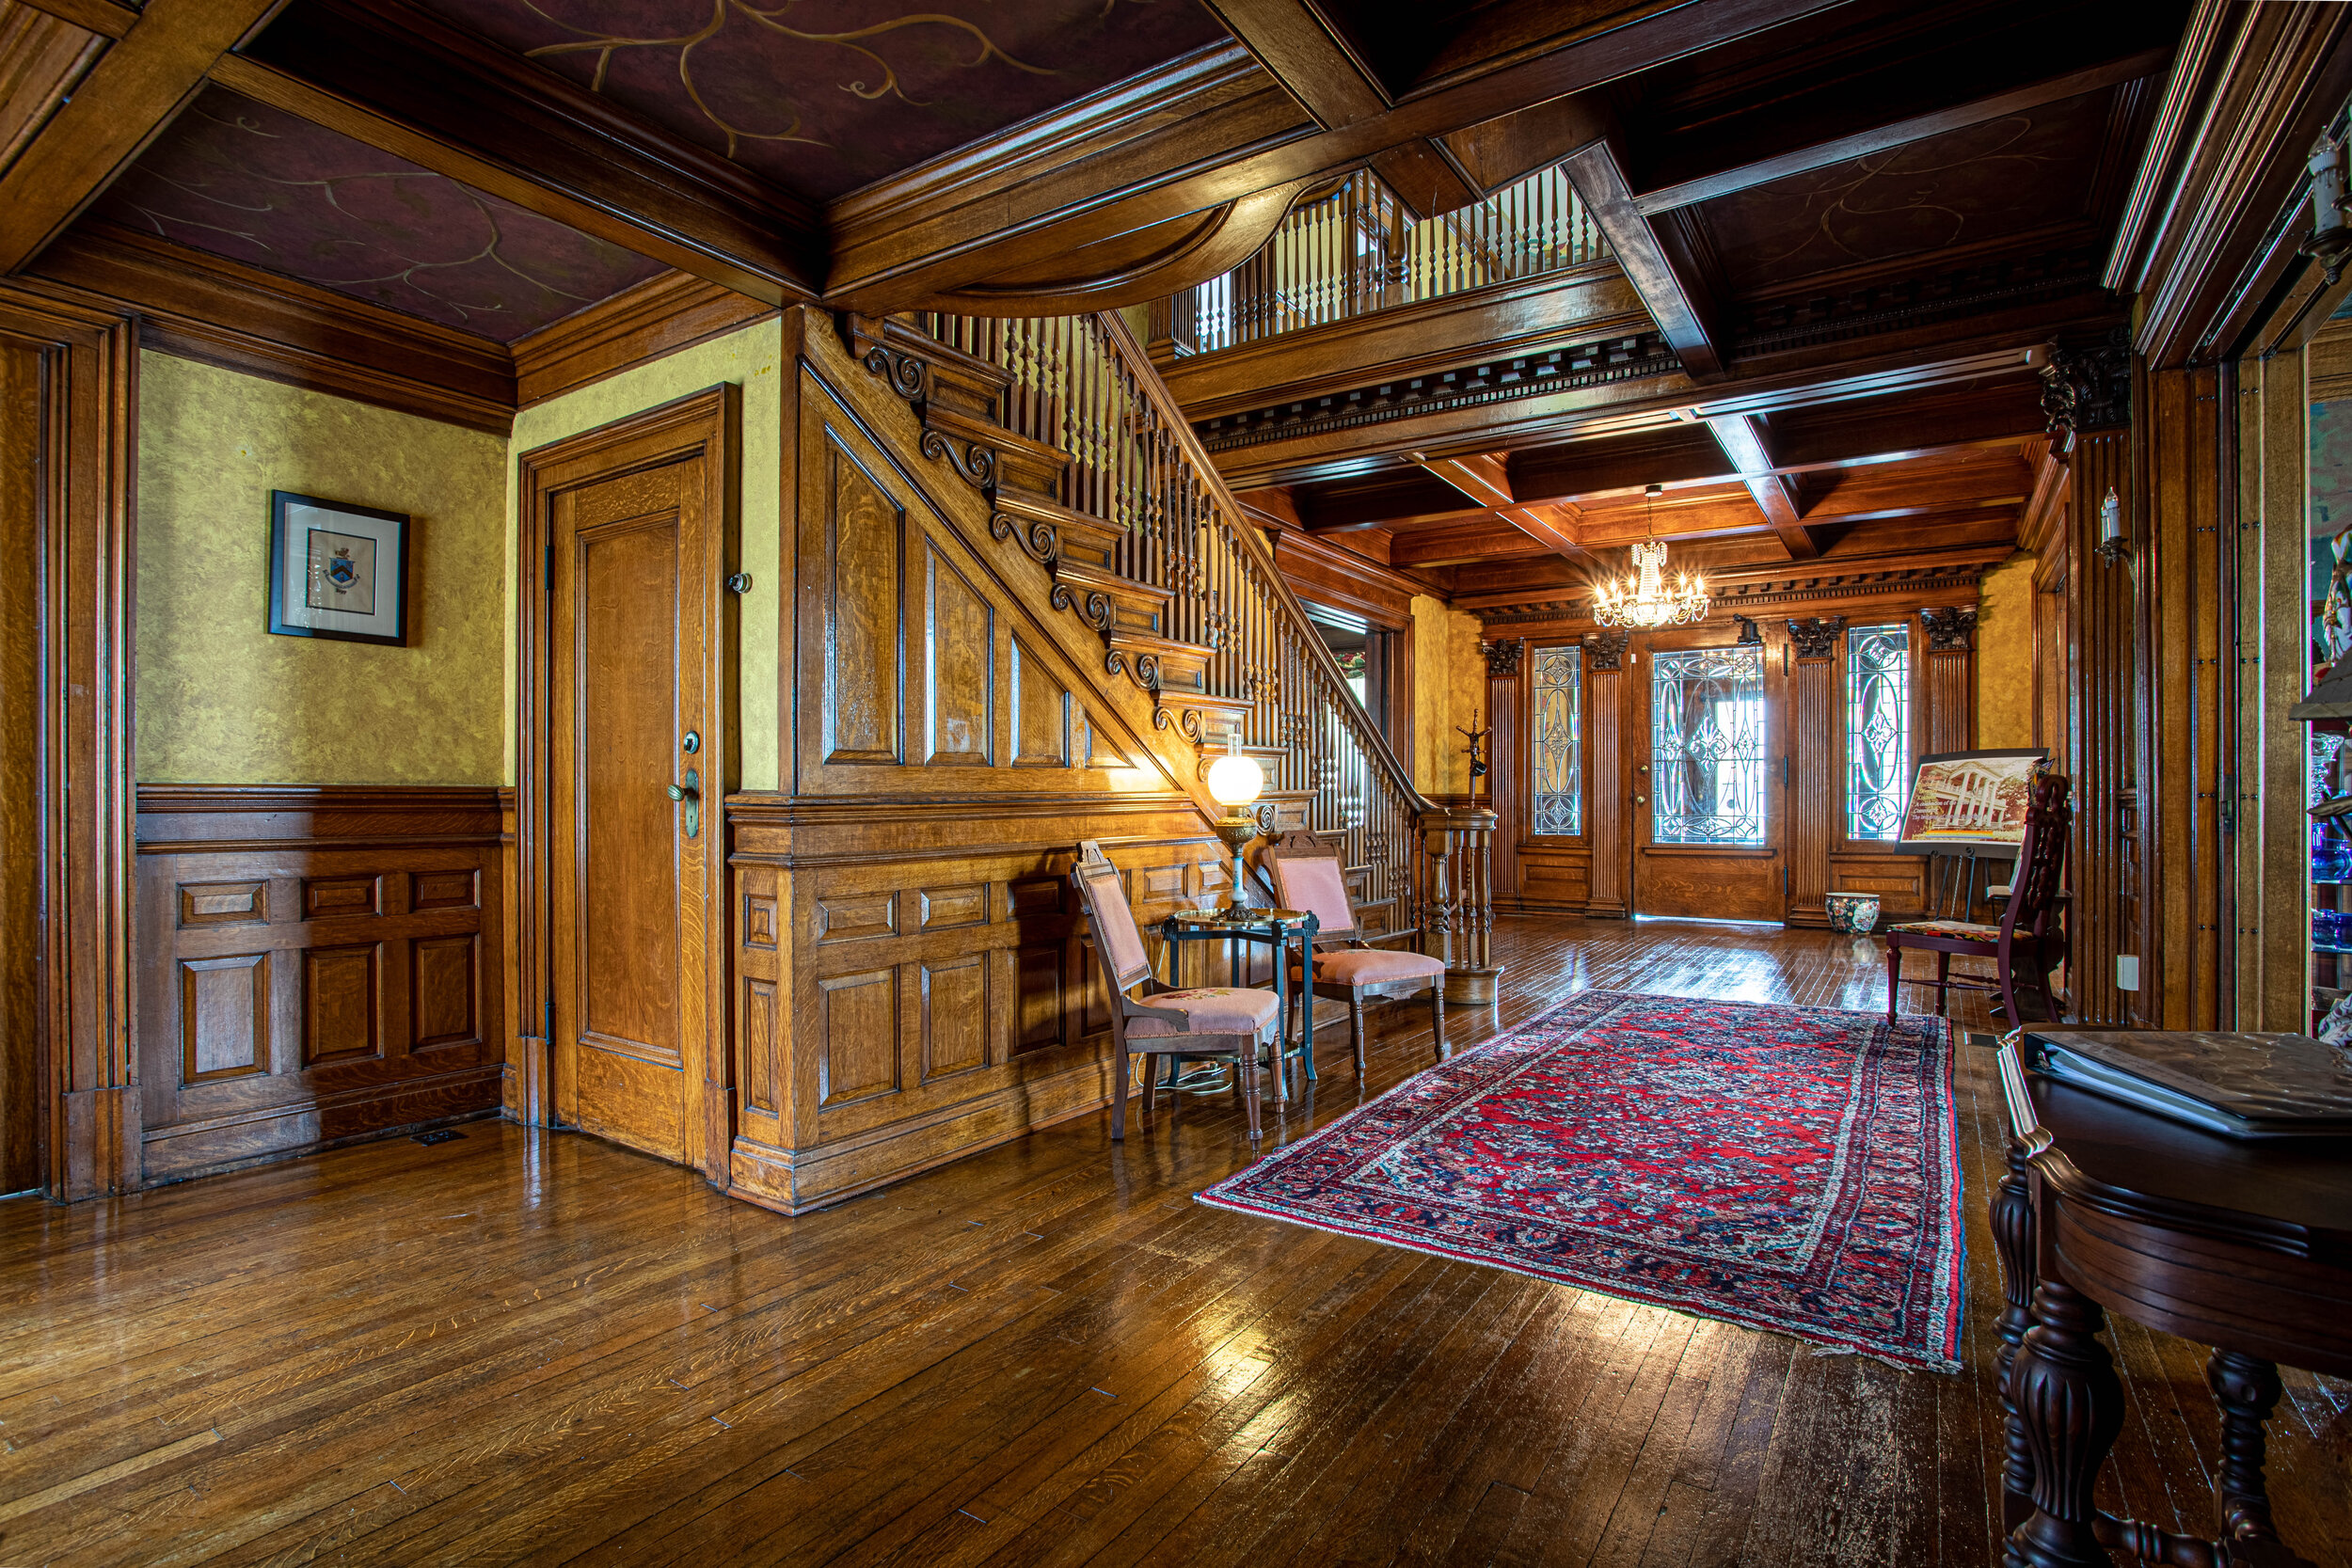

You guys, I felt like straight-up royalty walking down this MASSIVE staircase. No joke. I felt like the queen! And a little historic tidbit - this house actually was built for a prestigious family back in the day. True to this era, there’s actually a second, smaller staircase near the kitchen for “the help”. Tucked right next to the dumbwaiter, which has been turned into a cold air return. Amazingly, this house actually has modern amenities (including 4 HVAC units), which is hard to find in houses this old!
Now back to the details - check out that intricate, pristine woodwork! Not to mention the coffered ceiling in the foyer and those stained glass windows in the staircase. Am I dreaming?


And while we’re at it, let’s take a quick stroll up the stairs to get a closer look, shall we? (I promise we’ll head back downstairs in a moment.)

A fireplace on a landing? If you have space, why not!?
Okay, heading back downstairs…
You know how I mentioned the coffered ceilings? Well, check this out:
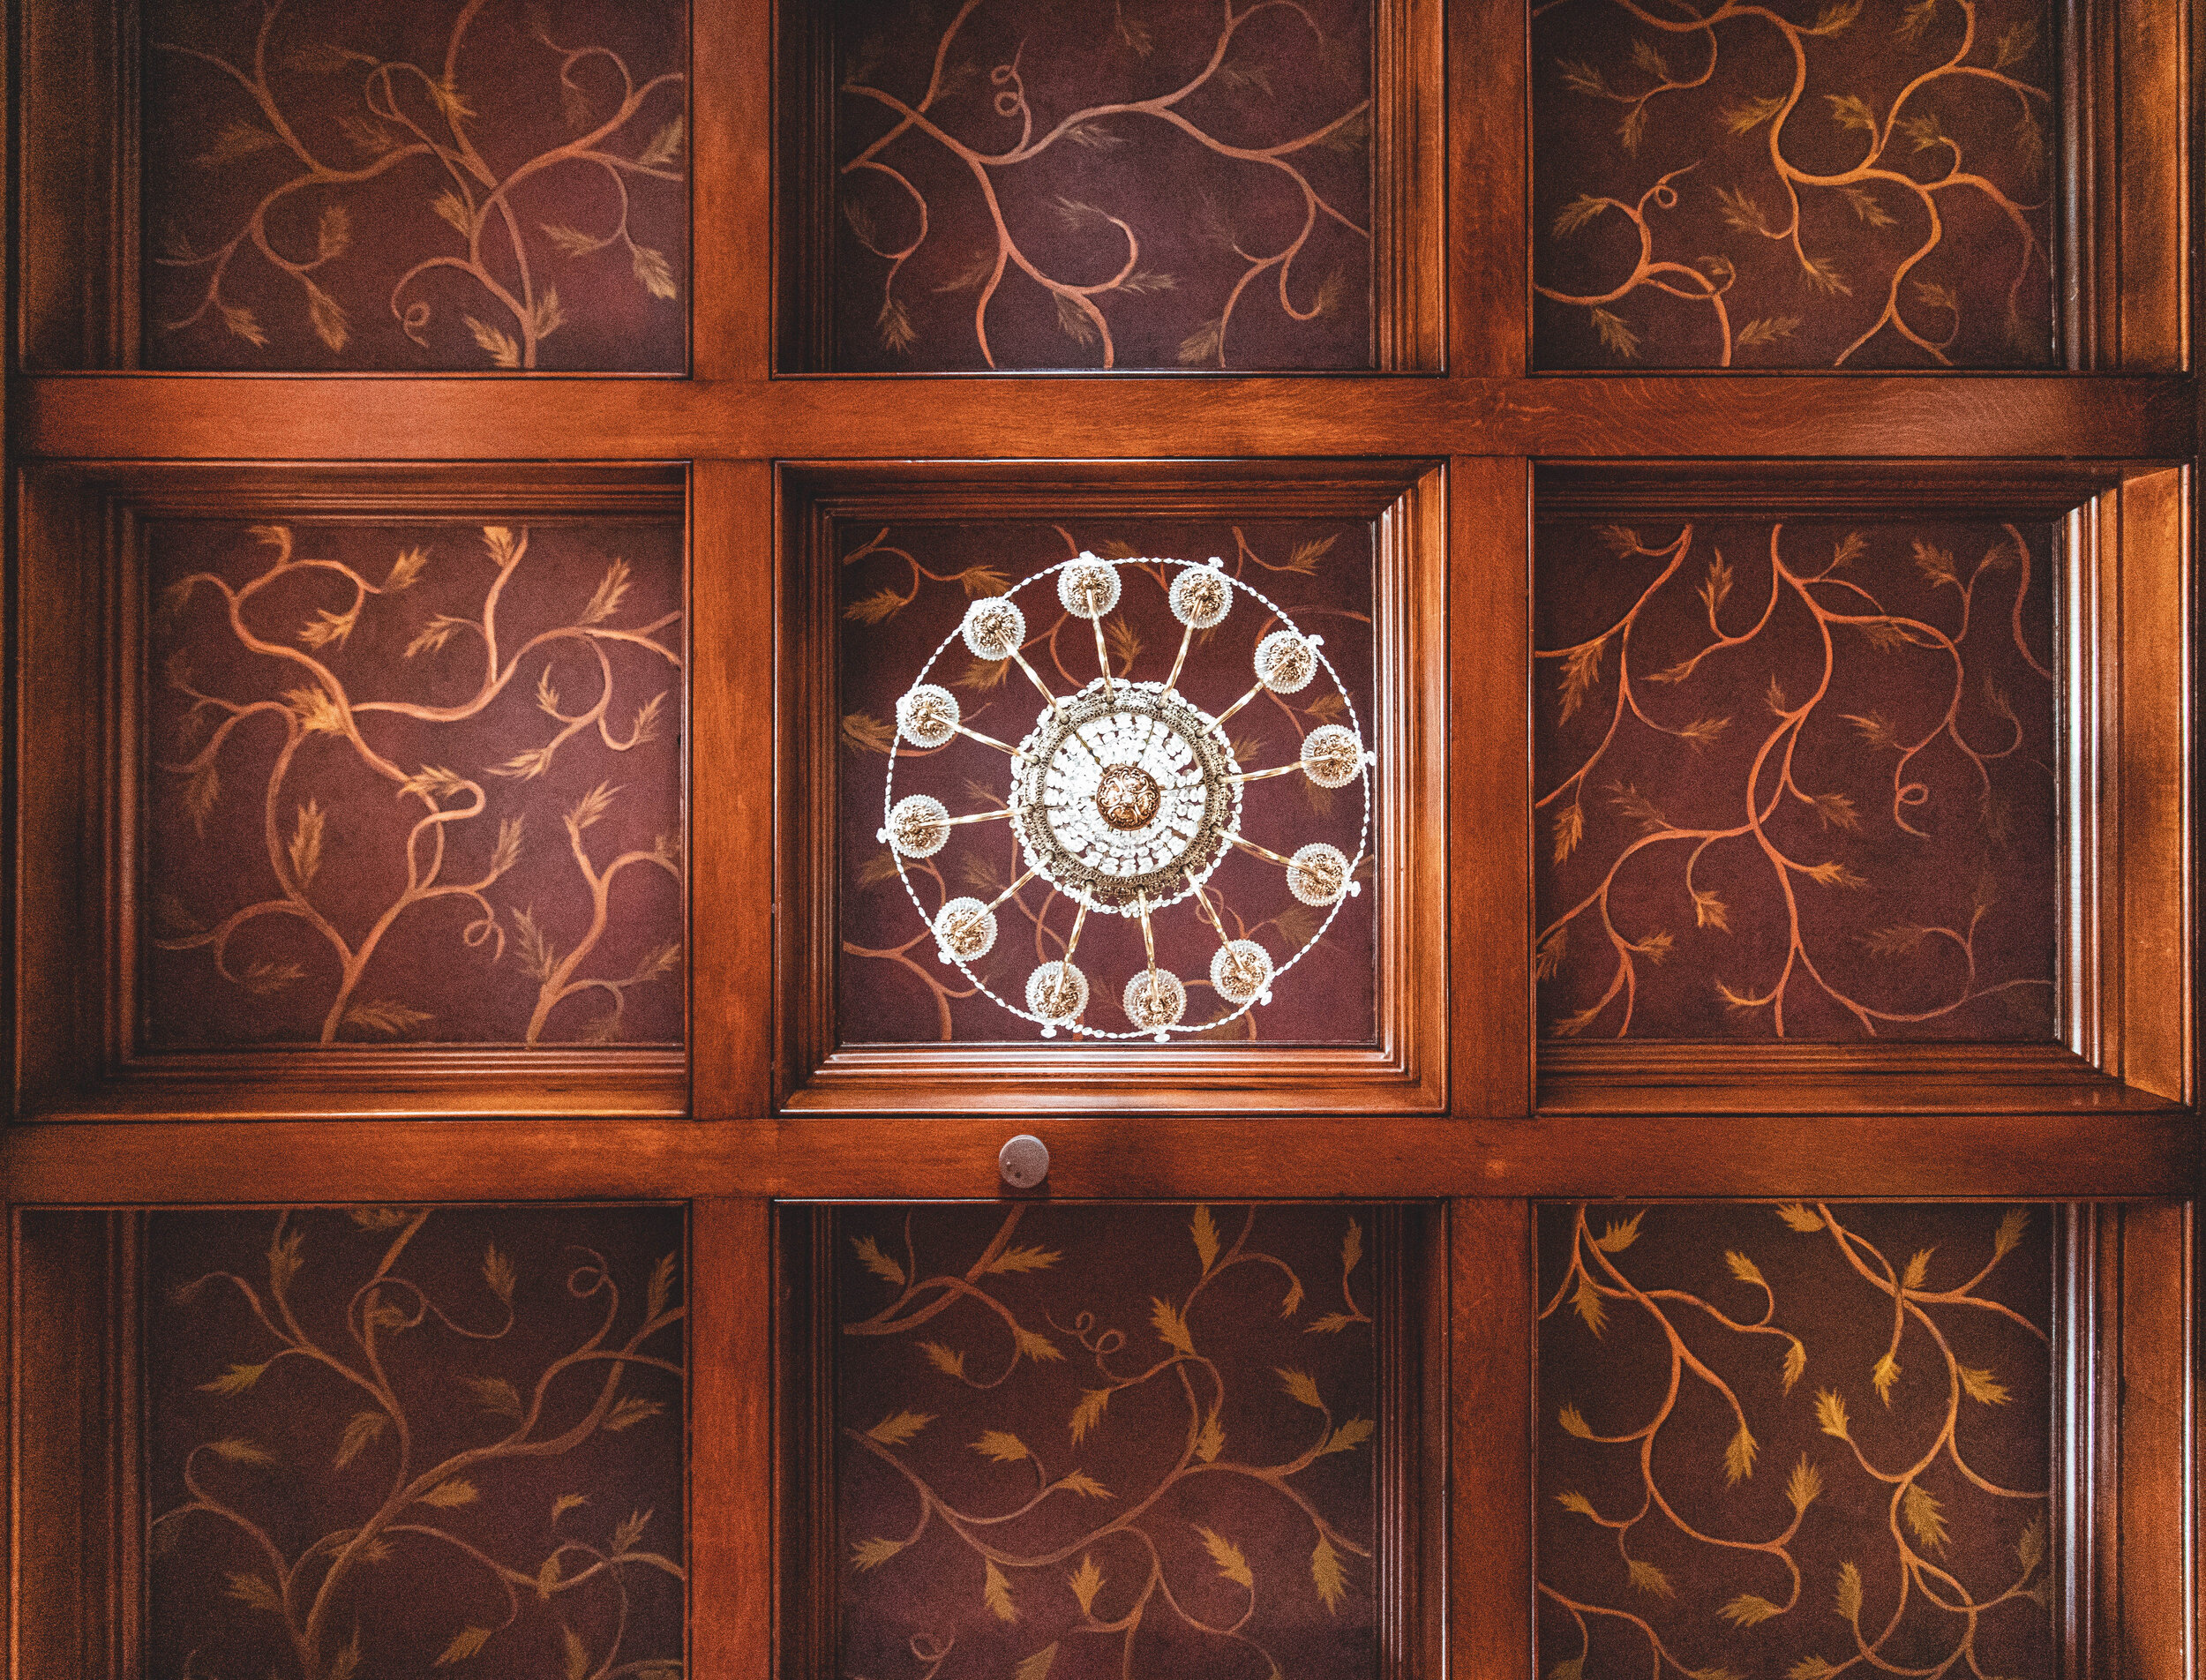
Not only is that chandelier absolutely beautiful, the pattern on the ceiling is gorgeous too! You’d think it’s wallpaper, wouldn’t you? But it’s most definitely not - it’s all hand-painted! And that’s a detail you’ll see all over this house.
The Sitting Rooms and Dining Areas
As you wander through the house, to the right of the staircase you have a sitting room with another insanely intricate original fireplace.

And just behind the sitting room is the breakfast room.

Check out those high ceilings, giant windows, and don’t even get me started on the chunky trim!
If you were to turn to the left after entering the foyer, you’d walk into another sitting room.

Through this sitting room, you’re led into the most epic dining room I’ve ever seen. I can’t decide which angle of this room is best so I’m just gonna show you all of them.
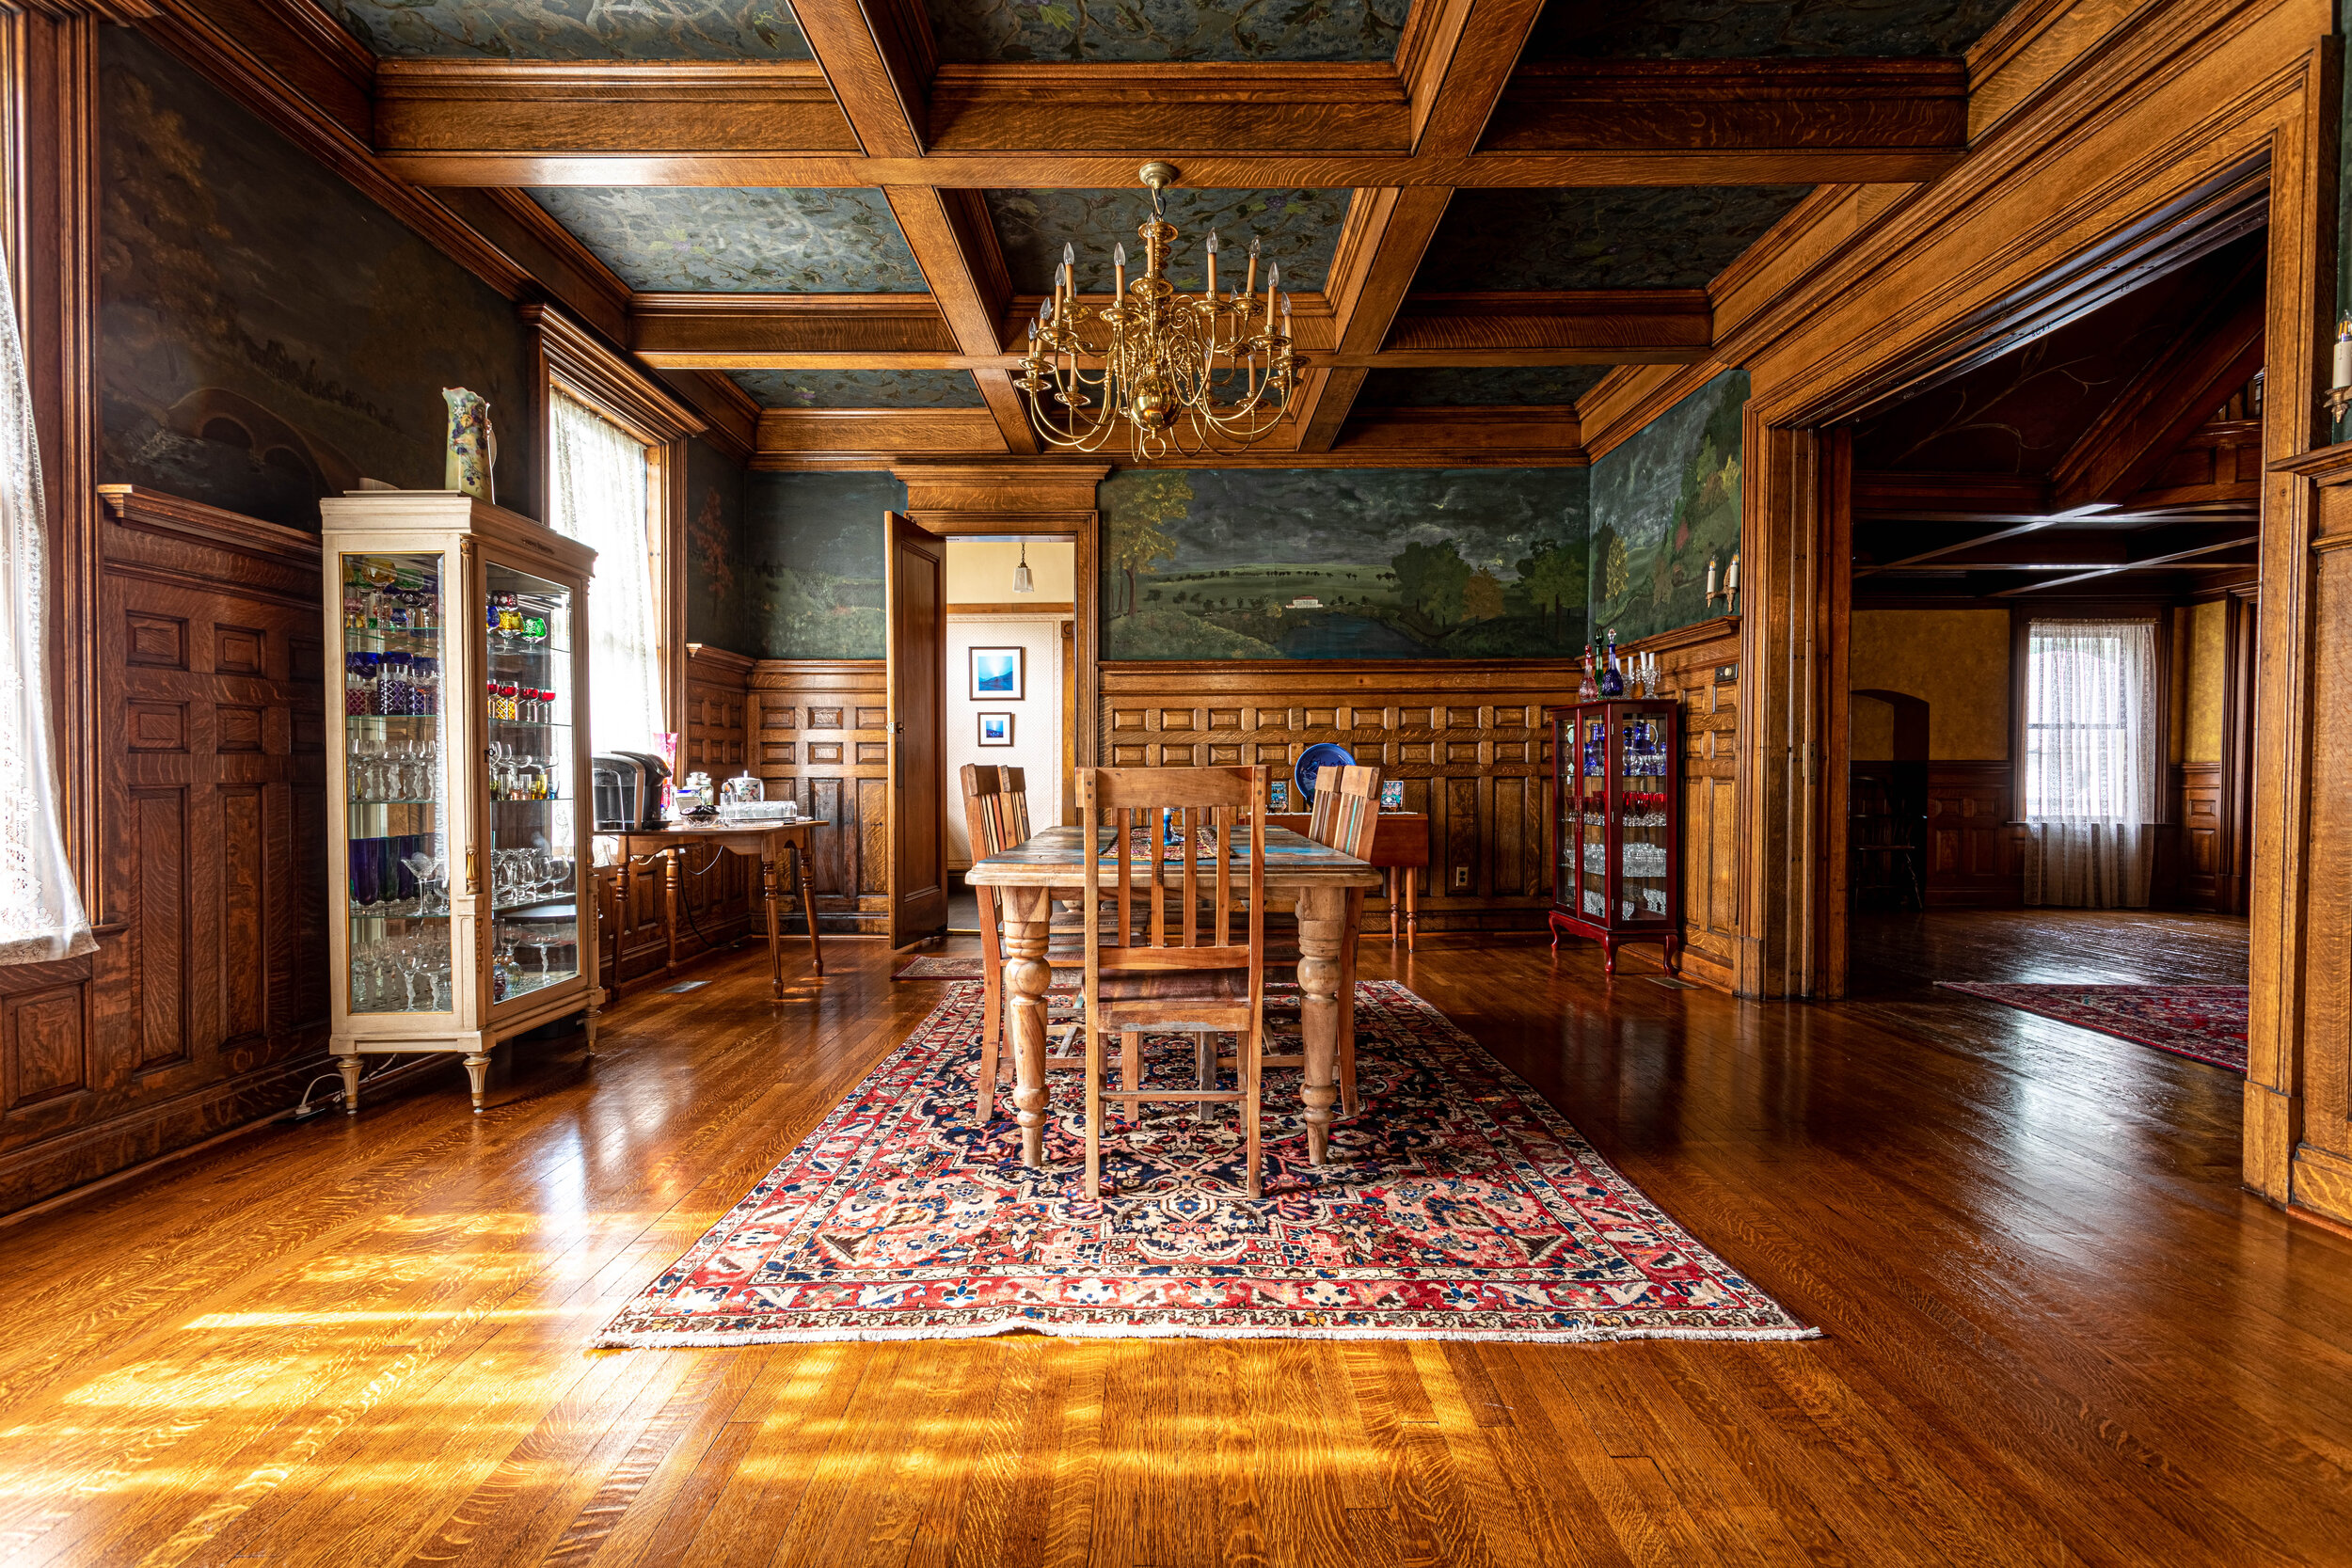
That wainscoting is simply flawless and I’m in love with the dramatic mural above it. Yep, it’s not wallpaper. The mural and the ceiling in this room were also hand-painted.
Because this room is so large, it would be easy for it to be cold and uninviting, but the use of dramatic and dark colors complements the orange in the wood and creates a really warm space. The oriental rug under the table is also a really great, dramatic touch.


The Kitchen
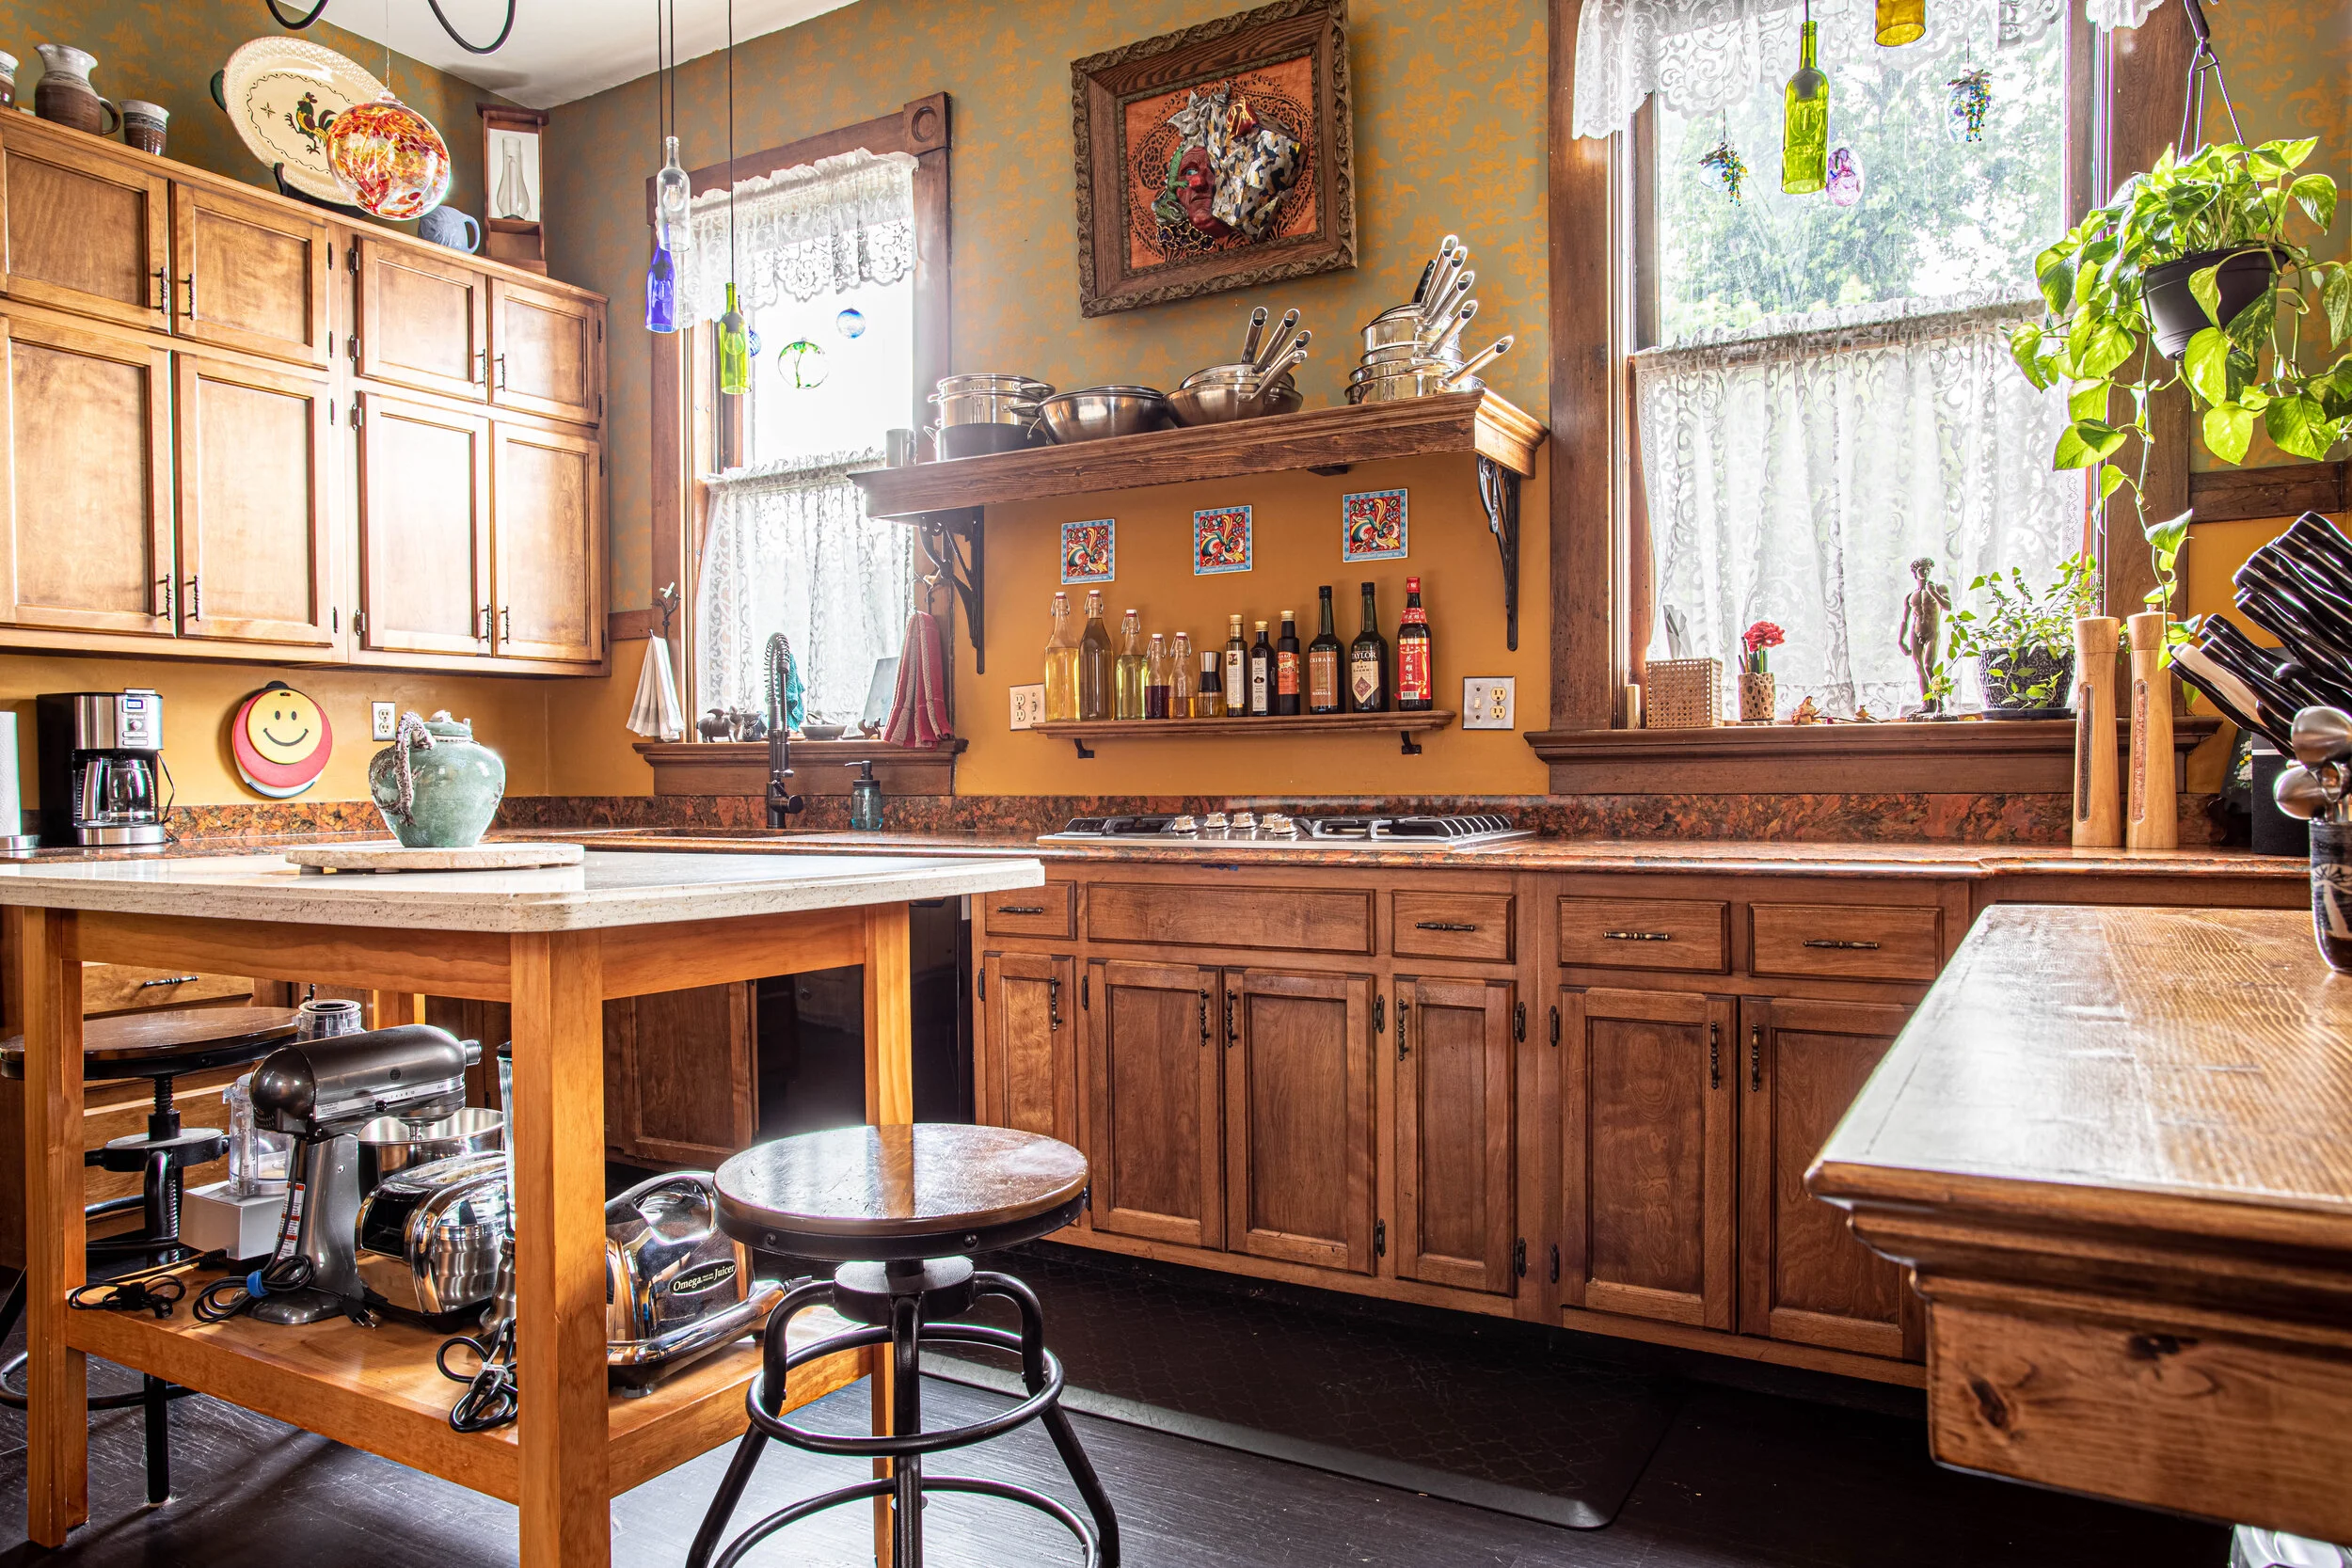
Through the dining room is one of the pantries (this house has two!) and then the kitchen. Houses from this era typically don’t have very functional (in terms of this day and age) kitchens. The kitchen in this house has been updated and is now not only functional but still flows nicely with the rest of the house in the use of wood tones and ornate wall finishes.


The Bedrooms
Heading back on up that amazing staircase… Once you make your way to the top and catch your breath, you’ll realize that you’re not in a room - you’re on a giant landing, which leads to five large bedrooms.

Our first stop on the bedroom tour is Jonathan’s room, which is simple, clean, and modern.
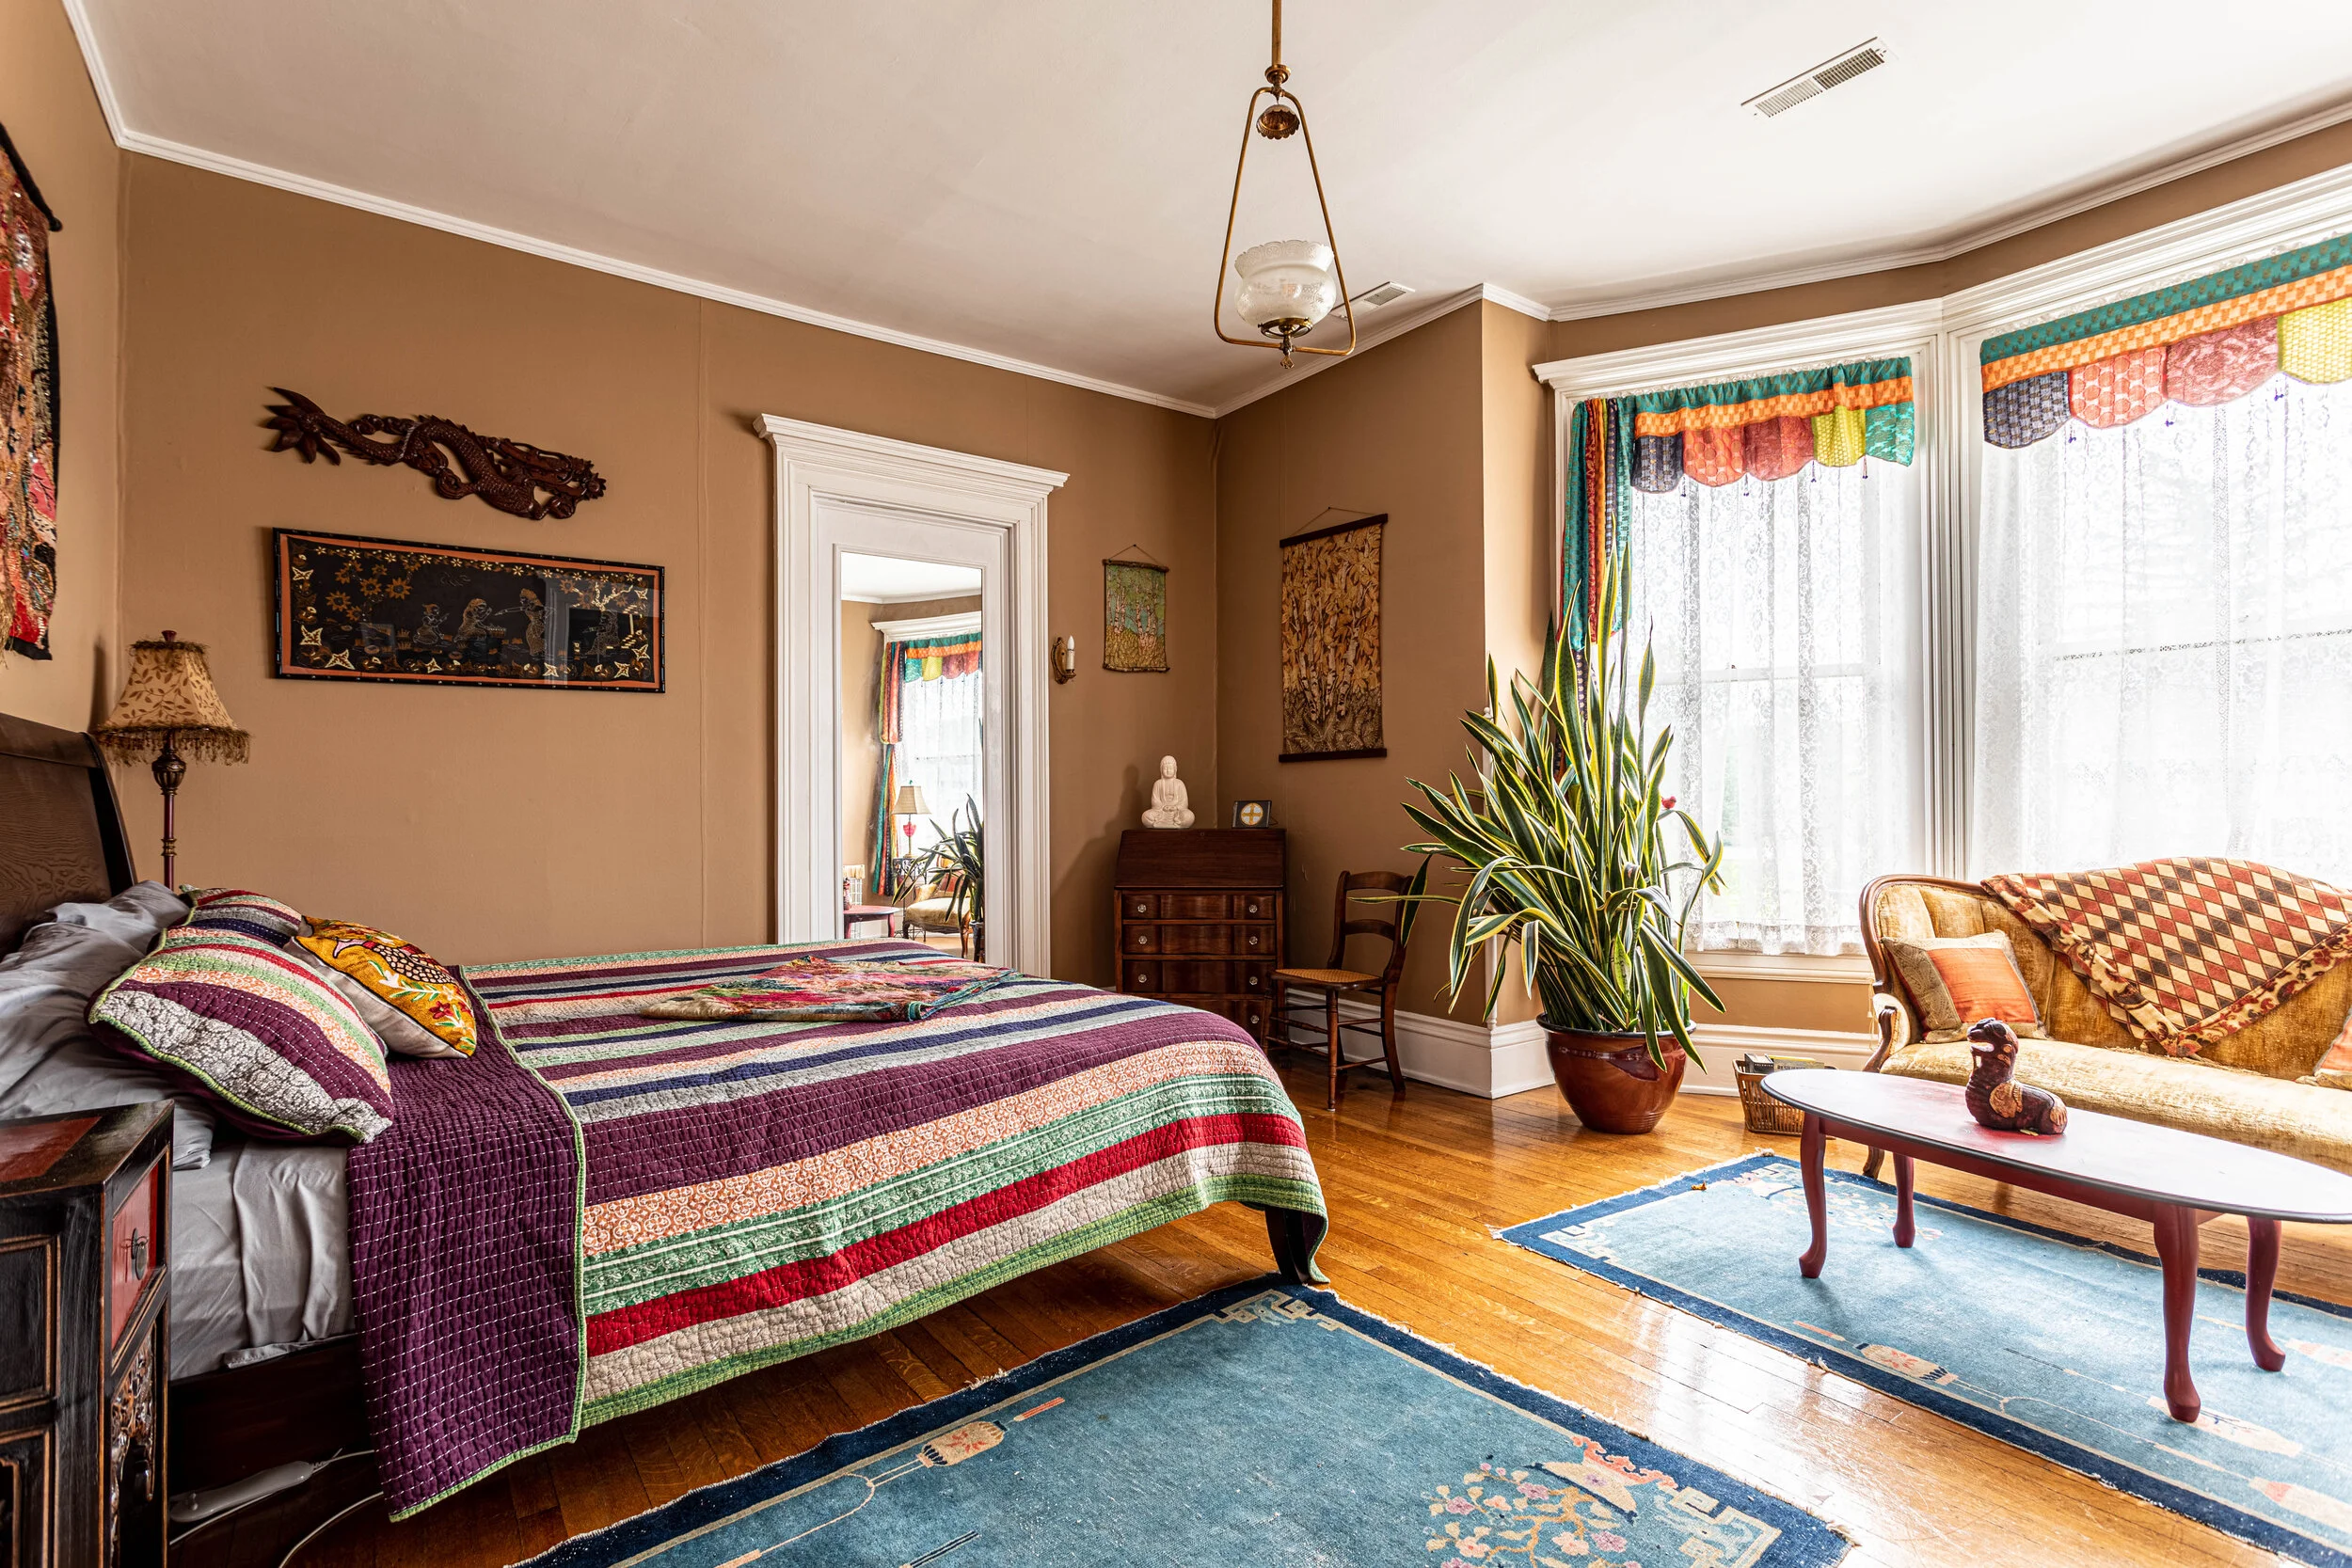
The other four bedrooms are decked out in true Victorian style, which is a good thing because they can be rented for an AirBnB stay! Yep, you can book your stay in your pick of one of the four beautiful bedrooms.
Your first option is what Jonathan affectionately calls The Rose Room (aka “Grandma’s Room”). It’s dressed in sweet, floral wallpaper and a delicate quilt.

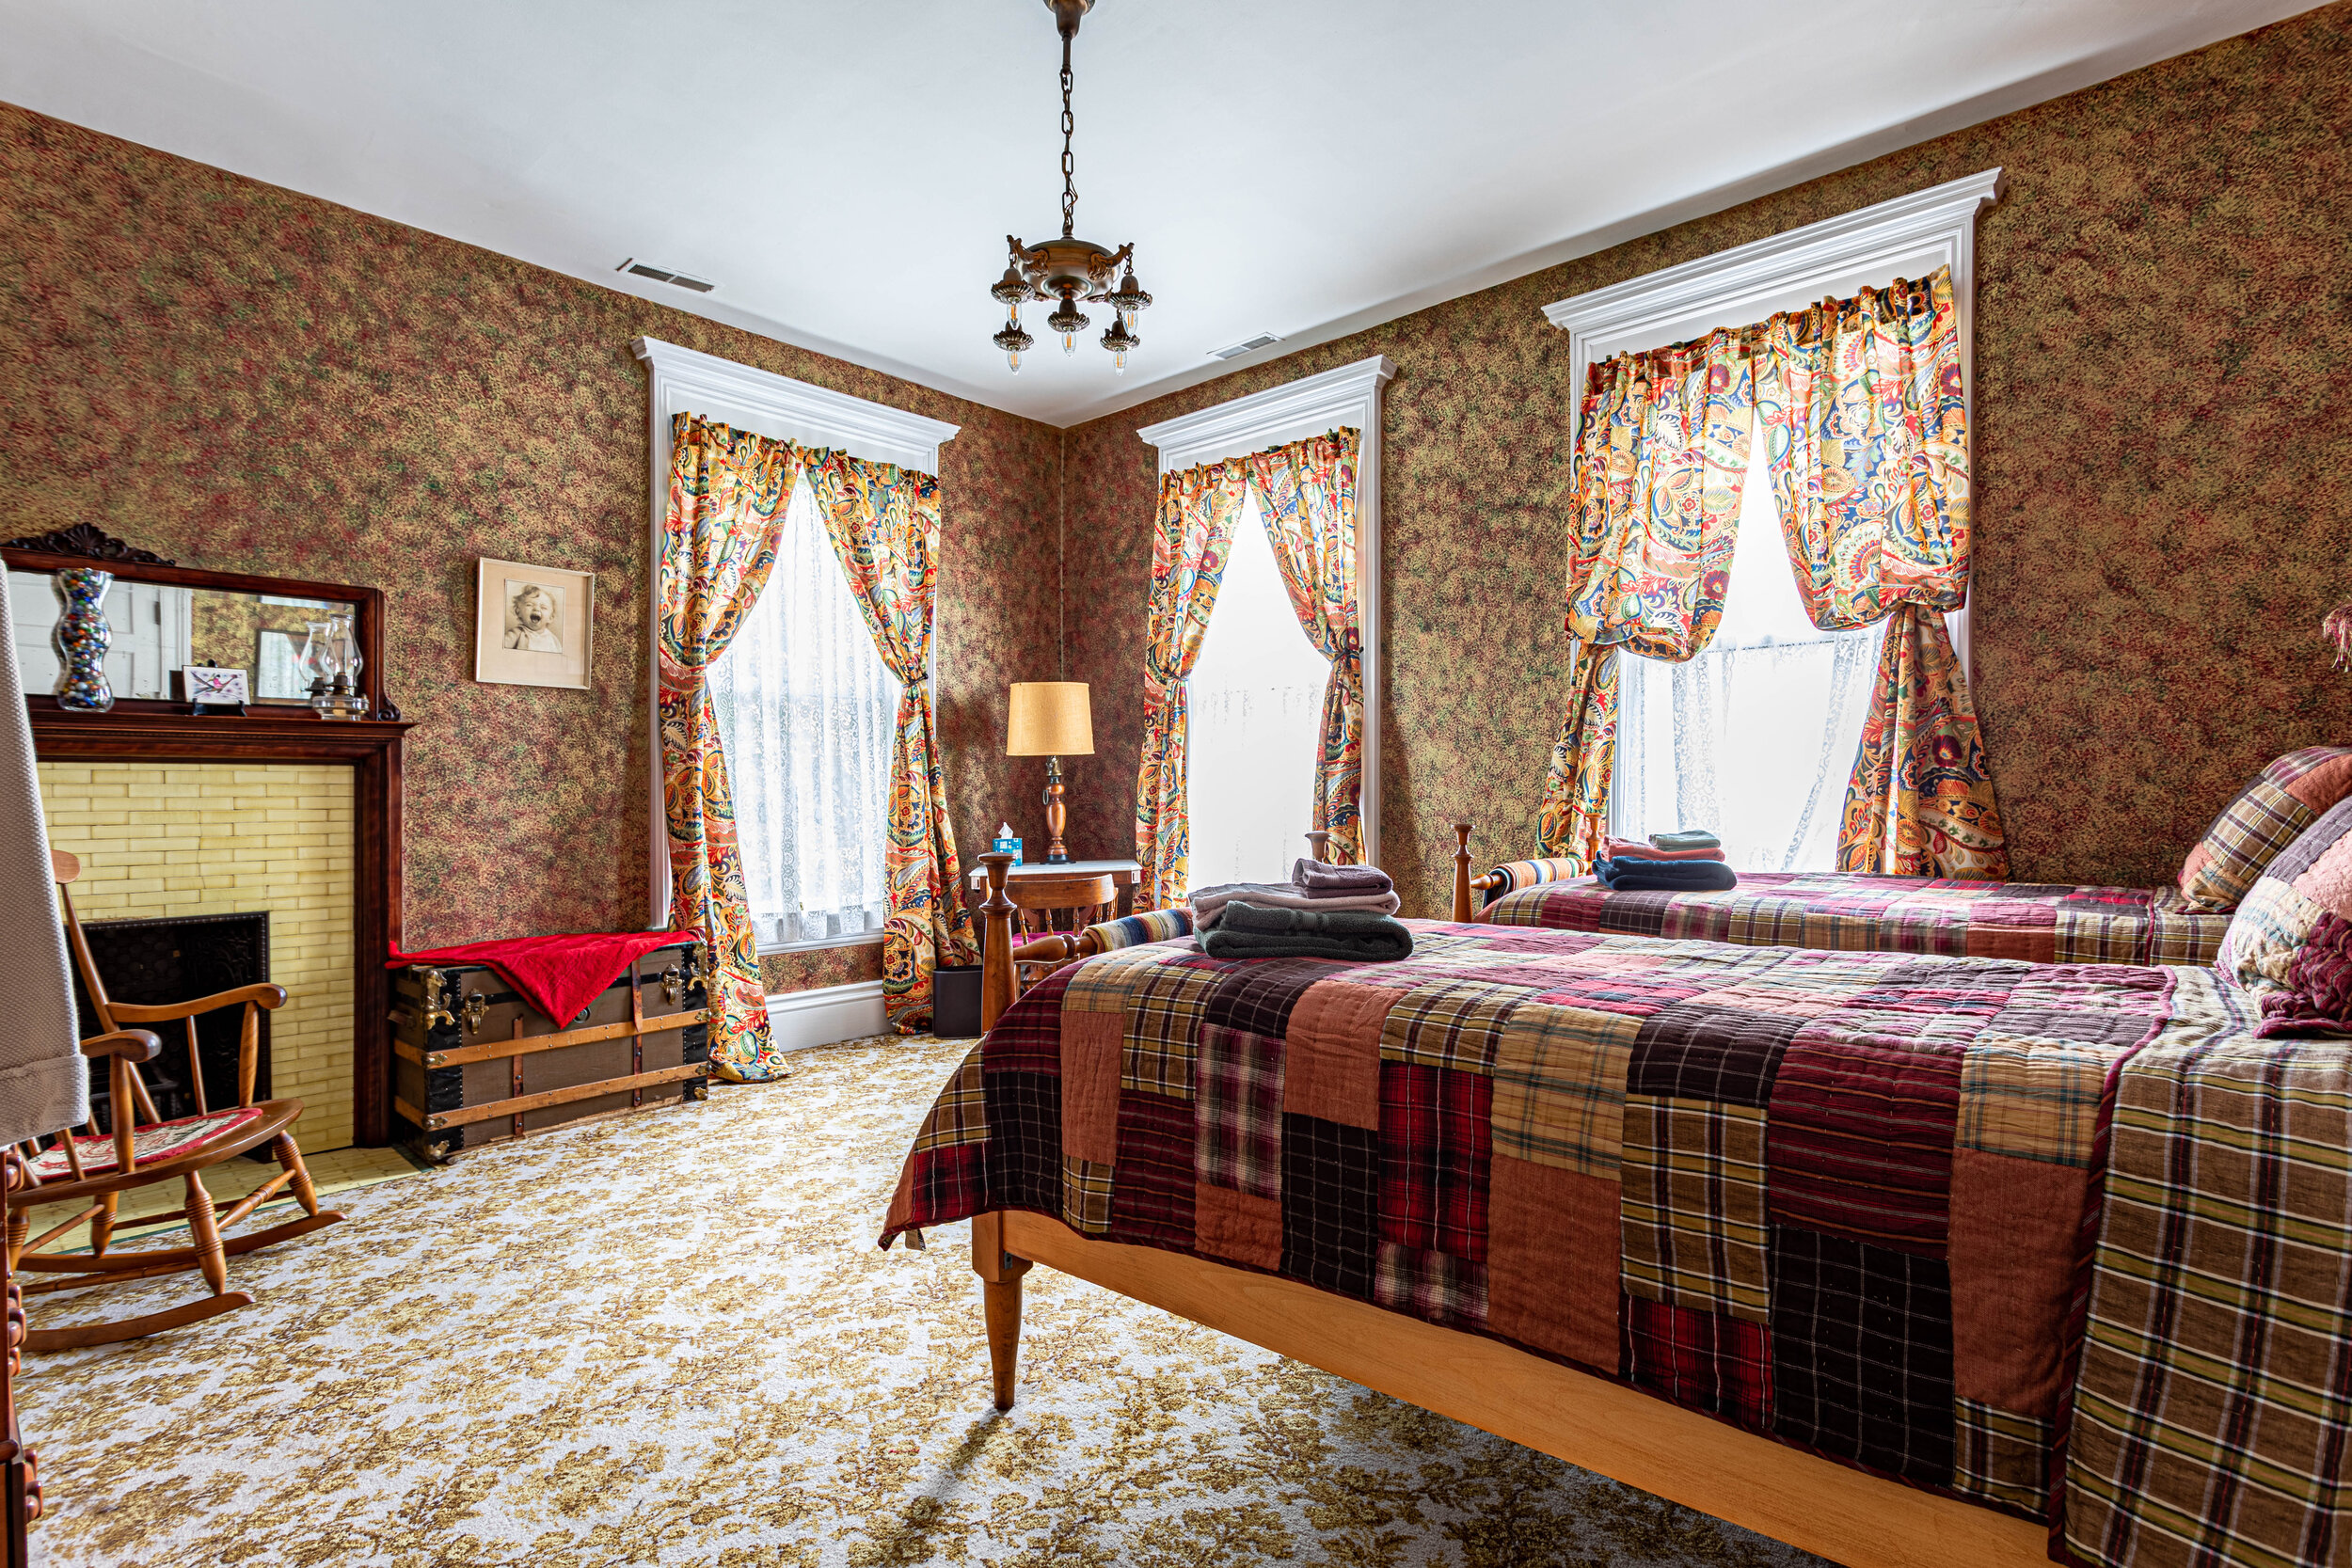
Option number 2 is what has been donned The Circus Room due to the red, yellow, and green striped wallpaper that was hung before Jonathan got his hands on it. In here you have two twin beds and a fireplace (and no more circus wallpaper!).

Bedroom number 3, The Gilded Room, might be my favorite with its intricately stenciled metallic walls. Jonathan explained his multi-step paint application process to me (involving 5 layers of paint!) and man, it was a labor of love at an estimated 60 hours of work.
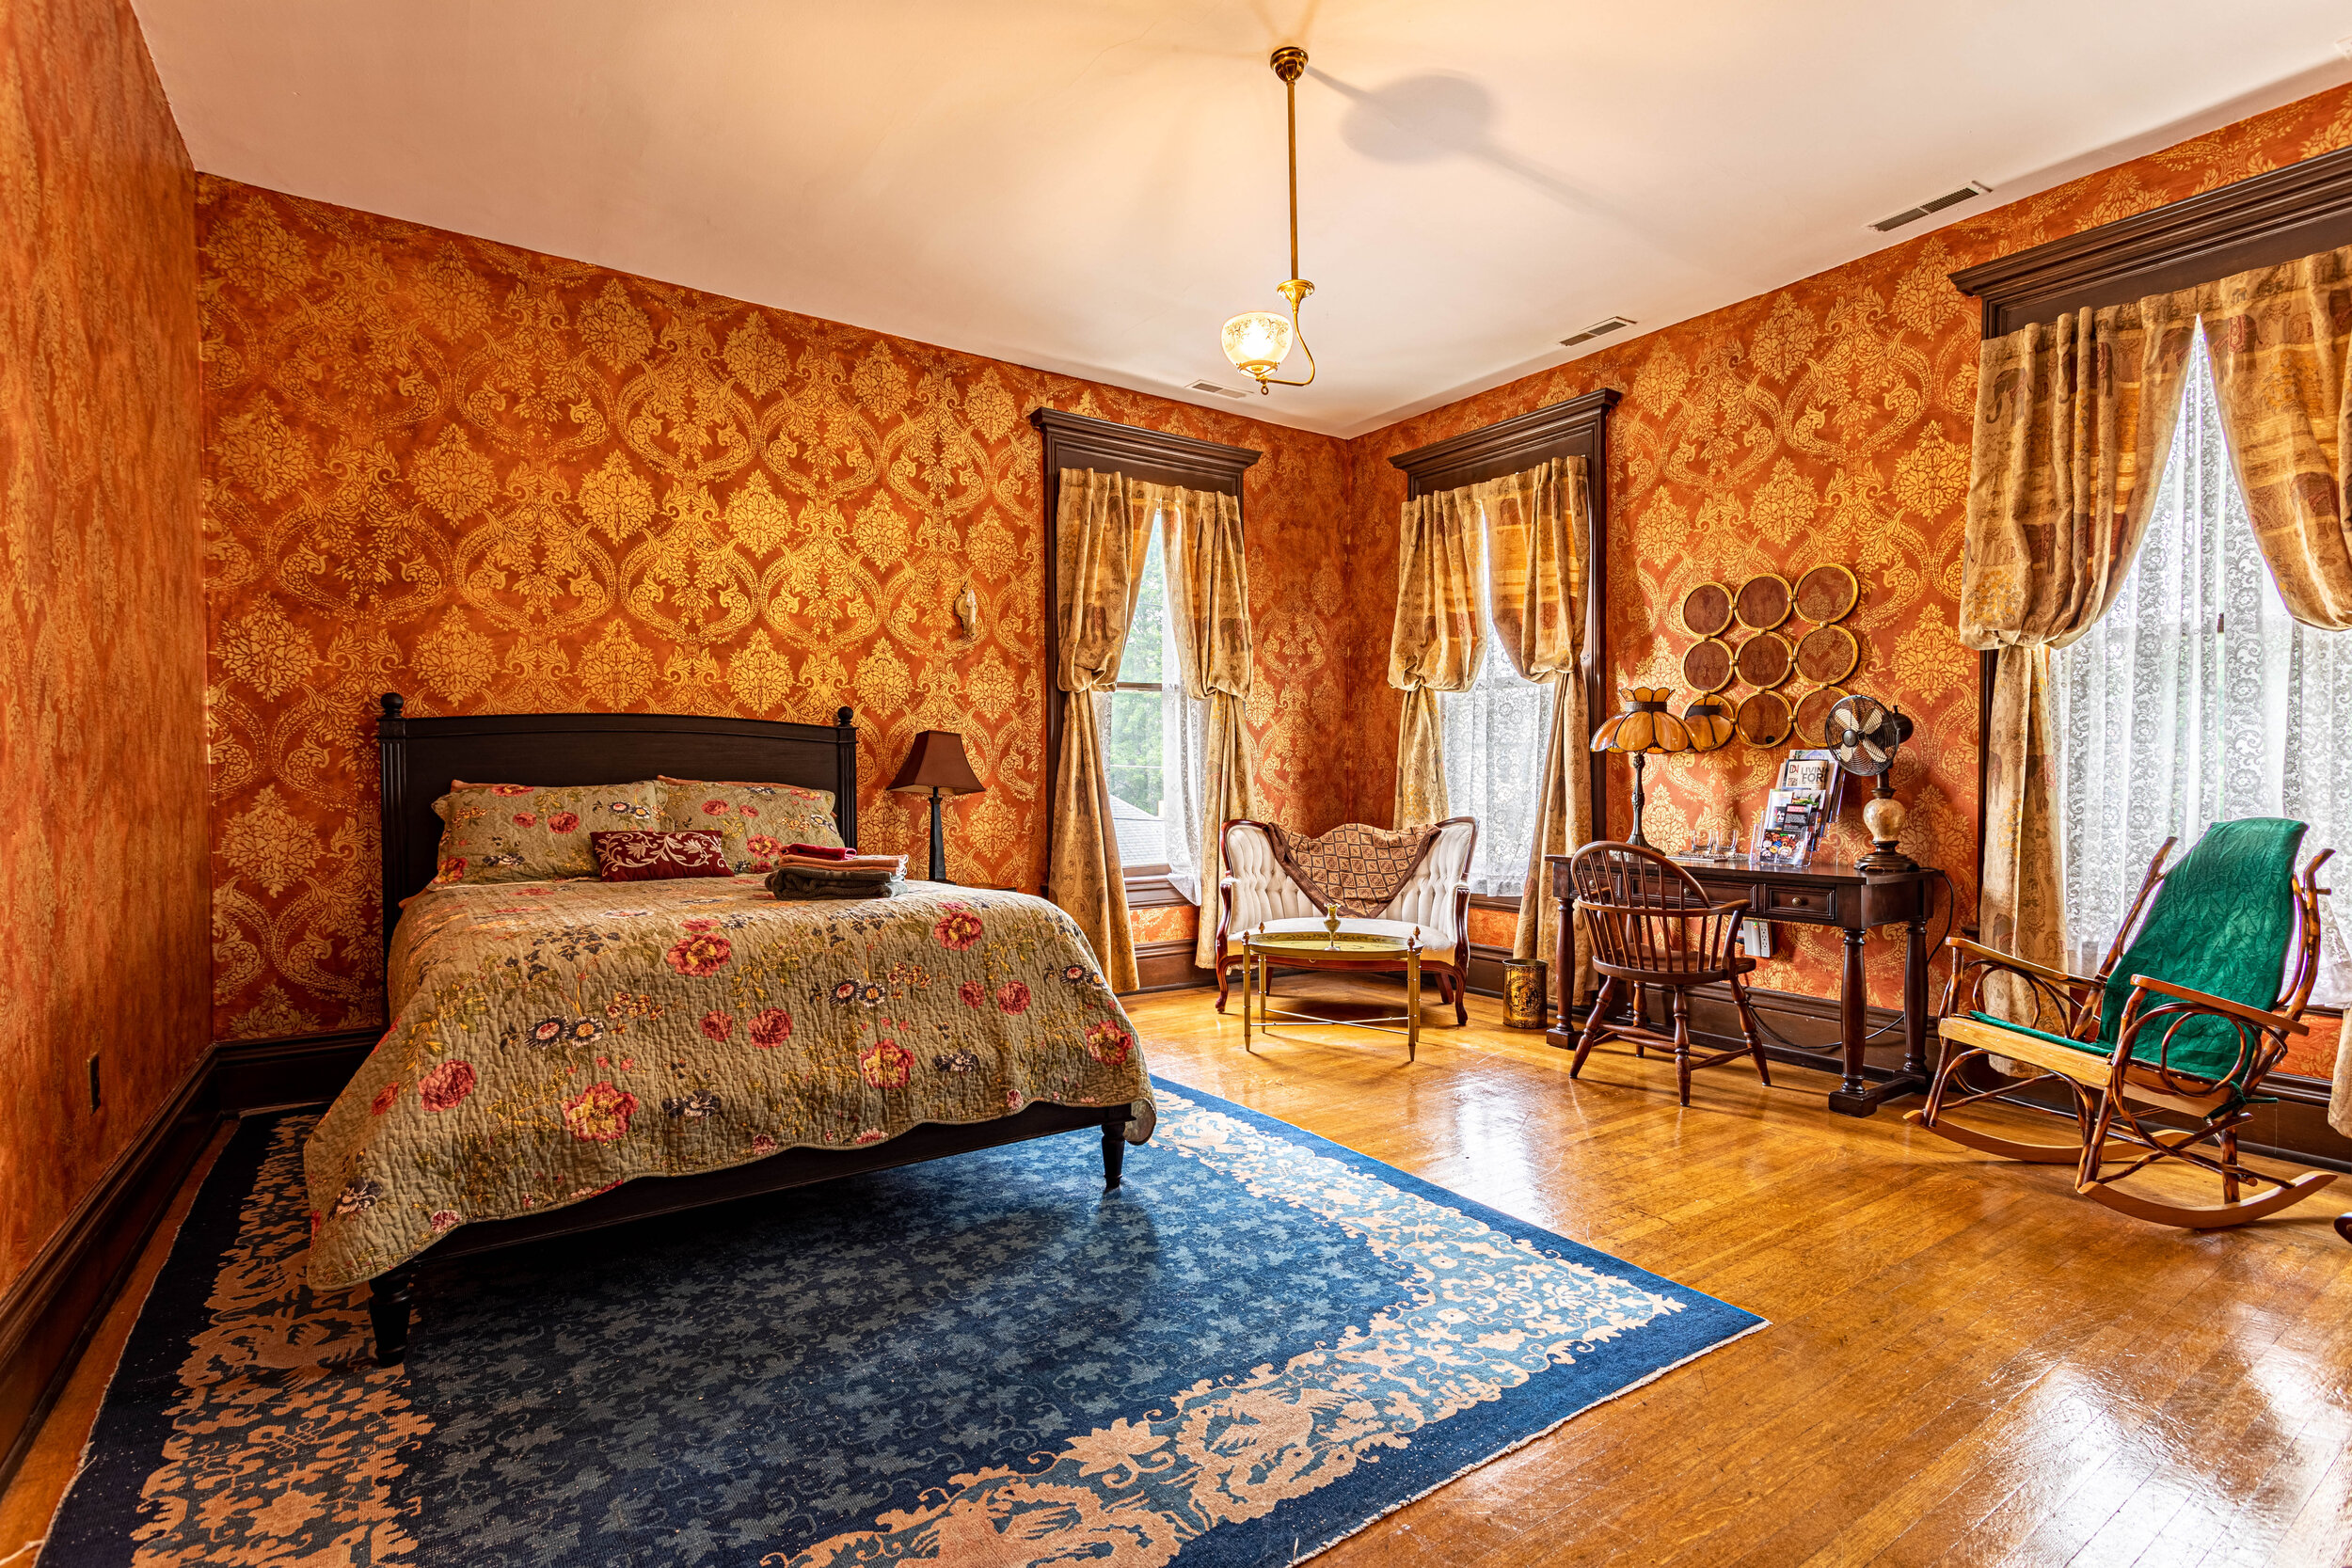

And lastly, you have The Purple Room, one of the more Victorian-inspired bedrooms including, you guessed it, another fireplace!

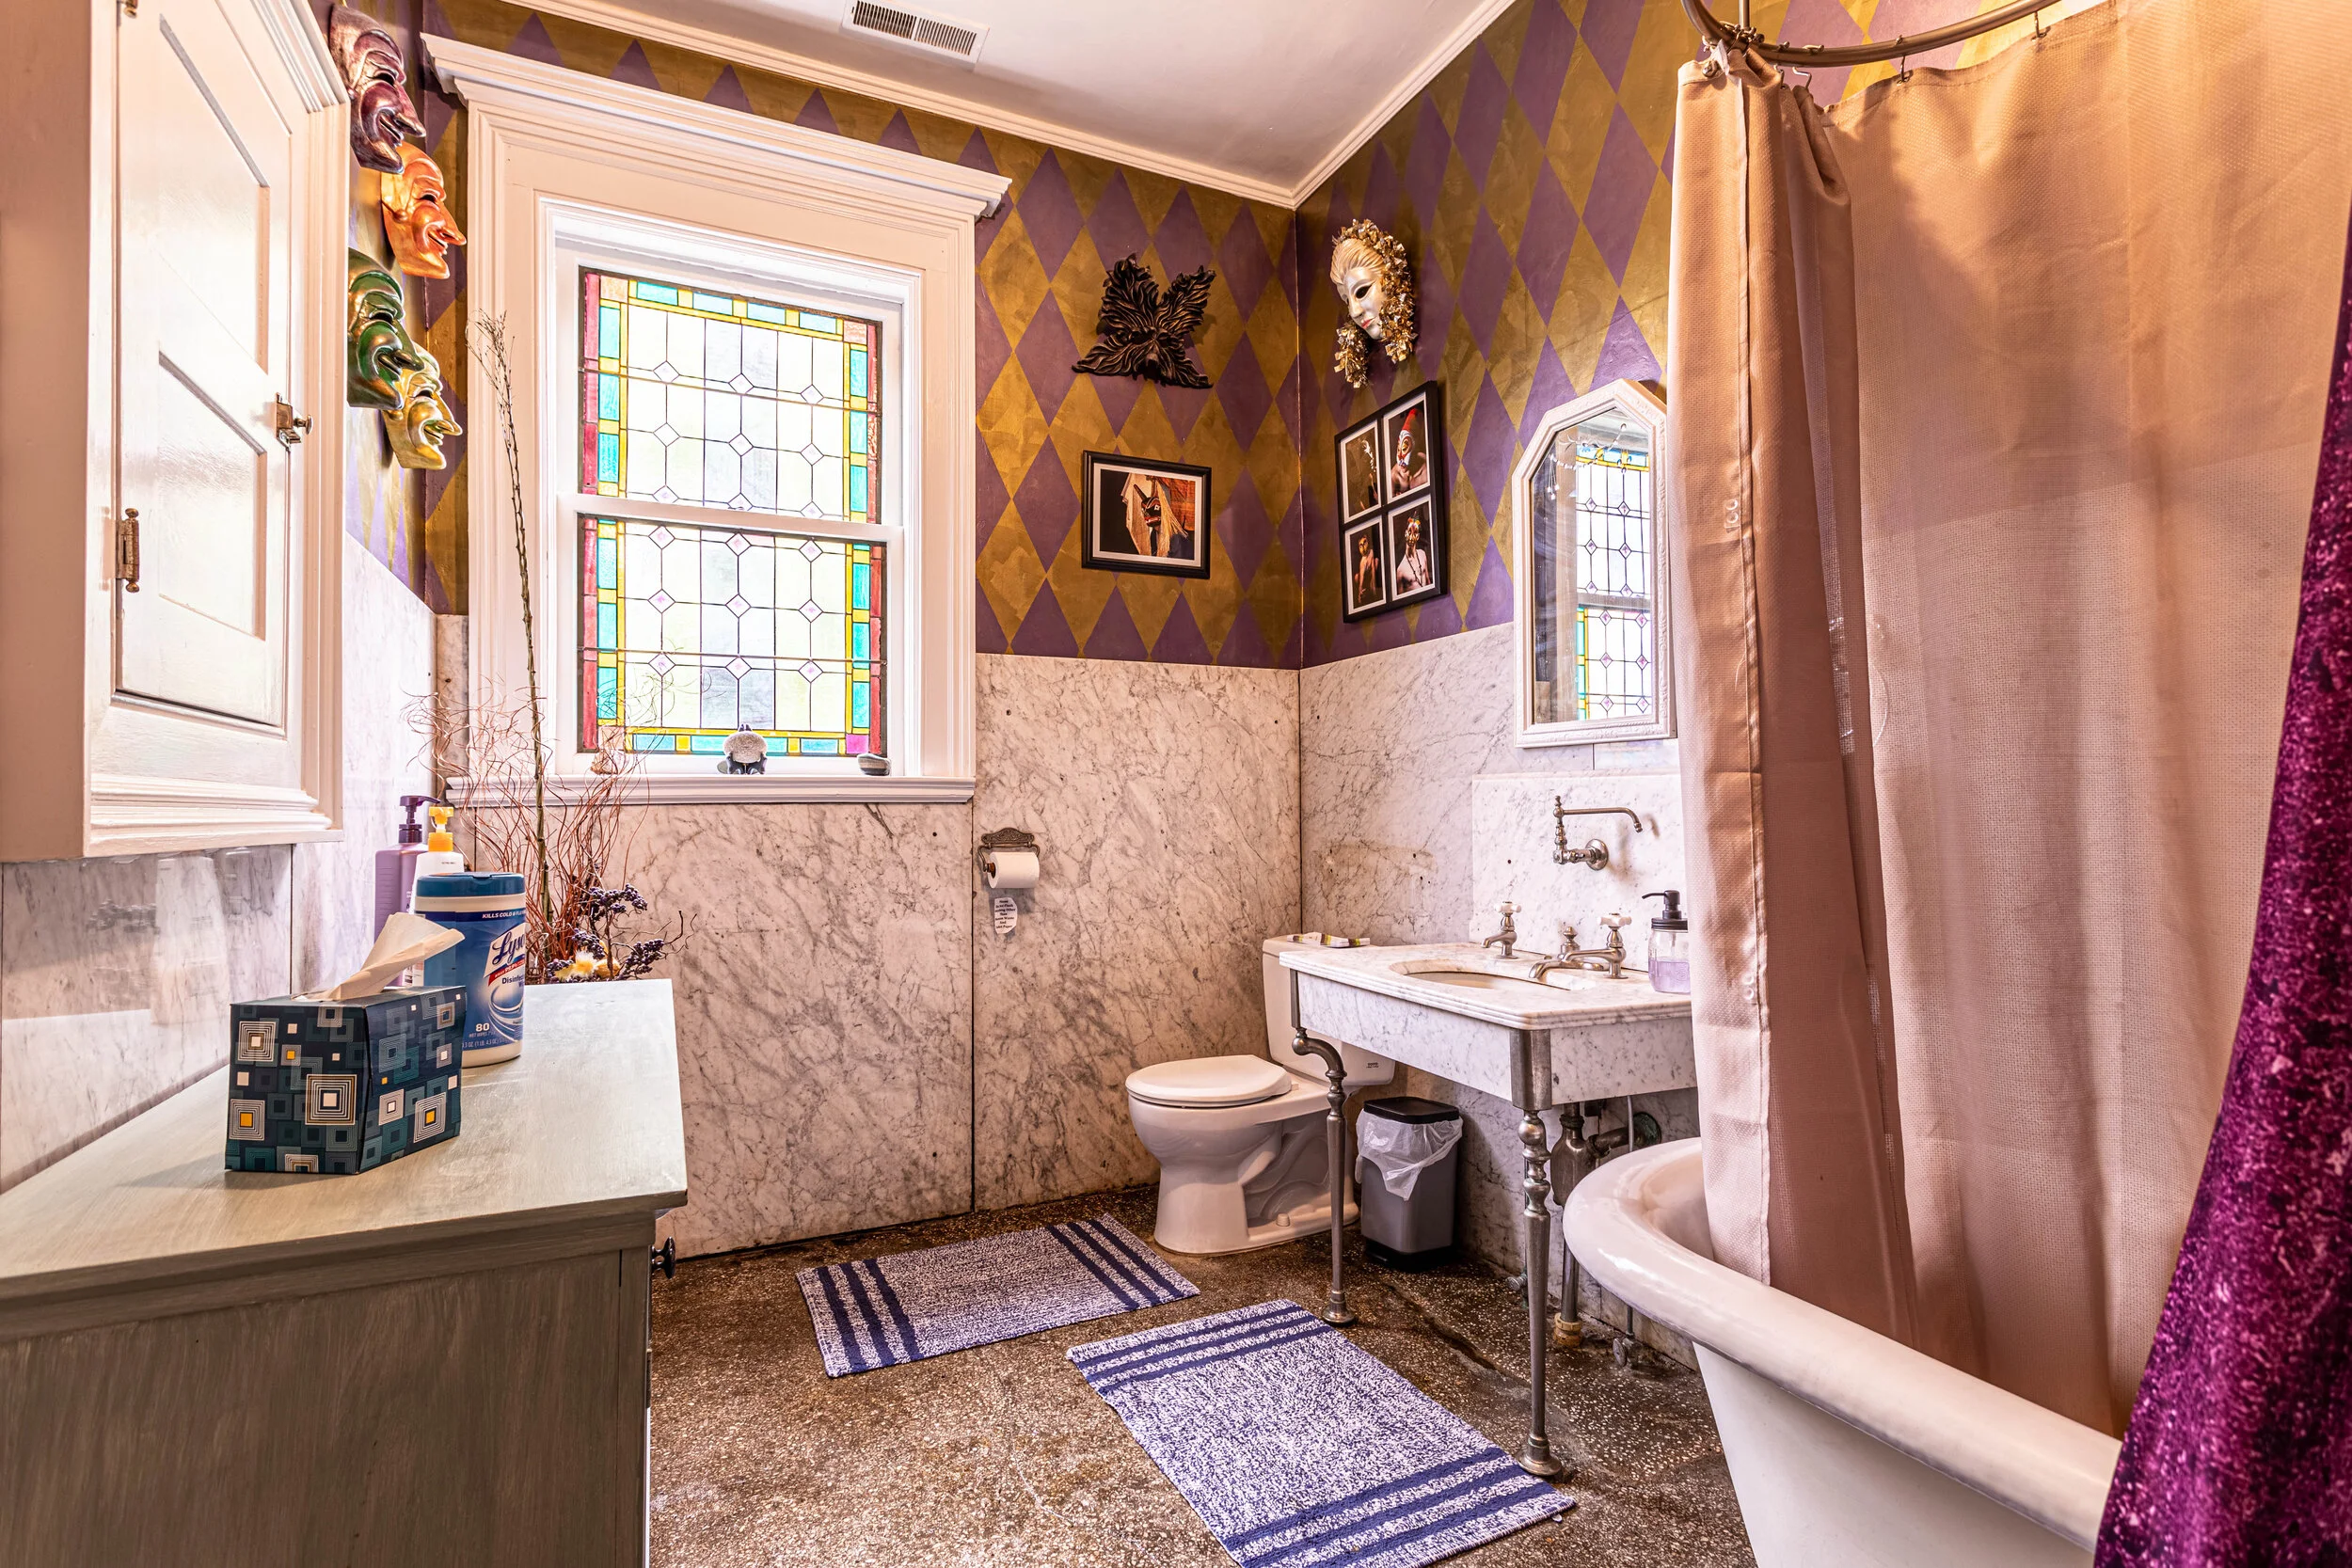
The Bathrooms
There are two full baths on the second floor (and one half bath on the first floor), that of course aren’t lacking in charm and detail.
Both bathrooms are spacious and feature beautiful stained glass windows. At the time of day I was able to visit, the sun was hitting this window just right to light the whole room in a surreal yellow glow.

And of course, in a house from this era, you HAVE to have a clawfoot tub. Also, check out the legs on that vanity!

The Third Floor
And for the grand finale, we’ll mosey up yet another set of stairs to the third floor, which is currently used as Jonathan’s workshop. However, in its heyday, it was used as a ballroom - and you’ll see why.

WOW! What a whirlwind of a house - I hope you enjoyed it as much as I did. What was your favorite part? The woodwork? The stained glass? The whole dang house!?
And don’t forget - until it’s sold you can stay here on your next trip! In case you didn’t catch the AirBnB links above, here they are: The Rose Room, The Circus Room, The Gilded Room, The Purple Room. And here’s the link to the listing.

Related Home Tour Posts:
1901 Victorian Mansion Home Tour
We bought another house...
You’re probably thinking, “But didn’t you just move into your house?” Well, yes, but this new house isn’t one we’ll be living in. We bought a flip!
You’re probably thinking, “But didn’t you just move into your house?” Well, yes, but this new house isn’t one we’ll be living in. We bought a flip!

We’ve been a part of a few flips in the past, but this is the first time we’ve taken the leap to be the primary owner. Flipping houses is something we’ve dreamed about for years, so it was only a matter of time before we pulled the trigger.
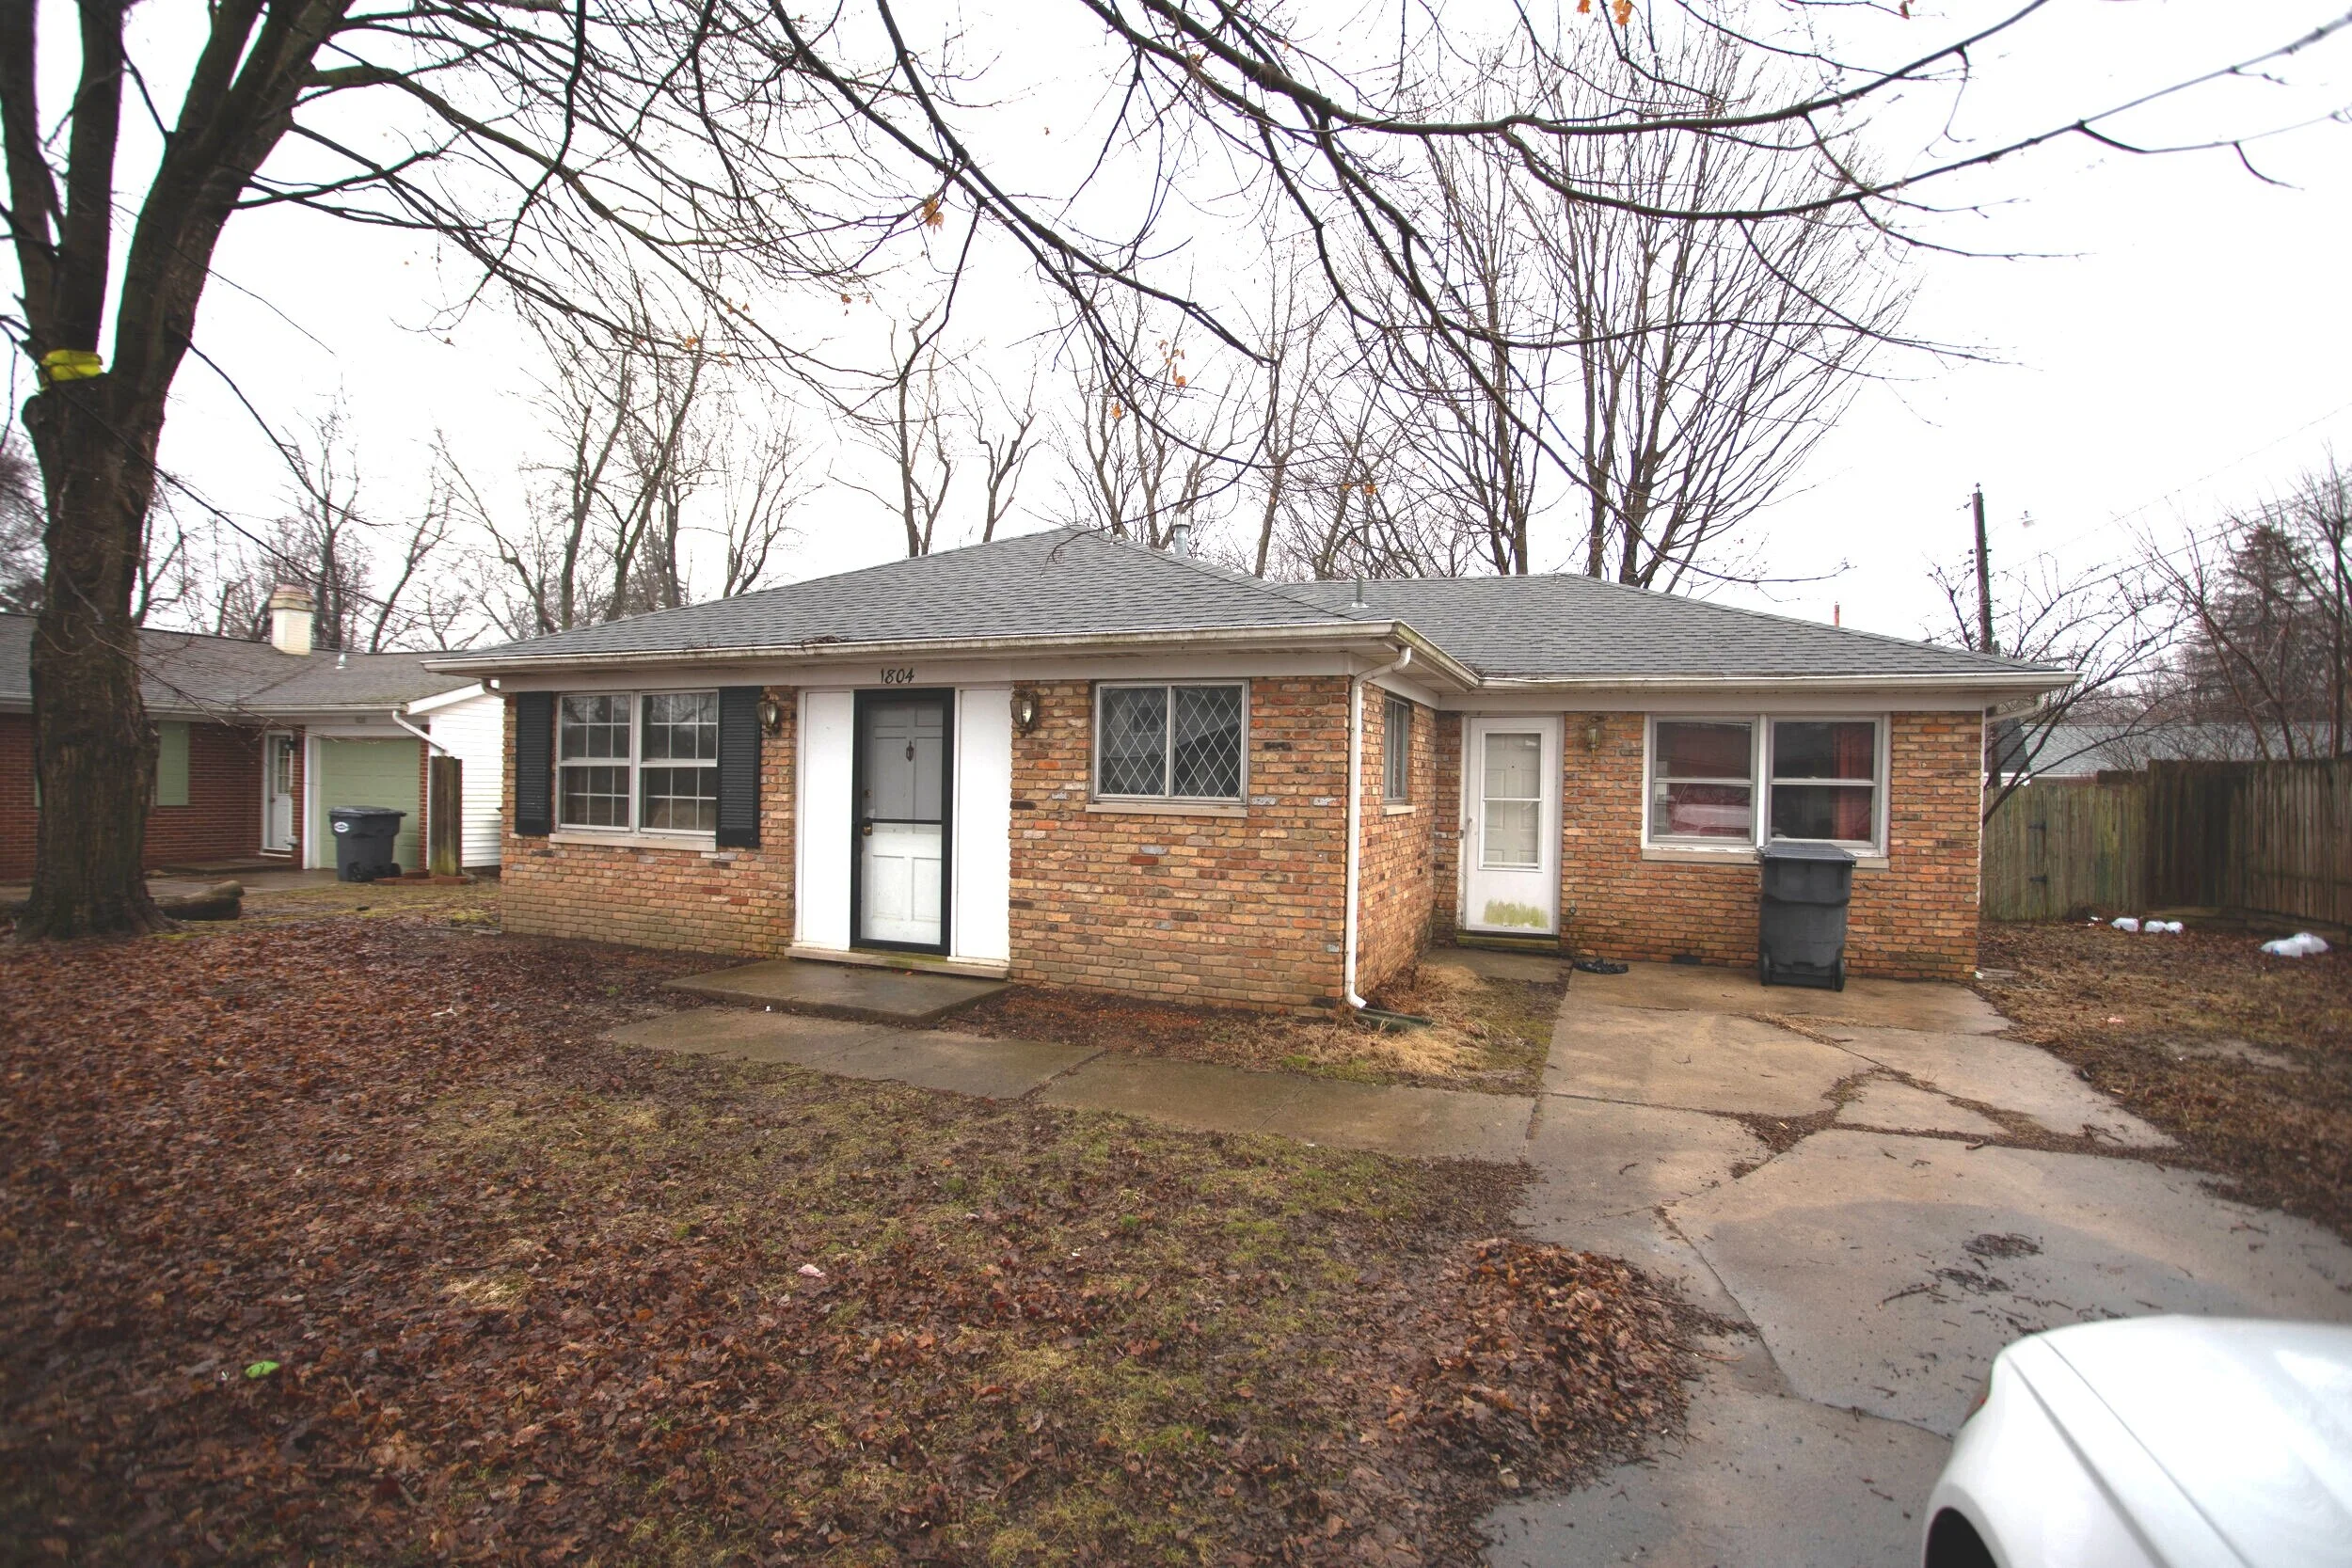
The flip house is a cute (beauty is in the eye of the beholder here) little 3-bedroom one-bath starter home in a great location. It’s not much to look at right now (and definitely something you don’t want to smell), but boy do we have plans.
Let’s start with the exterior. We closed a couple of weeks ago and obviously the weather isn’t the greatest this time of year, so everything is looking pretty sad right now. First off, the whole exterior and driveway/walkway need power washed. (I love power washing, so sign me up!) And the yard needs some basic maintenance.
Now picture this house looking something along the lines of these beauties:


I love brick, but not all brick is created equal. The brick on this house isn’t anything special, and I think the house would look amazing if it were painted white. We still have to figure out if painting the brick is in the budget, but man oh man do I hope it is because I think it would look INCREDIBLE. I also plan to paint the front door a bright color and add a fun and unique knocker. Below is some of my current inspiration.


Obviously I haven’t narrowed down the color of the door yet.
Adding a little bit of landscaping out front will also help brighten it up and increase the curb appeal. I’m thinking that some boxwood bushes would be perfect. If you aren’t sure what boxwoods are, let me tell you that they’re amazing. From someone who doesn’t have the greenest thumb, these bushes are easy to maintain and look great! I’m sure you’ve seen them before but probably didn’t even realize it. Here’s an example of what they look like:

Look familiar? I thought so…
Now, on to the interior!
At this point, we’ve already completed most of the demo, but here are a few pictures of what we started with.

Living room. Free couch! woo! (Just kidding)

Dining Room on the left/Kitchen on the Right

Kitchen

Bathroom

Bedroom

Bedroom

Bonus Room

Opposite end of the bonus room
And below is what it looks like all cleared out. You can take the virtual tour if you want to walk through the place yourself. Just use your cursor to navigate by clicking on the little circles on the floor. I’ve also taken some snapshots to help explain some of the ideas swirling around in my head - there’s a lot going on up there.
To get us started, picture the whole house in shades of a blue/green/gray color with rich medium tone laminate flooring and crisp white trim.

Living Room
In the picture above, before we demoed it there used to be a wall right where I’m standing. There was a doorway between the dining and living rooms and a coat closet a few feet in front of the front door.
In the picture below, if you look at the ceiling you can see where we knocked out the wall separating the dining room and kitchen from the living room. You can also see the giant hole in the ceiling where the coat closet used to be. To save you from scrolling, I posted one of the pictures from before we took out the wall from a similar angle below.

Living Room on the left/Kitchen on the right

This house is pretty tiny, so taking out that wall felt like a good decision to really open the space up and make it feel bigger and create some good sight lines across the living areas.

Kitchen on the left/Dining Room on the right
Now that the wall is gone, you can see from the living room into the dining room and kitchen. Open concept for the win!

Kitchen
Doing the demo work and clearing out a flip to make a blank slate is pretty exciting in itself, but unless you’re staging, the transformation of a lot of the rooms is pretty limited to paint and flooring. I know, I know. On HGTV everything is so glamorous and there’s a huge reveal with tons of special details throughout the house. That’s simply not real life. Now the kitchen is where you get to put in a little of that HGTV flair and make things more exciting.
The previous kitchen left a lot to be desired. The layout wasn’t functional, there was very little counter space, and it was pretty dark. Now that the wall is gone, we’re able to reconfigure the space to provide more storage, counter space, better flow, and let in some light! Lucius put together a little mockup of the kitchen layout to get a sense of how the space will feel once it’s put back together.

Obviously the wall on the left-hand side won’t be there and there is a doorway on the right-hand side to get to the bonus room, laundry room, and side door. We’re thinking of putting some open shelving above the sink area and adding a tile backsplash. The doors on the cabinets in the island will be facing the other direction so the side of the island that you see now will actually be flat.
I’m picturing white shaker cabinets and maybe a lighter countertop with stainless steel appliances, natural wood (or maybe white) for the open shelving, and some clean and simple subway tile for the backsplash. The picture below is a good example of what I’m imagining, though maybe a little higher end than what we are willing to put in a flip. It’s all about balance, guys!

Below is the bathroom. It’s in pretty rough shape so we’re gutting it and starting over. It’s tiny, so we plan to put a medicine cabinet back in and I’m searching for a vanity with as much storage as possible. To add a little surprise I would love to tile the floor with something fun and unexpected, but we’ll see how everything pans out.

Aside from ripping up the carpet, the bedrooms look more or less the same as the pictures above, so I haven’t included pictures. The bonus room hasn’t undergone any huge renovations yet either, though we did replace the failing french doors with a sliding glass door and already it’s getting a ton more light!

So as you can see, things are moving right along (and pretty quickly!) with the flip. I’ll be sure to keep posting as we continue to renovate and beautify this cute little house!