

House Tour!
If you’ve been following along, you’ve seen bits and pieces of the house as we’ve been making updates and writing individual posts. But today I’m going to show you the whole house, top to bottom, so you can get a feel for the flow and all the spaces we plan on updating. I’ve included TONS of pictures, and even took a (possibly motion sickness-inducing) video.
If you’ve been following along, you’ve seen bits and pieces of the house as we’ve been making updates and writing individual posts. But today I’m going to show you the whole house, top to bottom, so you can get a feel for the flow and all the spaces we plan on updating. I’ve included TONS of pictures, and even took a (possibly motion sickness-inducing) video, which you can watch here:
One note, I went the wrong way out of the foyer so the room by room walkthrough doesn’t quite match up with the pictures below, but I think you’ll be able to keep up.
The Exterior

I don’t have many pictures of the exterior of our house to show just yet. We moved in at the end of October and the weather quickly turned gross and cold. The picture above is from last summer when the house was listed for sale. I love all the green (look at all those huge trees!) and can’t wait to see how the backyard looks when everything is alive again. I’ll be sure to take pictures then.
RELATED: I have now posted a tour of the exterior of our house, which can be found HERE.
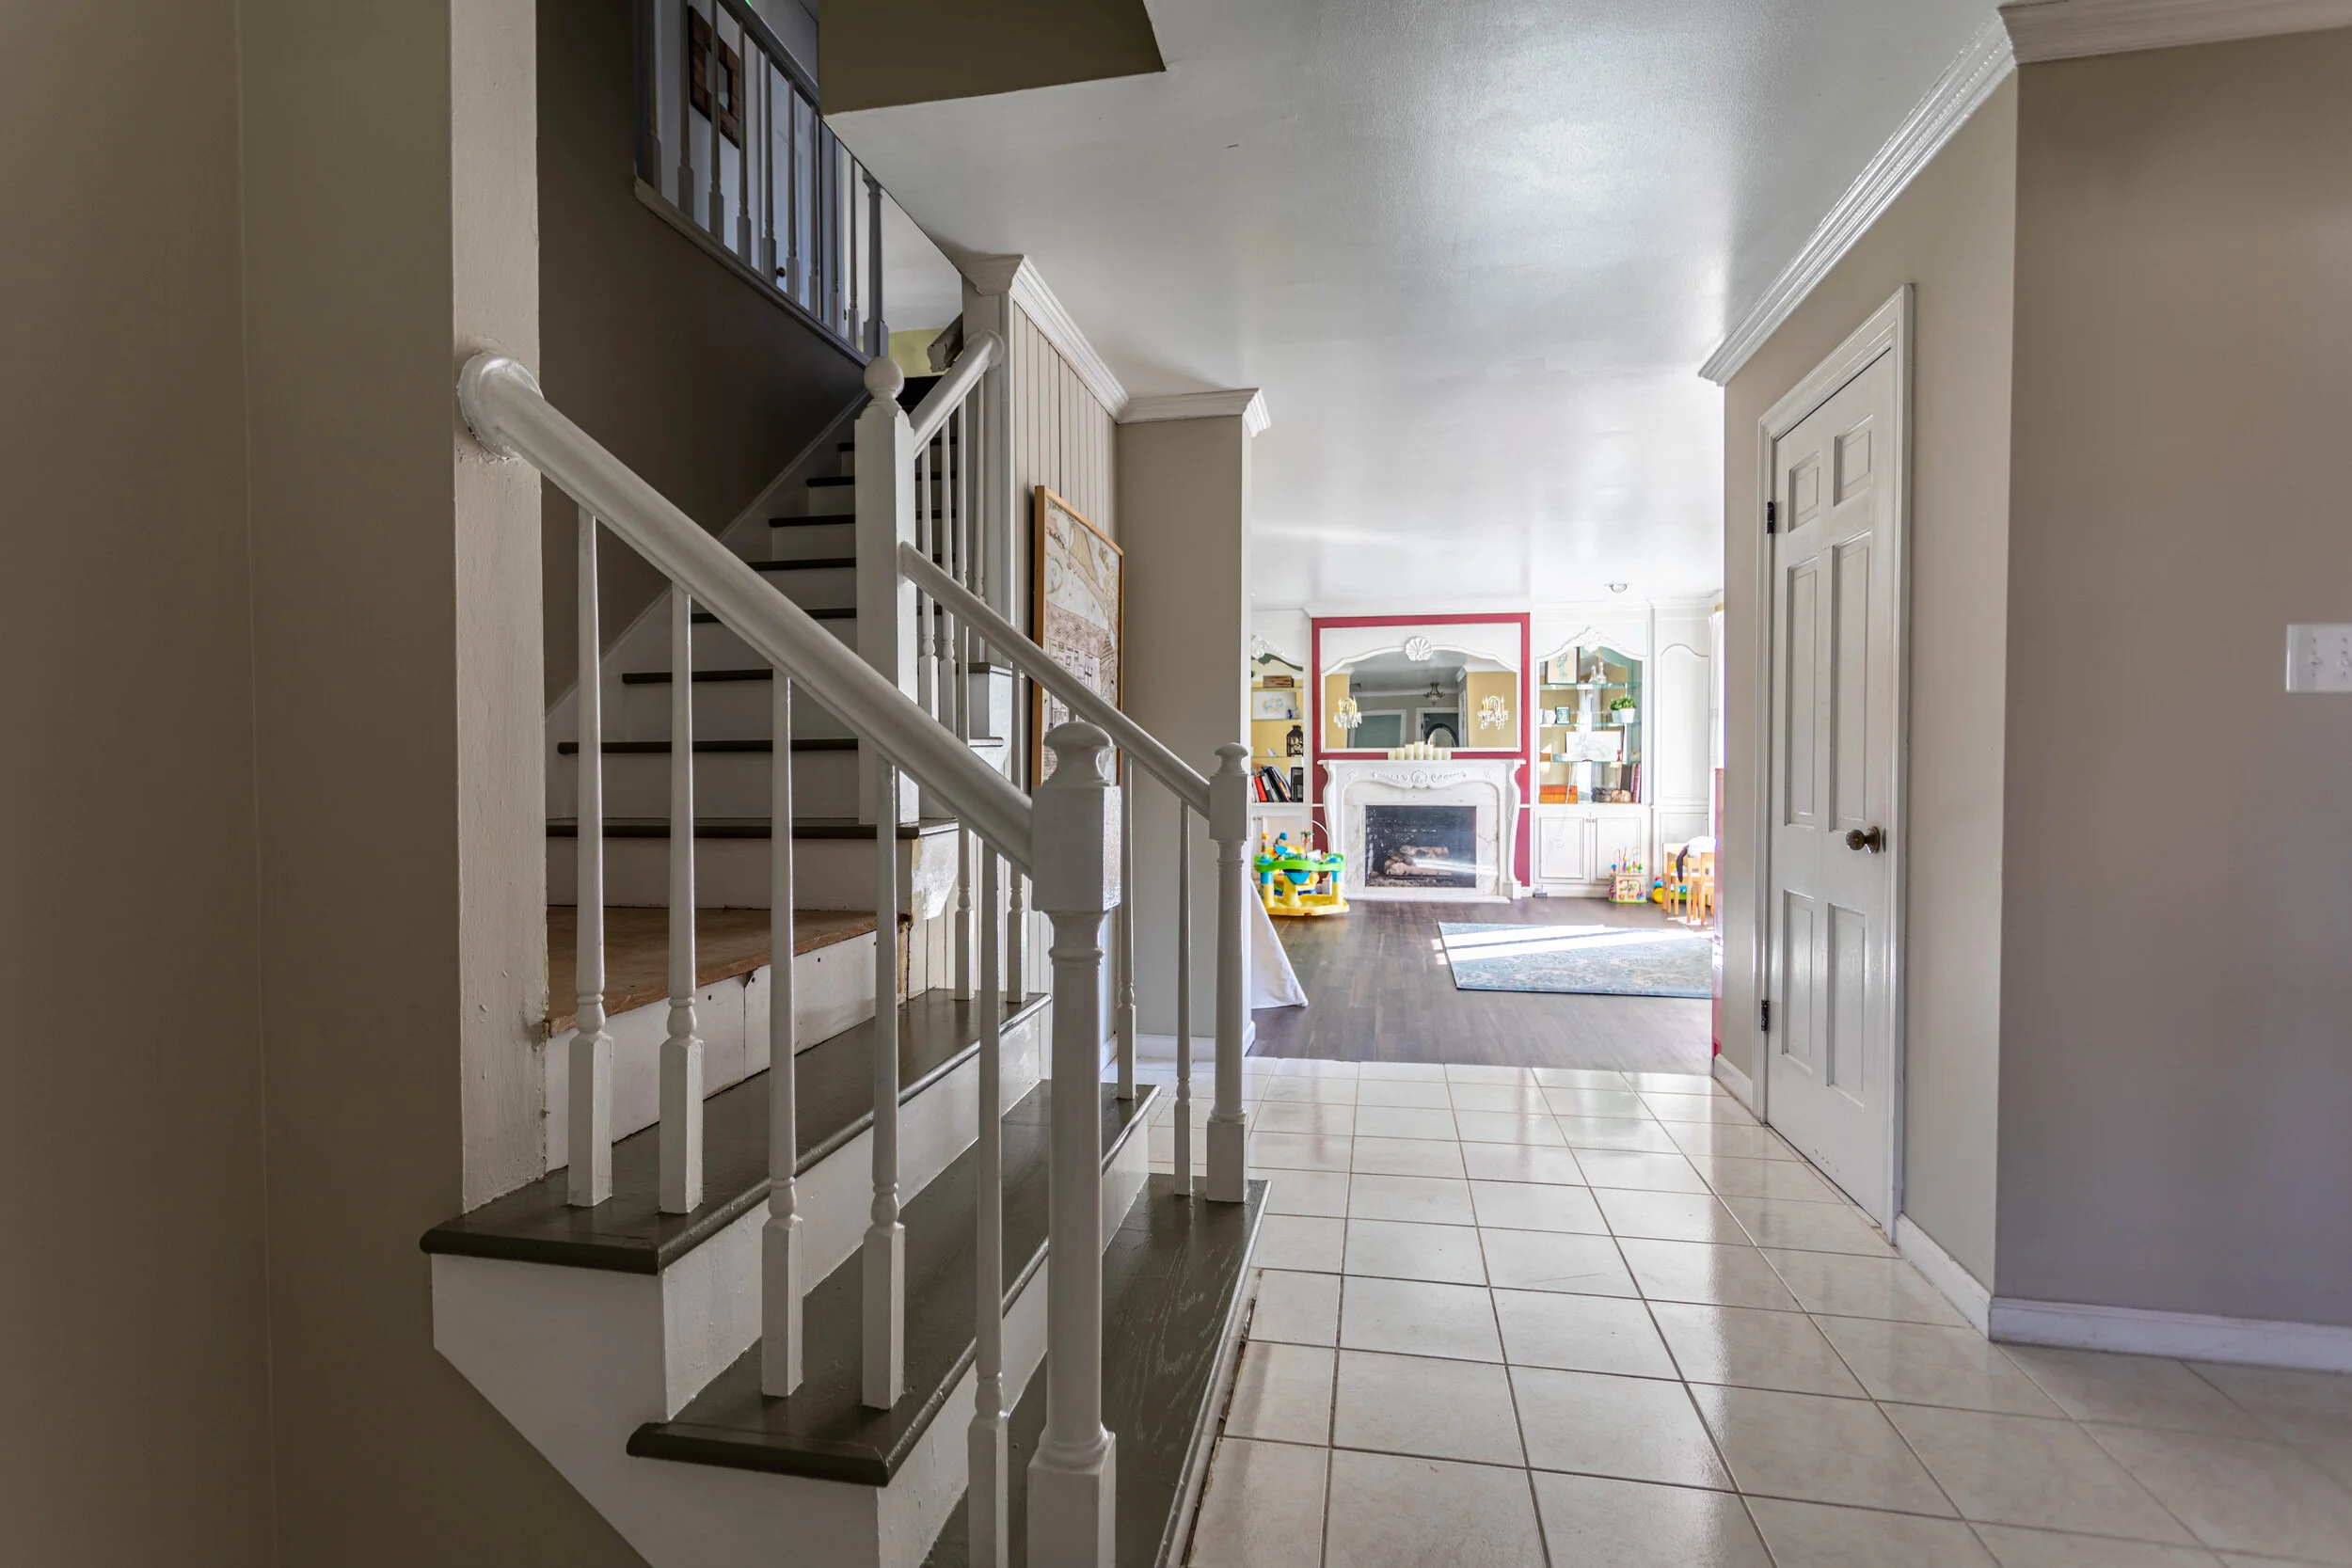
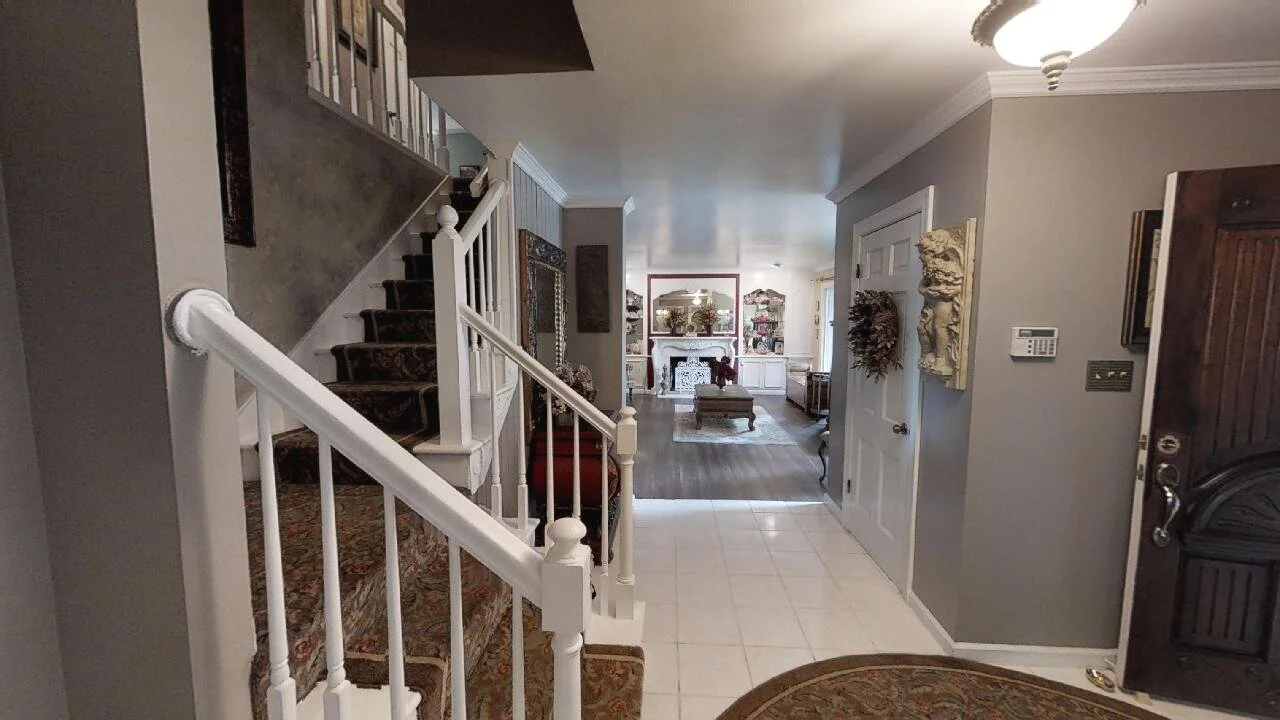
The Foyer

In the picture above, the front door is blocked by the closet on the left-hand side of the frame. The door is solid, with no windows, though there is a tall window next to it.
The door frame to the left of center is the half bath, and the door frame right of center goes to the living room.
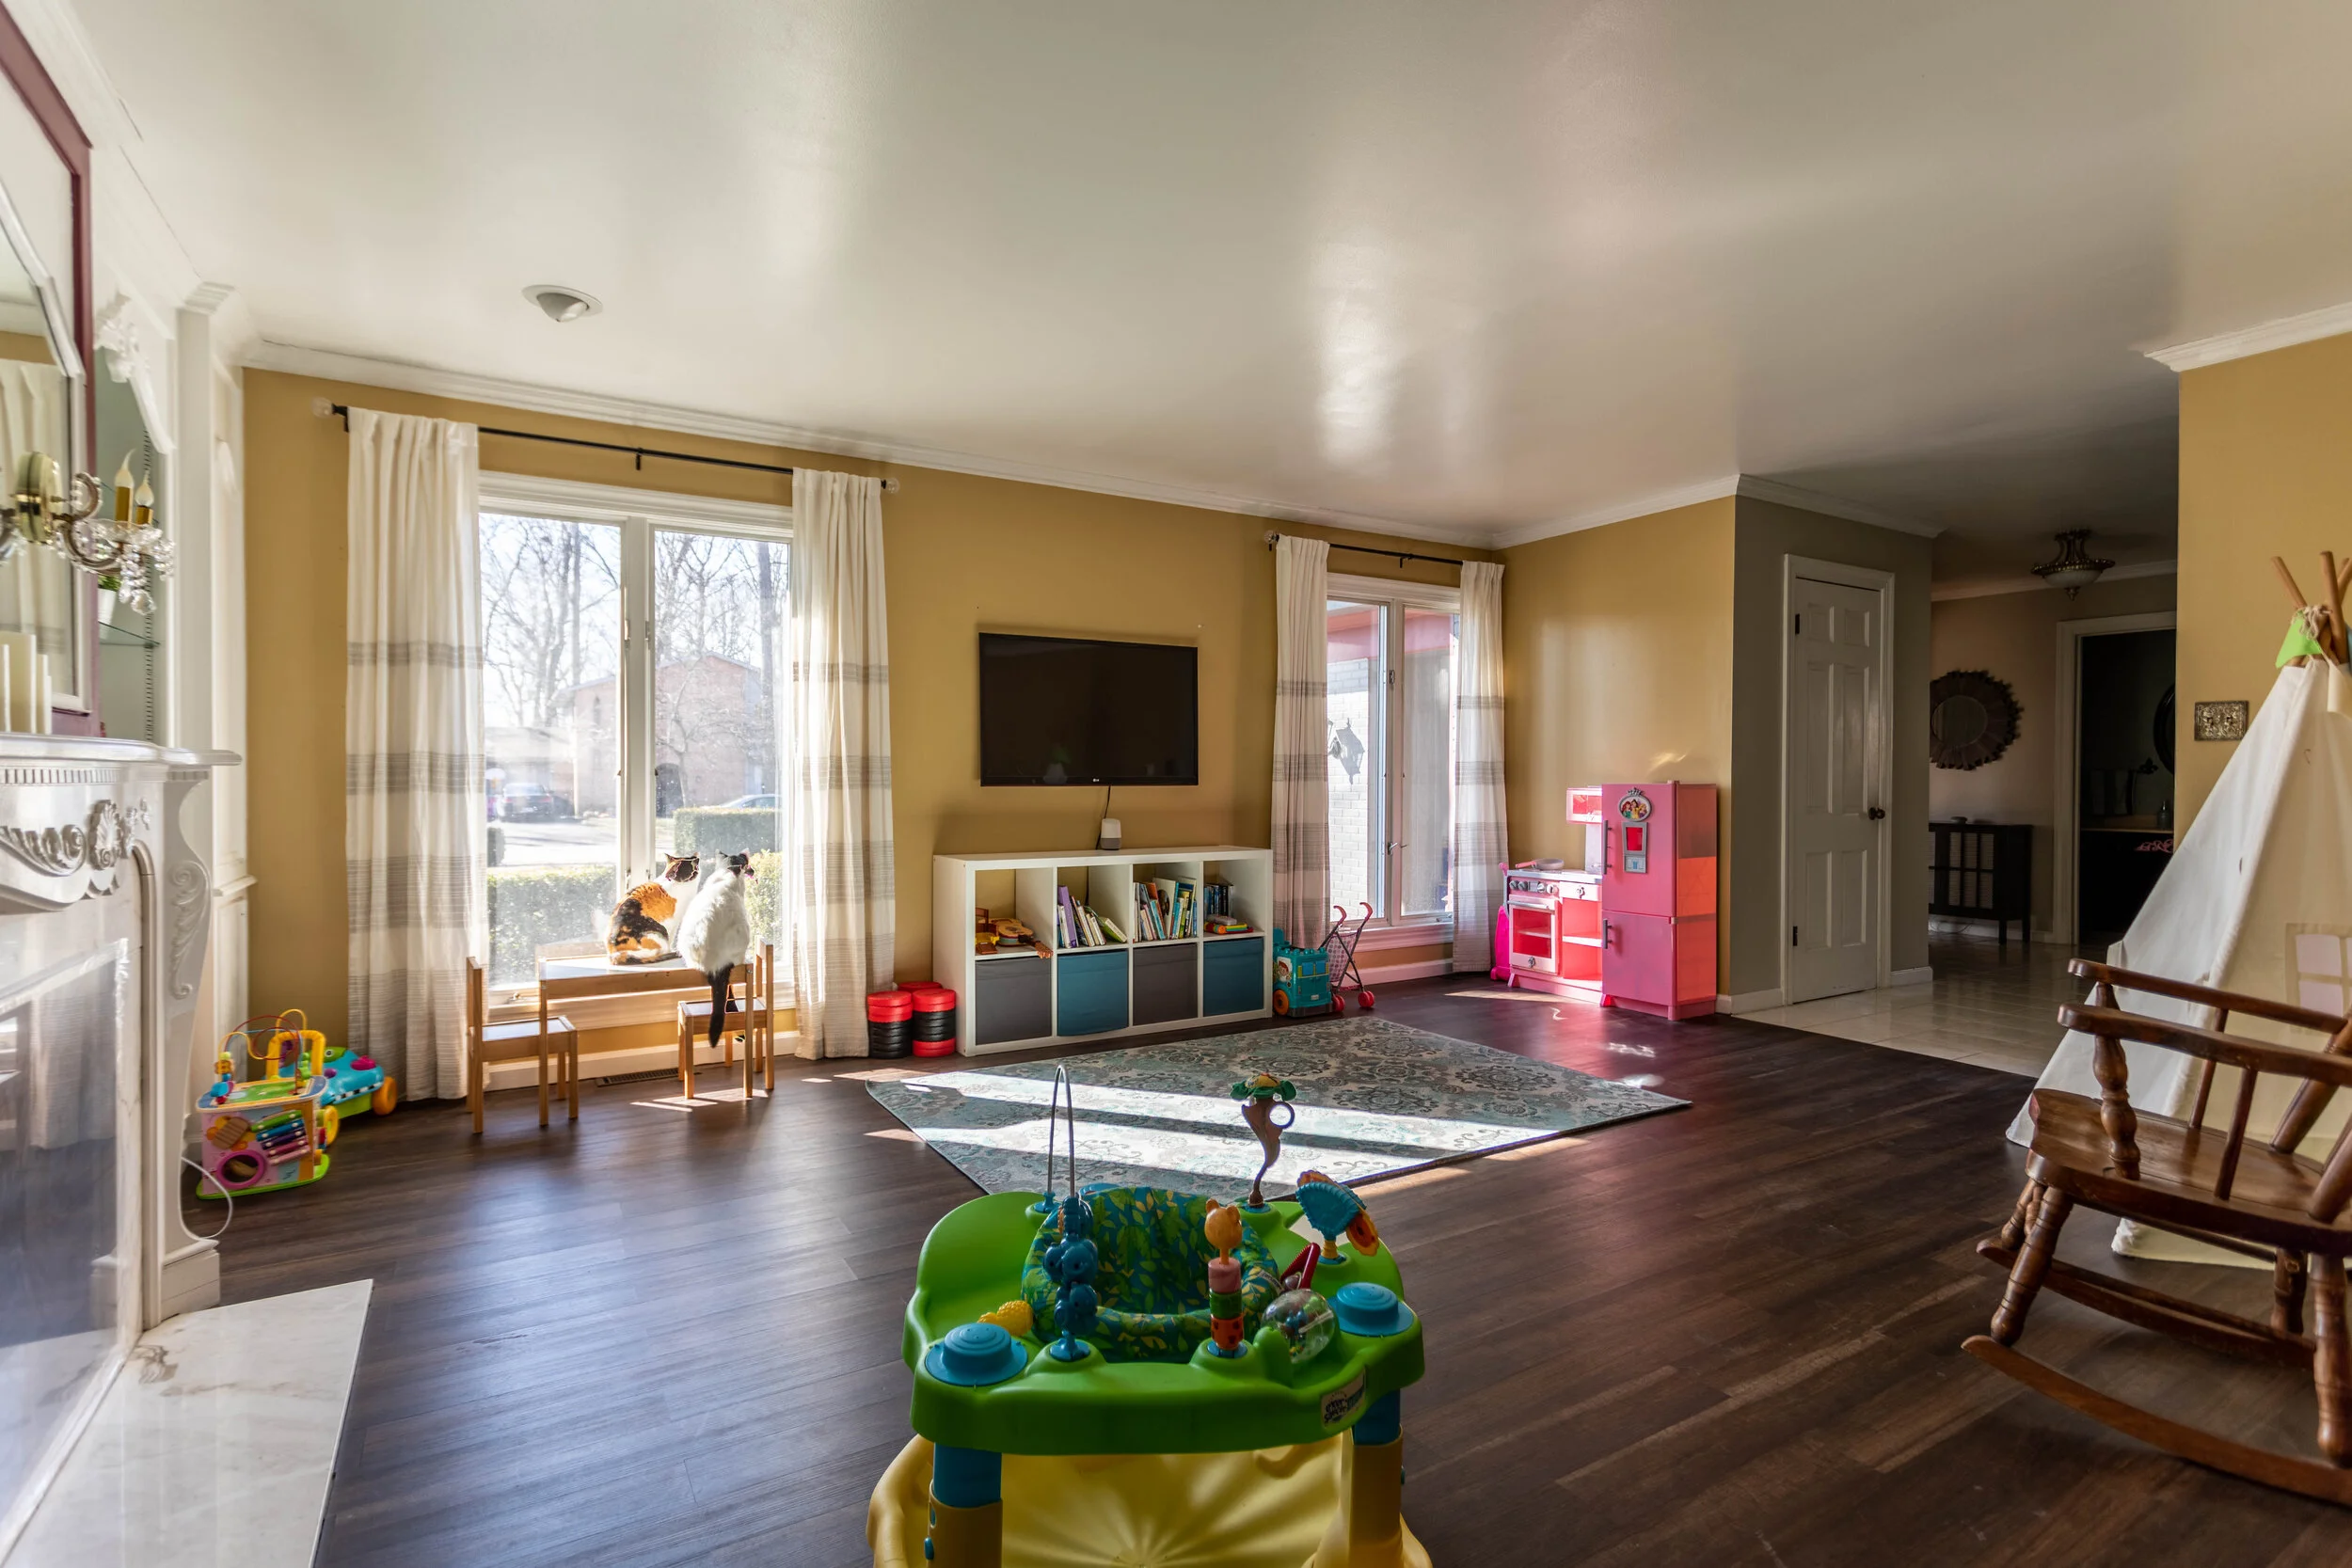
The picture below is the other side of the foyer, looking into what was intended to be a formal living room, but we’re not exactly formal people so we’ve deemed it the playroom. The door on the right is the giant coat closet that currently has two coats and my wedding dress living in it.
The Half Bath

Although this is a fairly large half bath, it’s still small enough to make it tricky to get decent pictures. All in all, it’s pretty basic, but certainly has some quirks that I’ll get into later, like the exterior light fixture and the swirls in the plaster.
The Living Room


Through the foyer is the living room. I love the coziness created by the beams on the ceiling and that AMAZING brick wall/fireplace. The living room is open to the eat-in kitchen and through the door on the left of the picture above is the mudroom/laundry room.
The Mudroom
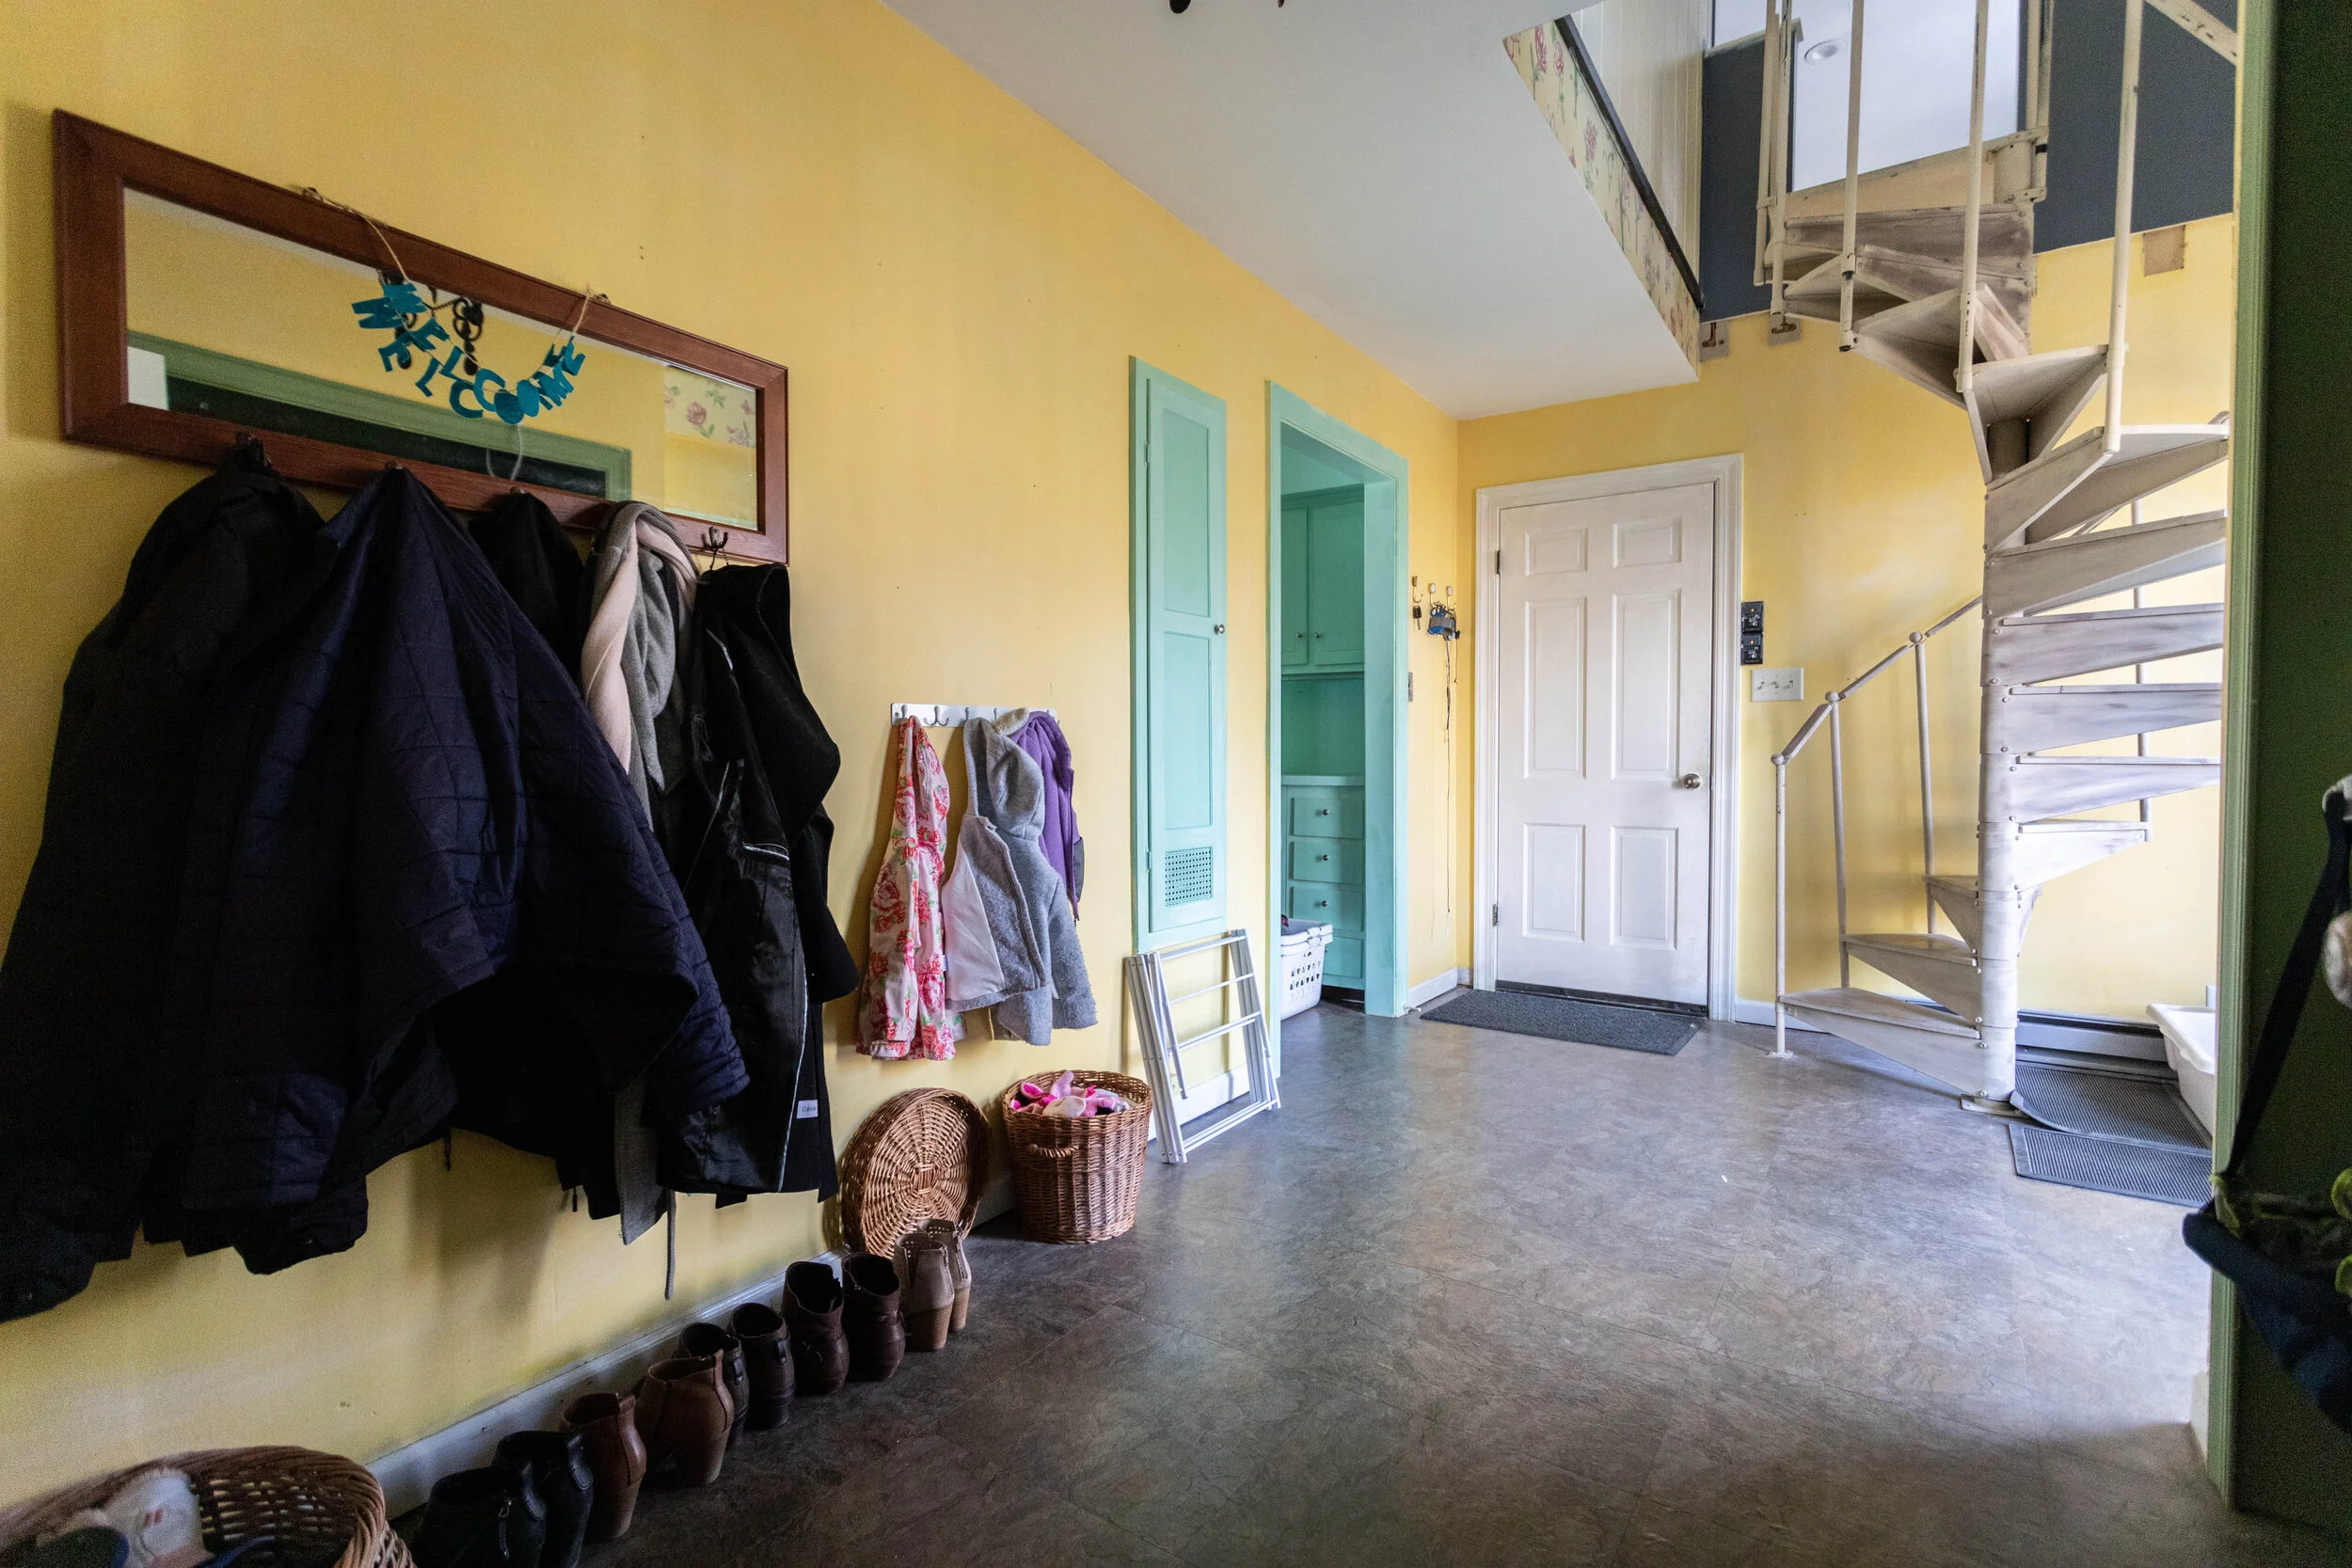
The mudroom could definitely be more functional (and I’ve got big plans that I’ll share later), but it’s amazing to have a dedicated spot to drop all our things. The little door on the left is a built-in ironing board, which I think is so stinkin’ cute. The through the doorway next to it is the laundry room with more storage than I know what to do with. The door next to the stairs used to open to a second mudroom but Lucius ripped that out a couple of weeks after moving in (and before we got any pictures) since a) it took up space in the garage, and b) who needs two mudrooms? Lastly, the spiral staircase takes you up to the loft above the garage.

Standing against the garage door you can see the opposite side of the mudroom, complete with wallpaper (yay) and a chandelier… because we like to feel fancy in our mudroom. Just kidding, that thing isn’t staying.
The doorframe on the left is a closet that was turned into a desk area that we’ve been using as storage. Also, these photos are making me realize that I might have a boot obsession.
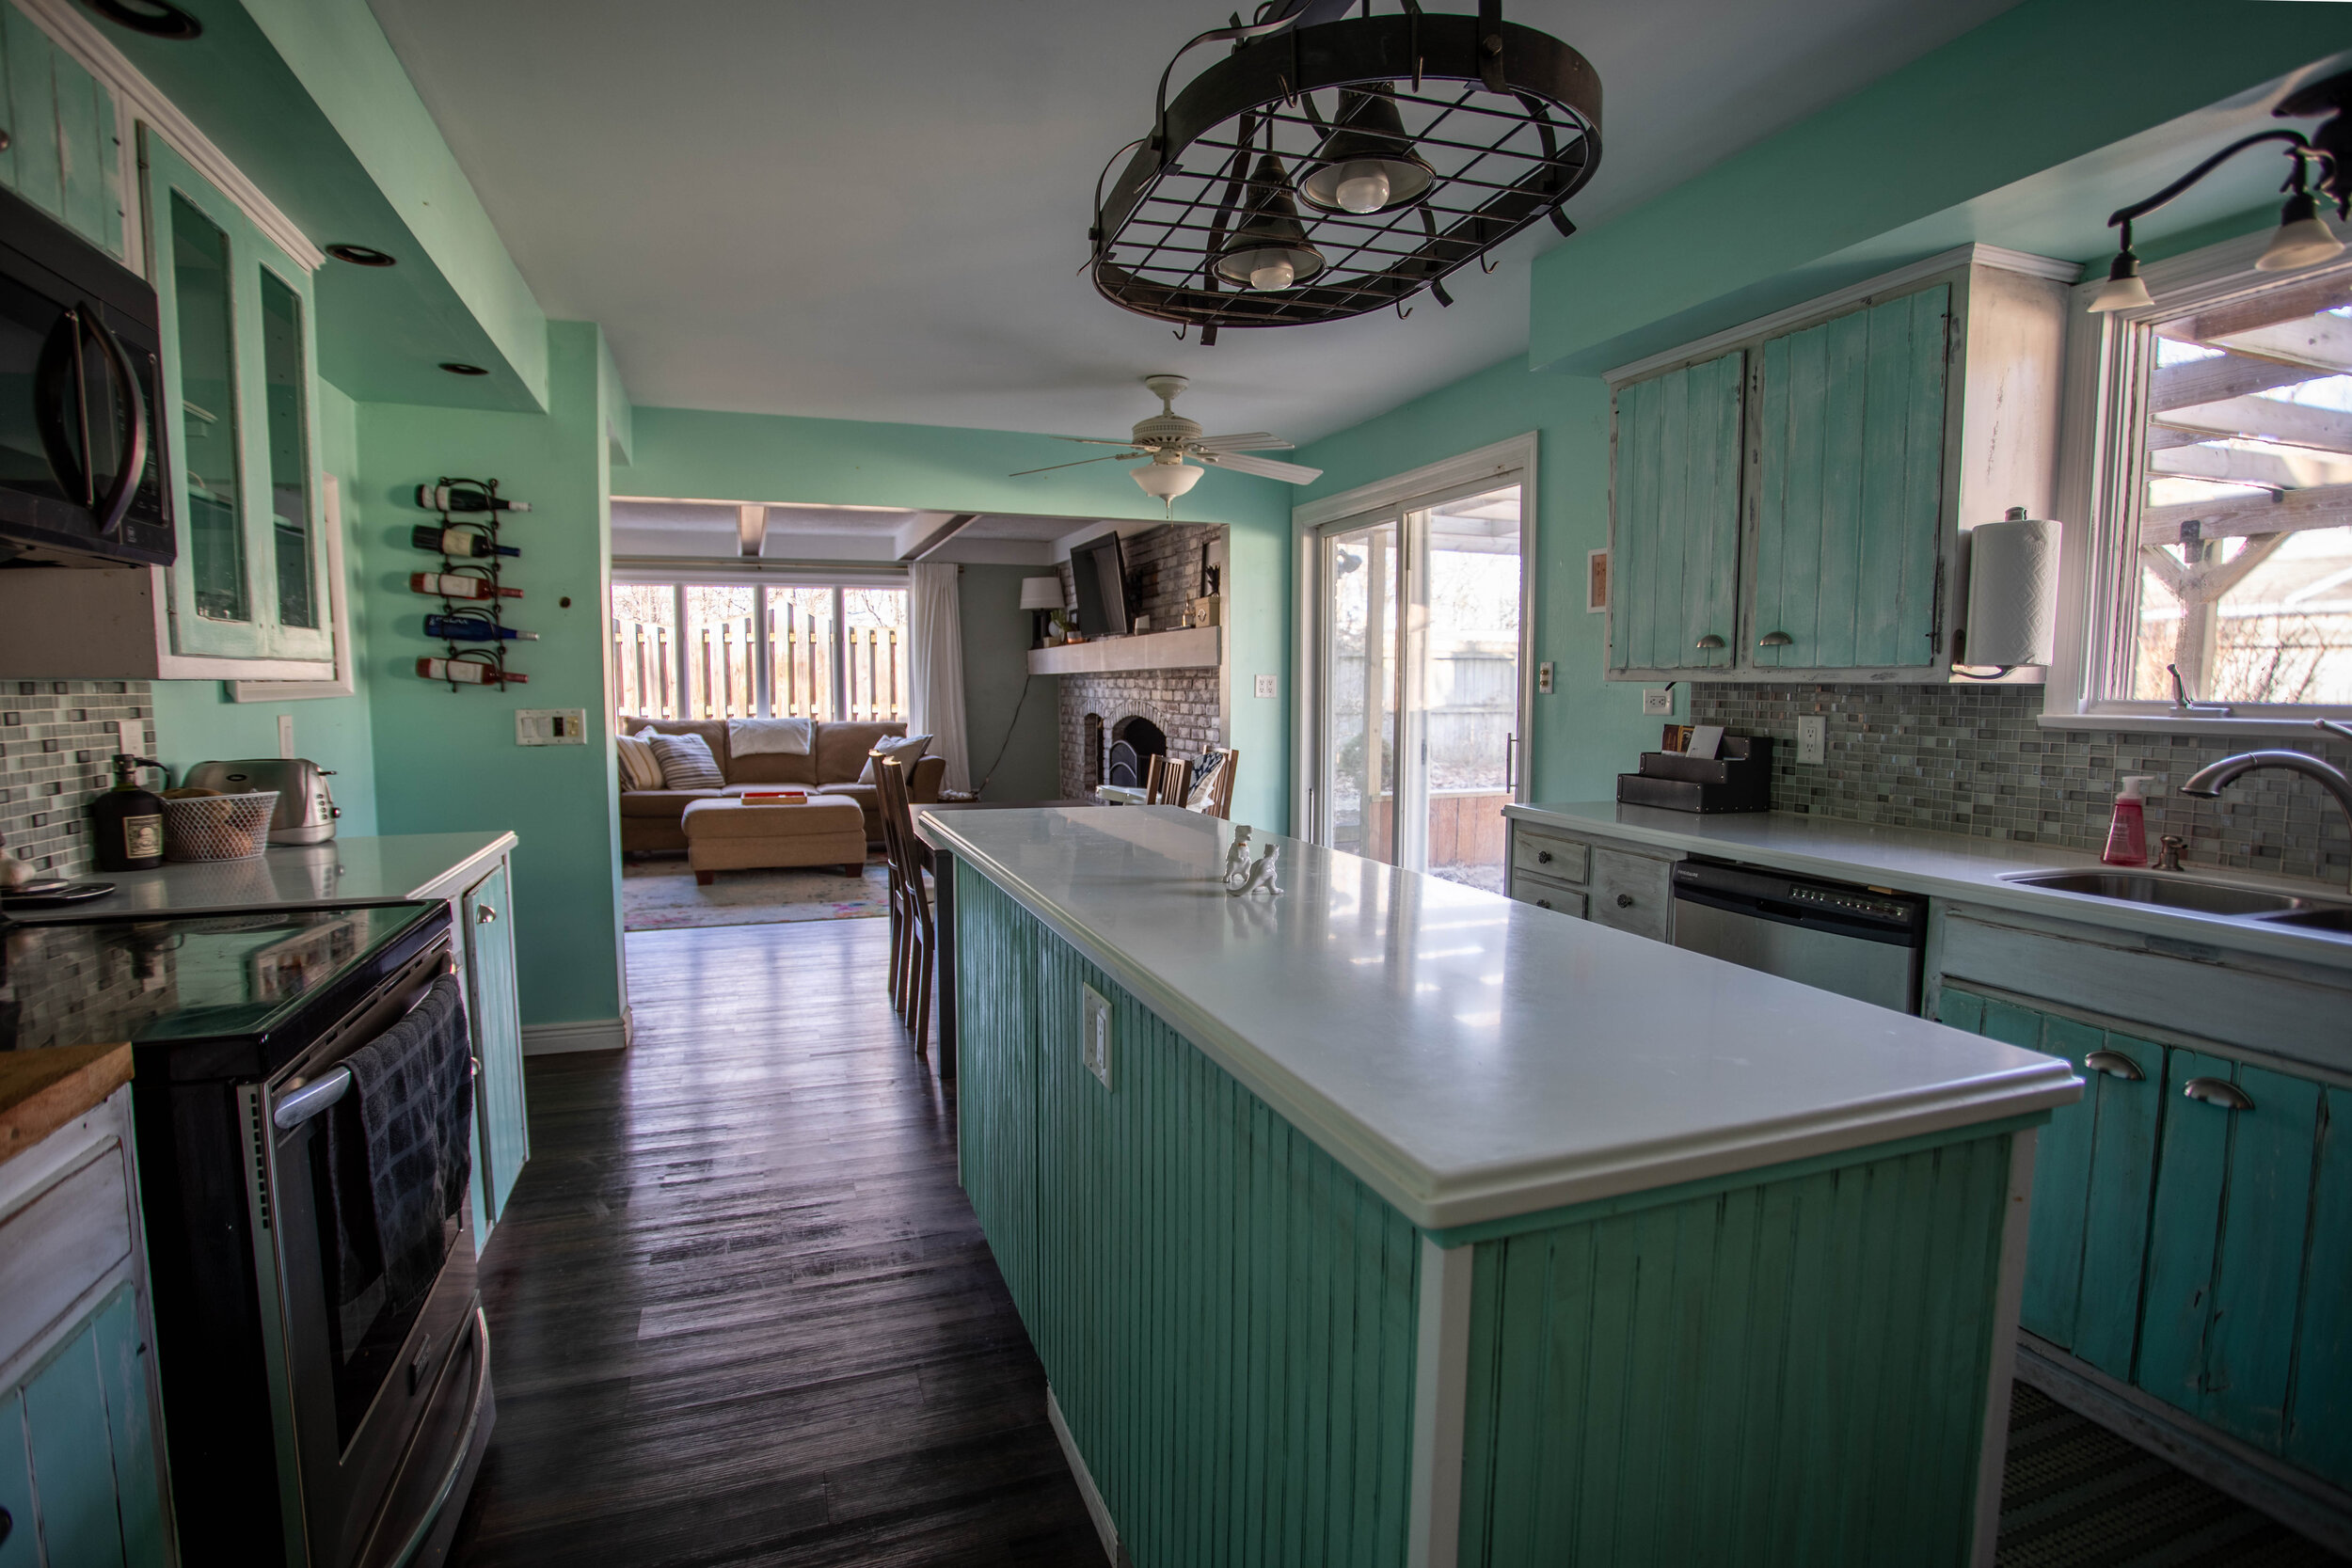
The Kitchen
Back through the living room is the kitchen. Below, you can see the sliding glass door that leads out to the deck. Also, (surprisingly) Hunter’s first photobomb of this series of pictures. Through the door frame on the far end of the kitchen is the dining room.

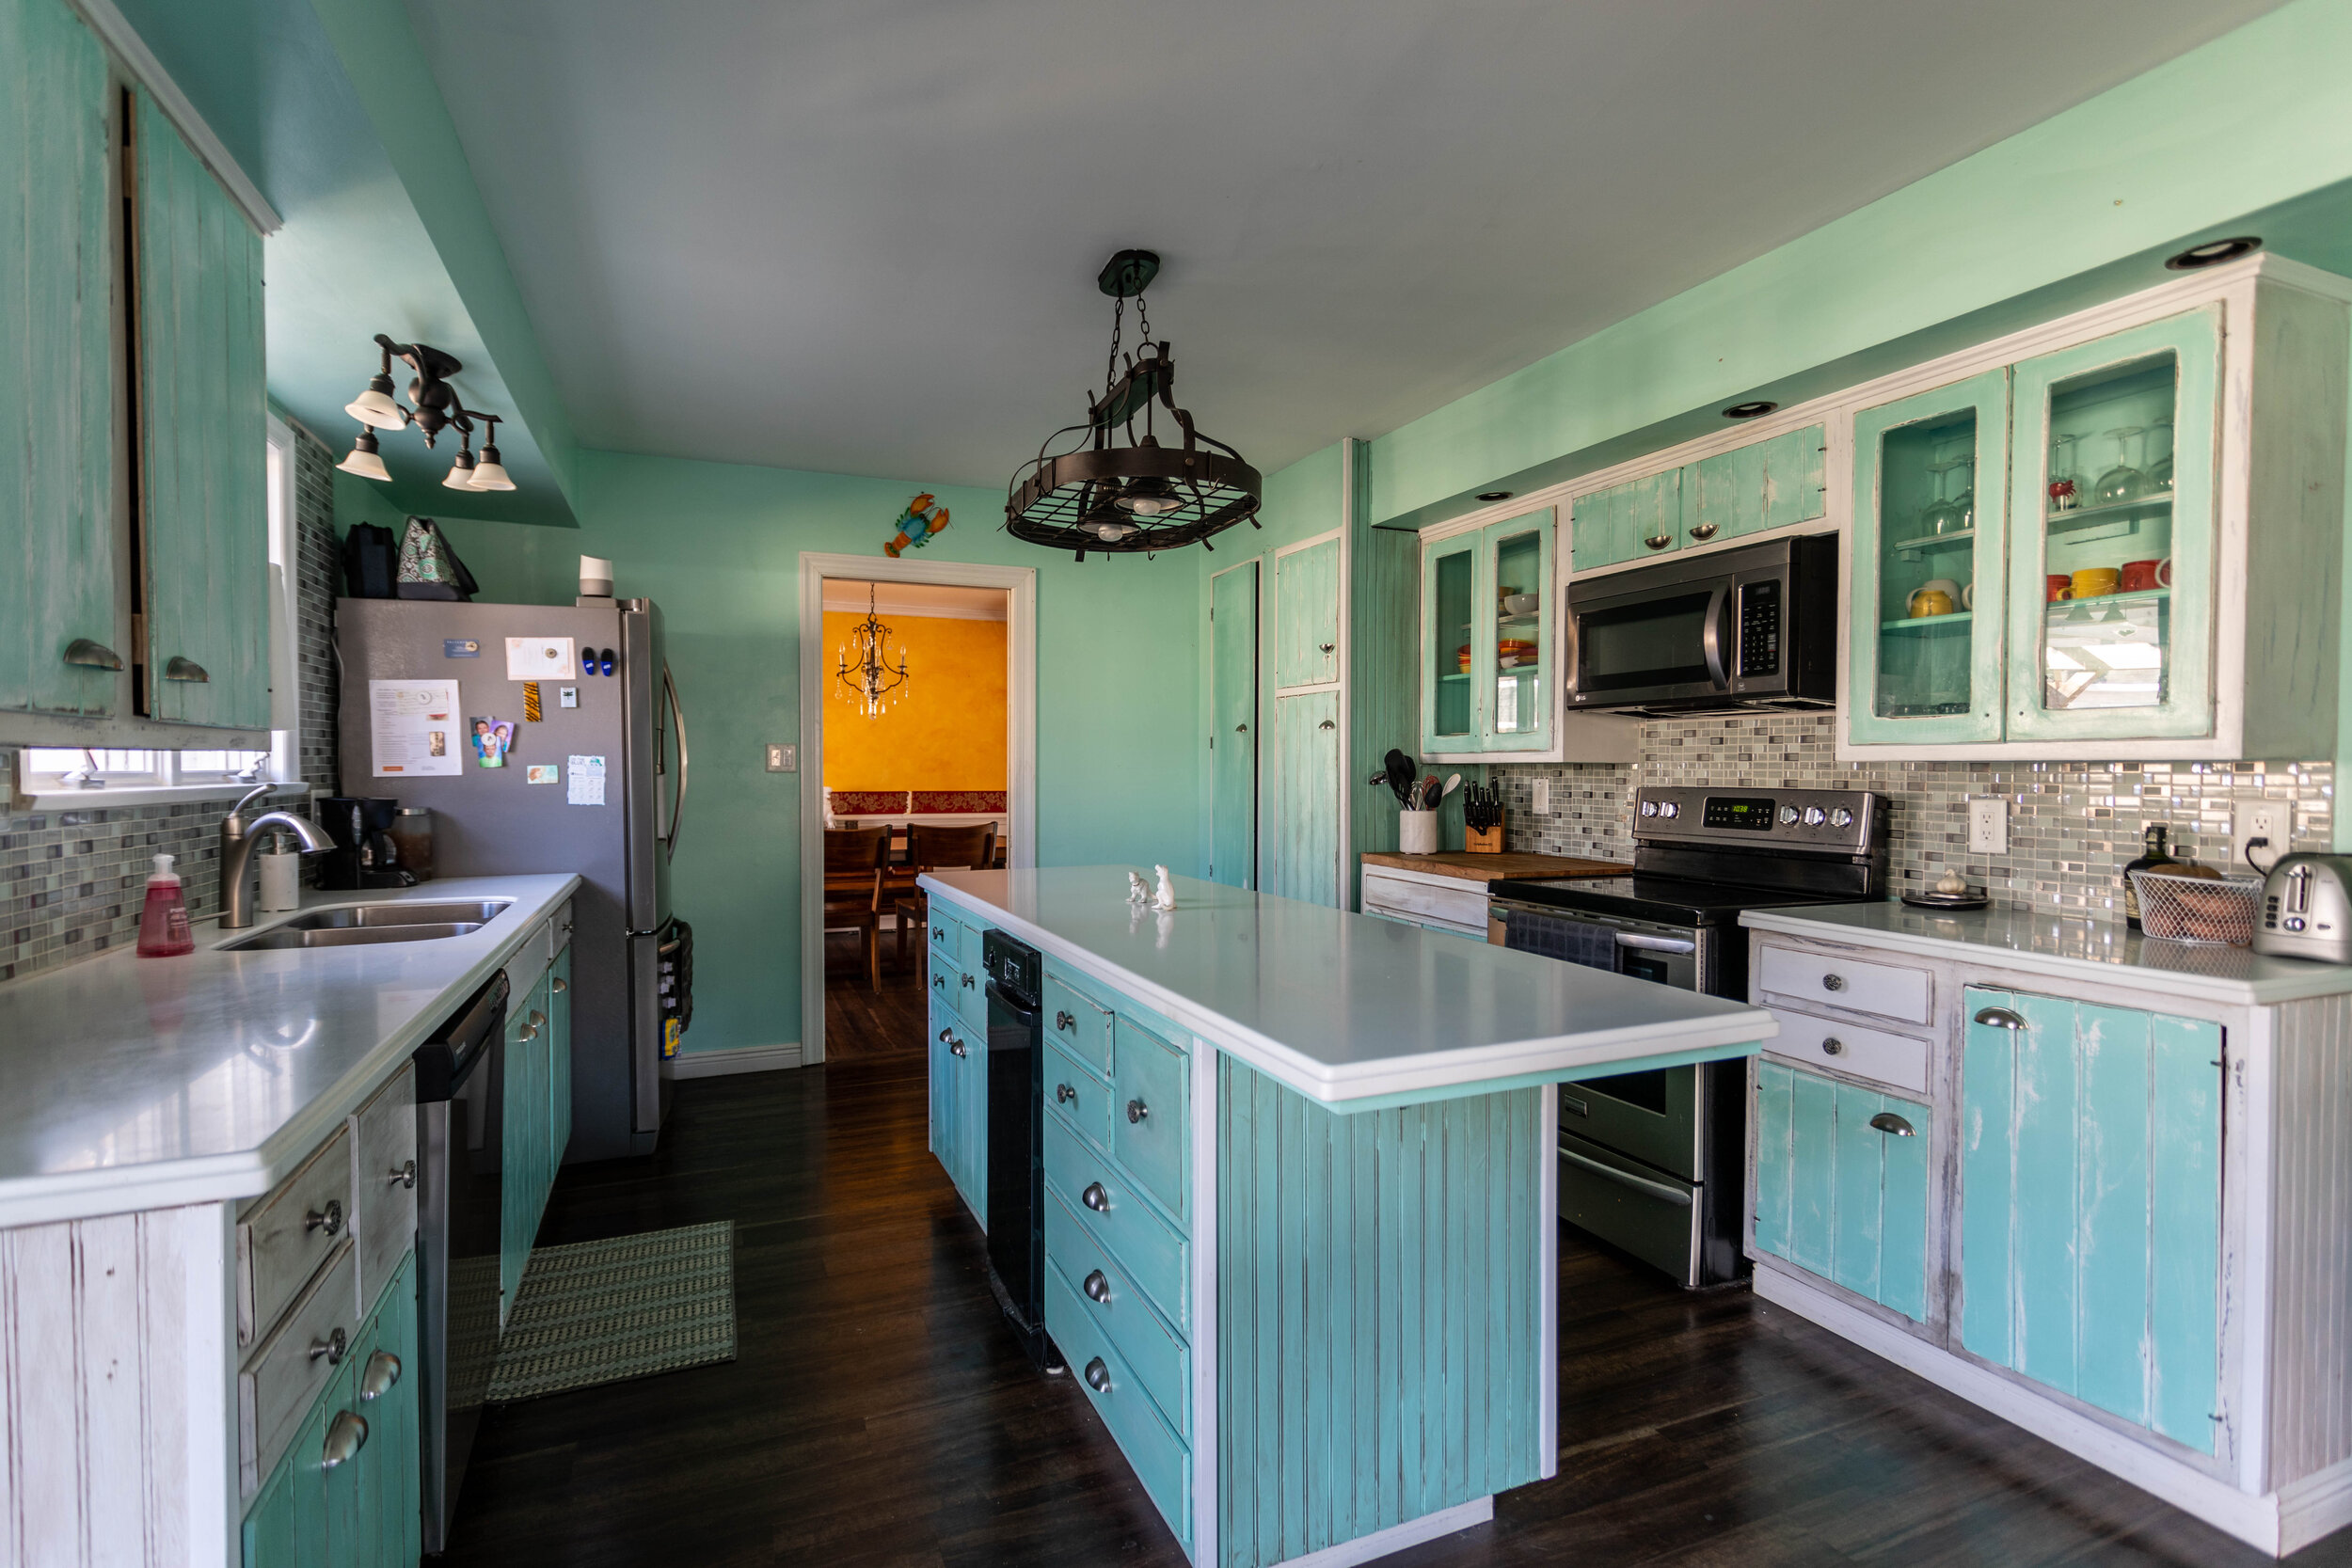
The picture below hopefully gives you a better sense of the open concept living room/kitchen flow.
The Dining Room

Holy yellow dining room. This room is a hot mess mix of styles at the moment, but I think the t-rex cookie jar really pulls it all together.
RELATED: You can check out our progress on this room HERE and HERE.
The Playroom
Open to the dining room is the playroom, which currently is a hodgepodge of toys with really no design scheme at all, and a severely undersized rug. Past the playroom in the picture below you can see that we’ve come full circle (literally), as we’ve ended up back in the foyer.

The Spare Room

Heading upstairs the first bedroom to the right is the spare room. It’s very sparse right now, pretty much just containing overflow items - shelves, curtains, rugs, pictures, mirrors.
RELATED: Check out my plans for this room HERE.
Our Oldest Daughter’s Room


Next to our oldest daughter’s room is the nursery. You’d think the kids would wake each other up since their rooms share a wall, but surprisingly that hasn’t been an issue!
RELATED: Want to know how I made the mobile in the corner? All the deets can be found HERE.
The Kid’s Bathroom
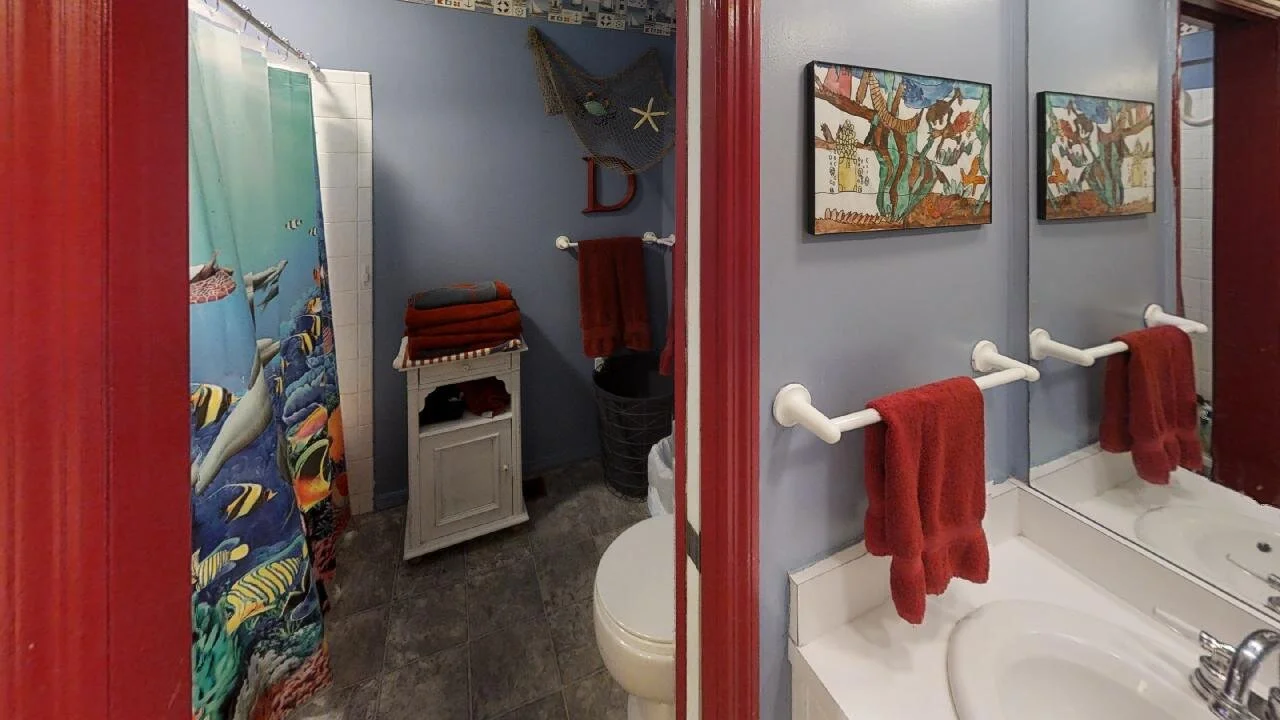
The picture above is from the house listing. The kid’s bathroom is a functional space, but there are lots of walls that make it really difficult to photograph and honestly a little cramped feeling in person. Out of frame on the left-hand side is a second vanity and the doorway in front of you is a pocket door. It makes sense - one kid can shower while the other one uses the sink/vanity, but it doesn’t flow as well as it probably could.
The Master Bedroom
(and some really peculiar design decisions)
I’m going to do my best to explain this room, but I would recommend watching the video to get the best understanding of its weird layout. Also, I hope someone out there appreciates the fact that I made my bed for this. I’m pretty sure making my bed is my least favorite chore.

The bedroom itself if pretty basic, but there’s a weird sunroom that you can see straight ahead in the picture above. For some reason the sunroom doesn’t extend all the way to the wall on the right. Instead, there’s a strange little alcove with a vanity light and an overhead light over there.
Making the sunroom even weirder is that it’s really long and narrow. Lastly, to top it all off, there’s a window on each of the far ends of it. As you can see below, we’re standing in the alcove looking through the window on the far end of the sunroom and peering all the through the other window on the other side that looks out over the loft. (Please ignore the mess, Lucius couldn’t help himself and started peeling back some of the paneling already.)

The picture below shows the other side of the bedroom if you’re standing in the alcove. The mirror on the wall is built into place and can’t easily be taken off the wall. Yay.

The doors on the right of the picture above is Lucius’ closet and mine is on the opposite side of the hall. As you can see, it’s insanely dark because all the glorious windows are in the sunroom that we’ll never use. Below is a shot of the hallway from the center of the door frame.

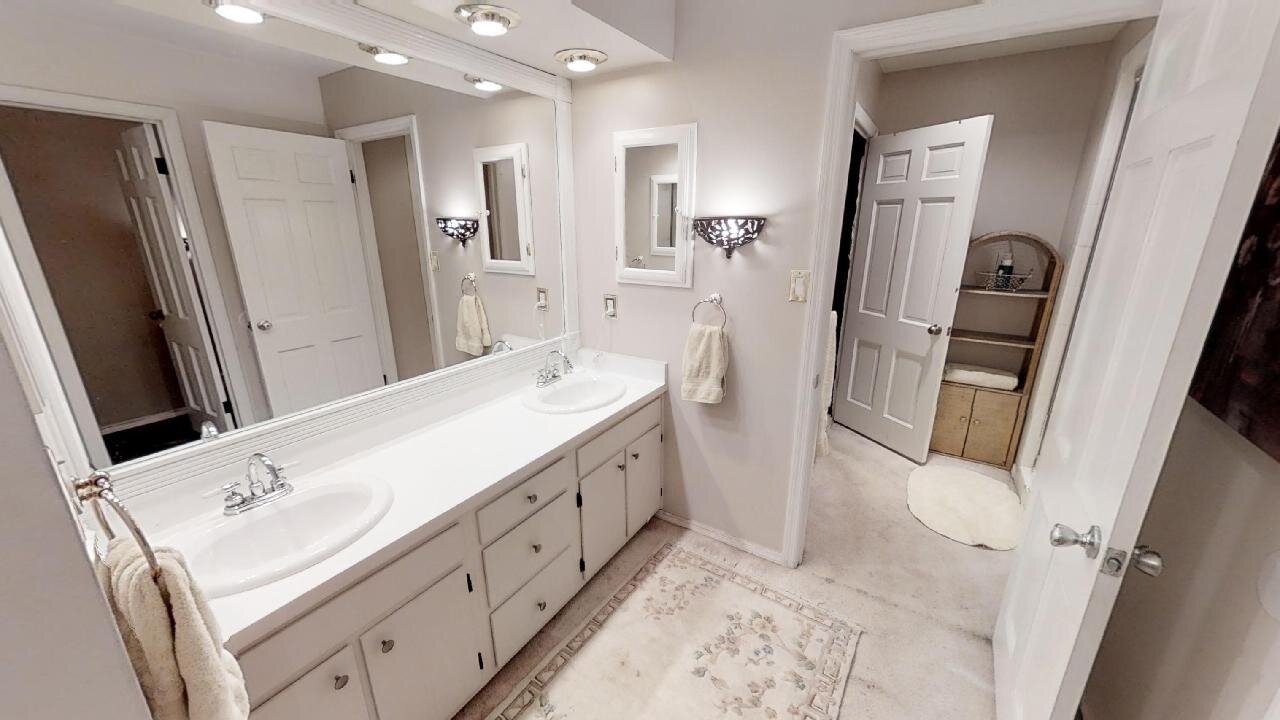
The Master Bathroom
Continuing with our theme of weirdness for this part of the house is the master bathroom. Referencing the picture above, once you walk past our closets, on the left-hand side of the wall is our vanity, on the right-hand side is our toilet closet, and straight ahead through the doorway is our shower.
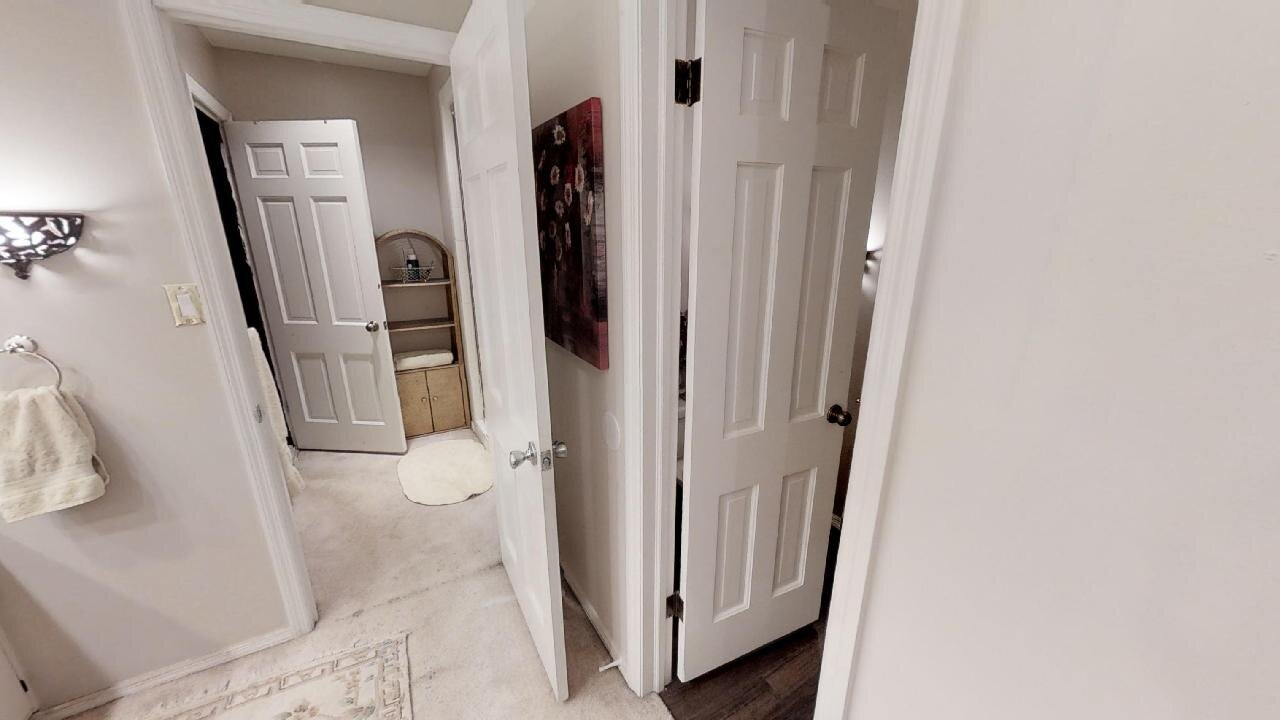
The shower being in its own room is very weird, but it actually makes sense. At one point in time it was a working sauna but I don’t think it’s been functional in a long time. Currently it’s just a really big shower in its own strange little room.
Oh, and if you didn’t notice in the picture above, take another look at the OTHER door in the shower room. Other than using the spiral staircase in the mudroom, that doorway is the only other way to get to the loft.
RELATED: Demo is officially underway. The progress report and floor plans for the master suite can be found HERE and HERE.
The Loft

Upon walking through the shower room into the loft, the view above is what you see. It’s a giant space - it actually spans the entirety of the 3-car garage below. The carpet is a hot mess, which we didn’t help when I forgot to close a paint can and Lucius, unable to find a stir stick, decided to shake it to mix it up…

Whoops….
Would you believe that this room started off painted Ohio State red with black trim!?

Standing on the far side of the loft, you can see the kitchenette. The yellow area you see is where the spiral staircase comes up to the loft.

And there you have it - the official house tour! We have big plans for literally every room of this house, and you get to follow along as we renovate our little hearts out! It’s not going to be easy, but we’re excited to make this house our own.

Related House Update Posts

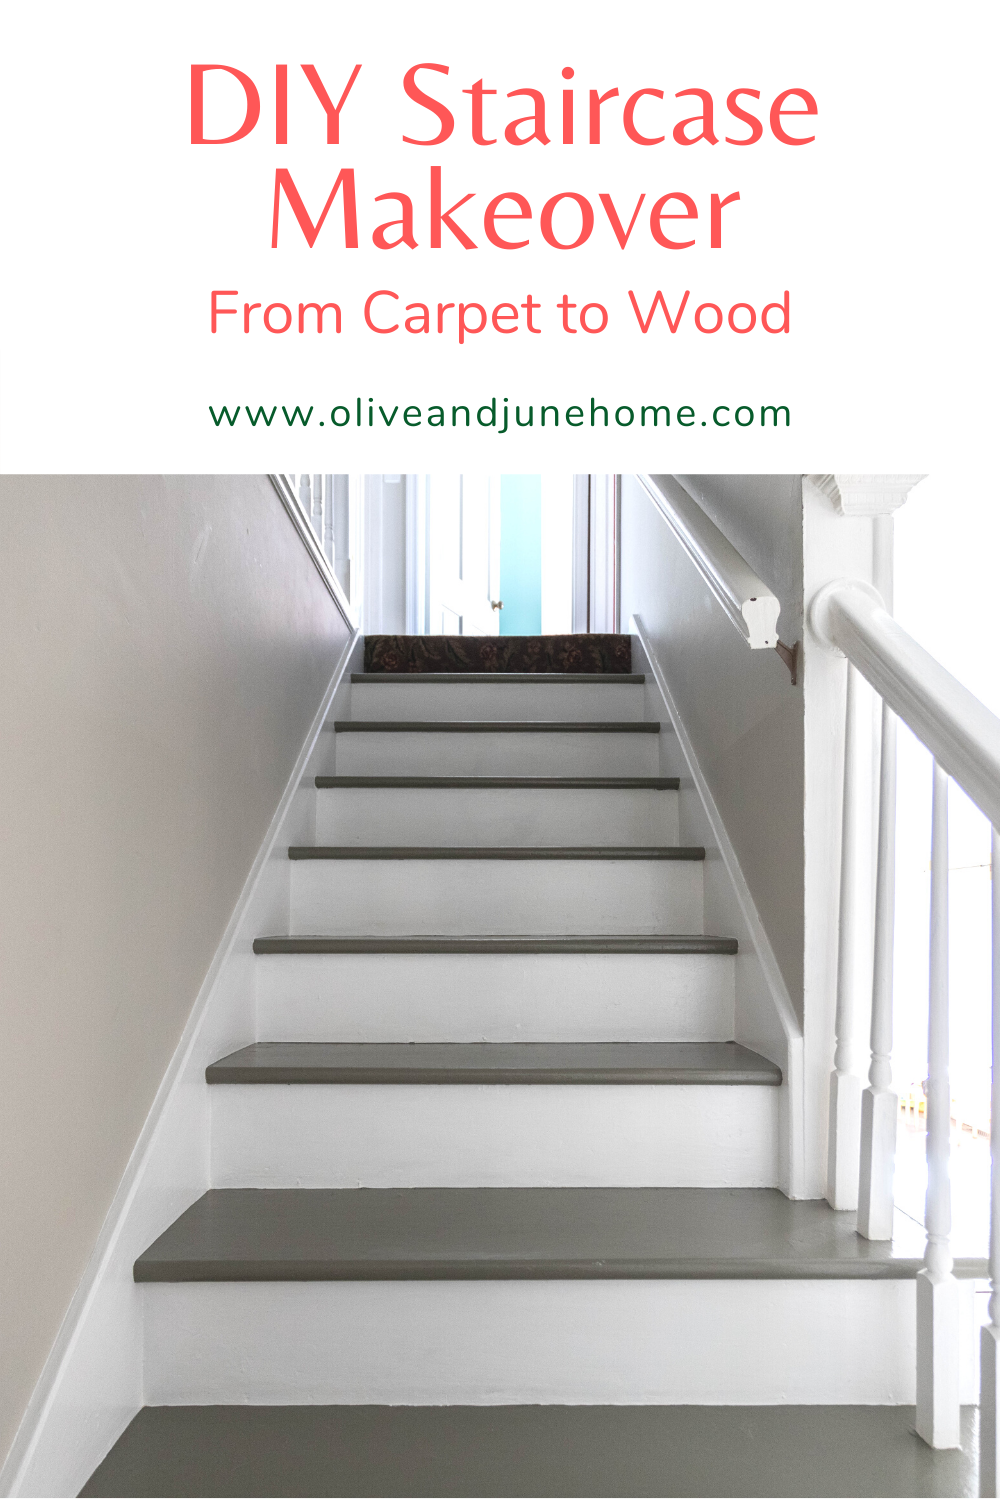
Painting our stairs, part 1
A few days after we moved into this house I took the day off work to get things organized. 8 hours later I had ripped the hideous carpet runner (and 8,000 staples) off the stairs. And 3 months later I got my butt in gear, painted our stairs, and haven’t looked back since!
How to Prep and Paint Your Stairs
A few days after we moved into this house I took the day off work to get things organized. 8 hours later I had ripped the hideous carpet runner (and 8,000 staples) off the stairs. And 3 months later I got my butt in gear, painted our stairs, and haven’t looked back since!

The carpet that was on the staircase when we moved in was dark, musty, and not to mention ugly. I couldn’t wait to get it out of there!

Picture from the house listing.
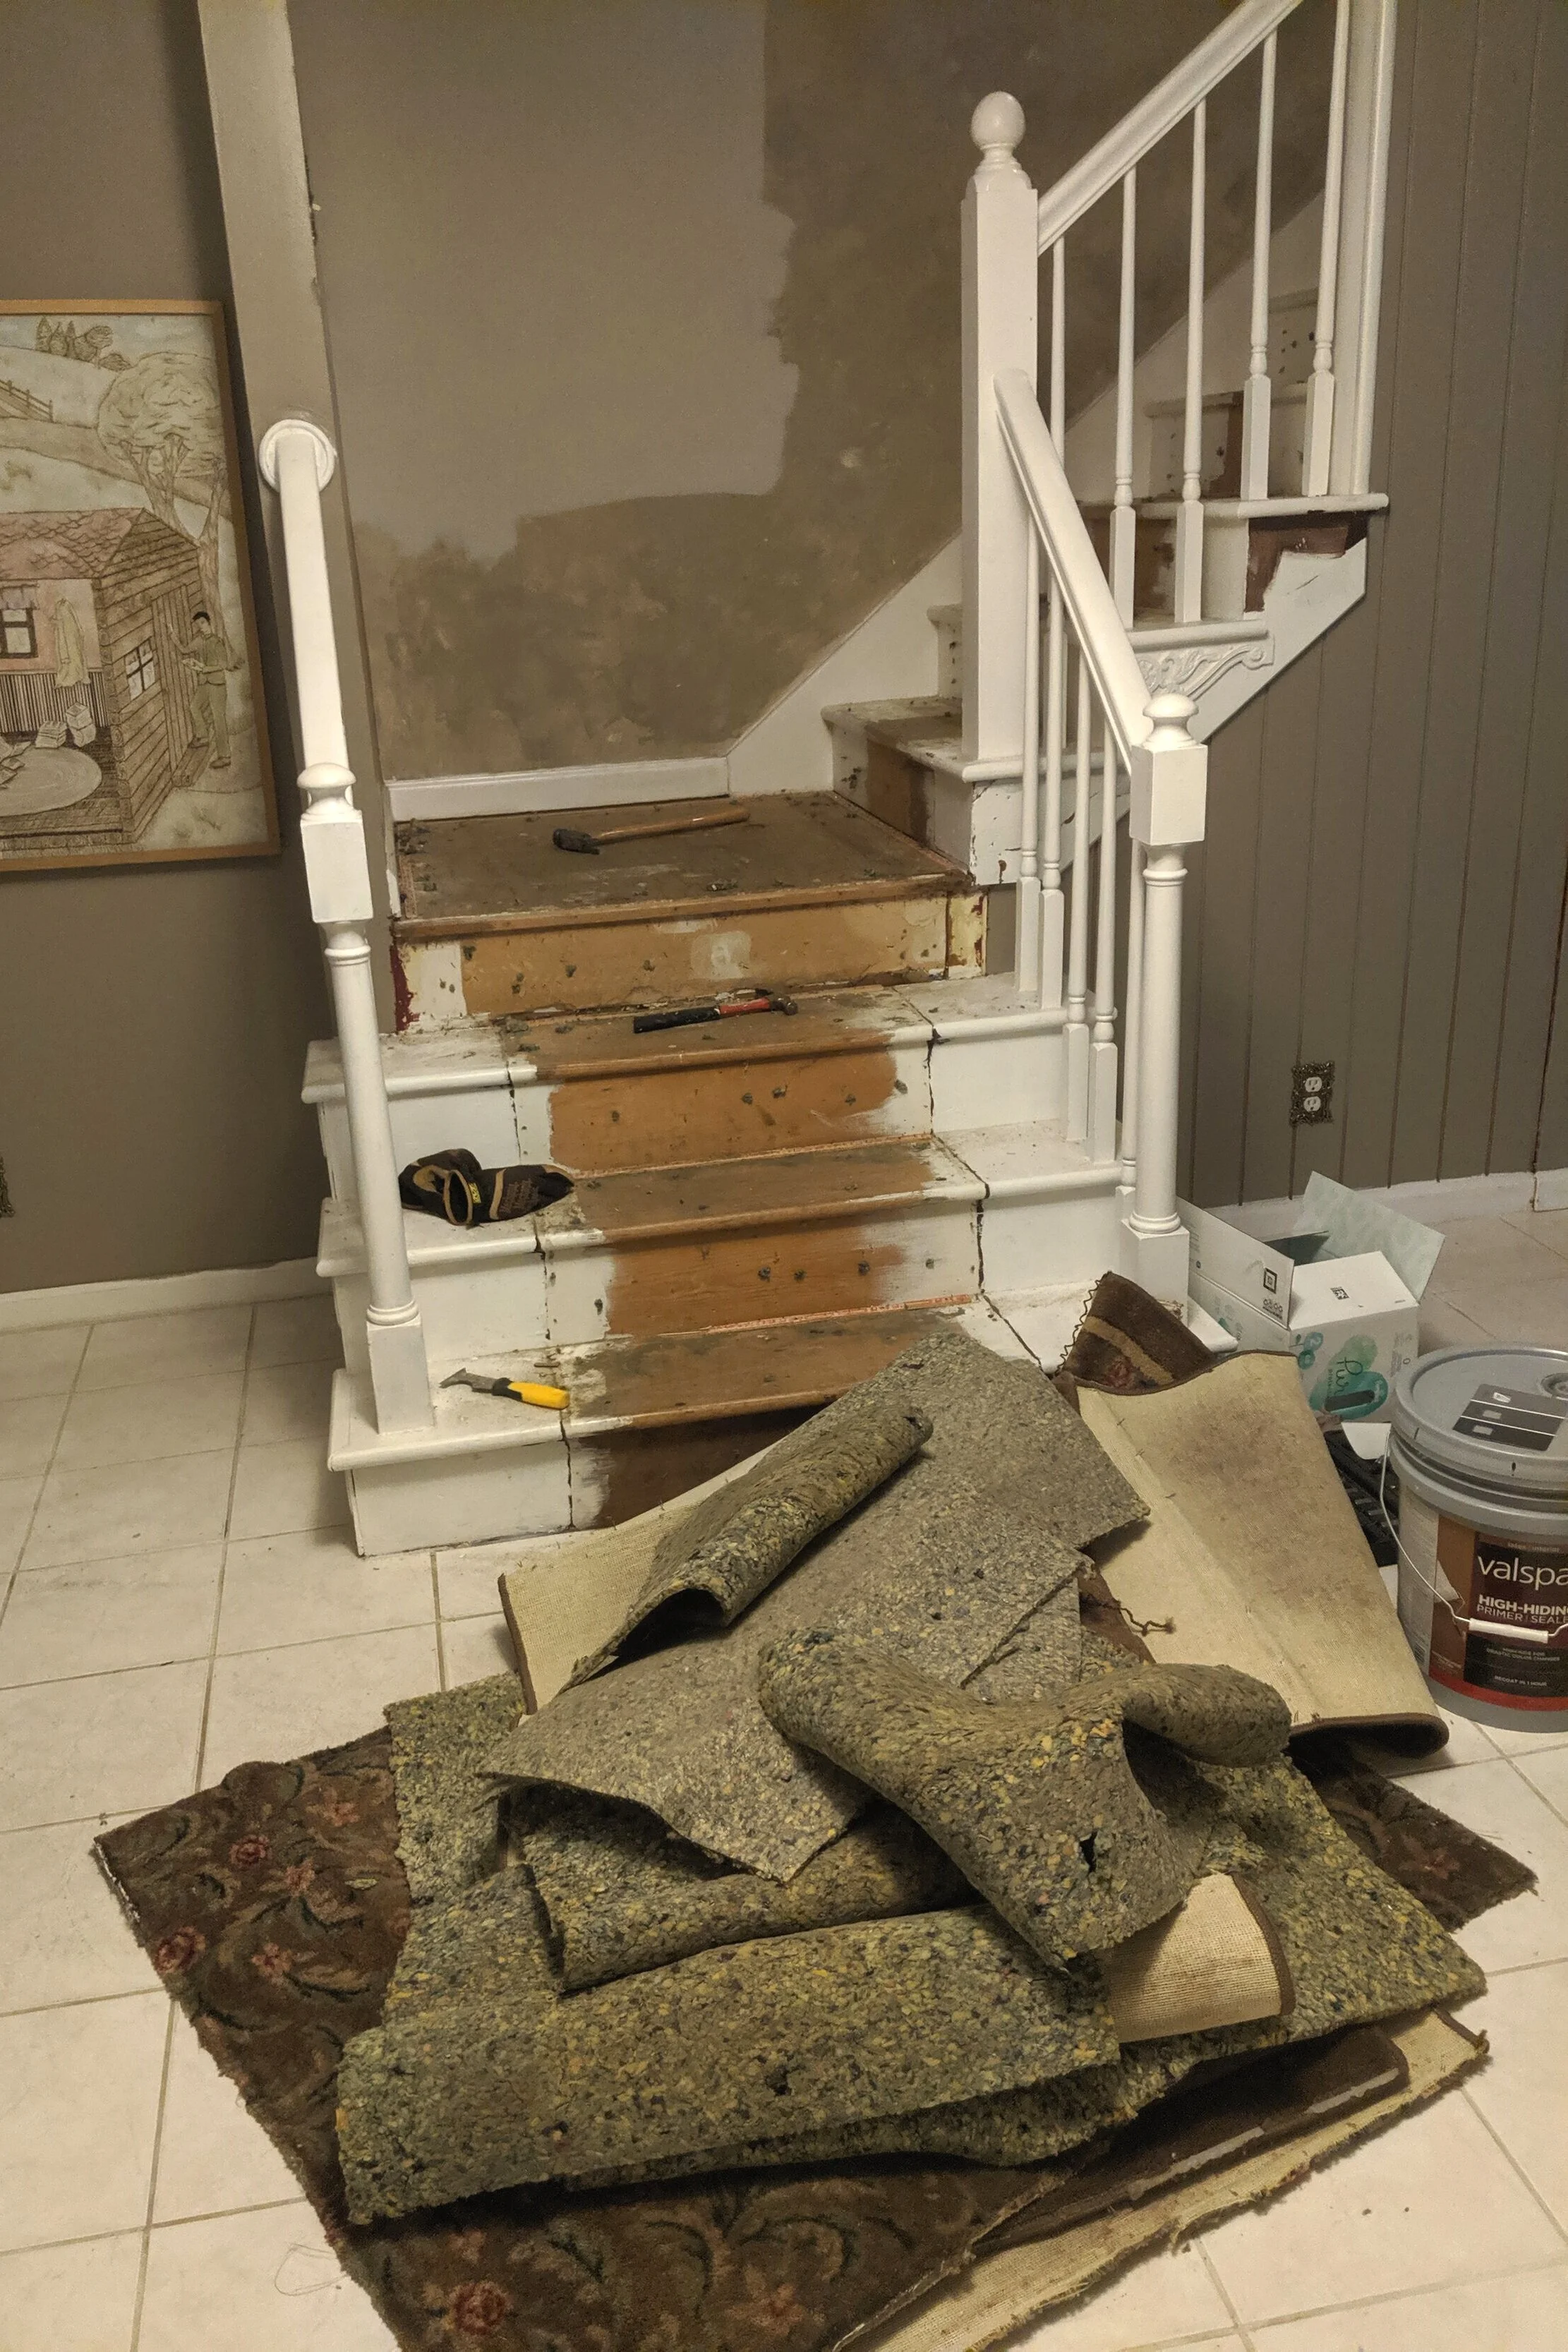
Carpet be Gone!
I didn’t get a chance to refinish the stairs at our previous house before we moved, so I was especially excited to get a chance to makeover these bad boys.
But after I ripped up the carpet, the stairs stayed bare… for 3 months. There are so many things in this house we want to get our hands on, so it was easy to get distracted painting the loft, the foyer, and our oldest daughter’s room.
But once those rooms were painted (though I don’t consider any of them to be complete yet), I felt like I could shift my focus back to the stairs. Here’s how I tackled them!
Getting started - prep work
(so.much.prep work.)
First thing’s first…. If you’re starting with carpeted stairs like I did, you’ll need some good pliers and work gloves to rip it out. Those saved my dainty little lady hands from a lot of pain.
Next, take out the staples. It’s tedious and will take a whole bunch of time, but getting all the staples out is key to a nice end product. Just throw on some music, a movie, or a podcast (if you’re a true crime fanatic like I am, I highly recommend My Favorite Murder) and get comfortable. You’re gonna be there for a while.
If you already have bare stairs, I’m jealous because you’re at a way better starting point than I was. Either way, once your stairs are bare, CLEAN THEM! I wiped mine down with a Magic Eraser and some water and was appalled (yet oddly satisfied) at how much dirt came off them.

Next, fill the crap outta all the little holes you just created with wood filler. Here’s what I used.
I went through so much more wood filler than I anticipated. Since the holes were so small, I just used my fingers to push the filler into them, rather than a putty knife.
Also, I learned a new trick - when your wood filler starts to dry out, add just a little bit of water and mix it together to revive it. Dry wood filler would rather stick to your fingers than the wood and it’s infuriating. This trick saved the stairs from a lot of unkind words.
As you can see below, I wasn’t shy about filling in not just holes, but also dents, nicks, and cracks.

Once your wood filler is dry, you’ll need to sand off the excess.
I started sanding by hand and after about an hour when I had only completed 3 stairs Lucius asked me why I wasn’t using our palm sander. In my stubbornness, I almost said, “I’m too far in!” and kept painstakingly sanding by hand, but my reasonable side luckily stepped in and said, “girl, just try it”. And I’m so glad I did.
Although the palm sander spread dust EVERYWHERE (like, I really should have closed the bedroom doors before I started), it was way faster than hand sanding and the end product was a lot more smooth and consistent.
Our sander is similar to this one and I used 100 grit sandpaper. I could have/maybe should have used a finer grit, but 100 grit was what I had on hand and I didn’t notice any significant scrapes or roughness so I think it turned out fine. You could also use an orbital sander.
Once your sanding is complete, you need to thoroughly clean the stairs again. I started by vacuuming the stairs. Then I gently wiped them down with wet paper towels. I didn’t want to wipe the wood filler out of any crevices so I opted not to use a Magic Eraser this time. At this point, I realized it was a good idea to caulk any gaps or cracks to make everything look seamless. Make sure you’re using paintable caulk for this.
FINALLY, it was time to prime! I planned on using a latex primer, but ended up using oil for two reasons: 1 - I feel that oil primer typically dries harder and holds up better, and 2 - I have a stupid amount of oil primer on hand. I should really stop buying more before checking my stock first.
I typically steer away from oil-based paints and primers because of the VOCs (fumes and chemical off-gassing), and the fact that you have to use mineral spirits or paint thinner to clean your tools after you use them, which feels chemically and gross to me. But since stairs need to be pretty darn durable (compared to a wall that no one will be walking on several times a day), it made sense in this situation. I used Killz Original Oil-based Primer and applied it with a cheap brush similar to this that I could just throw away when I was done.
I knew there would be holes that I missed while filling the first time around. Adding a coat of primer to the stairs helped identify any holes I missed as well as some stray staples. I pulled out the remaining staples and filled the rest of the holes.

After this round of wood filler dried, I had to sand again. I didn’t want to sand off the primer, and there were way fewer areas to sand this time around, so I just sanded these areas down by hand.
Afterward, I vacuumed the stairs again, and to take it a step further to make sure the stairs were super duper clean before I put down my first layer of paint, I wiped them down with tack cloth. Tack cloth is just a sticky version of cheesecloth used for picking up dust and small particles for jobs just like this. It’s super inexpensive (less than $2.00 for two of them) and well worth it.
The exciting part - Painting!
After hours of prep work, I was so excited to get some uniform color on these sad, ugly stairs. I knew I wanted to paint the stairs, rather than buying an actual runner. I hate vacuuming stairs, so painting the stairs was really the only option. For the last several months, I had been researching different design ideas. Here were the three contenders:


The third example is actually a carpet runner, but I did consider painting a runner (without the extra stripes on either side like the one in the middle) in a similar color. The third example also has the treads painted a different color than the risers so I guess I had 4 ideas I was considering. Initially, I was really leaning toward painting a runner similar to the second and third options above, until I covered the stairs with rosin paper between work sessions…

…and realized how much more narrow the stairs felt. This stairway is already fairly narrow, and the “runner” just seemed to emphasize that. At that point, it was pretty clear that I needed to lose the idea of painting any kind of runner and just focus on painting the treads, like in the first example above.
From doing loads of research I knew I needed to buy floor paint for this project, so off to Lowe’s I went! And I was honestly kind of underwhelmed. Usually, I LOVE Lowe’s (and frequently refer to it as the happiest place on Earth… and may have seriously considered working there part-time when I retire years and years from now), but their selection of paint for this project seemed to be lacking. Valspar seemed to be my only choice of paint and only in a select range of colors and sheens. I ended up grabbing a quart of this in satin in a tan color called Covered Bridge and applied it with my preferred 2-inch angled brush.
Once I started on the first tread, I quickly realized that I needed to break out my painter’s tape. Painting under the lip of the tread (the part of the stairs you step on) without getting a ton of paint on the risers (the vertical parts of the step) was proving trickier than I thought. Typically I don’t use painter’s tape (I feel like it gives me a false sense of security and I usually end up making a bigger mess), but with this project it was necessary.
Finally, I was able to get to painting the treads, which was so, so satisfying. This part really only took about an hour for all the treads.
When I got to the bottom and looked up I was… again underwhelmed. The color clashed a little bit with the greige walls (it looks like it matches perfectly in the pictures, but trust me, it clashed) and although it lightened the staircase and looked cleaner, there was just something missing. The next day when Lucius walked up the stairs in his shoes and left prints on the freshly painted treads, I knew that I had to buy a different sheen anyway, so I decided to take that opportunity to check out some other colors too.


Back to Lowe’s I went!
I looked over the colors and decided to go with something darker and with a little more gray in it to pull out some of the grays in the walls, rather than the beige. The color I used was Elkhorn Cactus, and I was immediately happier with it. Unfortunately, the only sheen available other than satin was gloss, and they didn’t have any additives that I could buy to add texture. I’m a little nervous about the glossy sheen, but we’ll give it a little while and if there’s too much slipping and sliding going on, I’ll consider adding some anti-slip tread covers, like this.

Final Thoughts
Our stairs are now looking a bajillion times better than what we started with, but there’s still lots of work to be done - painting the handrails, newel posts, and balusters, and figuring out what in the world we’re going to do with the landing.
In case you didn’t notice in the pictures above, the landing is its own animal. Below is a picture to save you from scrolling back up.

The above is actually an improvement from what we started with when I pulled the carpet off - knotty, thin plywood. But it’s similar to an MDF type material and I really don’t think it’ll stand the test of time, so we’ll find a better solution.
Once we come up with a game plan for the landing, I’ll be sure to write a step-by-step (hah, I couldn’t help myself…) post about it and show the complete, finished product. In the meantime, stay tuned. This story isn’t over yet.
Related Painted Stairs Posts
Refresh Your Staircase with Paint

A room makeover for a unicorn-loving 4-year-old
Our oldest daughter is all girl. She loves pink, hair bows, rainbows, dresses, nail polish, all of it! I had a blast putting together her nursery when I was pregnant (with both our daughters we didn’t know the gender… gender neutral nurseries for the win!). When we moved into our last house, I got the opportunity to design a room more specific to her interests. And now that she’s getting a little older and is able to tell us her likes and dislikes, and since we’ve moved yet again, I had so many ideas for her new room - but where to start?
Our oldest daughter is all girl. She loves pink, hair bows, rainbows, dresses, nail polish, all of it! I had a blast putting together her nursery when I was pregnant (we didn’t find out the gender of either of our daughters… gender neutral nurseries for the win!):

When we moved into our last house, I had the opportunity to design a room more specific to her interests:

And now that she’s getting a little older and is able to tell us her likes and dislikes, and since we’ve moved yet again, I had so many ideas for her new room - but where to start?
We started off with a dark blue/grey room. The picture below is from the house listing and as you can see it’s certainly not the room a little girl dreams of.

I thought of doing an accent wall with a stencil, or maybe with wallpaper. I considered painting the ceiling a bold color and leaving the walls white - like this, or painting the ceiling a softer tone - like this. I even considered decals (this one here was especially tempting). Then I got lost on Pinterest looking at ombre walls and I fell in love.
Now that I had my general design idea, I needed to figure out a color scheme. While she’s getting more opinionated, when I asked my daughter what color she wanted her room to be she promptly told me every single color she could think of. So I had to scratch that idea.
I knew I wanted to steer away from all pink since that was the color of her room at our old house, but I still wanted something bright to keep it fun. I’ve always loved coral and teal together so after mulling it over I landed on that combination. I decided to paint the whole room in teal and use the coral as a transition color for the ombre wall. (Don’t worry, I’ll write a post about painting an ombre wall soon enough.)

Once her walls were complete, I could move on to decorating and pulling the whole room together.
I knew I wanted the ombre wall to be the focal point and would therefore be the wall her bed was on. We saw the canopy over her bed at Target before Christmas and she got so excited we thought she was going to burst into kittens, so we picked it up as a Christmas gift. It’s also ombre, (hard to tell in photos, but the bottom is pink and it transitions to white) so that may have played into the overall design a bit! The nightstands were a second-hand find on Facebook Marketplace and were conveniently already painted pink and white.
Although I’m very hesitant to hang anything on the ombre wall (I don’t see patching holes going very smoothly), I think it needs something more, so I’ll likely hang some pictures on either side of her bed once I get the confidence to drill into the wall.

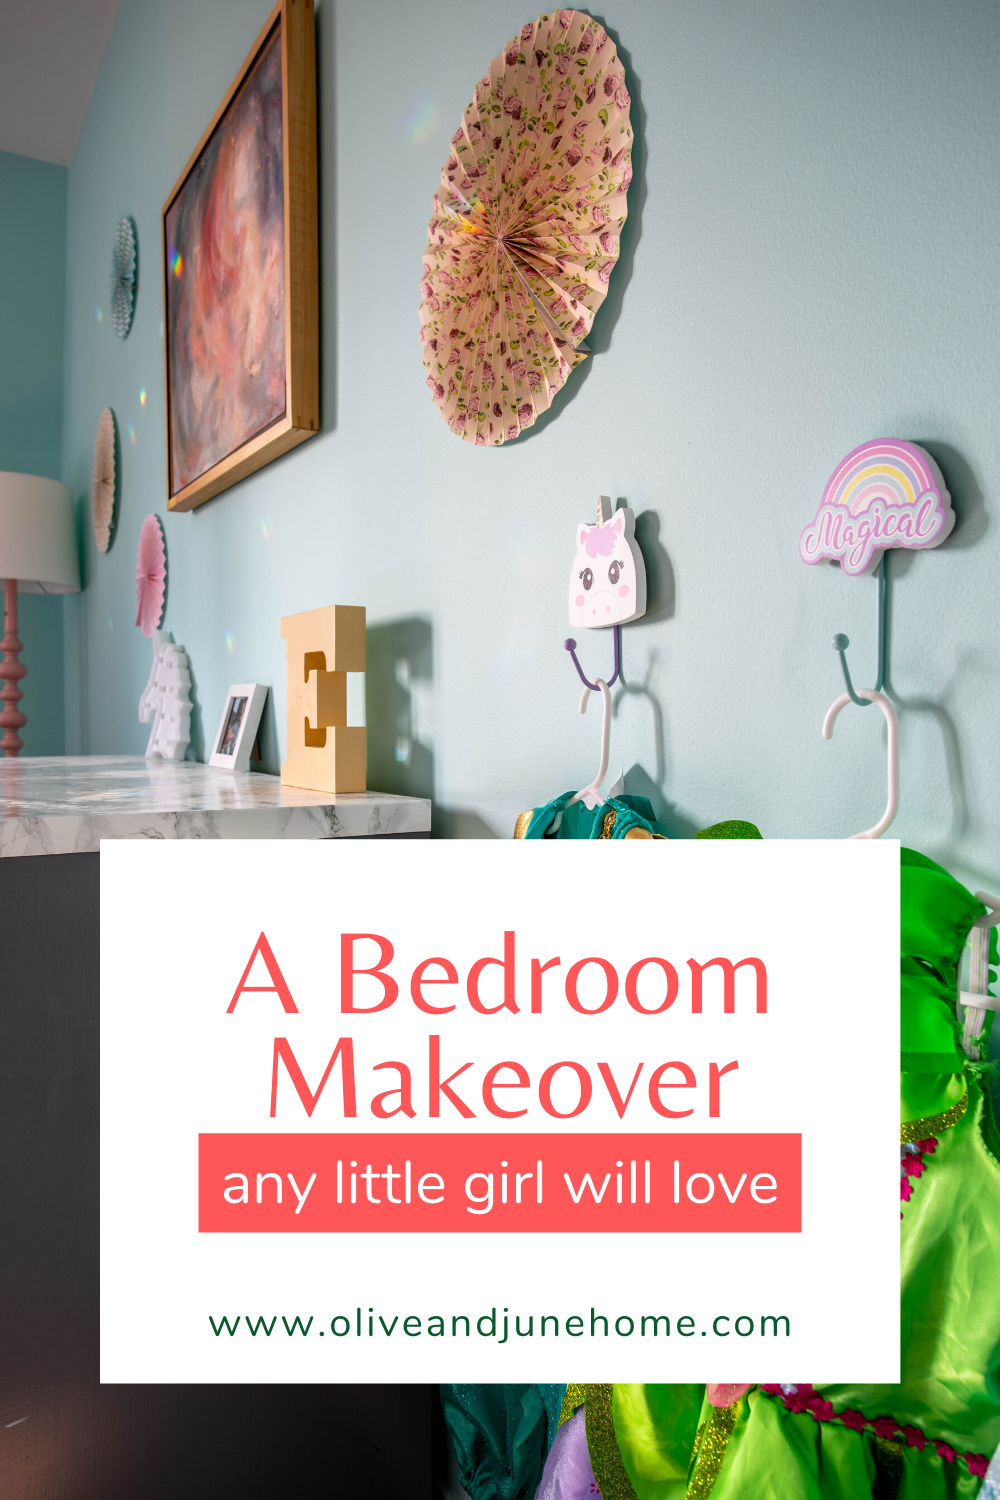
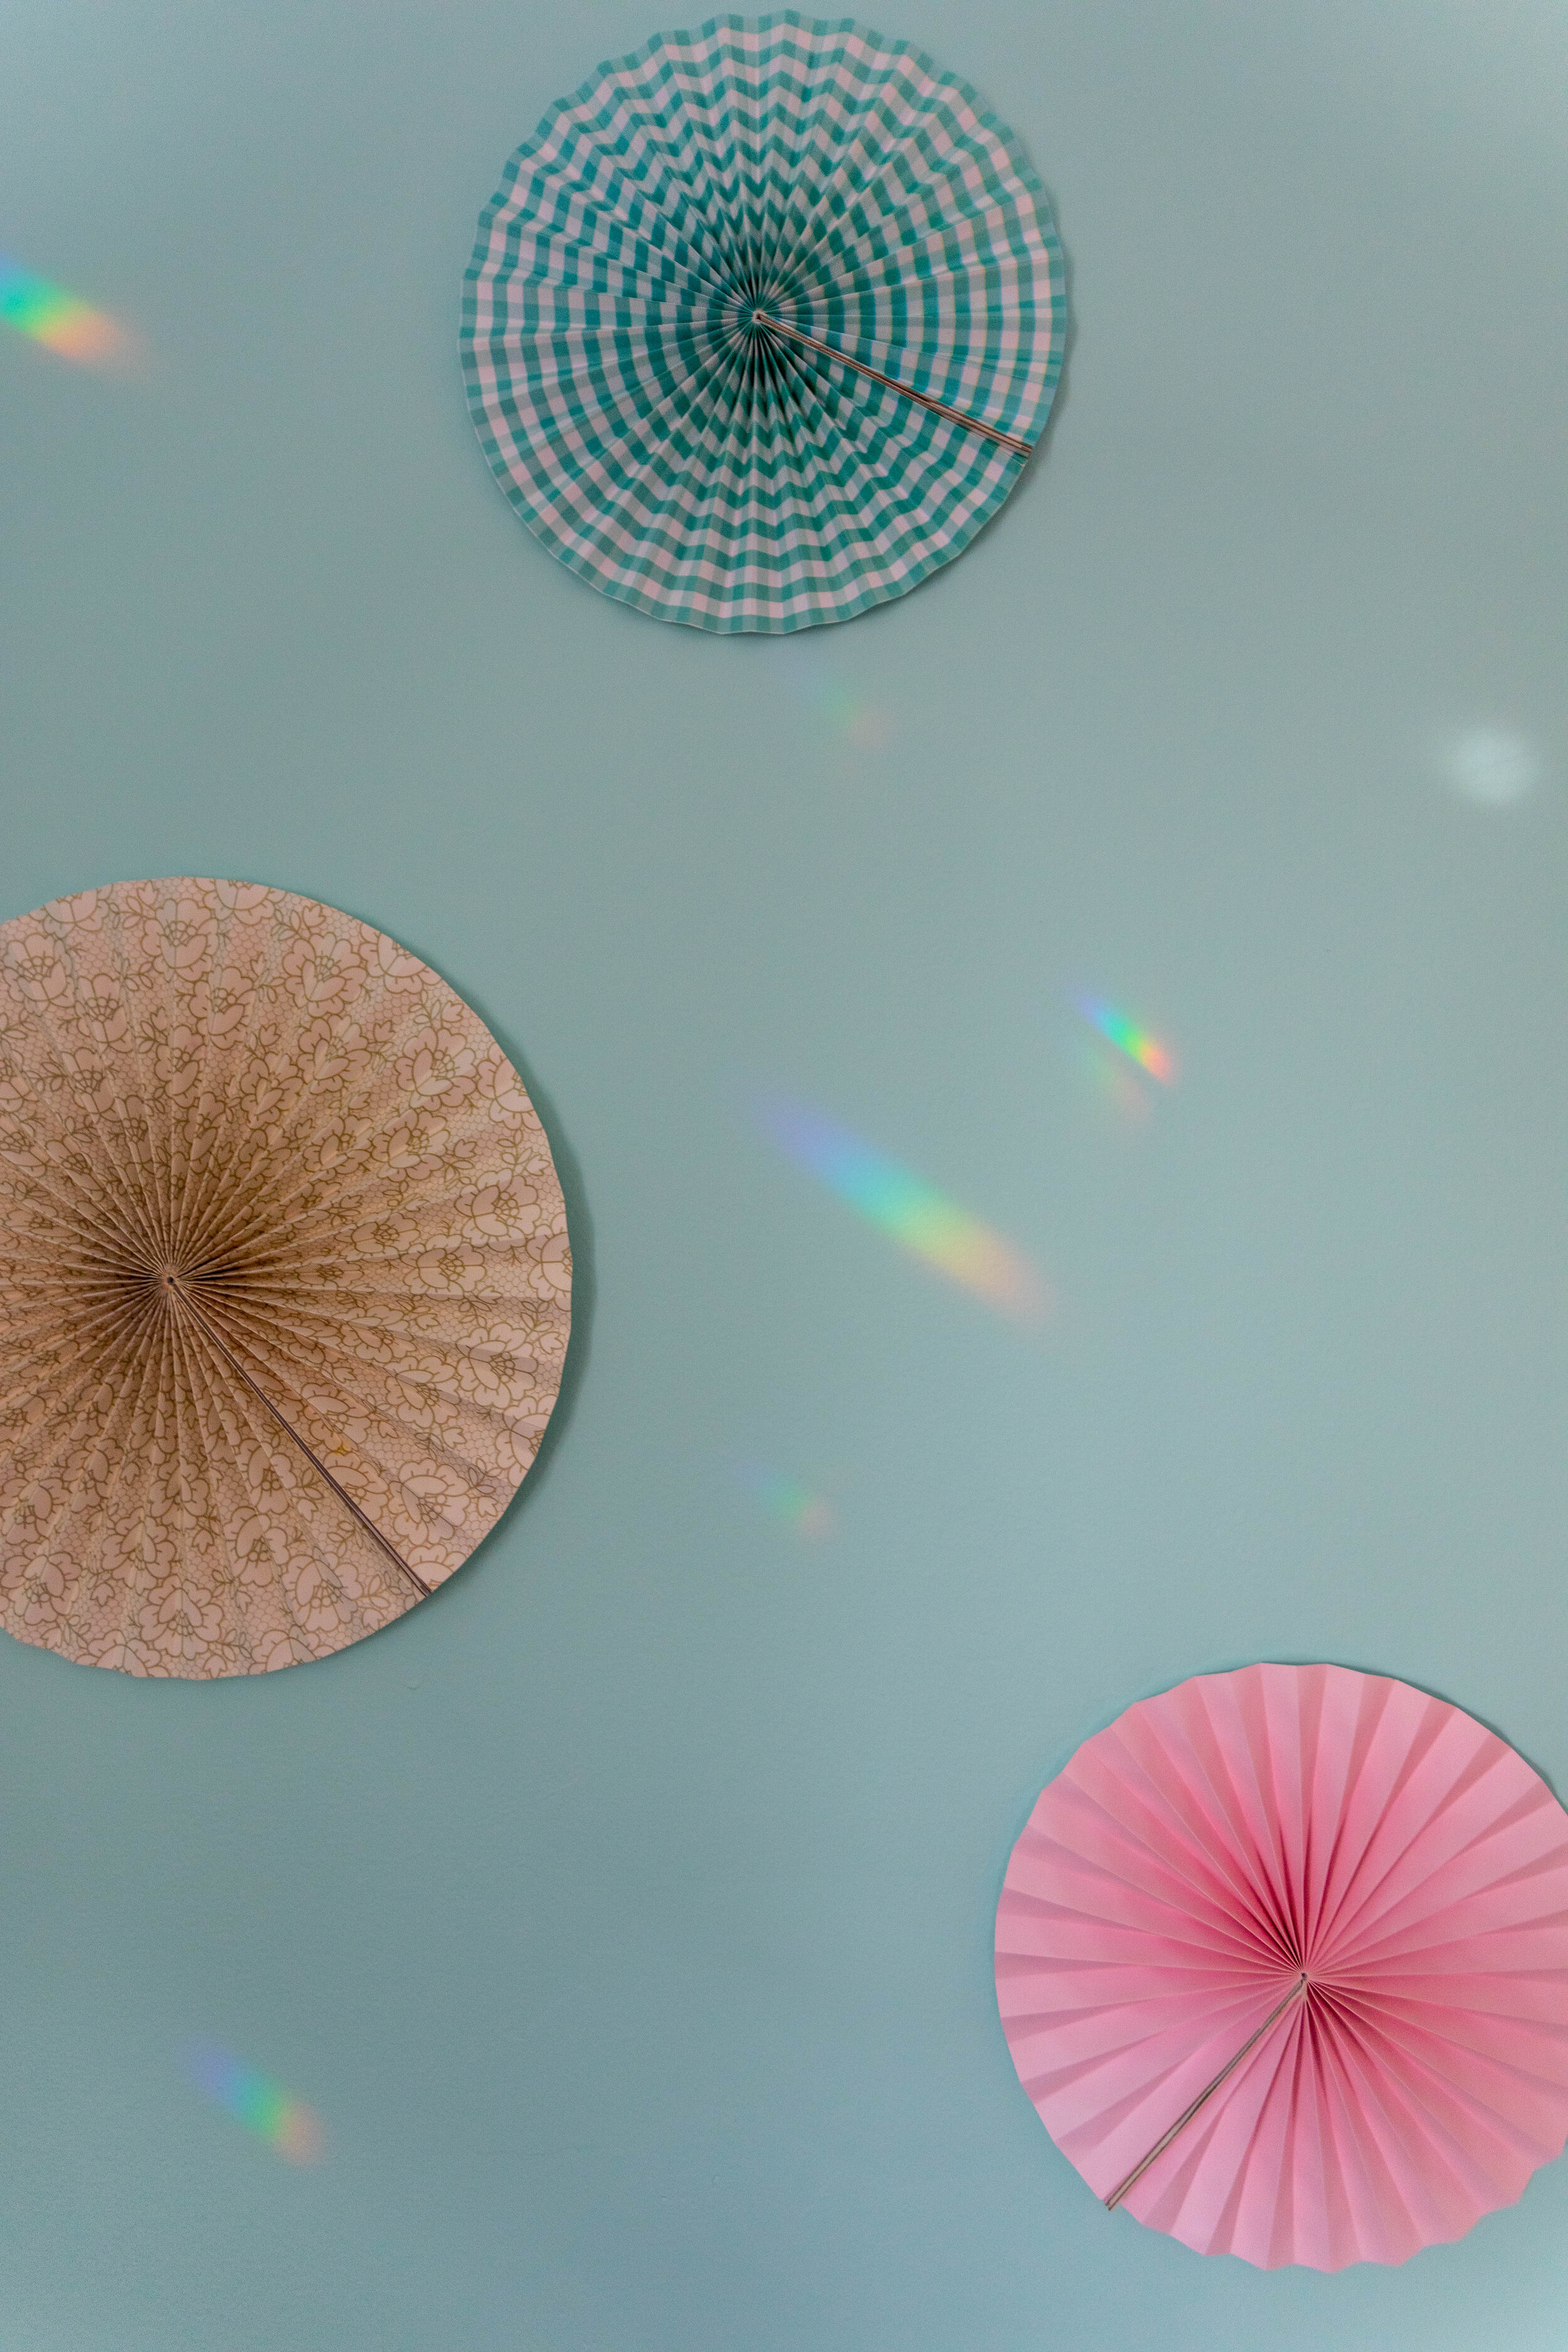
For Christmas this year we were definitely less focused on buying toys that she’d get bored with in 5 minutes and more focused on buying things she’d enjoy for longer, so I picked up this unicorn lamp, this unicorn laundry hamper, and some unicorn hooks (I can’t find the original link, but these are similar) knowing that I would incorporate them into her new room. Above her dresser is a painting that I made several years ago that I think goes well with the color scheme. Surrounding the painting are some fan decorations that I bought for a friend’s bachelorette party a few years ago. I’m glad I kept them, because now they get a second life living on my daughter’s wall! I just opened them all the way and attached one side of the fan to the other with a Command strip, then used another Command strip to stick them to the wall. They’re lightweight and so far they seem to be staying up pretty securely.
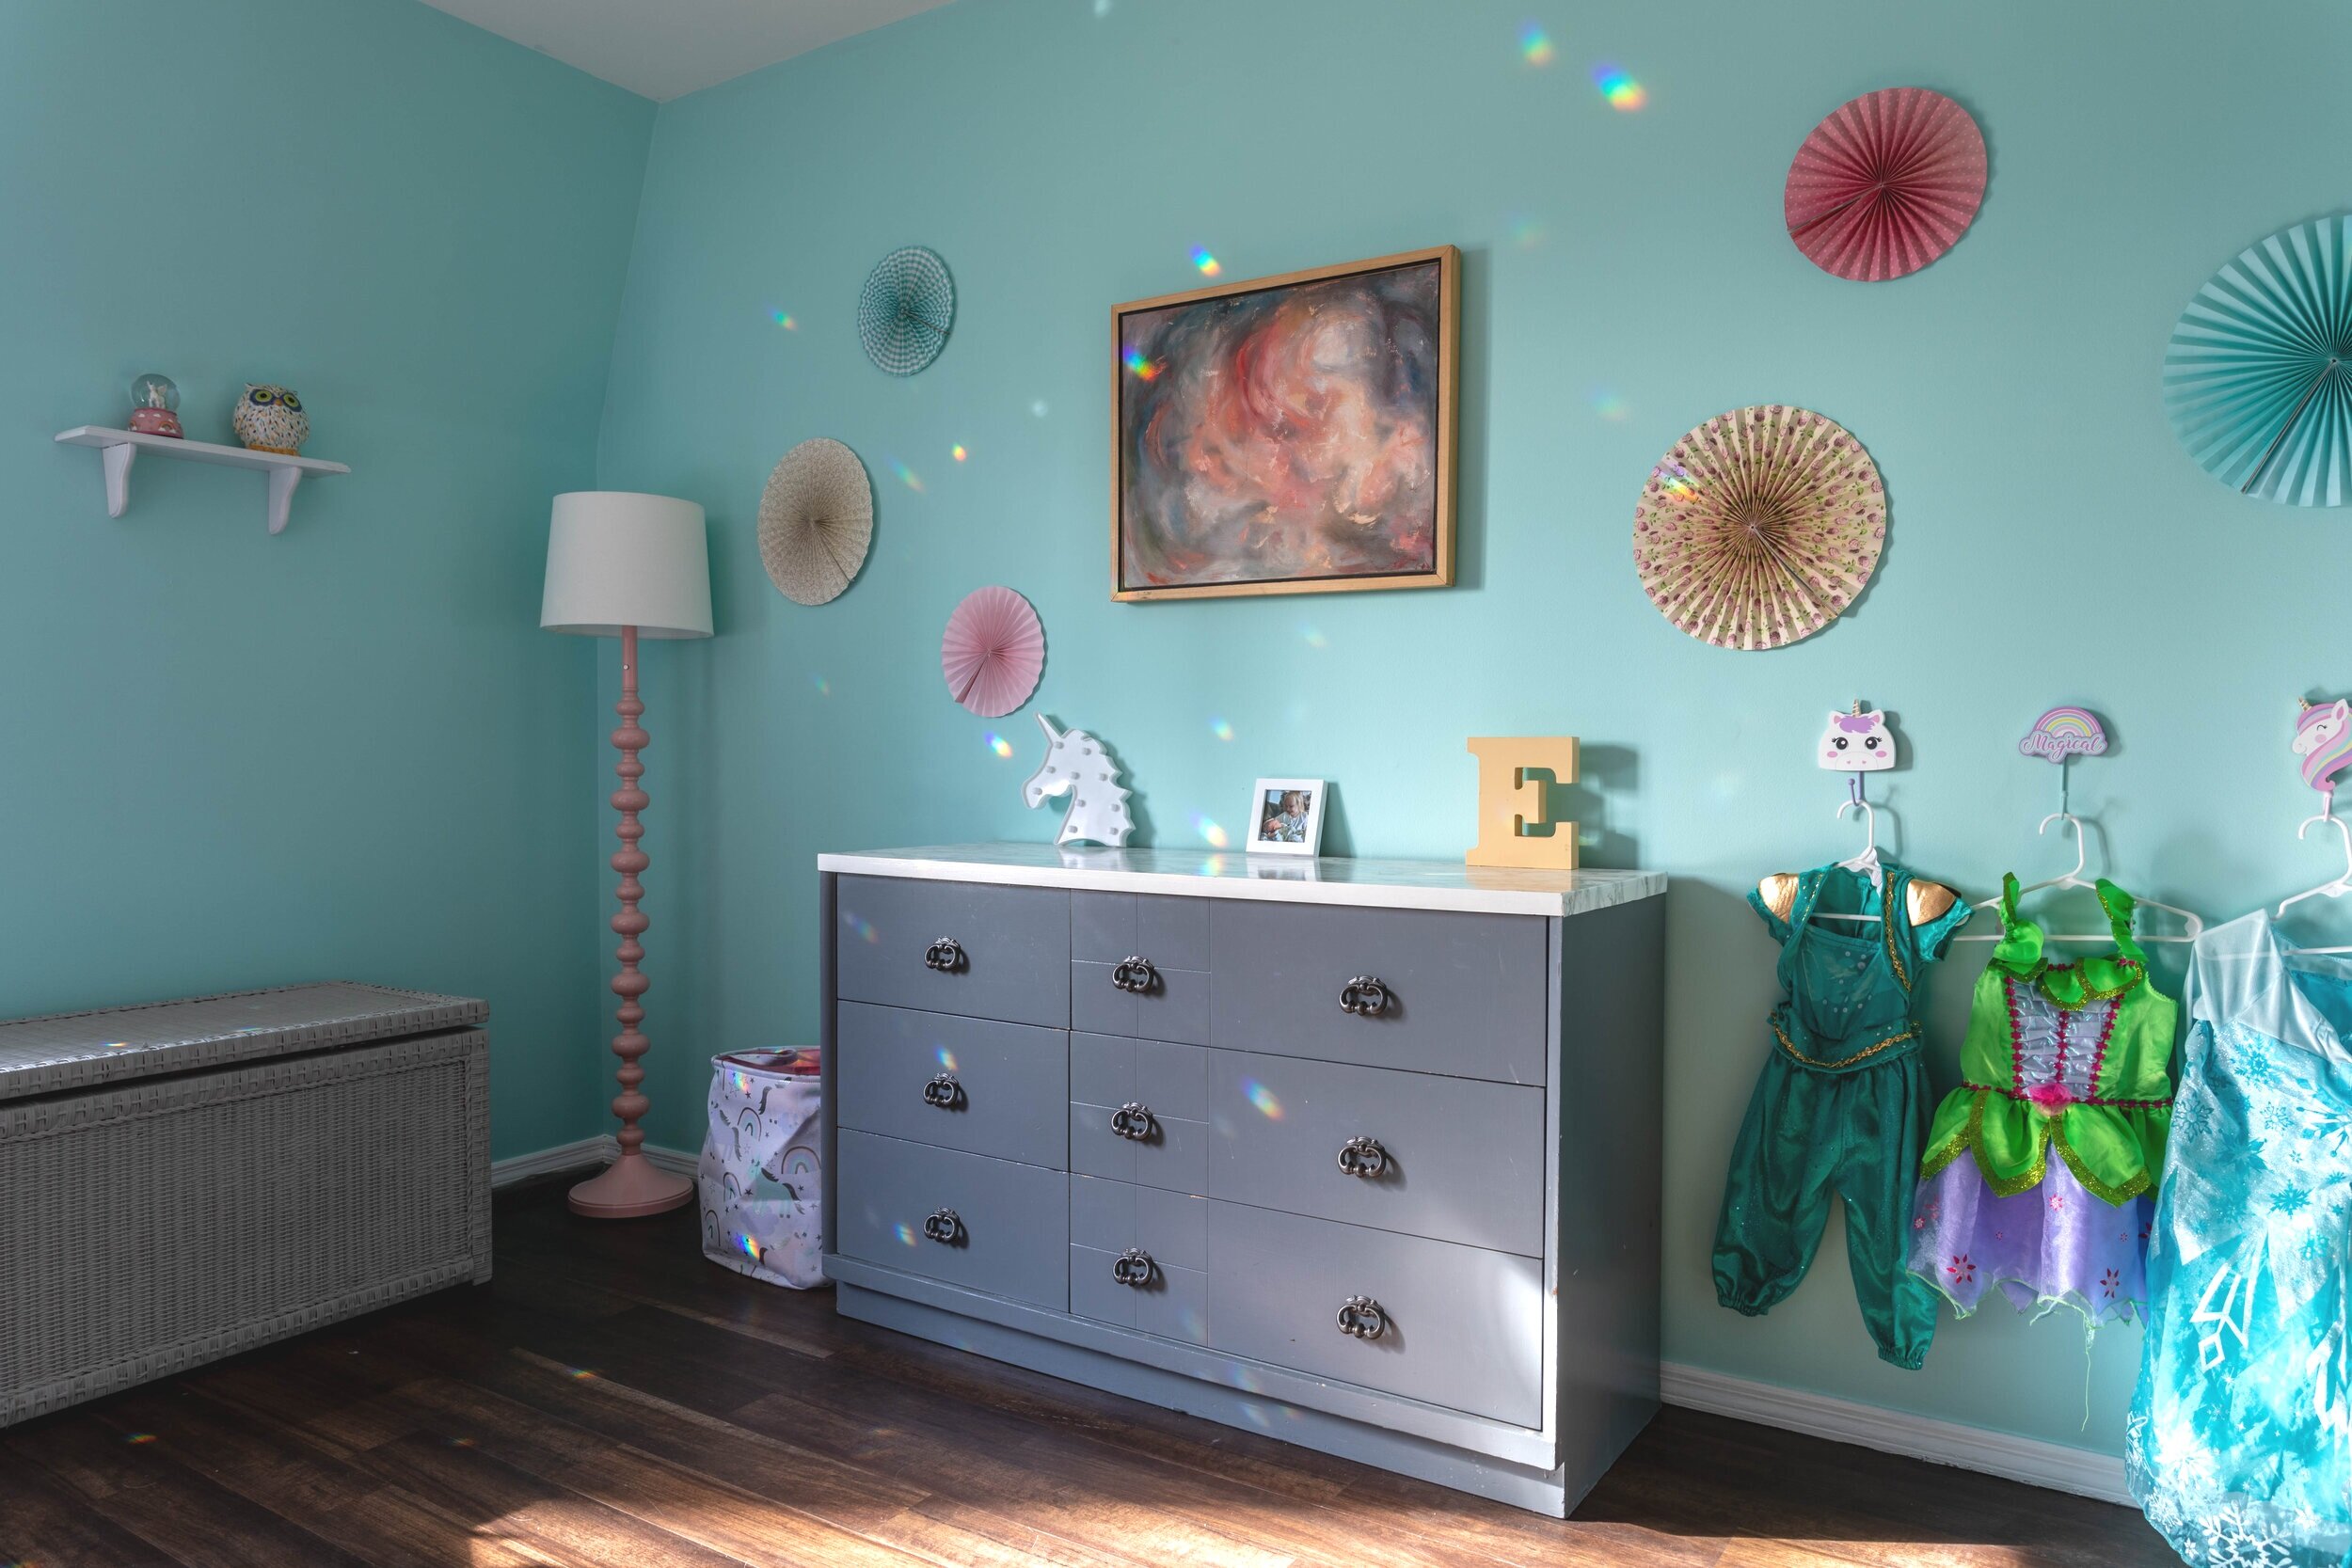

On the wall with her window is an (admittedly undersized) shelf with a couple of her more breakable items, like this unicorn globe and her owl piggy bank. I plan to either get a larger shelf or balance out the wall with pictures on either side. Also, we need to replace the blinds in her window, so I didn’t bother to hang the old ones up.

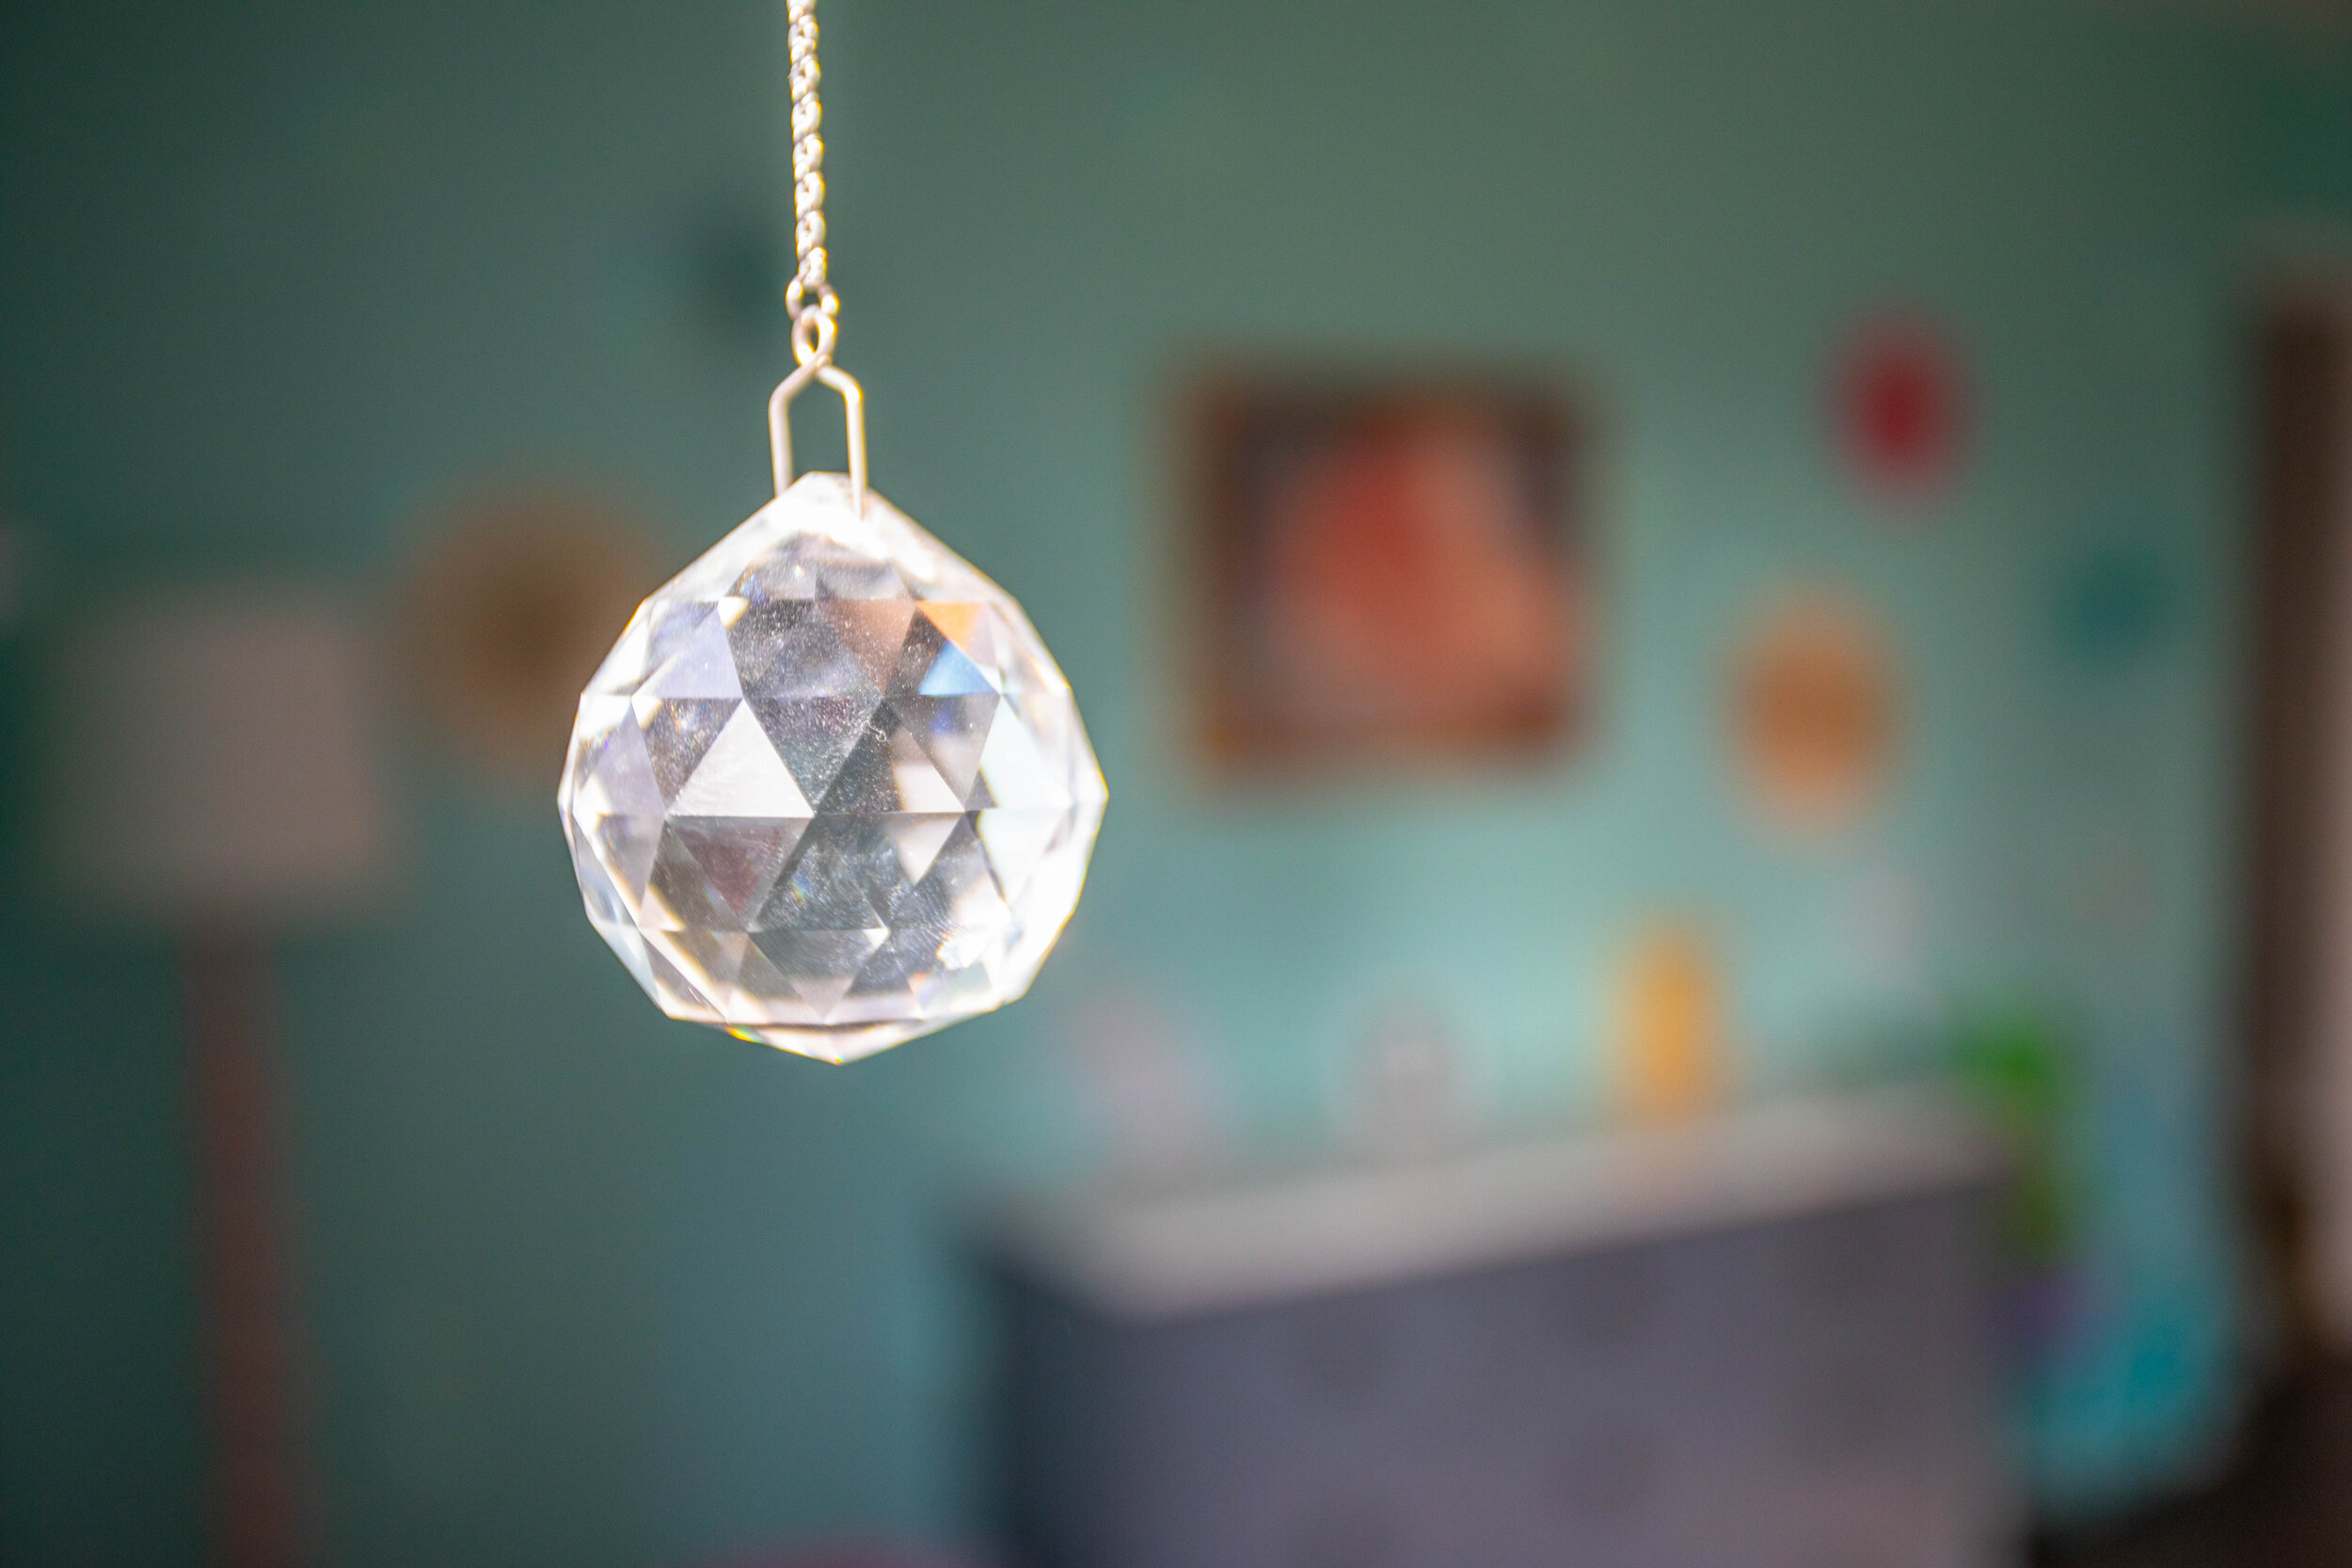
In the meantime, she can enjoy the rainbows that the prisms I hung in her windows cast all over her room whenever the sun shines in.
I was also PUMPED to find that pink lamp in the corner at a thrift store for $30!! I was eyeballing this guy at Target for quite a while, but I tend to put things in my online cart and let them sit there for months before I click the “checkout” button. What can I say? I have commitment issues.
I usually shy away from buying lamps at thrift stores - the potential fire hazard scares me and having them rewired is kind of an inconvenience. But this one was listed as new and even had the plastic on the lampshade and styrofoam bits stuck to it. It’s not the same one from Target, but you really can’t tell unless you put them side-by-side. And it was $50 cheaper!

This room is definitely still a work in progress, but I have big plans to round it out.
I mentioned previously all the pictures I need to hang and the fact that I need to replace the blinds. I also have some work to do on the closet doors. If you’ll notice below, two of them are missing. We have the doors in the spare bedroom, but after the flooring was replaced by the previous homeowners, the doors get caught on the floor in the middle of the door frame and won’t slide. We’re not quite sure how to fix that yet. I’m thinking we’ll need to cut a sliver off the bottom of each of them. Aside from that little hiccup, painting the trim bright white has made it glaringly obvious how dull the closet doors are, so those will be getting a fresh coat of paint before long.

Another thing to tackle is painting the dresser (again). I bought this dresser and the tall counterpart (currently living in the master bedroom) at a thrift store years ago and refinished them. The color I chose conveniently worked for a long time, and it’s not terrible in this room either, but I think a crisp white would be better. Plus, I’m itching to change the drawer pulls out for something fun and quirky.
Lastly, this room is screaming for an area rug, and I’m ready to deliver. Honestly, if I could spend a couple of hours a day shopping for area rugs I’d be so happy. I’ve been pining over oriental rugs for years but I’m having a hard time convincing Lucius that they can look great. I think our daughter’s room would be a great place to start incorporating them, and I have my eye on several:


So, obviously there’s still lots to do here but I’ll keep chipping away and one day it’ll be complete… just in time for us to move again for me to update her room for the next stage of her life. We’ll see!

That time we bought a new microwave on accident
Ok, so not entirely on accident. But we didn’t realize we didn’t need a new microwave.
New houses sometimes come with appliances included, which I’ve learned can be a blessing and a curse.
For instance, in our latest house, we were lucky to have all the kitchen appliances included, but we had to buy a new washer and dryer when we moved in. Of course we weren’t pumped about spending money on a new washer and dryer (especially considering all the expenses that come with moving), but we didn’t mind too much since the washer and dryer that we would have inherited, had the previous owners left them, would have needed to be replaced before long anyway.
While we were fortunate that all the kitchen appliances that came with the house were in working order, they had their quirks, specifically the microwave. Not only did it sound like it was going to shake itself off the wall mount whenever it was running, it would beep incessantly when the timer went off. We definitely had plans down the line to replace all the appliances at the same time to hopefully get a bit of a discount (and perhaps even plan our purchase around a big sale to get even more money off!). Oh, to dream.
Cut to a few weeks ago.
So there I was minding my own business just heating up some lunch. When the microwave stopped shuddering and the timer beeped over and over and over again I went to check on my food. It was still a little cold so I put it back in for another minute. But nothing happened. I opened the microwave door and closed it again. Still, no nothing. Thinking I blew a fuse I tested the surrounding lights and outlets, but everything was in working order. Perturbed, I ate my not-really-that-warm lunch and when Lucius got home I told him about my annoying adventure. Lucius also checked the lights and checked the outlets and confirmed that everything (except the microwave) had power (thanks dear, I could have told you that).

View the 4 outlets (there’s one behind the olive oil on the counter) and 4 switches (we’re in progress of replacing one, hence the blank space) on the image above. We checked all of them!
Anywho, it was ultimately decided that we needed a new microwave. Not the end of the world, but not ideal as we hadn’t planned on replacing the rest of the appliances yet, and would therefore likely miss out on a little bit of a discount when we replaced them.
So a couple of days later, Lucius buys a shiny new microwave. He spends some time installing said microwave, with help from yours truly. Once it’s installed we go to plug it in and…. nothing. Nothing happened. No power. Nada. What!?
Cue Lucius once again testing all the light switches, the outlets, and the fuse boxes (we have two, for some reason). When everything proved to be in working order he goes into the closet on the other side of the wall that the microwave lives on, which conveniently enough is exposed because that wall is shared with the stairs and our water heater is under the stairs.

Lo and behold…. there’s ANOTHER FRIGGIN’ FUSE BOX in the closet under the stairs…. JUST FOR THE MICROWAVE and apparently the oven too. And of course the breaker had flipped.

So long story short, we didn’t need a new microwave. Once we flipped the breaker, voila! We had power. *cue facepalm. We ultimately decided to keep the new microwave because it was kind of a pain to install and we were planning on buying it down the road anyway BUT, here’s a PSA to check your house for 8 million fuse boxes before you go buy new stuff, or something.
And speaking of quirky appliances, check out the hilariously long symphony our washer and dryer play when they’re done:
Samsung washing machine melody - this isn’t my washing machine but obviously I’m not the only one who owns this appliance. I found the video on YouTube and some of the comments are hilarious.

Well, hello there.
So I’ve been thinking about starting a blog… for about 6 years.
So I’ve been thinking about starting a blog… for about 6 years.
In the summer of 2012 my husband, Lucius, and I bought our first home – a cute little one story, two-bedroom, one-bathroom house that was pretty much a white box, aside from the wallpaper in the kitchen and the pink tile in the bathroom.
I’ve always been creative. I love art and I even have my degree in painting. I suppose it was only natural that I made my home my canvas. To my delight, Lucius quickly jumped aboard the home renovation train. Shortly after we started making home improvements, I toyed with the idea of starting a blog to document our renovations, certainly inspired by my favorite DIY blog YoungHouseLove.com. As I often do, I talked myself out of it and continued renovating simply for the love of renovating.
Five years later, we snagged a gorgeous two-story, four-bedroom, one-and-a-half bath 1927 American Foursquare. From these two houses we learned so much about home renovations, from HVAC, plumbing, and installing windows to painting, stripping wallpaper, and the best way to hang curtains.

Unfortunately, due to circumstances out of our control, we had to make the decision to move out of that amazing and historic home last fall. At the end of October, we moved into a two-story, four-bedroom, two full and one half bath French Provincial-style house.

My family lives a couple of hours away. When I visited this past Thanksgiving I was a little overwhelmed by how many of my family members wanted to see pictures of the house and our plans for renovating it. Historically I’ve kept a fairly good account of our progress on our homes on Facebook but have been slacking on this house because, simply, life is crazy, and we have a 4-year-old and an 8-month-old. But thinking about it, I realized we’ve only lived here about 4 months and have already started making so many updates (we just can’t help ourselves!) and got the urge to start documenting our progress again. So here I am, beginning this exciting (and admittedly intimidating) journey. Stay tuned!