

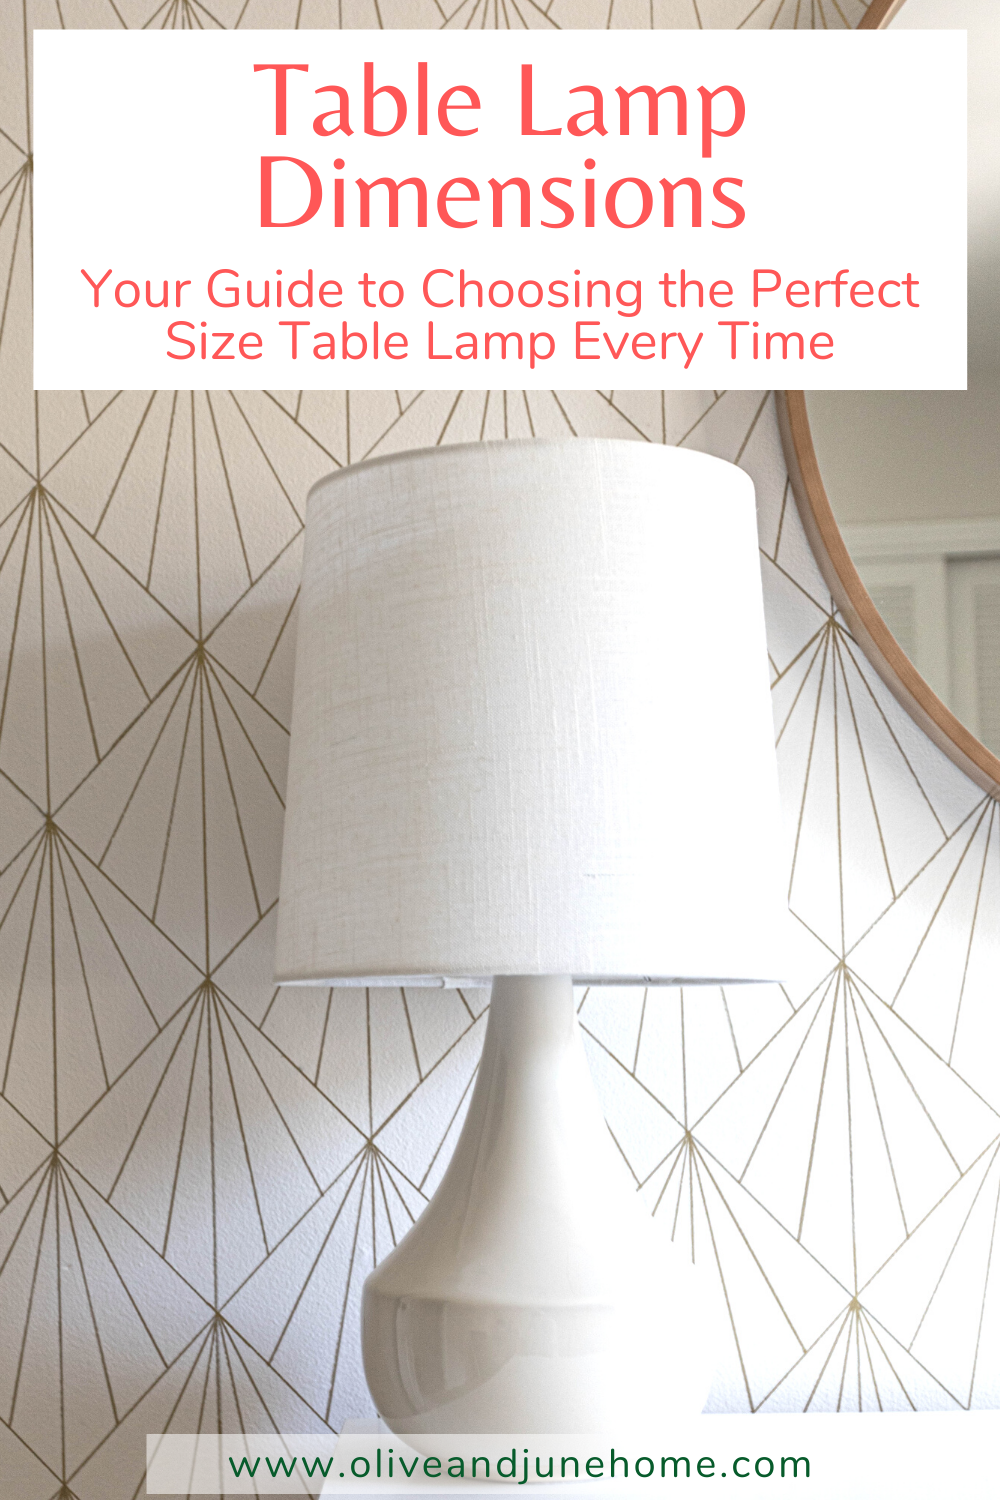
How to Pick the Right Size Lamp (Every Time!)
A lamp is a lamp is a lamp, right? WRONG. Although a lamp may easily serve its main purpose of lighting up a room, choosing the wrong size can really skew your design. But how do you pick the right size lamp? In this post, we’re going to talk all about how to choose the correct size table lamp, so you can select the perfect size lamp on the first try (and not try out a bunch like I did).
Choose the Perfect Size Lamp for Every Space
A lamp is a lamp is a lamp, right? WRONG. Although a lamp may easily serve its main purpose of lighting up a room, choosing the wrong size can really skew your design. But how do you pick the right size lamp?
You wouldn’t think picking out a lamp would be difficult, would you? I certainly didn’t… until I tried to pick one out for my desk.
As I was perusing my options, I quickly realized I have no clue how to choose the right size lamp! Standing in Target, I found myself with lamp paralysis, second-guessing every lamp I laid eyes on. (Don’t worry, I don’t think it’s contagious.)
You see, all these years, I’ve just been winging it. Sometimes I’ve bought the right size, but other times I’ve been way off base. But since I just ran into this issue, I figured other folks have likely had this conundrum before too - and that’s okay! There’s more to it than you’d think.
That’s why in this post, we’re going to talk all about how to choose the correct size table lamp, so you can select the perfect size lamp on the first try (and not try out a bunch like I did).
I’ve been researching this topic a ton, and I’ve learned that there are two main questions to consider: “what size lampshade do you need?” and “how tall should your lamp be?”. Simply picking out a lamp that’s pretty won’t cut it.
To buy the right lamp for your space, answering these two questions can make or break your room design. And the answer to both of these questions is more mathematical than I expected.
How to Choose the Right Size Lamp
Lamp base and shade requirements can vary depending on the room and what types of tasks are performed there. Height, width, and style all play an important role in choosing the best lamp for your space. And to demonstrate how these elements come into play, I’m going to regale you all with my astonishing photo manipulation skillz once again. You’re welcome.
Height
Height is one of the most involved factors in choosing the right lamp. Let me explain what I mean.
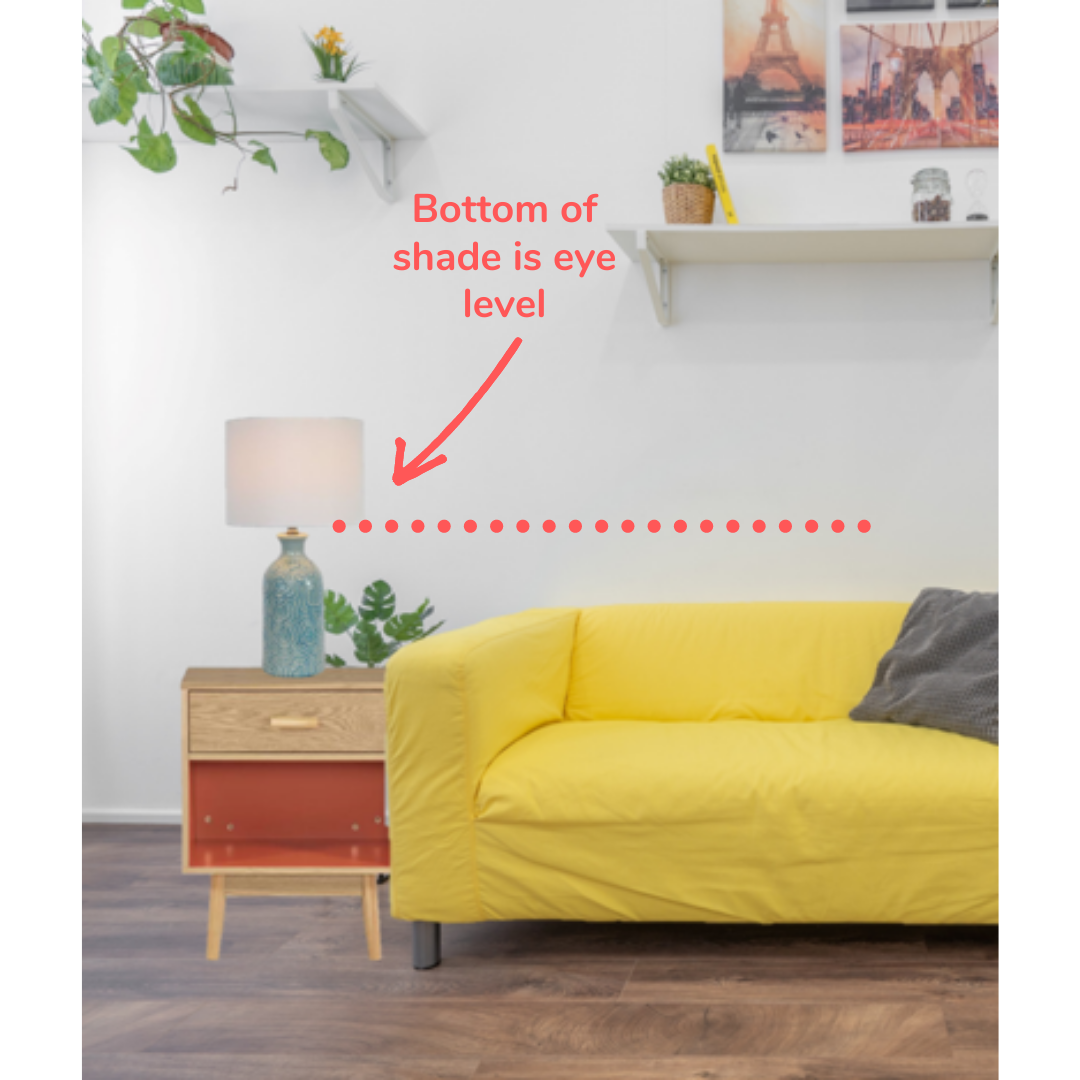
First of all, when considering the height of your lamp, you want to make sure that whatever surface your lamp is on, it isn’t so tall that it shines into your eyes. To prevent this, make sure the bottom of the lampshade is no higher than eye level. This should hide the glare from the light bulb and actually allow you to see. You’re trying to light the space - not blind yourself.
For example, in the image below, if you were to sit on the couch, the bottom of the lampshade should hit at or below eye level.
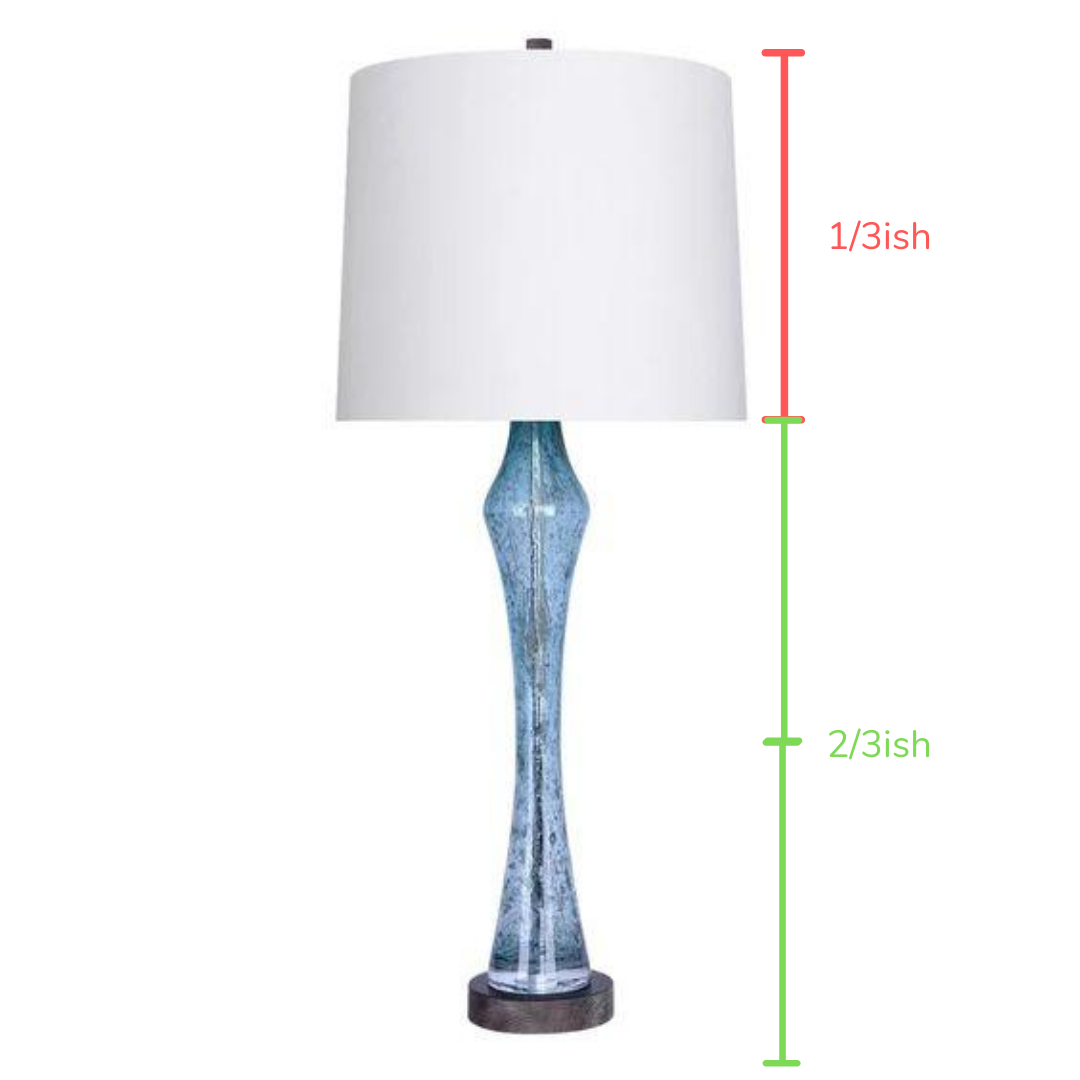
But you should also consider the ratio of the height of the shade to the lamp base. The shade should be approximately ⅓ the height of the entire lamp (including the bulb and/or harp). This means, if your lamp is 24 inches tall from base to bulb/harp, your shade should be around 8 inches tall.
I’m going to throw it out there up front - rarely will any base/shade combination have the perfect ratios, but as long as you’re within a couple of inches it’ll look fine. Take the below image for example. Although the shade is a little larger than 1/3 the size of the base, it’s close enough that it still looks okay.
Lastly, it’s a good idea to consider the scale of the table your lamp is sitting on in relation to the lamp base. If you had a small end table and a giant lamp, it would certainly look (and probably be) top-heavy, and vice versa!
As a rule of thumb, consider that your lamp should be a maximum of 1.5 times the height of your table.


Width
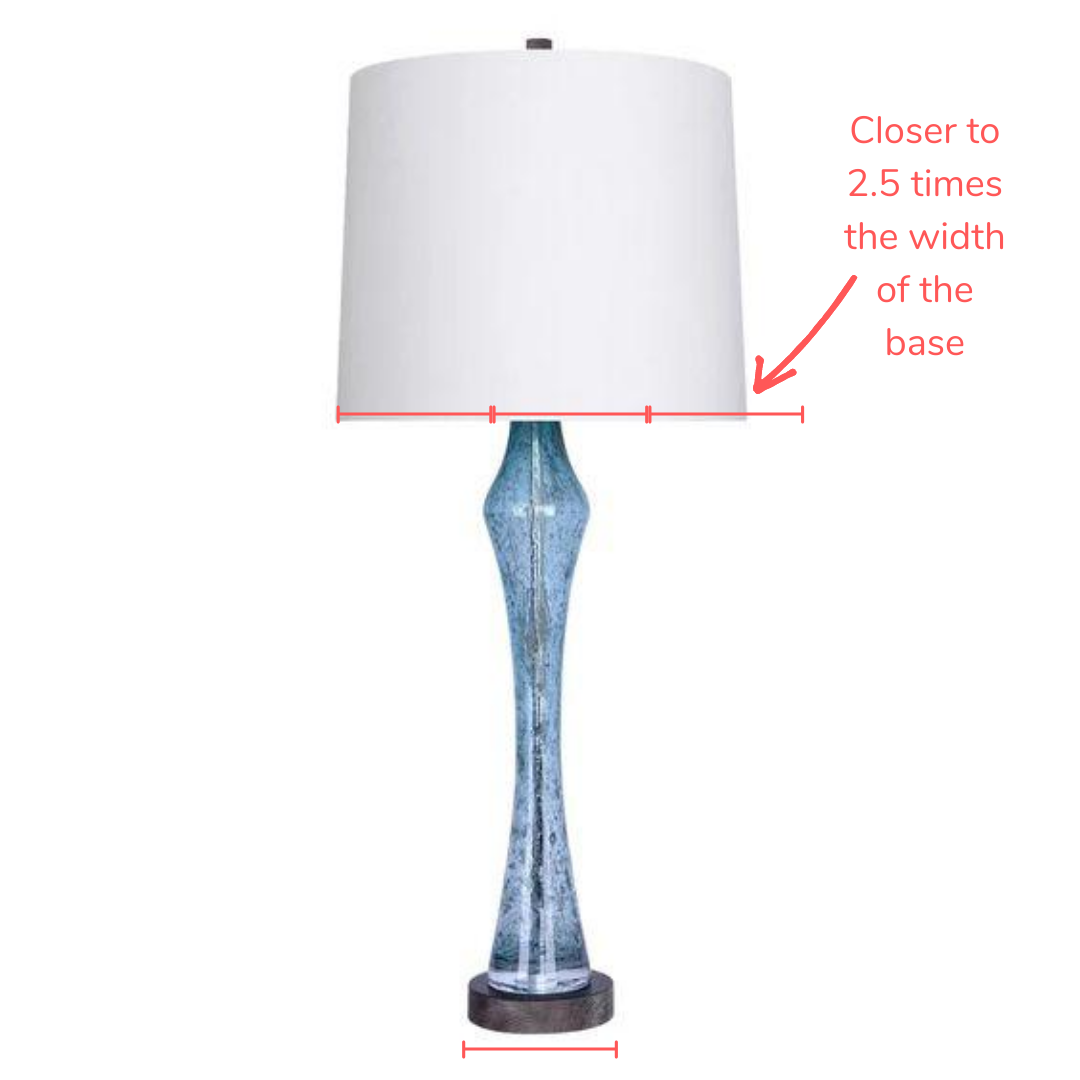
To make things more complicated, it’s also advised that the measurement across the bottom of the shade should be twice as wide as the diameter of the base of your lamp.
For example, if the base of your lamp is 6 inches wide, the bottom of your lampshade should be 12 inches wide (give or take an inch or two). For a square or rectangular lamp base or shade, measure diagonally.
But don’t give up yet! In the example below, you can see how that measurement isn’t exact. Remember - within an inch or two is close enough! No one is going to take a tape measure to your lamp - and if they do, do you really want that person in your house anyway?
One other, more straight-forward aspect to lamp width: you should also consider the width of the table your lamp is sitting on and make sure your lampshade is no wider than the table. This not only looks better but also helps prevent it from being accidentally knocked over.

Style
The last element of picking the right lamp is definitely the most intuitive, least math-involved (yay!), and dare I say most important? Simply enough, you want your lamp to “go” with the style of the table it’s sitting on (say whaaat?).
For instance, if you have a big, chunky table, you can probably get away with a big, chunky lamp. But a super skinny lamp (even if it was tall) would look odd.
I would also think about the style of not only the table but the entire room. Your lamp is essentially a functional design element - have fun with it - but make sure it fits the space.


Summary
I know I just threw a lot of information at you, so here are the main points:
The bottom of the lampshade should be no higher than eye level.
The lampshade should be approximately ⅓ the height of the entire lamp (including the bulb and/or harp).
Your lamp should be a maximum of 1.5 times the height of the table.
The shade should be twice as wide as the diameter of the base of the lamp.
The lampshade should be no wider than the table it sits on.
Your lamp should “go” with the style of the room.
Choosing a Lamp for my Office
So, following these rules, was I FINALLY able to find a lamp for my office? Well, allow me to tell you the story of my little lamp adventure.
Of course a few weeks after I posted about the DIY Sharpie wall in my office, I learn that I have the completely wrong-sized lamp in there!

Granted, I want to save some face by saying that a) I’ve always felt like something was “off” with this lamp but never quite knew what and b) I stole this lamp from our bedroom because I needed one in my office in a hurry. It was never meant to be permanent. Excuses aside, I figured it was a prime example of what not to do when choosing a lamp. And here’s why:
Mistake #1: The biggest no-no here, and the reason I now realize why this lamp has always felt “off”, is the giant lampshade. It’s half the height of the lamp! And it’s probably 3 times as wide as the base.
Mistake #2: I know the desk looks pretty in the picture above, but in real life, I have my giant desktop up there and it feels CROWDED. This lamp is way too big to be functional in this space.

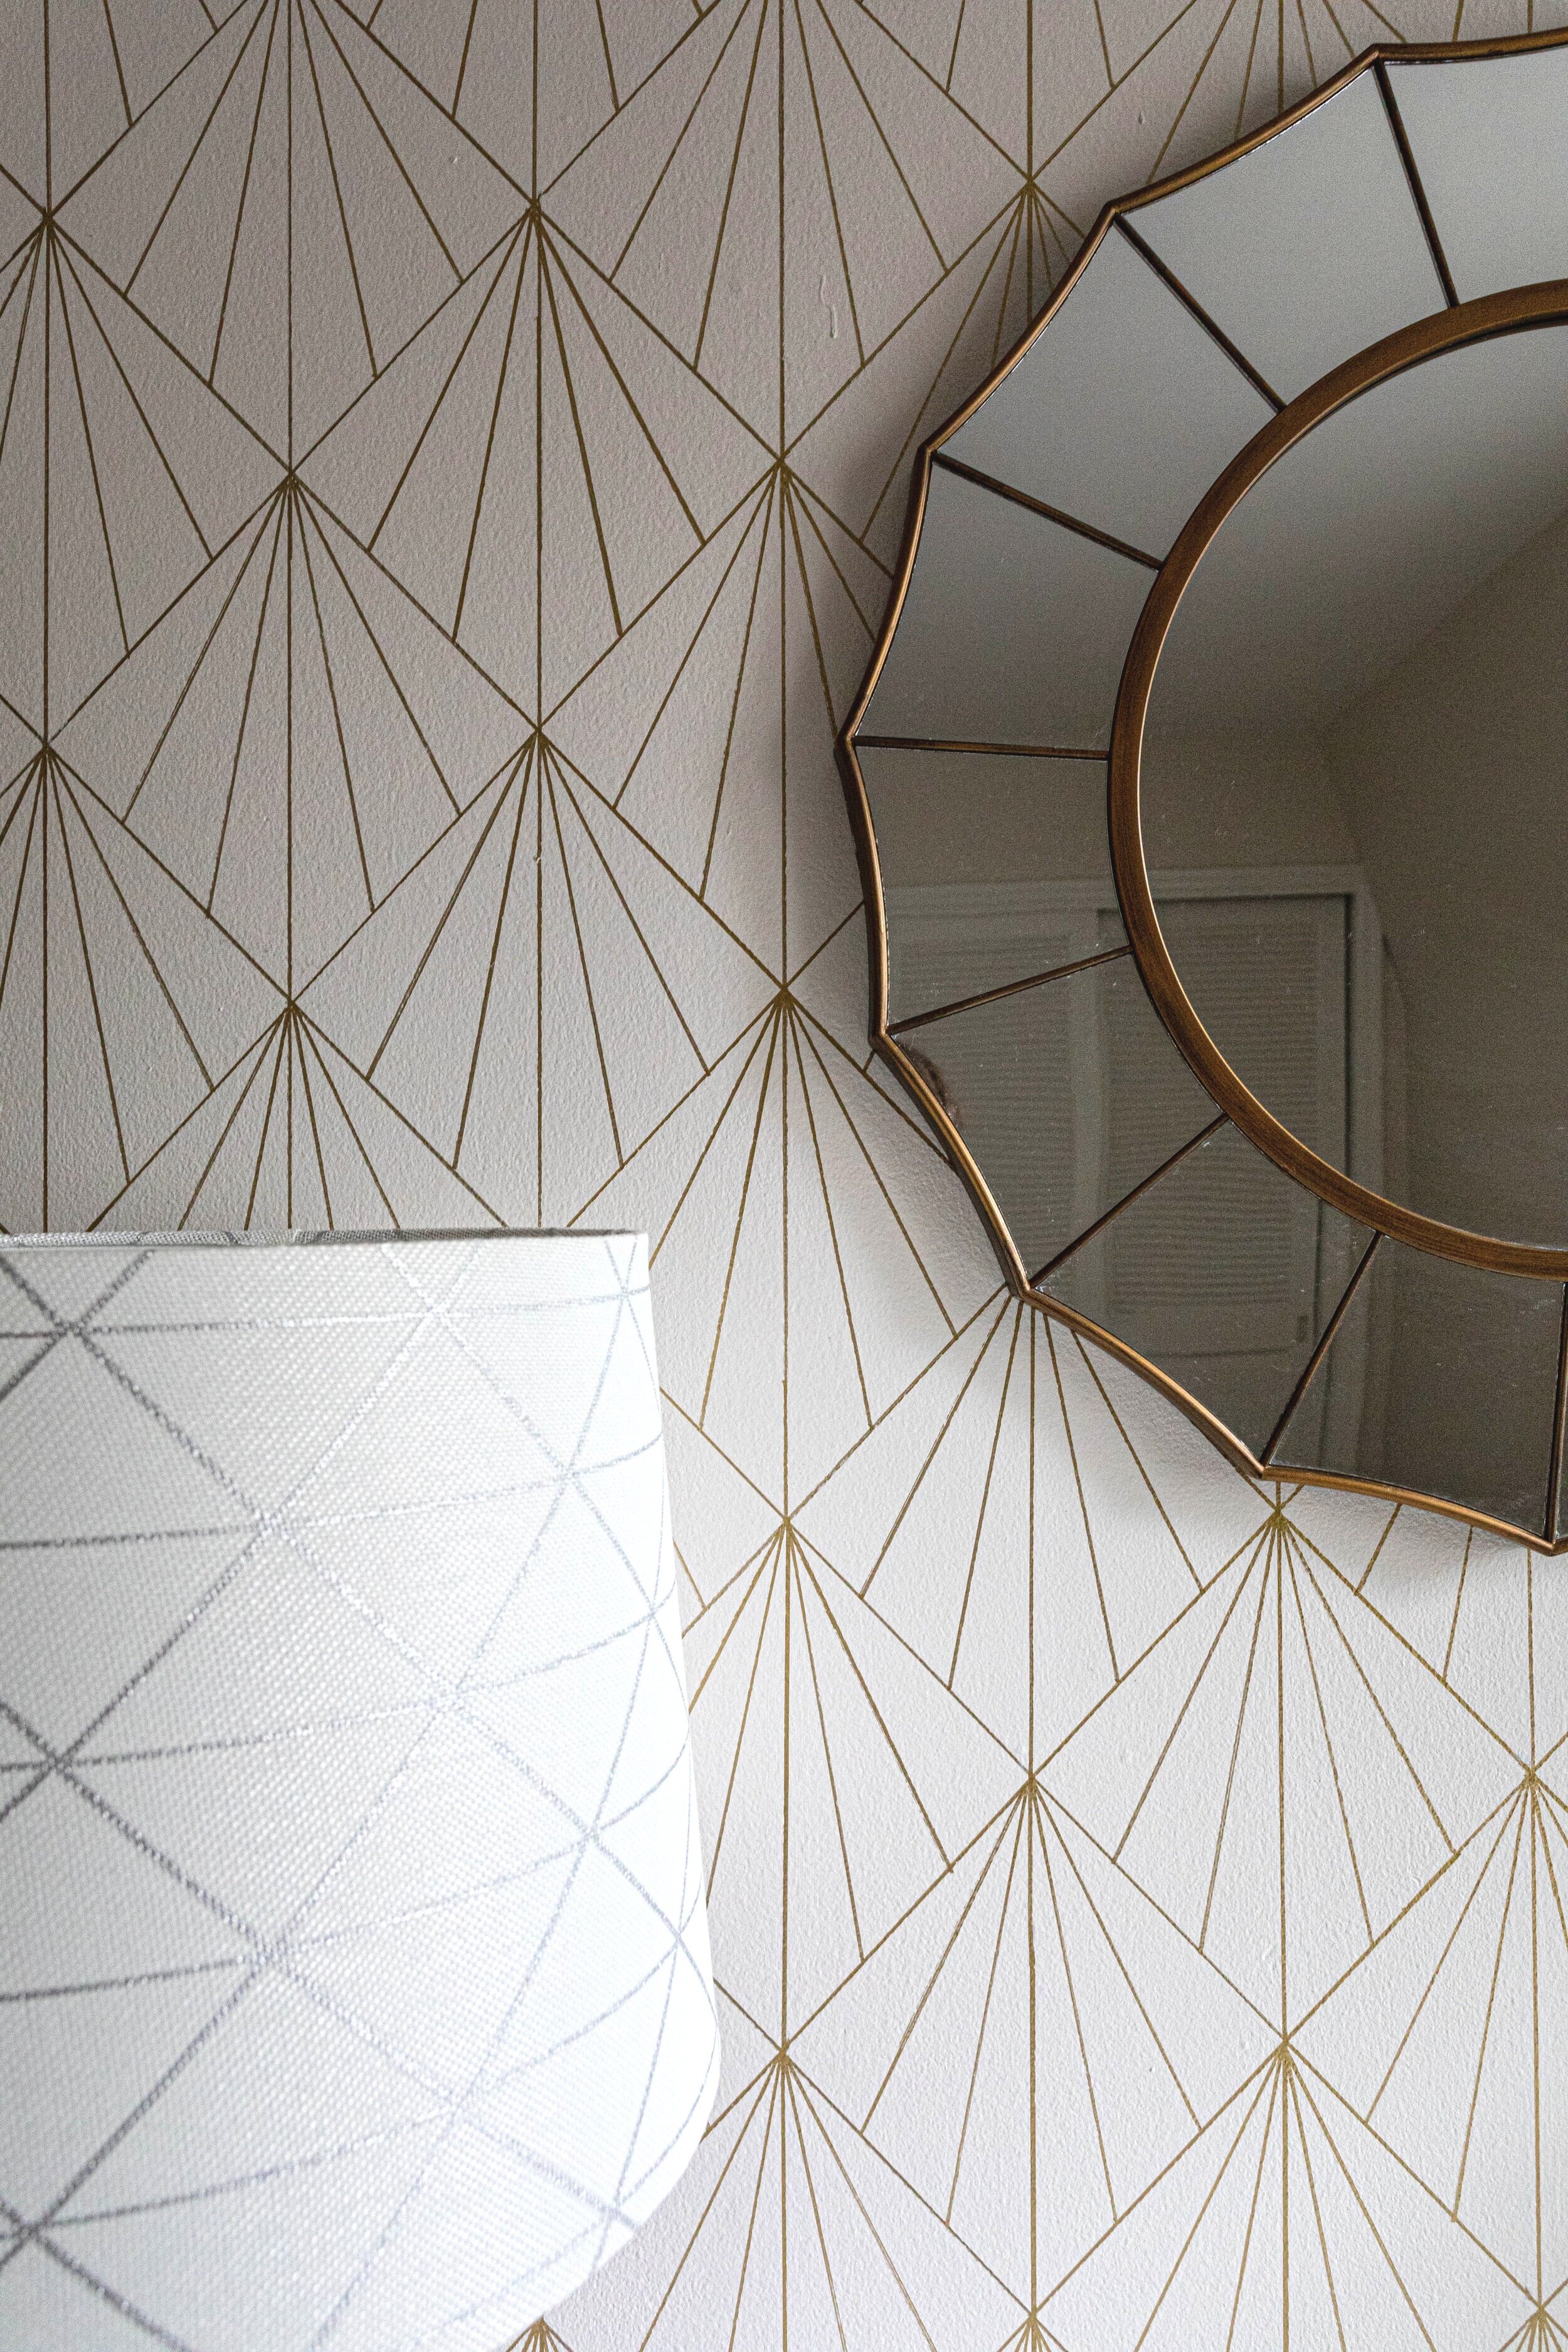
Mistake #3: I know I mentioned above that this lamp was a temporary fix, but to really drive the point home I think it’s important to point out the mismatching styles going on. First of all, the wall is so busy that the lines on the lampshade almost make you dizzy. And second, the style of the base is a little more traditional than this room can handle.
So while I was in Target on my lamp replacement adventure, I picked up this cutie, fully unsure of my purchase because I hadn’t yet written this post and learned all this valuable information! I came home and plopped it on my desk and had a couple realizations…
Remember earlier when I mentioned scale as an important element to consider? This is why.
While the style was okay (there are a lot of gold/blonde wood tones going on though), this lamp was way too dainty for this space. I could immediately tell I needed something bulkier.
And just to see if another size lamp that I already had would work better, I borrowed a lamp from one of my daughter’s rooms.
Right away it was glaringly obvious it wasn’t tall enough. At this point I started to feel a little like Goldilocks and started researching the correct lamp size… and a blog post was born. (Isn’t she beautiful!?)
Now, you may be wondering that since I’m putting the lamp on a desk why I didn’t just buy a desk lamp. And the answer is simply: I didn’t want to. A desk lamp would be fine, but I was more drawn to the table lamps so that’s what I went searching for.
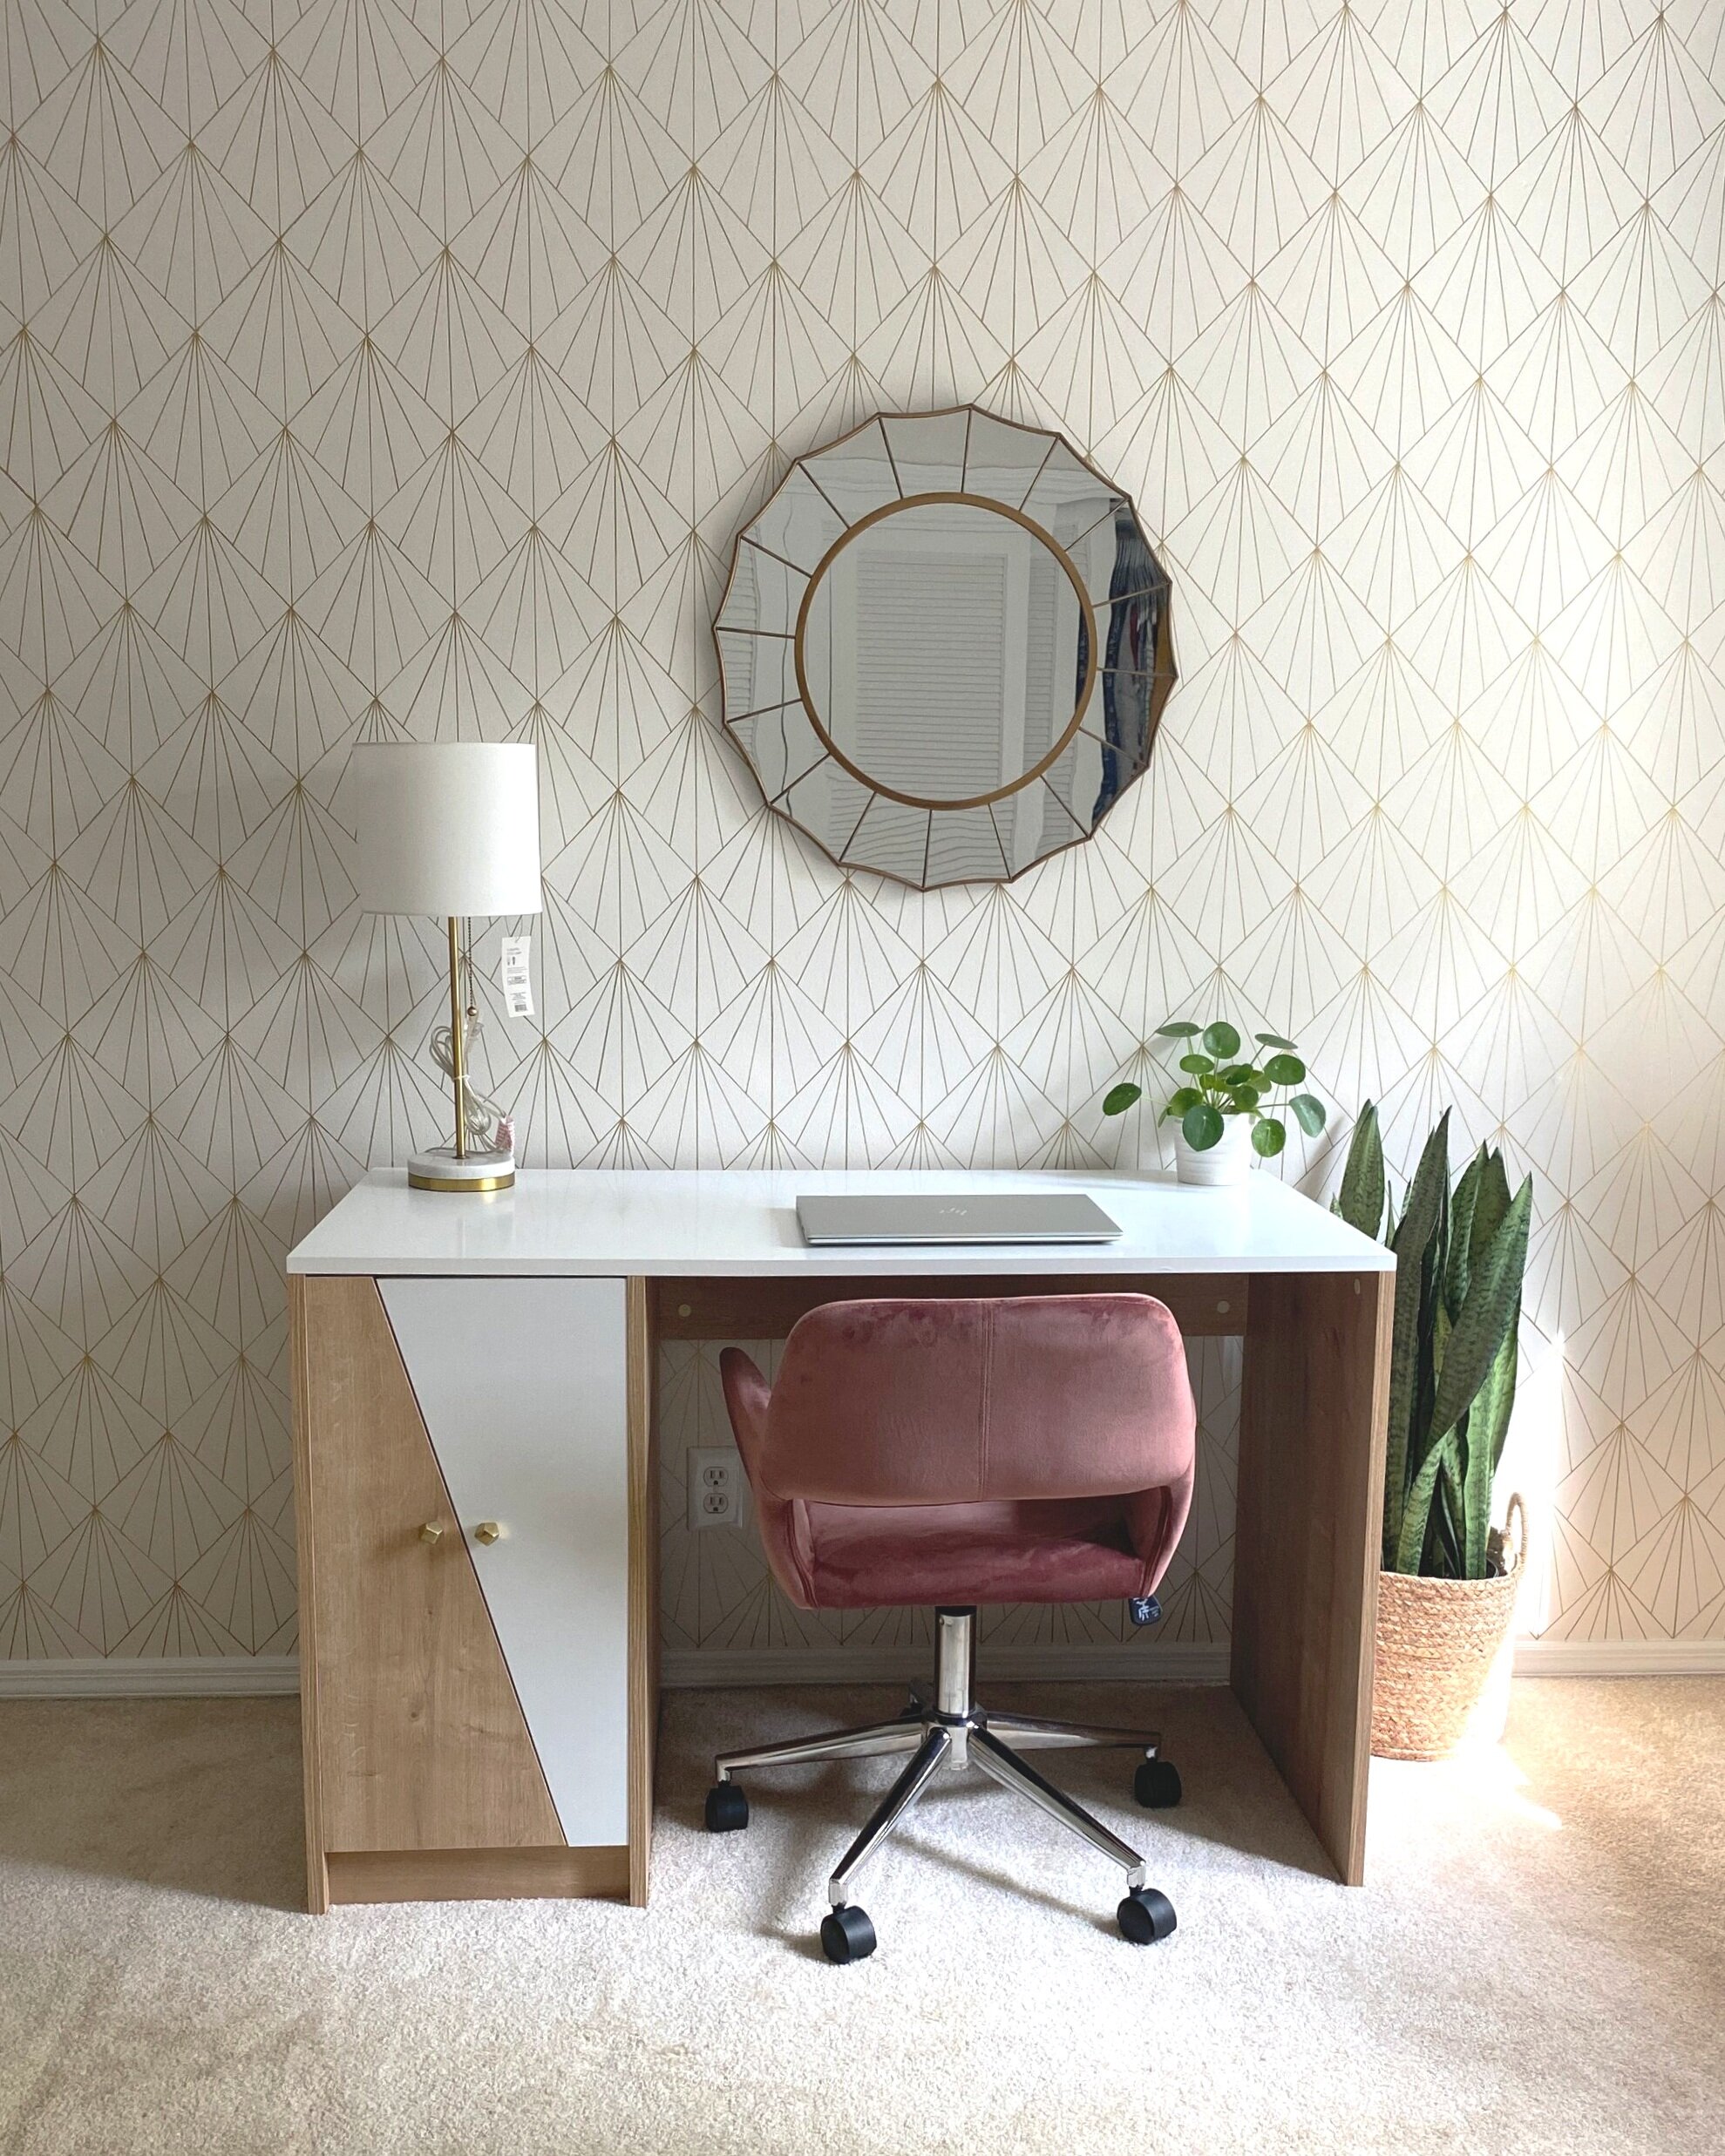
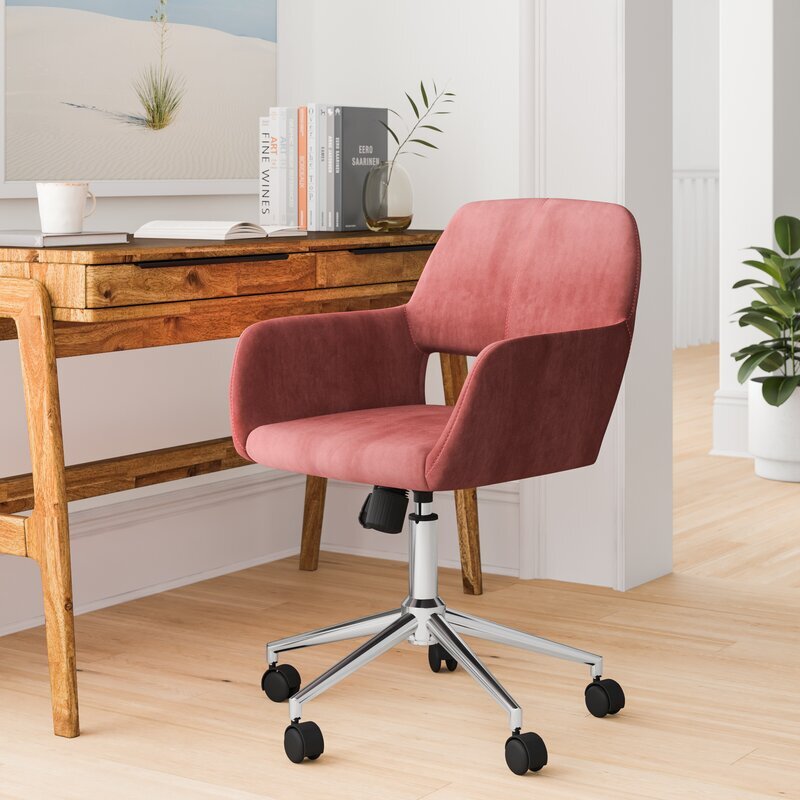
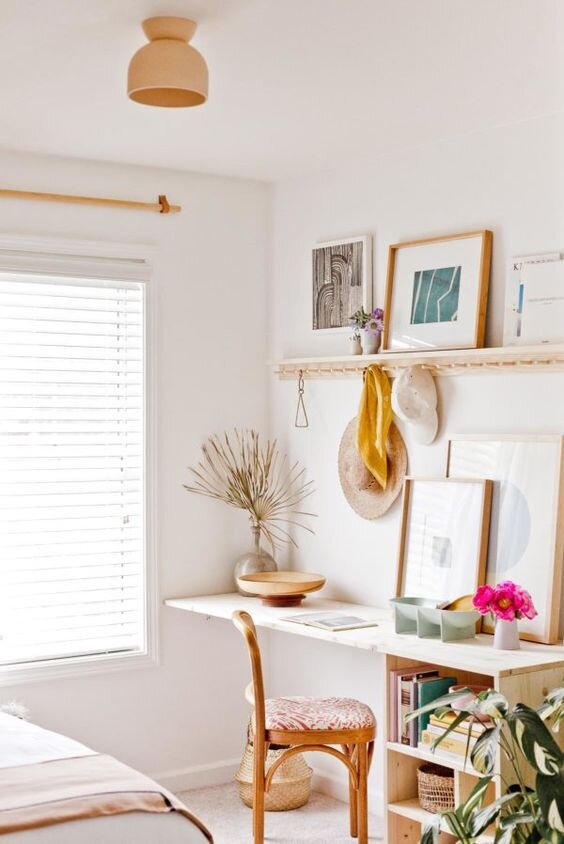
So taking the information I learned about lamps, I took another stab at it and found this beauty!
She’s the whole dang package.
The new lamp is weighty enough to ground the space, but not so big I bump into it all the time. It’s also a perfect height, and lastly, the style suits this room. The colors go well with the surrounding decor and the curved but sharp edges of the silhouette are a great contrast to all the straight lines on the wall and the angled line in the doors of the desk.
And remember how I mentioned above that style may be the most important factor? This is a perfect scenario because although the lampshade is pretty tall for this base, it “goes” with the style and makes sense. I think the fact that it’s a skinnier shade helps.

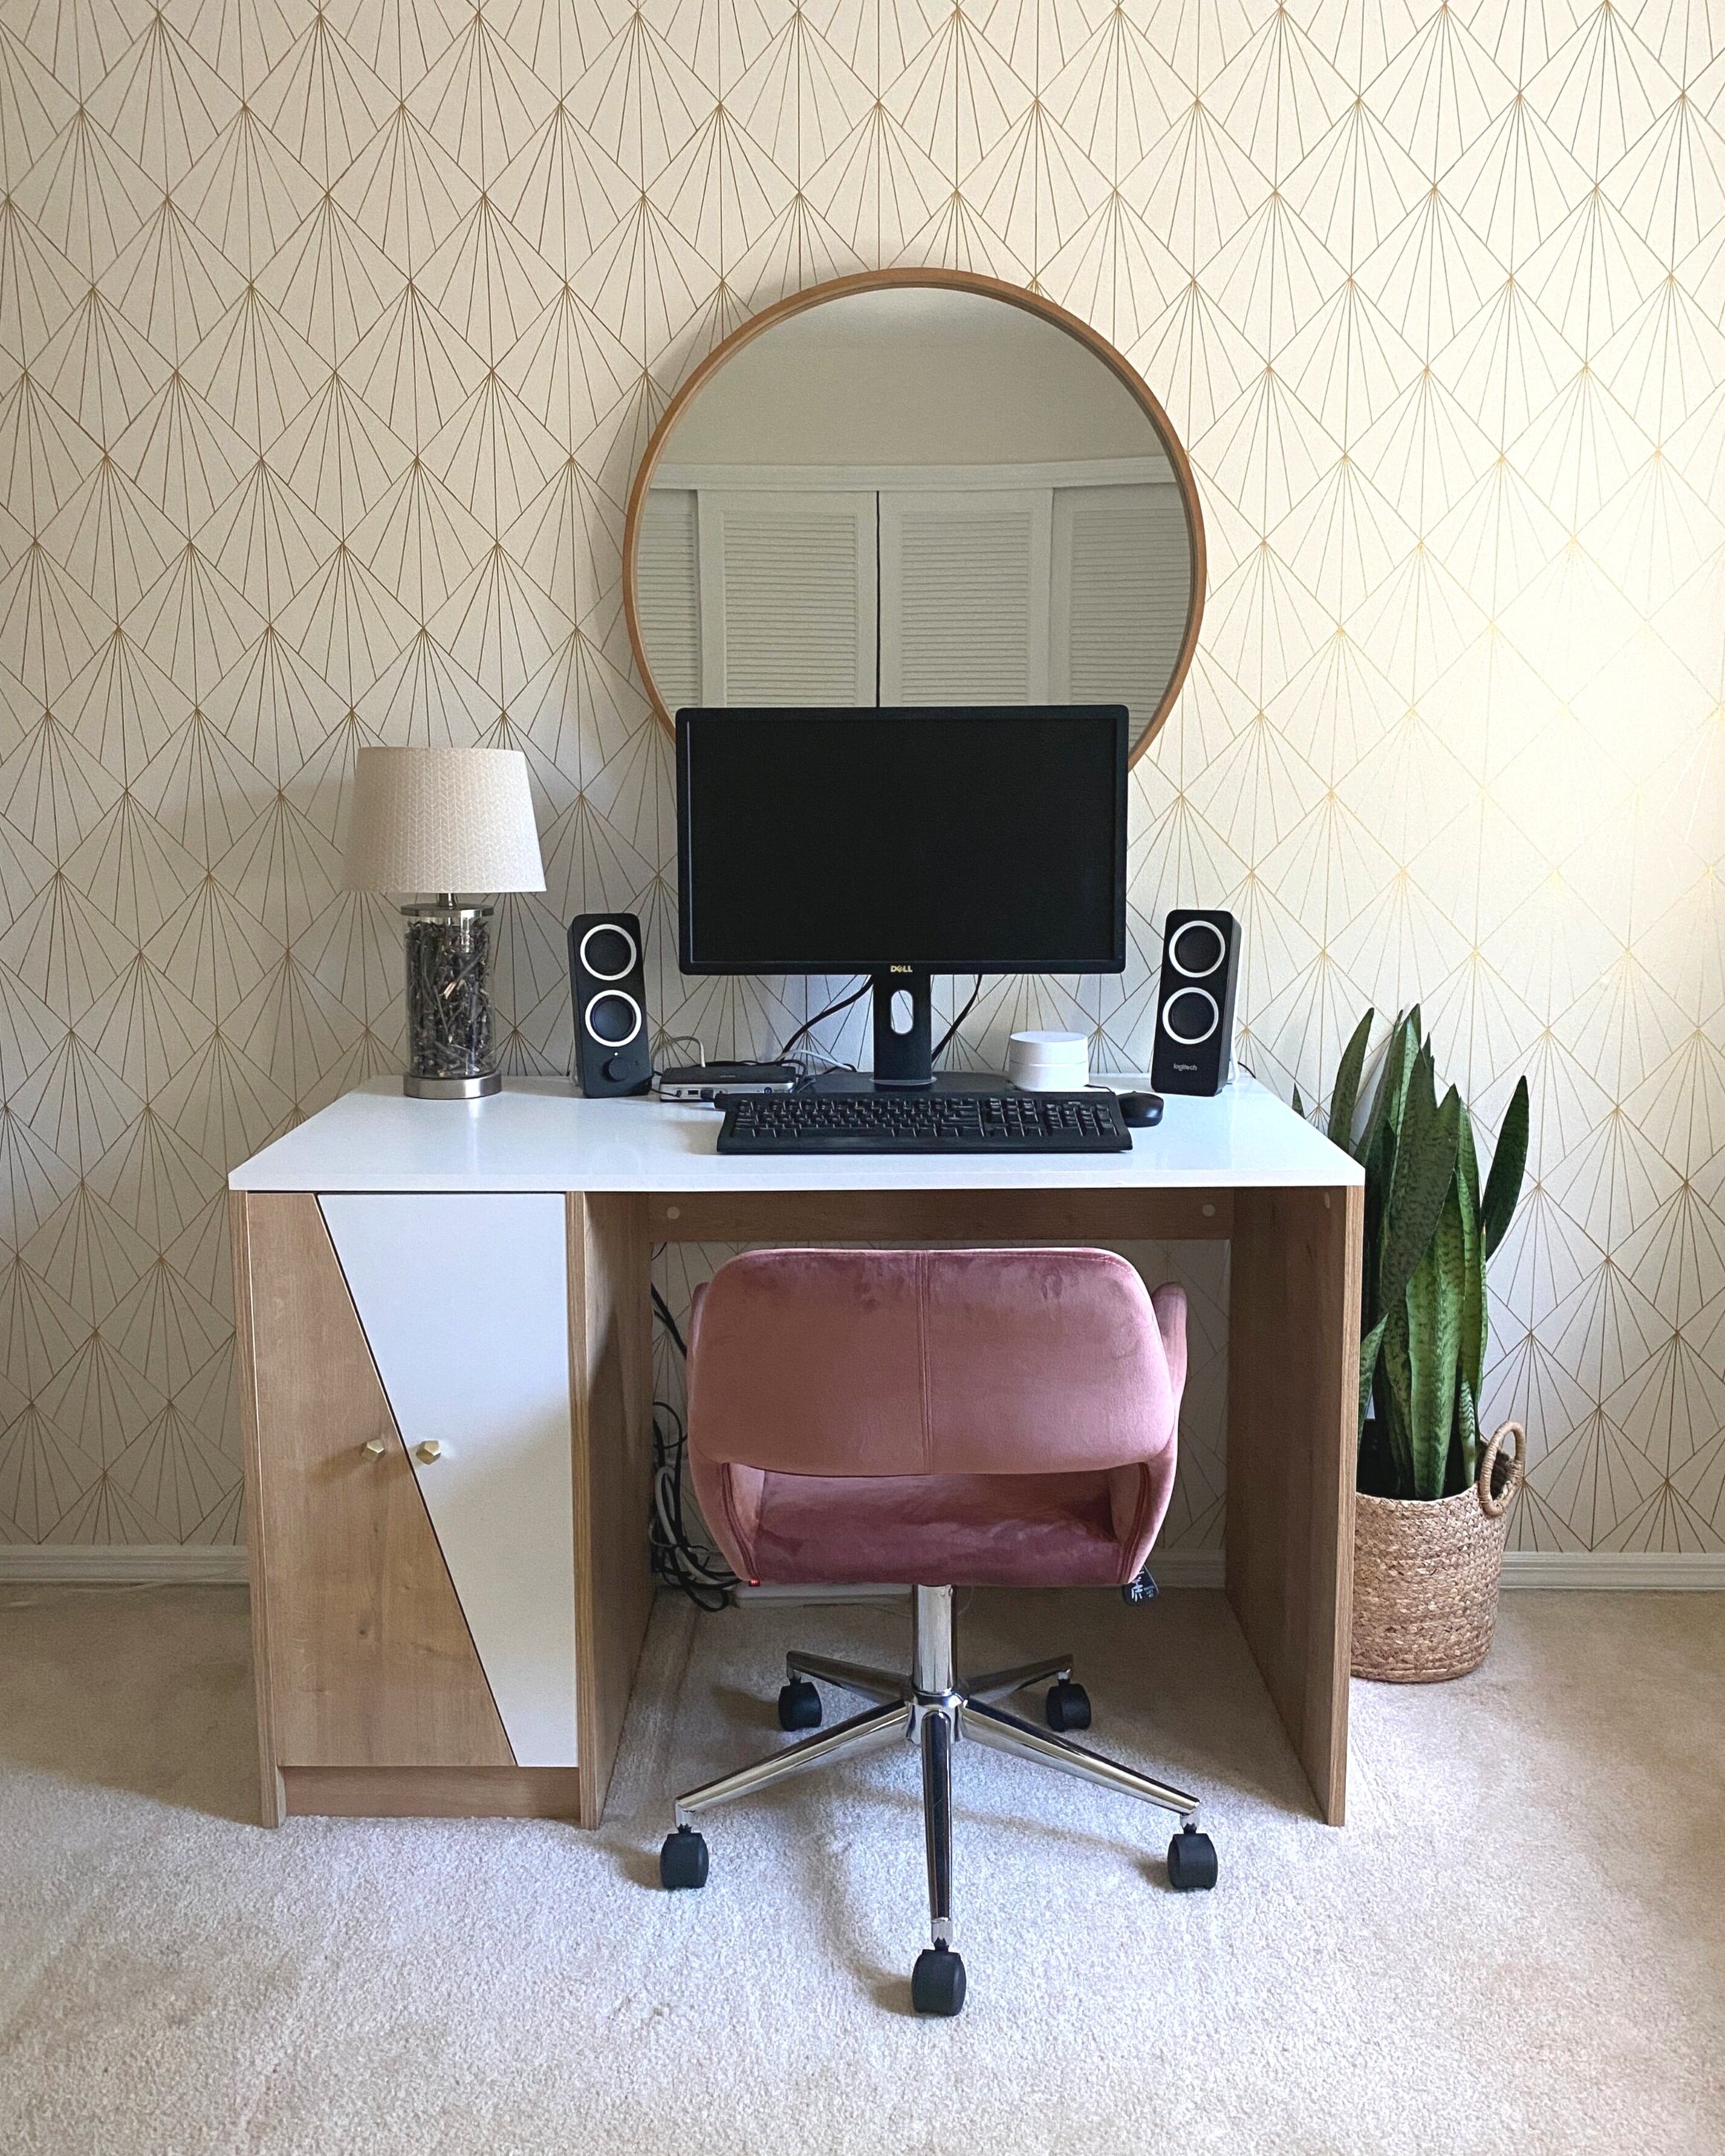
And here’s how the new lamp looks with my desktop. Because the lampshade isn’t so big, I have a few more inches of wiggle room so hopefully I don’t bump into this one all the time.

Who knew anyone could write so much about a friggin’ table lamp? But here I am! And I hope you were able to take away some valuable info to help round out your spaces.
Now, I’m going to go sit down by the warm glow of my beautiful new lamp and birth a new post. Ew… forget I said that…
If you enjoyed this post, you may also like:
How to Select the Perfect Size Lamp Every Time

DIY Sharpie Wall Tutorial
HOT DAMN, it’s been a minute since I shared an update about my home office redesign. Well, don’t you worry your pretty little head. That doesn’t mean I haven’t been working on it!
I’ve finally painted this room and created a killer DIY Sharpie wall that I can’t wait to share with you (including a tutorial)!
How to Make Faux Wallpaper with Sharpie
HOT DAMN, it’s been a minute since I shared an update about my home office redesign. Well, don’t you worry your pretty little head. That doesn’t mean I haven’t been working on it!
I’ve finally painted this room and created a killer DIY Sharpie wall that I can’t wait to share with you (including a tutorial)!

But first, a quick refresher:
There was a lot to do to get this room prepped. If you recall, I started with this beauty of a space.
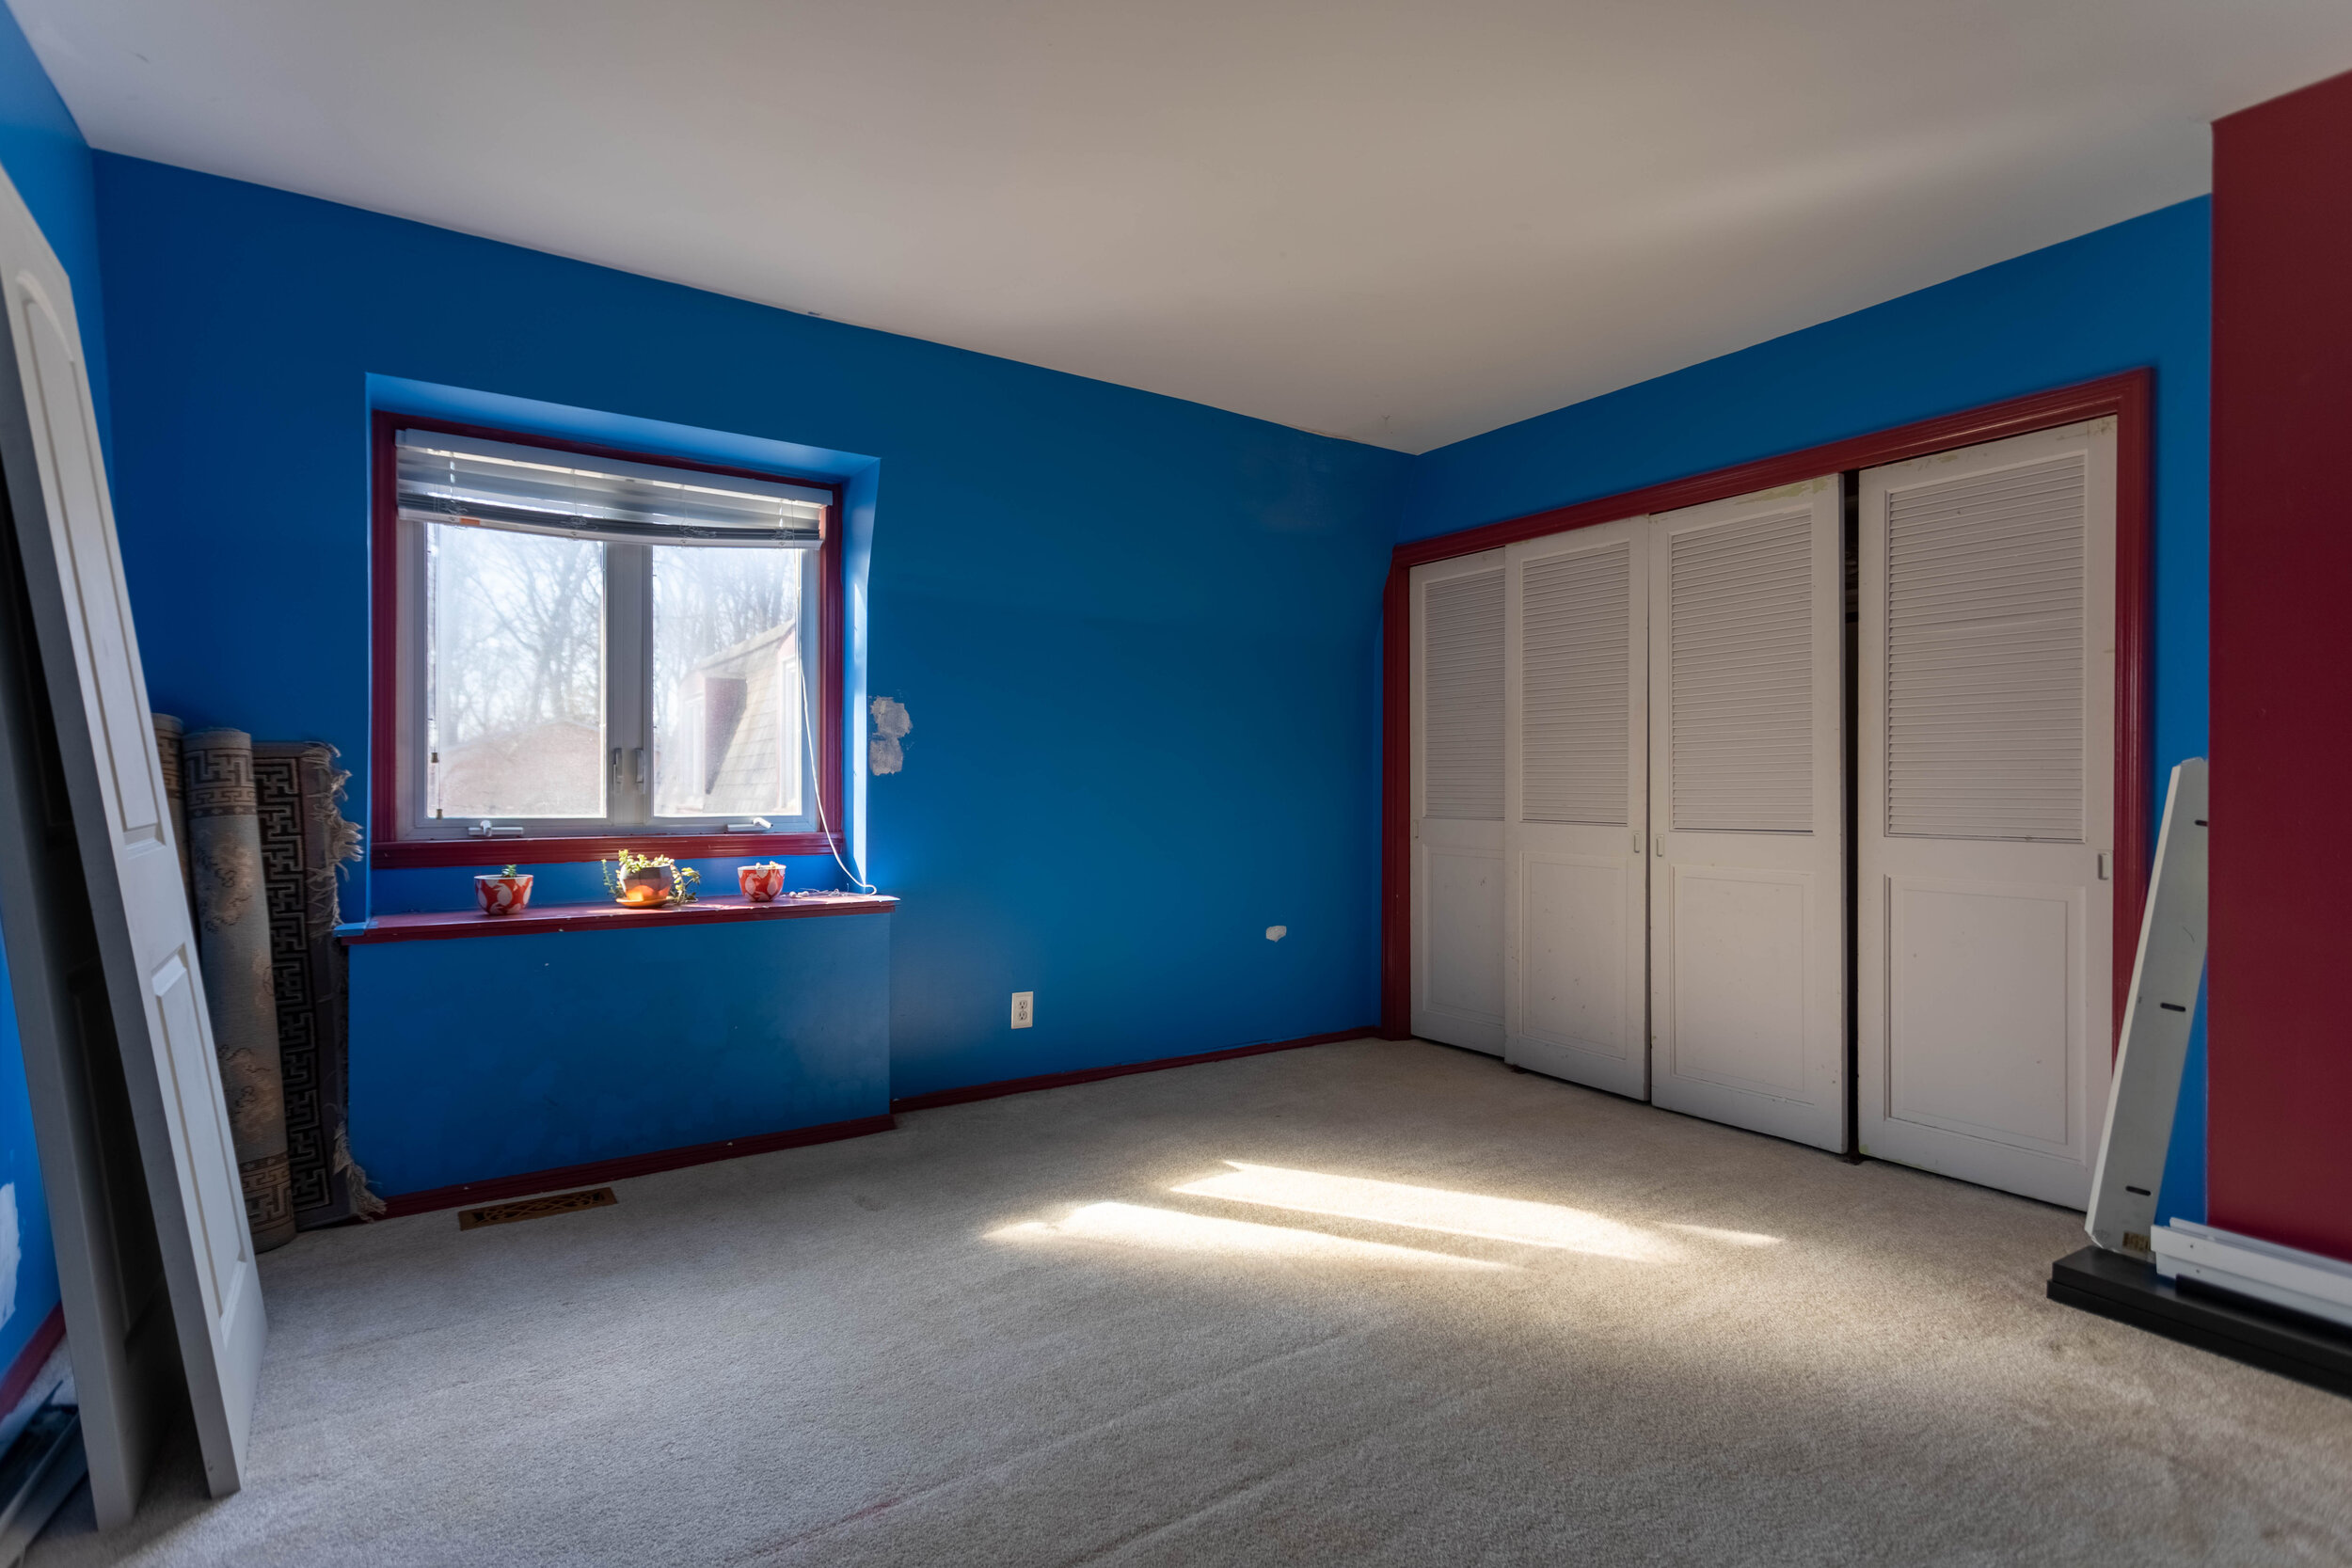
In my kick-off post, I shared the beginning stages of my redesign and my design inspiration to ultimately round out the room. When all was said and done, I had purchased a desk and chair and shopped around my own house to find a few items to make this room at least a little more tolerable, especially since it’s become my office since COVID started.

Baby PhotoBomb and all
As an Amazon Associate, I earn from qualifying purchases. This post may contain affiliate links, meaning I receive commissions for purchases made through those links, at no cost to you.
Of course, that wasn’t my final design plan though! Over the last several months(!!!), as we’ve been working on the dining room renovation (HERE and HERE), the flip (HERE, HERE, and HERE), and the master suite remodel (HERE), I’ve been stealing any free time I can find to work on this room - and it’s finally coming together!
In the kick-off post for this room, I mentioned how I was loving the design below and I planned to use Sharpie Paint Pens to create an accent wall.
Well, I’ve done it! And of course, I’ll show you how I made it happen with a DIY Sharpie wall tutorial. Let’s go!
Materials
- Sharpie Paint Pens
- I ended up using 3 medium point oil-based gold metallic pens
- Make sure you’re using Sharpie Paint Pens and NOT a regular Sharpie or you’ll have a helluva time painting over it if you ever want to.
- Level
- Pencil
- Ruler
- Patience
- I’ll warn you, this project isn’t necessarily quick. But I think the end result is worth it for sure!
Step 1: Create a Template
I jumped into this project with a vision, but there were a few things I needed to do before I could get to the fun part. First things first, I needed to figure out the scale of my design. To do this, I simply drew one of the diamonds for the design in approximately the size I was imagining on a piece of paper and taped it up on the wall.

I’m glad I took this simple step, too, because the first diamond was larger than I wanted.
Once I figured out the sizing, I created a mocked-up design on some paper and taped that up as well. This helped me feel more confident to move forward.

Step 2 - Draw your Vertical Lines
Next, I worked on penciling my pattern onto the wall. I started by marking every 4 inches along the bottom of the wall by the baseboard.
I actually started in the middle of the room so I didn’t end up with a full diamond on one side of the wall and a partial diamond on the other. Now, both sides have partial diamonds and I think it flows nicely.
The mocked-up design was created out of 6x6 squares, but that doesn’t translate to 6 inches from corner to corner - it’s more like 8.5. To make it easier on myself, I didn’t fret over the diamonds being that EXACT dimension as long as they were close. I ended up making my diamonds 8x8 from corner to corner.
The image below hopefully helps show that the diamonds themselves are 8 inches, but because they all have a vertical line running through them as part of the design, I marked along the baseboard every 4 inches.

From here, I used a laser level that I hooked on to a laundry basket to lightly pencil in my vertical lines. This is the level we have. You could also use a traditional level for this step, though it’ll take you a little longer.
Pro tip: As you’re drawing your vertical lines, measure along the way every once in a while to make sure they’re still 4 inches from one another. I didn’t do this and had to fix quite a bit because of it (I think my level may have shifted a couple of times). I’ll show you what I mean a little further down.


Step 3 - Draw your Diagonal Lines
Once I drew my vertical lines, it was time to pencil in my diagonal lines. For this step, I measured up 4 inches from the bottom of every other vertical line and made a tick mark. Then, I went back and measured up 8 inches from the bottom of the remaining vertical lines and made a tick mark.

Once you’ve marked your vertical lines along the bottom accordingly, you can make a tick mark every 8 inches on each line until you hit the top of the line where it meets the ceiling.
When you’ve finished making all your tick marks, lightly (again, emphasis on the lightly part) connect your tick marks diagonally.
Step 4: Fix Your Mistakes
You will inevitably have measured a little off here and there. NOW IS YOUR CHANCE TO FIX THAT.
Remember how I said to check that your vertical lines were 4 inches apart all the way up the wall? Well, this is why I specifically called that out.

It’s super important to make sure that your vertical lines intersect with the points of your diamonds. Otherwise, when you add your remaining lines to each diamond, they’re going to look weird if the vertical line isn’t centered (or mostly centered. We’re not robots, after all).
So before you go gung-ho and bust out your paint pen, correct your lines or you’ll have to paint over a bunch of them like I did.

Bwomp Bwomp #DIYfail
Yeah, there were quite a few that didn’t line up as well as I wanted them to. It was a huge time suck that could have been avoided if I had corrected them before I traced over my pencil lines with Sharpie. Learn from my mistakes!
Once your lines are nice and centered, you can trace over them with your Sharpie Paint Pen. I recommend starting with your diagonal lines, as you can cheat the vertical lines here and there a little if needed. This design is so busy, it’s hard to tell if they don’t line up perfectly.
Step 5 - Add Lines to Each Diamond
This is where it starts to get more exciting (yet, also more time-consuming) because you can really see your design start to come together. To save my arms from falling off, I did this part in sections over several days.
Starting at the bottom tip of each diamond, make a tick mark at 2 inches and 4 inches along the bottom two sides.

Then, draw a line connecting the top point of your diamond to each of your tick marks.

It’s kind of an ugly little mock-up, but it gets the point across
Soon, you’ll see it start to come together. This is where I got a little excited and just HAD to see what a few of them looked like grouped together.

Eeeeeee, so exciting!
Step 6 - Finish the Edges
No matter how you plan out your design, you’re going to have pieces of the pattern that are incomplete where the design meets an adjacent wall. These sections are a little tricky to finish. Here’s what I did.
The bottom row: Because of how I started my design along the baseboard, there are half diamonds that needed to be finished. But since the bottom half of the diamond was missing, I had to figure out how to work around that.
To do so, I simply took a piece of paper, held it up in the middle (horizontally) of one of the completed diamonds, and marked where the lines were. I then used that to mark where those lines would be in the middle of each half diamond.

Then, I drew a line from the top of the diamond to each tick mark.

The top row: I followed similar steps on the top row. I took that same piece of paper and held it up in the middle of each diamond to identify where the line would intersect.

Then, I drew a line from the tick marks on the bottom edges of each diamond (remember how we made marks 2 inches apart in an earlier step?) to the tick marks I made in the middle of the diamond.

The sides: Along the sides of the wall where I only had a small section of a diamond to work with definitely took a little noodling to figure out. Since I didn’t have the rest of the diamond to use to make my tick marks or lines, I had to come up with another solution.
I ended up tracing one of my diamonds and cutting out a new template that I could wrap around the side of the wall. I made tick marks at the tip of the diamond and where any lines within the diamond would touch the bottom edge using the lines on the template as a guide.

Next, I used a piece of paper to wrap around the corner and connect my dots in pencil.

Then, I was able to use my ruler to trace my pencil line in Sharpie to the edge of the wall.

Step 7 - Touch-ups
There will most certainly be areas that you goofed up here and there (you can even catch some of my goof-ups in the pictures above!). Now that your design is complete, take a craft brush and touch up any lines that are a little wonky or any stray marks.
Bonus Step - Stand Back and Enjoy
Man, you just spent a lot of time creating an accent wall - relish in it because it looks AWESOME! I know I’ve spent a ridiculous amount of time admiring my handiwork. You should too!

Now, let’s be real. Would it have been easier to just use wallpaper? Probably! I found lots of similar wallpaper designs, but on many of them the design was way bigger than I wanted or the colors weren’t right. And don’t get me started on the cost! By DIYing my own design, I was able to completely customize it FOR CHEAP! Plus, I love a challenge and it feels good to know I created this wall with my own two hands.

This space has undergone such a huge transformation. It’s hard to believe it was once red and blue. Now it’s so much brighter and more inviting. I definitely don’t mind working in this office anymore and actually prefer to work in here now! Especially since I get to share my space with my sweet little plant babies all day long while I work.

I definitely don’t consider this room “complete” yet. Heck - I still have the whole other side of the room to furnish! But that’s a post for another day…

Related Home Office Design Posts:
How to Create a Sharpie Accent Wall

Designing a Home Office
I never really thought I’d need a home office, so until recently I hadn’t given much consideration as to how I would want it to look if I were to create one. But now that it was actually happening, my mind was buzzing with possibilities. In this post (and subsequent posts on this subject, since I’m just in the beginning stages of this room makeover) I’ll give you a sense of how I tackle a room and walk you through my overall design thought process start to finish.
How I Designed My Home Office

I mentioned in our house tour that I, like many people these days, have been working from home. During this time, the living room has been my office. (Picture me sitting on the couch in my sweatpants with a cozy blanket and my laptop.)
Well, before COVID-19 when I was only working from home a couple days a week, the couch worked just fine. But once I got the call that I’d be working from home consistently for who knows how long, Lucius suggested I get a desk and set up an office in our previously empty spare room. I was on board right away. Not only because by the end of the day working from the couch I usually feel pretty gross and lazy, but Lucius telling me to buy house stuff? Okay!
I’m the type of person who likes to do lots of research before I commit to anything. I like to know what I’m getting myself into and I like to avoid the unexpected when at all possible. So I figured since I’m starting at ground zero for this project, why not take you guys along as I plan out my home office?
In this post (and subsequent posts on this subject, since I’m just in the beginning stages of this room makeover) I’ll give you a sense of how I tackle a room and walk you through my overall design thought process start to finish.

As an Amazon Associate I earn from qualifying purchases. This post may contain affiliate links, meaning I receive commissions for purchases made through those links, at no cost to you.
Finding your inspiration
I never really thought I’d need a home office, so until recently I hadn’t given much consideration as to how I would want it to look if I were to create one. But now that it was actually happening, my mind was buzzing with possibilities.
One of the biggest pieces of advice I can give is when you’re starting to design a room, don’t overthink it. This can be hard advice to follow, especially if you’re like me and tend to overthink just about everything. But when designing a room I try to force myself to let one thing be my inspiration and build on that, otherwise you can get really overwhelmed really fast.
For this room, the biggest necessity was of course a desk and a chair, so that’s where I started, but really ANYTHING can be your inspiration - it doesn’t have to be a big piece of furniture or the color you plan to paint your room. It CAN be those things, but your inspiration could also be something as simple as a vase or a painting that you like.
Since this room was empty to begin with, using the immediate necessities as my inspiration was the most logical choice for me.

I knew my minimum requirements were to have a desk that fit my computer and all my stuff and a chair that I could comfortably curl up in. (Even when I work in the office at work I tend to sit cross-legged in my chair, so I certainly wouldn’t expect anything different at home.)
Being the cheap budget-conscious person that I am, I started looking at desks and chairs on Facebook Marketplace. I use Marketplace a lot like I use Pinterest to organize my thoughts. I saved everything that was intriguing and then looked at them as a group. This helped me figure out the style I was most attracted to for these staple items and I highly recommend using this technique to figure out your style, too.
Here’s how you do it: hop on Pinterest, search for the item you’re after, and pin anything that looks even remotely interesting to the same board. Once you’re done pinning, look at your board as a whole and you should start to notice some recurring themes/trends. You can take it a step further and either delete anything that doesn’t fit into the general theme or create a second board and pin your favorite items to that. Then go searching in real life for items similar to what you were most drawn to!
When I looked at all my saved items, I noticed I was saving a lot of light colored desks and velvet jewel-toned desk chairs so I figured that was where my head was at and I ran with it.
Because I have commitment issues, I continued to brainstorm options to make sure I was buying exactly what I wanted. We ended up taking a trip to IKEA to see what they had available too. This trip was a great way to also figure out what size desk felt best by sitting down and “testing” out several options.
I was most drawn to the Hilver desk and I was really considering pairing it with the Ekero armchair.


We almost bought them, except we didn’t have enough room in the car with both kids. We figured Lucius would just have to take a quick trip back the next day.
This was actually a blessing in disguise because I wasn’t 100% sold on either of those items. The desk felt a little too much like a table and I was concerned with the chair being difficult to move in and out since it didn’t have wheels. There were actual desk chairs at IKEA, but I wasn’t really in love with the look of any of them.
As an Amazon Associate, I earn from qualifying purchases. This post may contain affiliate links, meaning I receive commissions for purchases made through those links, at no cost to you.

One of the most exciting things about designing this room is that the only person I have to think of is myself! Normally I’m trying to design a room with Lucius in mind too so I have to be a little more thoughtful in some of my choices. It’s not very often that I get to run uninhibited with my ideas. With that being said, I totally bought a pink velvet chair AND I LOVE HOW IT LOOKS!

Building on your inspiration
For the past month or so (I’m losing track of my days at this point so it could be longer) I’ve been working in my new office. It’s still lacking quite a bit considering all I’ve done so far is bought the necessary furniture, stole a lamp from our bedroom, threw down an area rug, and hung a mirror I had lying around.

But of course I’ve been daydreaming and planning like crazy! Now that I have my staple items, my wheels are really turning.
My next tip: once you have your main source of inspiration, use that to drive your design. You can pull colors or patterns from your inspiration piece and use them elsewhere in the room. You can look on Pinterest for rooms with similar items as your inspiration piece(s) and create a board to pin images that get you excited and pull ideas from there. You might even realize that what you thought was your original inspiration shifts to something else once you start building up some reference images.
Here are my thoughts for this room…
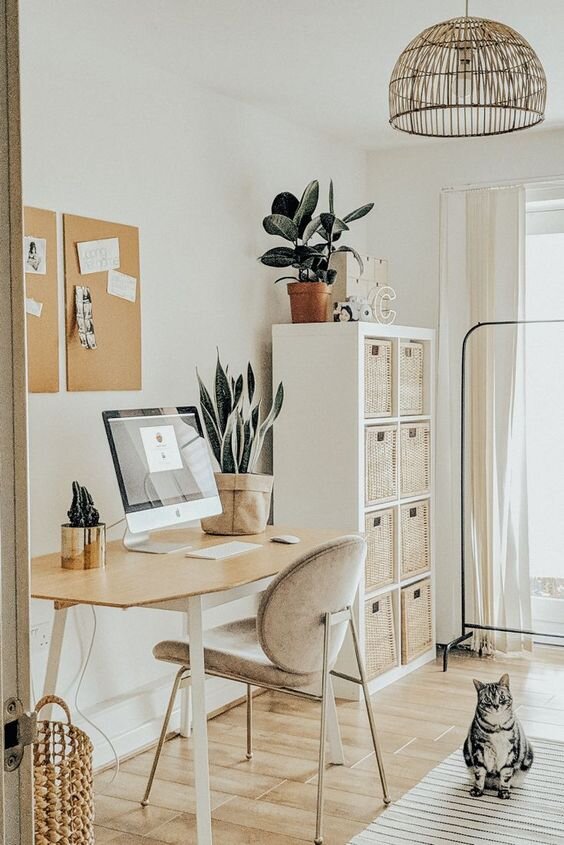
Maybe it was the trip to IKEA, but I picture this room being somewhat Scandinavian design inspired: bright and airy, small bursts of color, natural wood tones, clean lines. I already had the desk with wood tones and the chair with my burst of color, so I was on the right track. Below are examples of some inspiration photos.


But I also want a little more dimension and excitement in the room than what you see above. I considered doing wallpaper in here but I’d like to save that for the nursery once I get to updating that room. And if you haven’t noticed, I really like trying new/different wall treatments so in this room I’m going to draw a pattern with Sharpie paint pens!
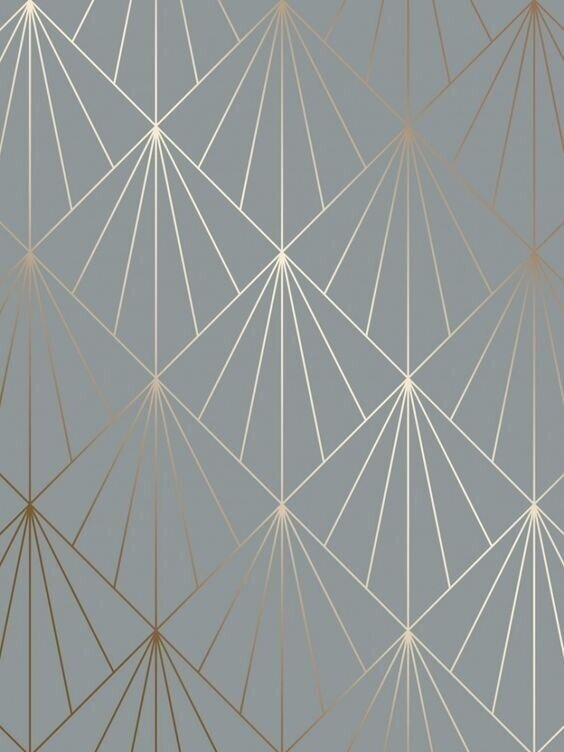
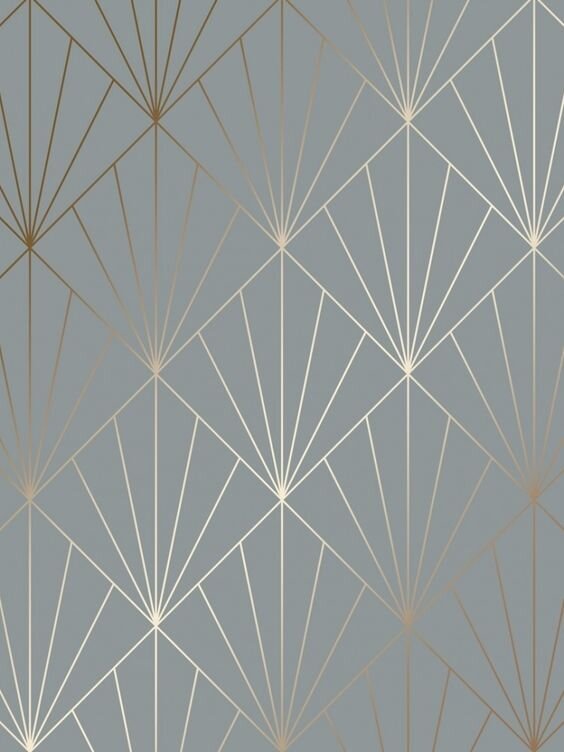
I’ve been obsessed with the pattern below lately. It’s a little bit art-deco but I think I can make it work with the Scandinavian-inspired elements.

My plan as of right now is to paint the walls a light gray/off-white color and draw the pattern on the wall that my desk is facing using a gold paint pen. The design could end up being too in your face if it were black or high contrast compared to the wall color, so I think the gold paint pen with the light colored paint will help make the pattern more subtle.
Below is an awesome example of a Sharpie paint pen wall using the gold pen and a really cool design.

I have a strange addiction to mindless, tedious tasks (painting rooms, peeling wallpaper), so this undertaking doesn’t scare me in the least. In college I even created a conceptual art piece where I made a tally on a piece of wood for every dollar I owed in student loans!

This represents one student loan. I actually made one for each of my loans! Apologies for the terrible photo. And yes, it currently lives in my garage because I graduated college years ago and don’t know what to do with it but can’t seem to throw it away.
The point being, if I’m feeling really crazy I might even draw on all the walls! We’ll see how difficult it is and how much I like the design.
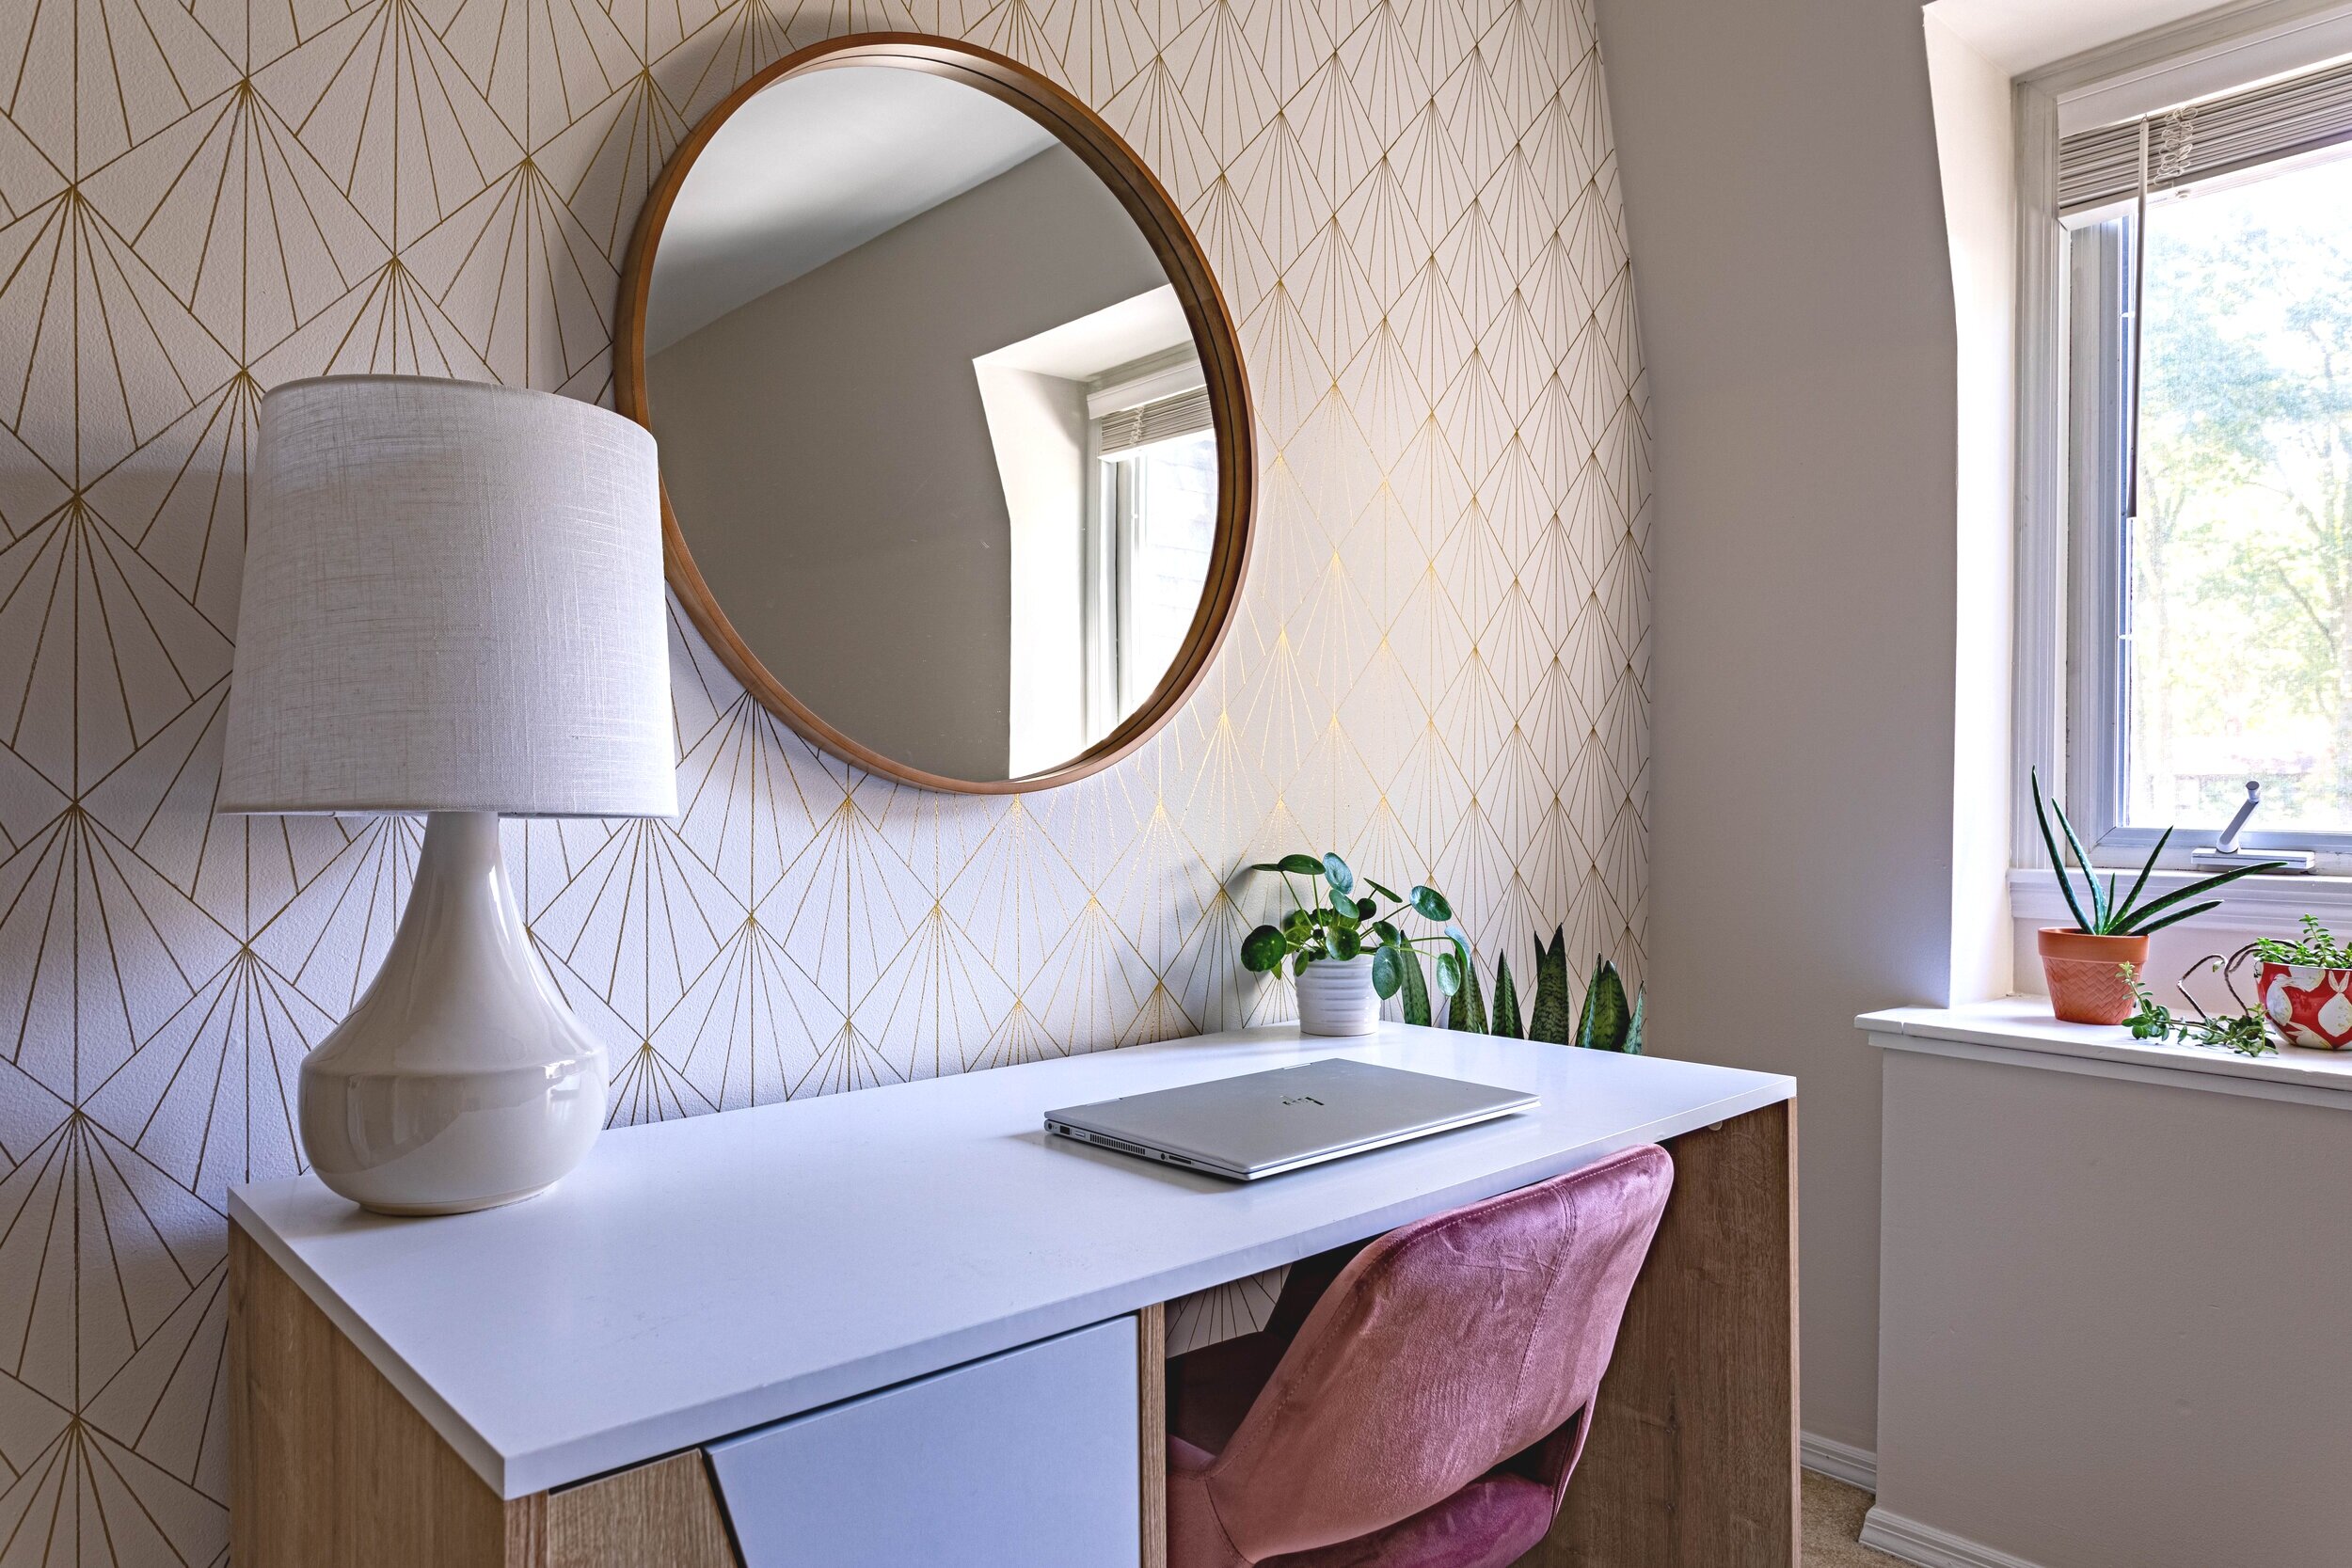
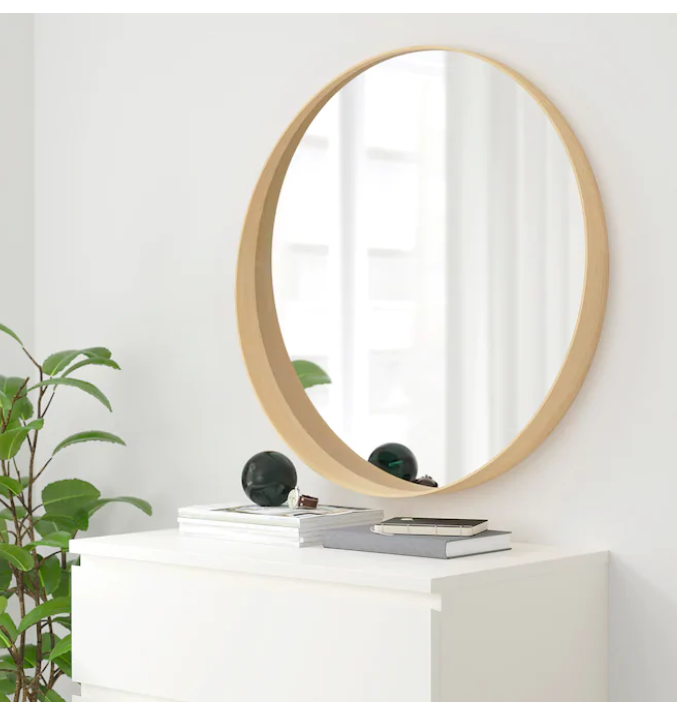
Since the desk has some strong lines in it and the wall pattern is very geometric, I’d like to switch out the current mirror with a simple round mirror. I’ve been stalking this one at IKEA for a while now.

I whisper sweet nothings to it every time I pass it in the store.
I think the circular shape of the mirror will really help soften up some of those hard lines and tie in nicely with the softness of the chair. Plus, it has more of the wood that I’d like to pull into the room.
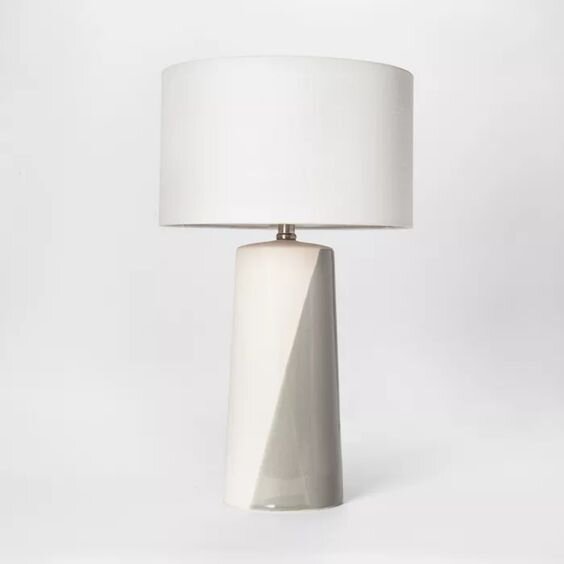
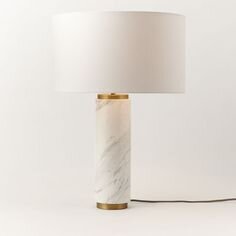
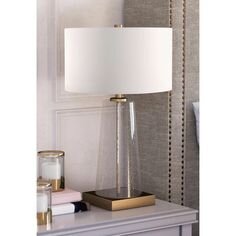
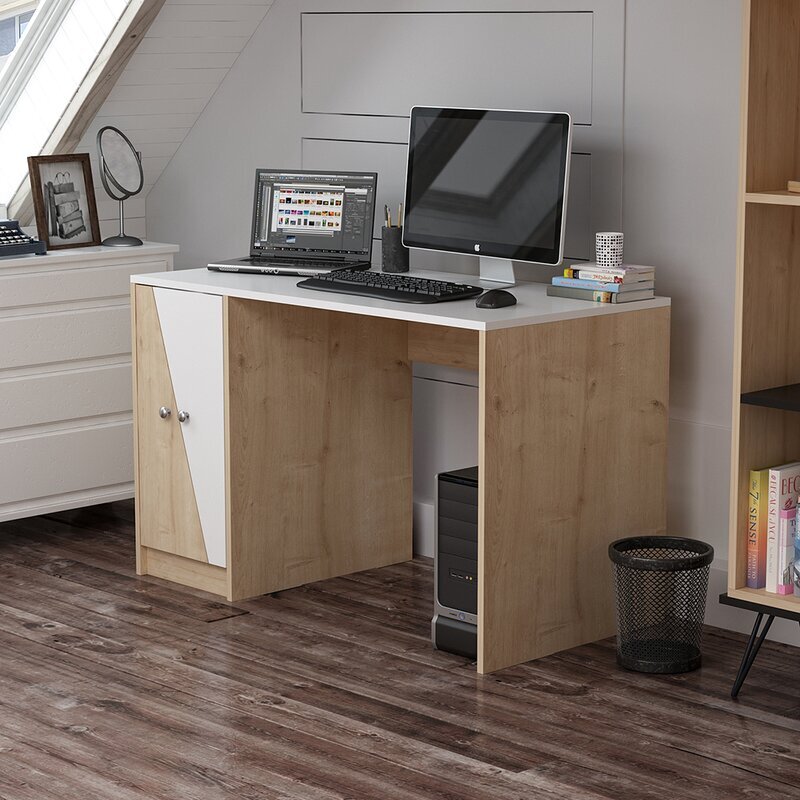
I’ll also need a new desk lamp so I can put the one I’m currently using back in our bedroom. Here I might introduce some more natural materials like stone or at least go with a softer, rounder silhouette for the lamp. Here are a few ideas:


Rounding out the room
Now that I have my office space somewhat planned out, there’s a whole other two-thirds of the room to consider! We planned on turning this into a guest room originally and I’m confident this space can still serve that purpose. It’s just a matter of working it into the overall design.
Obviously to make this into a guest room we’ll need a bed.
The natural wall where you’d place the bed is actually where I’m setting up my desk area. I could put my desk elsewhere in the room, but I figured since this will primarily be used as my office I should make it the most inviting space possible for me - and this wall gets the most light and has the best view. With that being determined, I have to rethink the bedroom portion of the room.
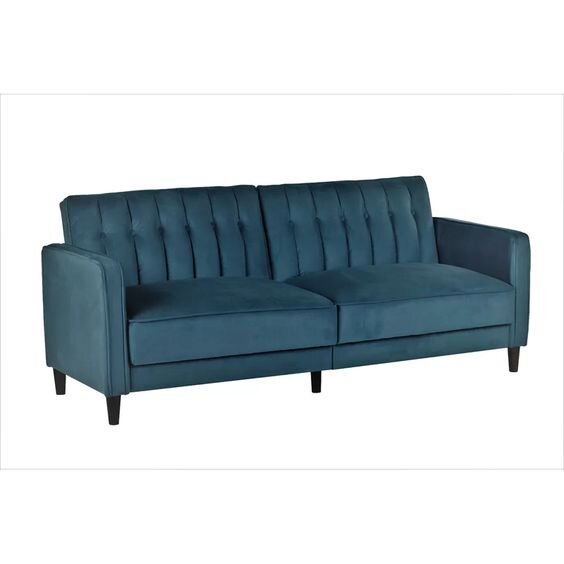
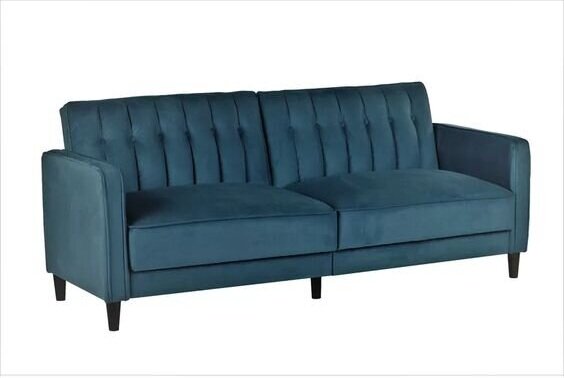
I think a normal bed might be a little awkward in the space available, but a daybed or stylish sofa bed could work! Apparently I’m pretty into jewel-toned velvet right now in general, because I’m really feeling this sofa bed:
I’ll also likely bring some end tables, maybe a footstool, and a dresser into this room. I’ve been thinking about stealing the dresser from the nursery and putting it in this room instead too.

I picked this dresser up from a thrift store years ago and refurbished it. I love it, but it can be difficult to open and I figure once our younger daughter will want to start dressing herself she’s going to have a heck of a time getting to her clothes. Plus, I think this dresser will fit nicely in the spare room both in style and function.
In a perfect world this room would have hardwood floors and I would have an awesome area rug in place of the carpet that’s in there currently. Replacing the flooring in the house is pretty far down the line, so for now I’ll just keep dreaming of what’s to come. I’m picturing a natural fiber rug, but I could be swayed for something with a design…. don’t even get me started on rugs. I’ll go down a rabbit hole I might never come out of.
Finishing touches
Of course the room wouldn’t be complete without some artwork on the walls and just some general decor items so I’ll be sure to add those once I get to that point. In the meantime, I have one last piece of advice: be comfortable changing your plans.
I find that a lot of times when I’m updating a room I’ll think I’m in love with an item I’m planning on buying or an idea I’d like to run with but once I make other updates it just doesn’t make sense in the space anymore. And that’s okay!
We’re not perfect and you can’t expect to get it right on the first try. I’m sure some of the things I’ve shared in this post won’t make it in the final room. Flexibility is key to winding up with an end product that flows. And at the end of the day, the point is to make yourself happy and to create a space that you love.