
What's Happening in the Loft?
Loft Renovation
Remember how I mentioned in my last post that we were focusing really hard on wrapping up the hallway renovation? Yeah… we started a big new project. We’re renovating the loft!


At the end of our BRAND! NEW! HALLWAY! (please tell me you said that like Bob Barker announcing a car as the prize on The Price is Right) is the loft. When we moved in, this room was 900 square feet of disgusting carpet, paneling, and RED walls. The previous owners were big Ohio State fans, and it showed. This was actually the first room in the house we painted - Crucible by Sherwin Williams.
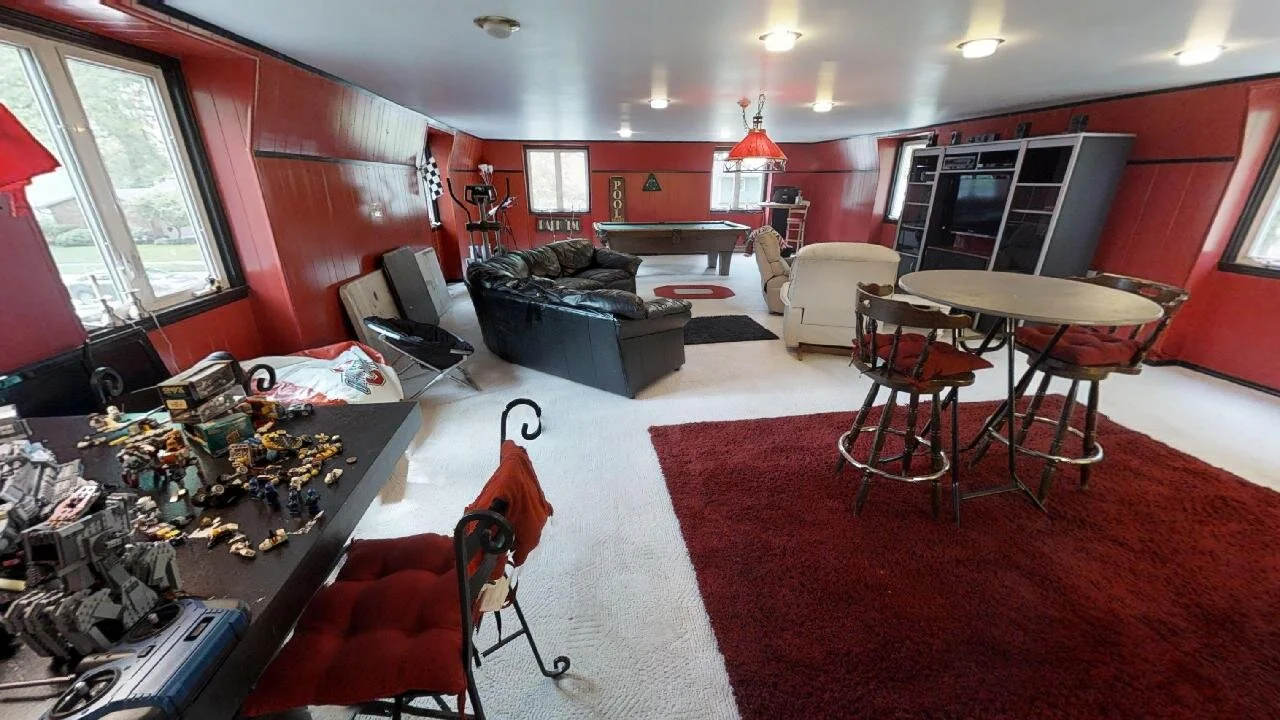

Aside from painting, in the short term, we removed the hazardous railing over the lofted section by the stairs (over by that yellow bit of wall way in the back of the picture above) and added a pony wall in its place (and very recently added a full wall with a door!), and removed the oddly-placed billiards light in the middle of the room. And for the past two years, the loft has served us well as an evening family hangout spot.


Other than our small “Phase 1” renovations, the loft remained mostly unchanged… until recently.
Enter my harebrained husband stage right. Always scheming up something, that one.
The Idea That Started It All
One day not so long ago my husband, Lucius, decided that right then and there was the perfect time to rip up the carpet. Ever the renovation enthusiast, I didn’t take much convincing - the existing carpet was in bad condition and, frankly, embarrassing. The vision of replacing it with the same flooring we used in the hallway and our master bedroom was enough to quickly get me on board!

A Big Hiccup
While we were deep in the process of ripping up carpet and pulling out staples came the unsettling realization that the laminate we installed in the hallway and our bedroom was no longer available. HUGE planning fail on our part.
It’s not that the flooring isn’t manufactured anymore. Apparently, it still is, but the hardware store hasn't been able to get any from the distributor for the last 10 months and they don’t know when they will have more (if ever). So we started brainstorming alternatives - carpeting, an entirely different material, painting the subfloor in the interim. In the end, we found a different, super similar laminate that we’ve decided to use.
No, it’s not exactly the same and that REALLY bothers me, but I have a picture in my head of the loft with laminate and wanted to follow through with that. The boards of the laminate for the loft are slightly wider and have a little less red in them, but my hope is that the differences will be so subtle no one will be able to tell. (Except everyone reading this. Hi!!!)
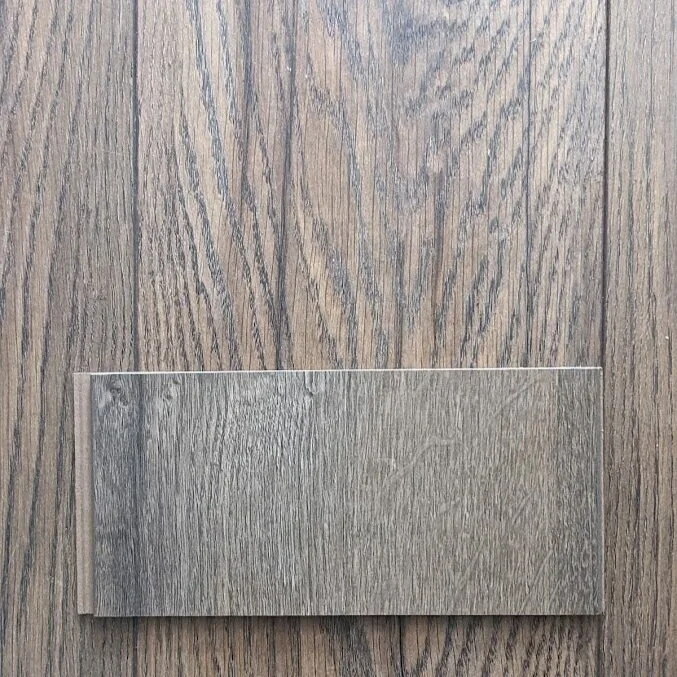
My saving grace is that the transition into the loft is pretty dark, so maybe that’ll help hide our inconsistent little secret. And HOPEFULLY, the old flooring comes back in stock eventually and we can use it in the other upstairs bedrooms.
Where Things REALLY Went Off the Rails
Once we had all the carpet ripped up and our flooring fiasco was resolved, Lucius and I got to thinking, scheming, and dreaming. We spend a shocking amount of time just standing in various unfinished areas of our house talking about what could be. Usually after the kids have gone to bed and we can form a complete thought. It typically leads to trouble renovations. This was no exception.
Seeing the room completely open and without the distracting stains all over the carpet really got our wheels spinning.
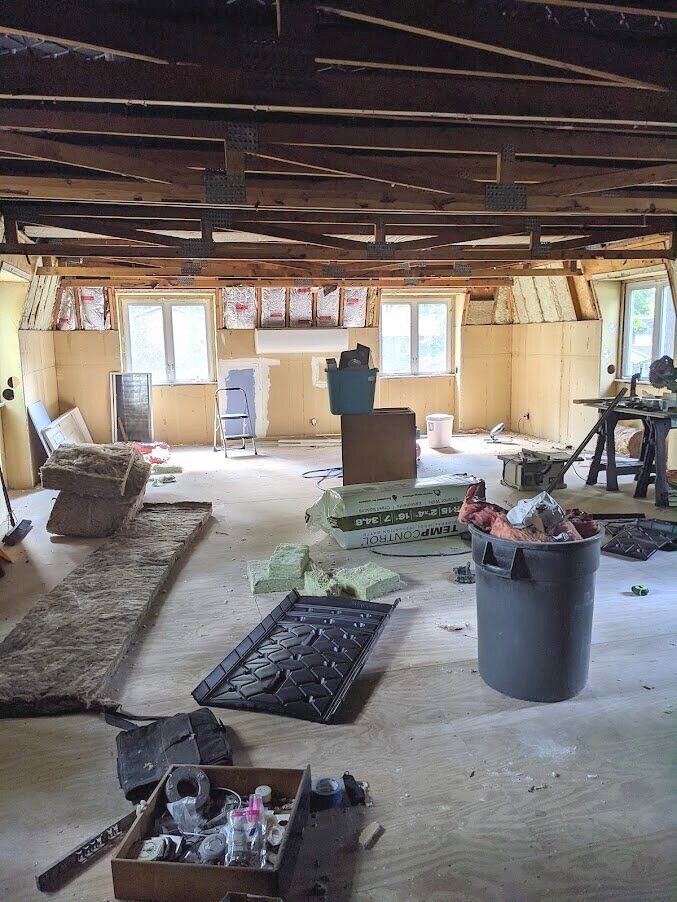
Lucius said that while he was installing the new door at the top of the spiral staircase, he got a glimpse of what was above the drywall and noticed there was a lot of open space up there - and even some trusses! He so slyly mentioned ripping out the drywall to expose the trusses while also creating more headroom.
Two hours later and the loft looked like this:

The Plot Thickens
That subheader is a lot more dramatic than it needs to be.
Over the course of the next few days, we made the decision to remove over half of the trusses for less visual clutter. But don’t worry, beforehand we determined that they weren’t structural at all and were installed simply to drop the ceiling height. (Lower ceiling = less to heat/cool = lower heating/cooling costs.)
We also decided to remove the paneling. We already knew there was drywall underneath that could be smoothed out with a skimcoat so this wasn’t a big deal. Plus, it saves us from having to try to seamlessly patch the paneling in areas where we were removing outlets and filling in the holes from when we insulated the second story - NOT an easy feat.
So now we’re here:
I’m glad we removed so many trusses so now you can actually see the detail of the ones we left. And although I didn’t mind the paneling, I also don’t mind that it’s gone!
As an Amazon Associate, I earn from qualifying purchases. This post may contain affiliate links, meaning I receive commissions for purchases made through those links, at no cost to you.
The Design
Ah, yes, my favorite part!
As scary as it can be to dive into a big renovation, having a vision of how much better a space can look makes the risk worth it. For the loft (or, I guess now it’s a bonus room since we’re enclosing the space?), I’ve been putting together an informal vision for a while (only the last 2 years… who’s counting?).
Although this is a family hangout space, my husband quickly claimed that since he uses it the most (which is true), he gets the final say in the design. Challenge accepted!
After talking it through, we decided that an industrial feel would suit this room, and Lucius’ aesthetic, nicely. So off I went to look for some inspiration and boy, did I find it!
Ceiling
Quickly after removing the drywall on the ceiling, I mentioned painting the ceiling matte black. So naturally, I gathered some examples for Lucius to see my vision. Although the image below is a basement, the concept is still the same, and Lucius is on board. It’s also helpful that the flooring is similar to what we are planning on installing so he can see how it’ll work together.

Kitchenette
The kitchenette below is another great inspiration image. I mean, exposed brick? Yes, please!

We’d like to do a similar design scheme with our kitchenette by installing brick tiles, open shelving, and black cabinets. Though we’d like to use flat cabinet doors for a more sleek feel and probably butcher block counters - it might just be our first try at an IKEA kitchen!
Since we ripped out the ceiling, we can’t do recessed lighting, but I think these sconces would look very on theme.
But before we can really get excited about the kitchenette, we need to put the rest of the room back together first!
Walls
One hurdle we had to cross after taking the drywall off the ceiling was deciding how to handle the edges of the drywall on the walls. I really like how the example below is just a clean, simple stop between materials. No muss, no fuss. Plus, this room is undeniably gorgeous!

I love the black windows, and would incorporate them into the loft in a minute… if we weren’t replacing our windows within the next few months. I inquired about having black windows installed and they were over $300 more per window! Yikes! And I can’t paint brand new windows… I just…. can’t.
BUT, this room did inspire me to go light with the paint color. I’d actually like to go with my tried and true White Heron by Sherwin Williams in the loft if I can convince Lucius. He has this thing against too much white, but I think the loft/bonus room could benefit from some contrast. Plus, White Heron is more of an off-white. That’s a good enough argument, right?
Lighting
I already mentioned the plan for lighting above the kitchenette, but there’s still A LOT of loft left to illuminate, and I have to say, it took some serious thought to figure out how many lights we’ll need. There was plenty of Googling phrases like “how do you calculate how many lights you need?”, which led us down a bit of a rabbit hole about foot candles, lumens, and wattage. My brain has already purged it all but I was at least able to commit to memory that we need a minimum of 11 lightbulbs in this room.
That’s a lot of lightbulbs! But I’ve already come up with a plan. To stay with the design and also keep cost in mind, we’re thinking we’ll use simple hanging Edison lights. They’re not only industrial but super cost-effective. Plus, the cord and base being black will blend in with the ceiling so they’ll be nice a subtle.
Below I’ve put together a definitely to-scale drawing of the lighting layout. All the unfilled circles will be single bulb Edison lights, and the filled-in circles will be wall sconces.

You might notice that there are actually 13 unfilled circles. That’s simply the best layout we could find to work with the spacing of the trusses we left hanging. The lights will be on a dimmer though, so if 13 is too bright we’ll just dim them a bit!
Furniture
To be honest, I haven’t given much thought to furniture in this space. We know what we want to use the room for, but it’ll be a while before it’s fully outfitted in all of its man-cave-esque glory. Here’s a rough plan though:

First of all, that square smack-dab in the middle is intentionally spelled that way. We have one of the couches made by the company LoveSac, called the Sactional. The cool thing about it is that each section can be moved around to create the layout you want. We always go back to the classic square, so that’s what I’ve mocked up.
Lucius’ desk will stay in the corner for now, but may move behind the couch - we’ll have to see how much room we have once we get a pool table. Oh yeah, we’re getting a pool table, eventually. (That’s a down-the-line item for sure.) Lucius is also a giant board game nerd, so we’d like to create a designated space for that.
And then there’s my art table/area. There was a bar-height table perpendicularly attached to the wall here originally, but we took it out when we removed the carpet. I’d like to replace it with a longer, lower table that’s parallel to the wall for more walking space and more surface area. I’ve also penciled in a couple of flexible sconces designated to light my workspace.
Final Thoughts
Was I prepared to start another big renovation while we’re still finishing up the details from our last big renovation? Nope! But there’s no turning back now! Plus, as messy and time-consuming as renovations can be, they’re also really exciting. Stay tuned on Instagram for more frequent updates, but I’ll be sure to post periodic updates here, too!