Gift Guides for the Whole Family
Sometimes gift ideas come easily. Sometimes I remember to write them down throughout the year to refer back to right about now. But, to be honest, most of the time I need a little help. If you’re anything like me, gift guides are the perfect cheat sheet for getting your wheels turning, so I’m sharing what I came up with this year. Enjoy!
Gift Guides for Him, Her, and The Kids
Sometimes gift ideas come easily. Sometimes I remember to write them down throughout the year to refer back to right about now. But, to be honest, most of the time, I need a little help. If you’re anything like me, gift guides are the perfect cheat sheet for getting your wheels turning, so I’m sharing what I came up with this year. Enjoy!

As an Amazon Associate, and partner with other brands, I earn from qualifying purchases. This post may contain affiliate links, meaning I receive commissions for purchases made through those links at no cost to you.
Gifts for Her

- Travel Jewelry Organizer Box | $19.98 For years, I've dealt with tangled jewelry while traveling. It seriously never occurred to me to just get a travel jewelry box - until now! This one gets bonus points for being beautiful!
- Clinique Skincare and Makeup Set | $52.50 I may be in my mid-30s, but I’m still overwhelmed by the amount of skincare products on the market. This skincare and makeup set would be perfect to introduce someone like me to a limited amount of products to get their feet (or face) wet.
- Roomba Self-Emptying Vacuum and Mop | $349 I’ll be the first to admit that I have a love/hate relationship with my Roomba (aka Rhonda). But with all her faults (she LOVES to get stuck under our buffet table), I love knowing that she's handling the day-to-day upkeep, so I don't have to.
- Laser Hair Remover | $79.78 Let's face it. We're all getting older, and hair is popping up where we'd prefer it didn't (hello, rogue chin hair). Get rid of it for good with a laser hair remover!
- Candle Warmer | $29.98 I’m cheap, so when this candle warmer started popping up everywhere, I thought I didn’t need it. I bought a boring old-school candle warmer instead, and I’m regretting it for sure. This is just so cute!
- Disco Ball Planter | $17.93 If I don’t get one of these disco ball planters from Santa this year, I’ll definitely be buying one (or more) for myself. I mean, plants and disco balls? What more could you ask for!?
- Faux Fur Blanket | $33.75 (price varies by size) My husband is over 6 feet tall and hates how tiny throw blankets are. I bought him this blanket in the king size, and he carries it around with him like a child. The only problem? It’s so cozy, I want one for myself!
- Digital Picture Frame | $119.99 Every year, I go through my pictures and pick out my favorites to print, but they never seem to end up in a photo album. This would be the perfect gift to make sure those pictures actually get seen and don’t end up in the bottom of a box forever (whoops).
- Grande Cosmetics Five-Star Favorites | $69 I started using Grande Lash MD about a year ago and am amazed at how long my lashes have gotten. I’m eager to try some of their other products! This would be the perfect gift for someone who's still figuring out what products they do and don't like!
Gifts for Him

- Beard Grooming Kit | $17.98 It’s getting colder, and for many men, that signals time to grow out their beards (no-shave November, anyone?) Make sure your guy doesn’t look like a mountain man with this complete beard grooming kit.
- Cocktail Infusion Kit | $85 I love a fun cocktail. This cocktail infusion kit has 7 different infusion blends and makes it easy to craft delicious cocktails right at home.
- Heated Stadium Seat | $119.97 If you’ve ever been to an event where the weather was less than warm, you know it can really bring down the vibe. This heated stadium seat is sure to make your seat the coziest in the crowd!
- Multi-Device Charging Station | $27.99 I don’t understand how men can have so many electronics, but somehow they do. A multi-device charging station is the perfect solution for keeping everything organized and in its place when not in use.
- Popcorn Seasoning Variety Pack | $53.08 My husband is obsessed with popcorn. In fact, last year I bought him this popcorn maker. What could be better with popcorn than a bunch of fun seasonings?
- Men’s Skincare Kit | $56 I recently went on a girl's trip. By the time I got back, my husband had gone down a TikTok rabbit hole about male skincare. But, like me, he's overwhelmed by the amount of products on the market. A kit like this would be perfect for a skincare novice!
- Racing Simulator | $248.99 We recently bought one of these and then shortly after hosted a party. Holy smokes was this a hit! There was a line awaiting their turn for the entire party. And when we don’t have guests? I can always find my husband racing his little heart away.
- Smokeless Firepit | $199.99 Love bonfires but hate being blasted in the face by smoke? Then this smokeless firepit (which is also PORTABLE, btw) is for you!
- Rocketbook Reusable Planner and Notebook | $22.53 Elevate his note-taking game with the Rocketbook Reusable Notebook and Planner – the perfect gift for the modern man who values both innovation and organization! This sleek, eco-friendly notebook lets him effortlessly transition between the tactile joy of writing and the digital convenience of syncing notes with a simple scan.
Gifts for Kids

- Uno Attack | $24.99 My seven-year-old recently learned how to play Uno and is begging for the classic game. I can’t wait to surprise her with this version that adds a little oomph by spitting out additional cards when you least expect it.
- There’s a Monster In Your Book | $11.59 & Stick Dog | $8.99 Books are ALWAYS on my gift list for my kids. We already have these books, but they’re such a big hit with my kids (4 and 7) I wanted to share them with you!
- Acrylic Paint Set | $25.99 My older daughter is always asking to use my (ahem, expensive) paints. This complete paint set is the perfect gift to encourage that creativity without breaking the bank.
- Origami Paper & Guidebook | $10.99 Speaking of crafty kids, I’m sure both of mine will get a kick out of this origami kit. It’s filled with tons of cute patterns and a book to show you exactly how to fold them.
- Custom Neon Sign | starting at $52.98 What kid wouldn’t feel like a star with their name in lights? Now they can with this customizable sign!
- Slushy Maker Cup | $11.99 If your kids are anything like mine, they’re convinced that everything tastes better as a slushy. I can’t wait for them to give themselves brain freezes nonstop with this cup that turns any liquid into a slushy!
- Toniebox | $69.99 I’ll be honest, I don’t exactly understand the appeal of a Toniebox, but my 4-year-old is obsessed with the one at her friend’s house. Maybe Santa will be bringing her one this year?
- Nintendo Switch & Mario Kart Bundle | $299 Yes, this gift is a little more on the expensive side, but it's seriously fun for the whole family. Not only do my kids like playing on their Switch independently, but we also have a blast hooking it up to the TV for some epic Mario Kart battles.
- Scooter | $40.12 Let your kid roll into the new year and impress their friends on some sweet new wheels with a scooter!
Happy Holidays!

Need more ideas? Check out last year’s gift guides!
Last-Minute Present Ideas
Powder Room Remodel Reveal
Looking for a dramatic before and after reveal? Then you’re in the right place! Dive into this post to see how I took my powder room from boring and outdated to dramatic and sophisticated.
Dark, Moody, and Oh-So-Dramatic Half-Bathroom Makeover
Looking for a dramatic before and after reveal? Then you’re in the right place! Dive into this post to see how I took my powder room from boring and outdated to dramatic and sophisticated.

It’s here! It’s here! We’ve reached the end of the One Room Challenge, and I’m TIRED, but so happy!

I completely forgot how much work it is to gut and put an entire room back together over an 8-week period. I guess after last year’s reveal, the memories of stressing over each week’s deadline and all the long nights working faded away almost immediately. It just feels so dang good when I get to share the finished product!
Of course, before we get into the reveal of this space, let’s take a look at the room before I got my hands on it.
As an Amazon Associate and partner with other brands, I earn from qualifying purchases. This post may contain affiliate links, meaning I receive commissions for purchases made through those links at no cost to you.
The Powder Room Before

There was literally nothing in this room that I wanted to keep. From the crown molding down to the dated tile - it all had to go. So I got rid of EVERYTHING and turned it into…
The Powder Room After
…this.

She’s dark. She’s moody. She’s oh-so-dramatic. And I’m in love!
It took a lot of work to get here, but I couldn’t be more proud of this space. This was the first time I’ve ever let myself stop worrying about the resale value of our house and let my creativity reign supreme. I think it paid off in the best way.
Now let’s get into the details because I can’t wait to show you around!
*Quick FYI - I linked as much as I could below each picture, but some items are vintage, thrifted, or no longer sold. Anything with an asterisk indicates the link is for a similar item.
Paint It Black
Most people assume that a small room should be painted a light color to make it feel larger, but I vehemently disagree. While this room is large for a half-bathroom, it’s still a small space (less than 5x7 feet). So what did I do?
I painted it black!

The key to painting small rooms a dark color is eliminating harsh color transitions. By painting the beadboard, door, trim, and ceiling all the same color your eye doesn’t notice the break between, for example, a dark wall and white ceiling. Instead, it all blends together and actually makes the room look and feel larger.
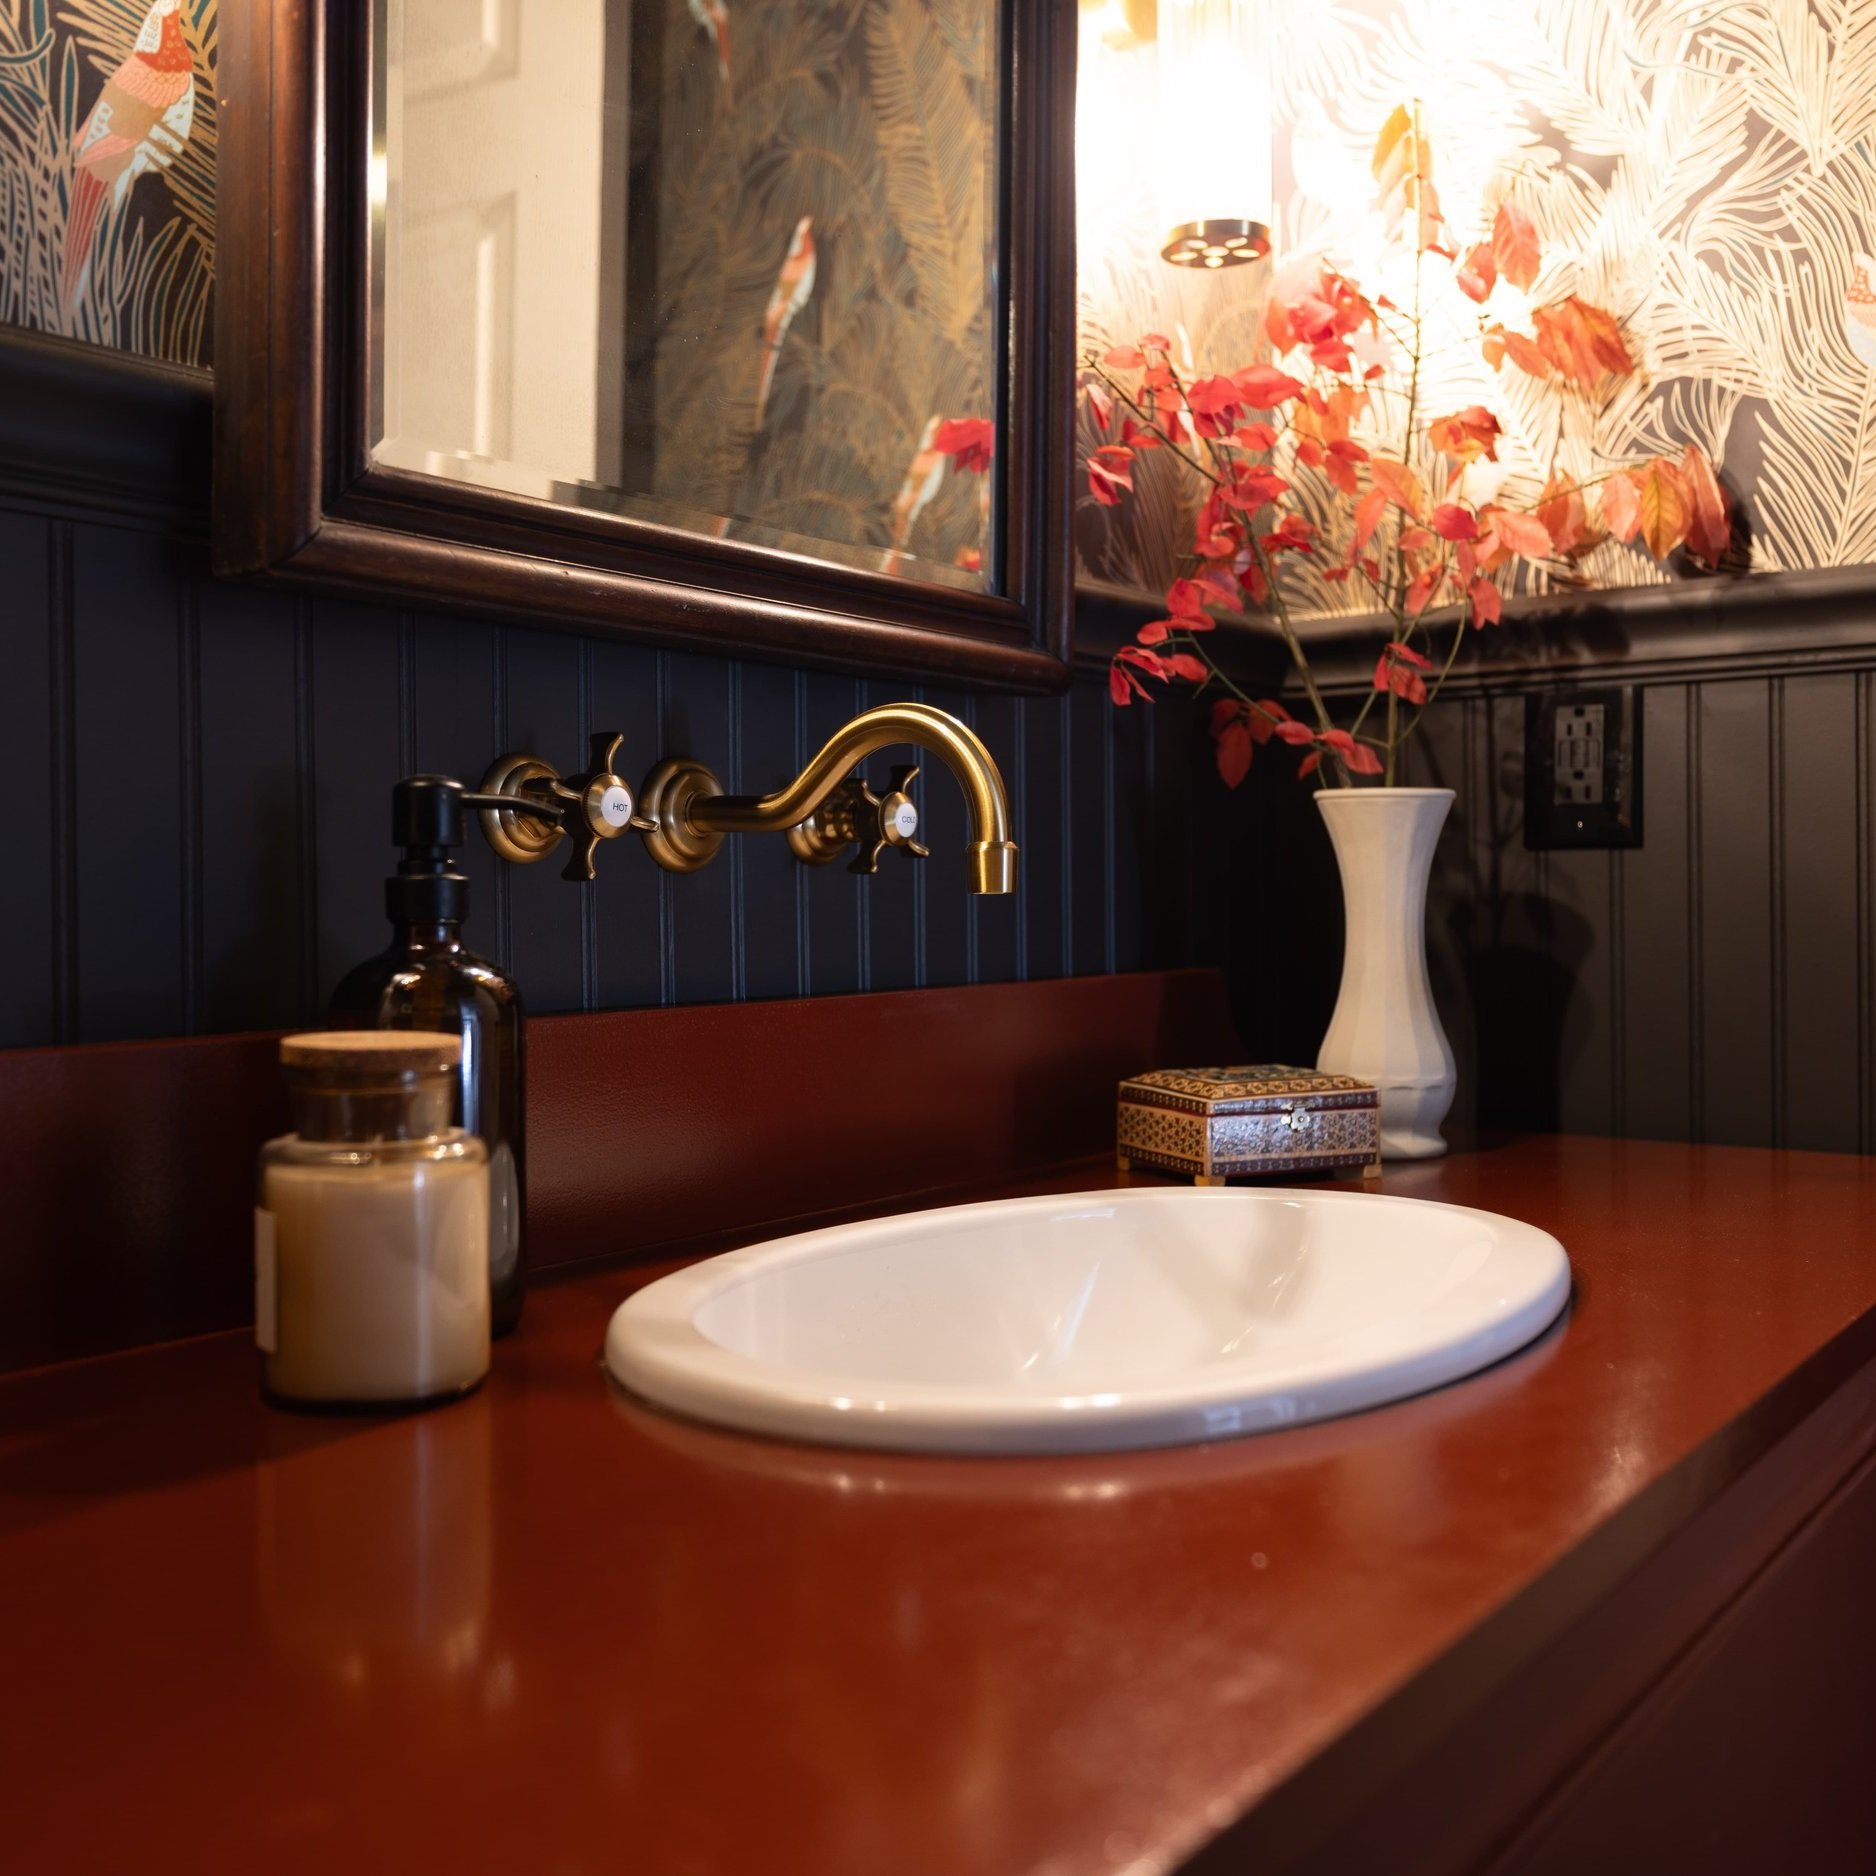
For this room, I chose Onyx by Pittsburgh Paints. I love that it’s a softer shade of black with some brown undertones, which pair perfectly with the wallpaper.
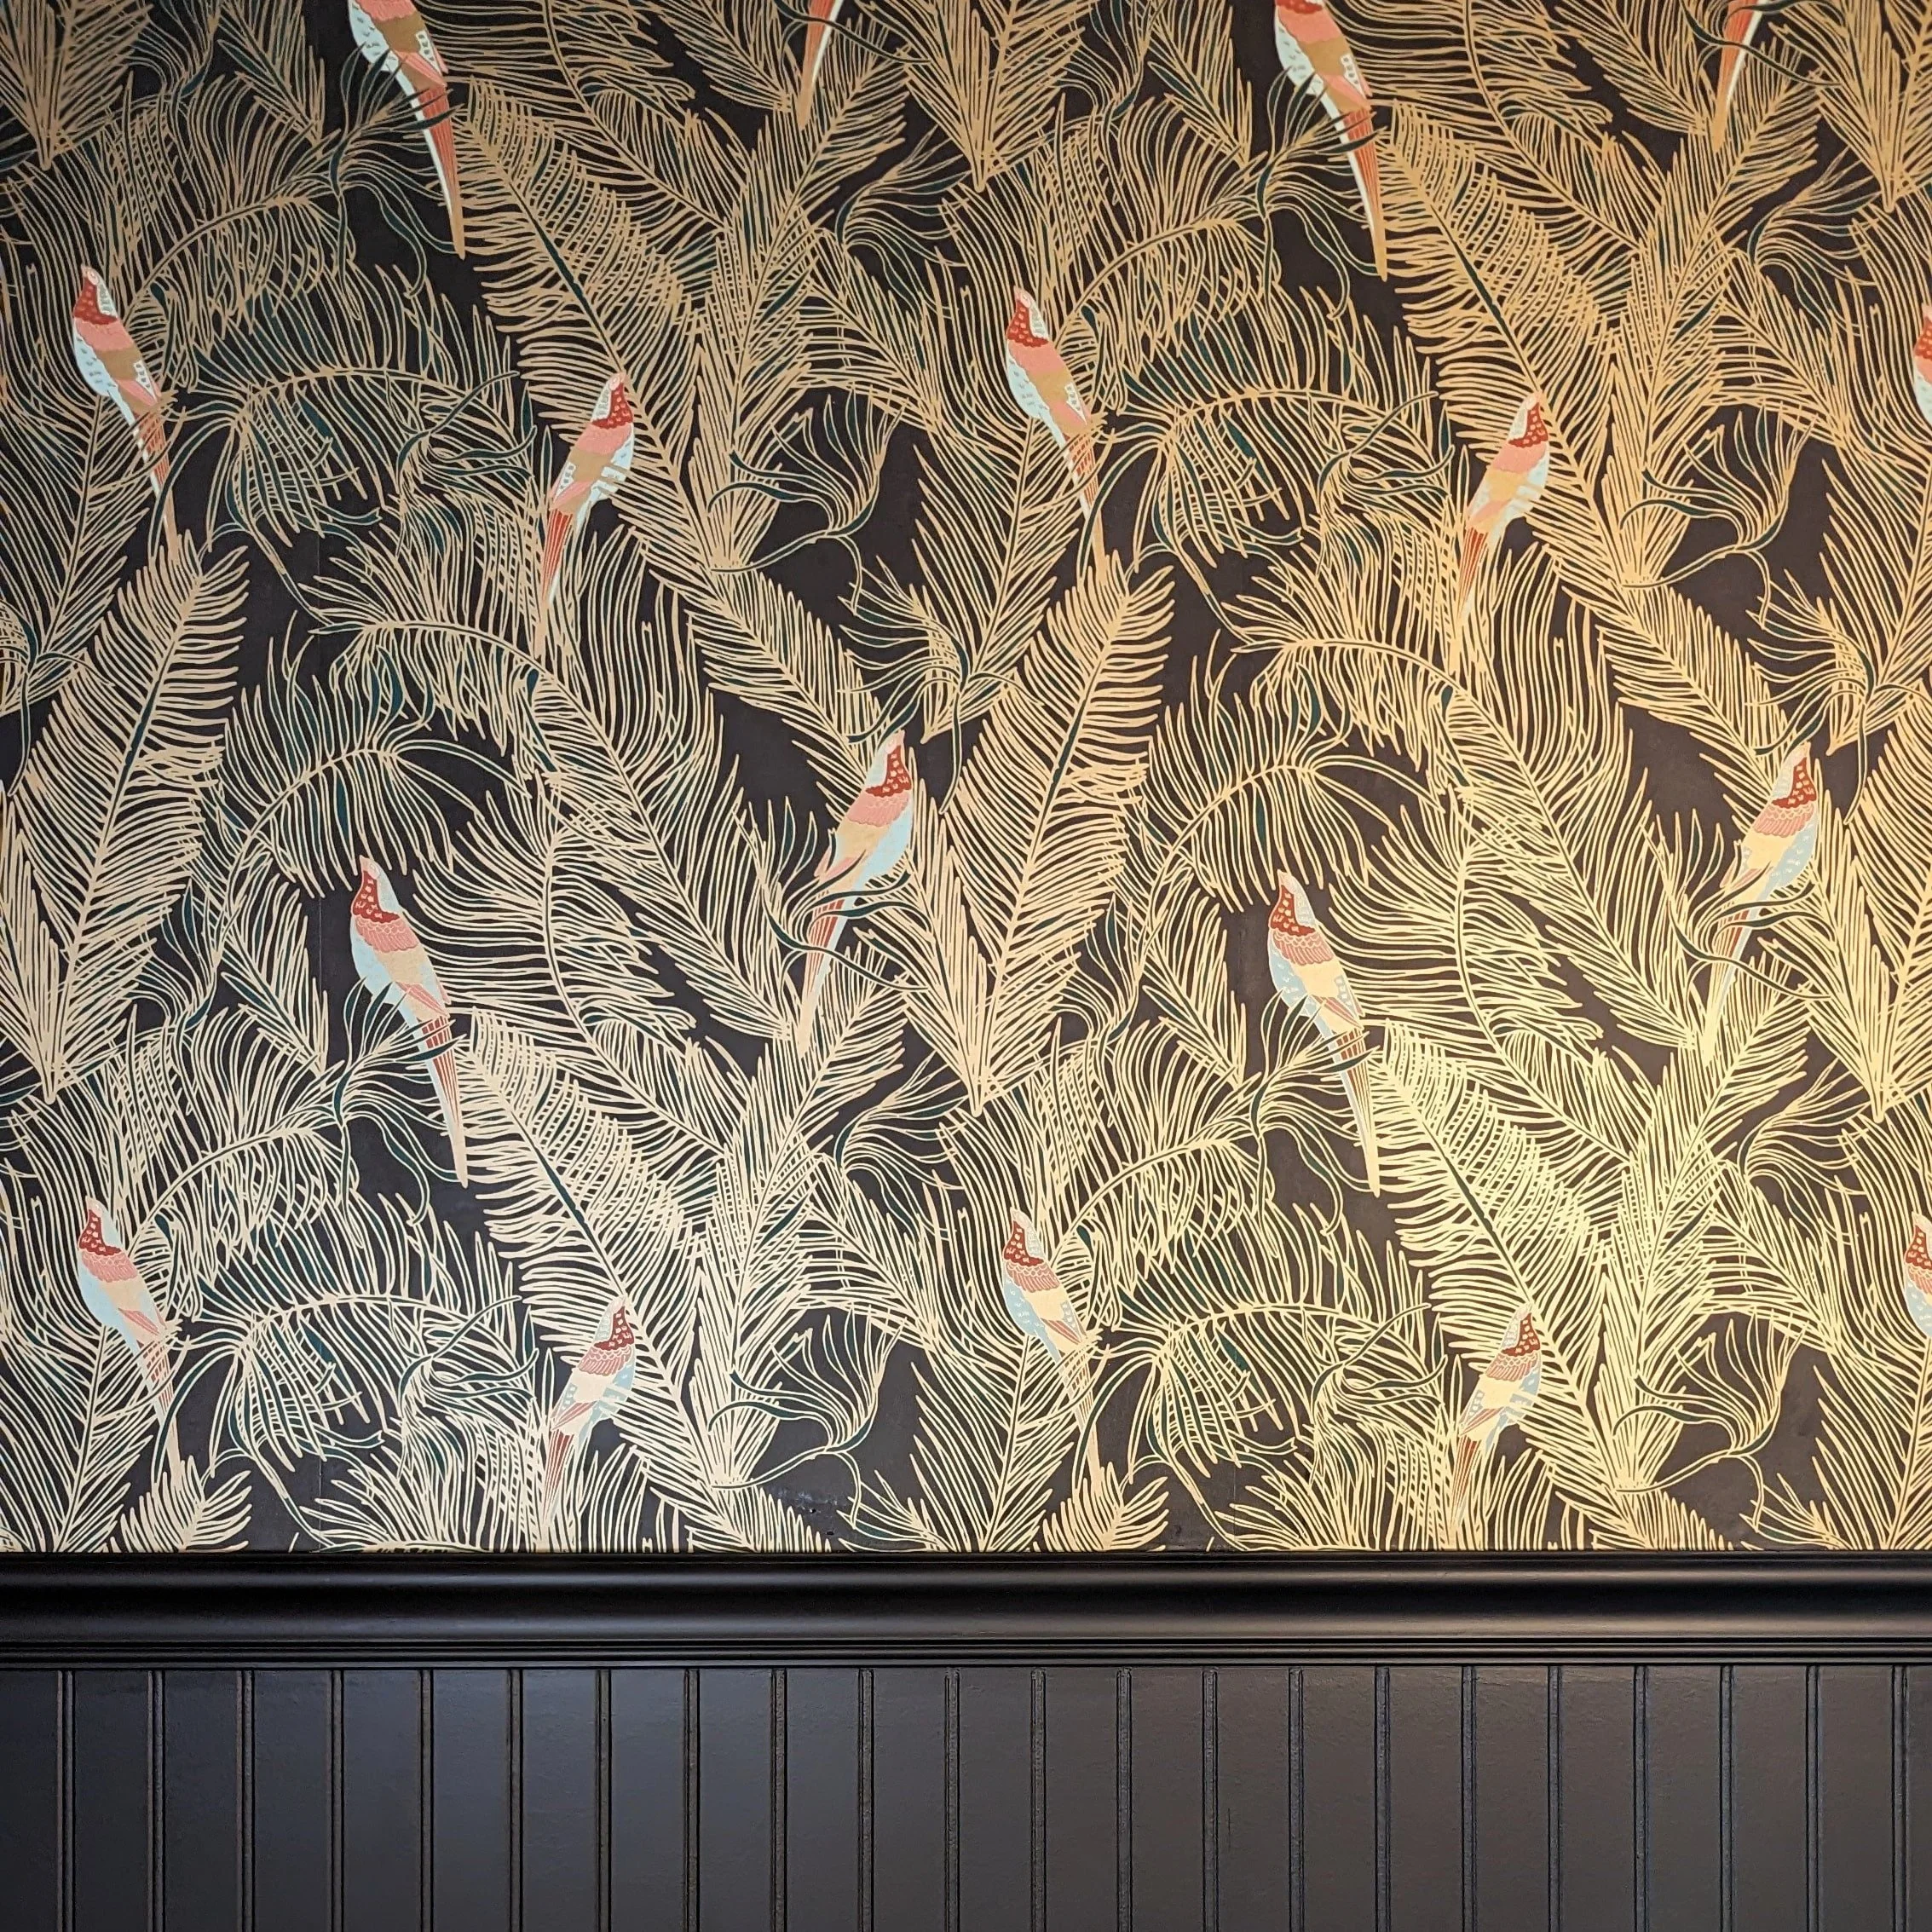
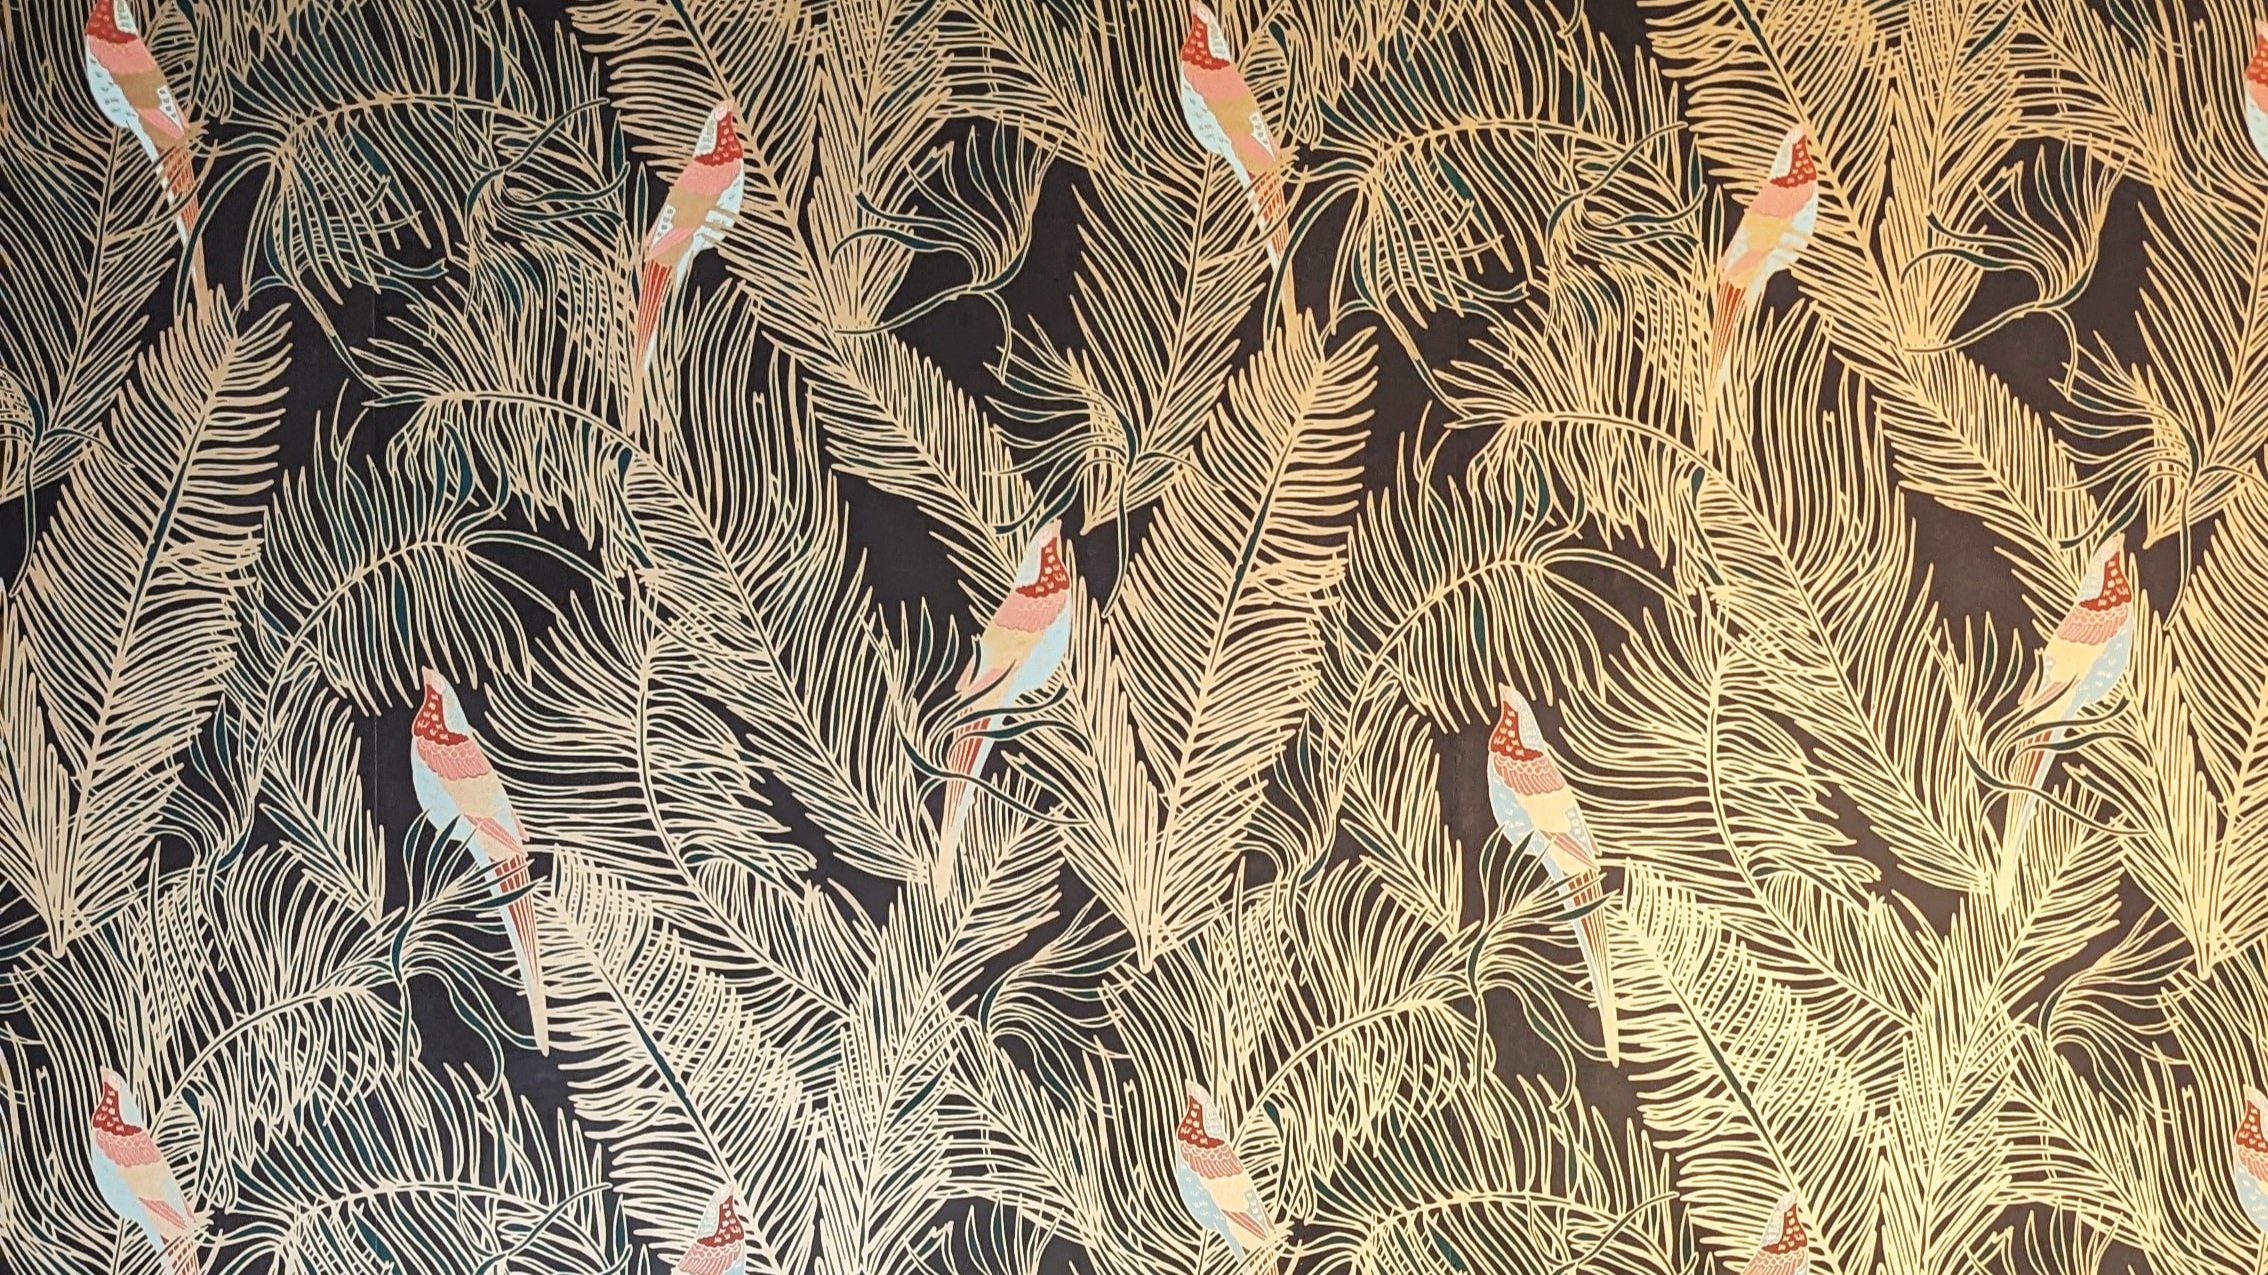
Add Eye-Catching Wallpaper
Speaking of the wallpaper… I’m in LOVE.

This wallpaper takes my breath away. I love the organic feel of the leaves with the subtle green and metallic gold outline. I especially love the pops of color in the birds.
From the beginning, I was certain I wanted the vanity to be green. (I was inspired by this one.} But once I started testing colors, I was shocked that green no longer felt right. Instead, I was drawn to the warm red tones of the birds in the wallpaper.
I don’t typically like red, but I went with my gut and, well, I’d say it was worth it…

The color is Rustic Red by Sherwin Williams. I was a little nervous at first because it was much brighter when I was painting it in the mudroom. However, in this darker space, it adds so much drama and depth. As much as I love green, I have to admit that it wouldn’t have had nearly the same impact.

Not only was installing penny tile a really fun DIY, but it added so much character and sophistication to this room!
Light It Up
Moving on up the walls… can we talk about the sconces for a hot second?

I’ve been fawning over these sconces for quite a while, so I was ecstatic when I found a place to use them! I’m really drawn to the vintage look with the brass and ribbed glass, and I think they fit right into the overall feel of this bathroom.
Something Old, Something New
While we’re talking about vintage, there are several actual vintage items used throughout this space. In fact, most of the decor is thrifted, like this awesome brass bowl with feet that fits a roll of toilet paper perfectly.

It’s seriously the happiest little accident! (I found a couple of similar pieces here, and this one comes in a set of two!)
The box on the vanity was also a thrifted find ( this one is similar), and I thrifted the vase and painted it when I did this project a while back. Here and here are a couple other vases that caught my eye.
I stole the branches from a Burning Bush in my backyard, but now I’m on the hunt for a look-a-like faux version like this or this so I can keep the look year-round.

The mirror above the vanity is one of my favorite parts of the bathroom because it’s actually from our Charlie Foursquare house! The arch, the details in the wood, and the slight bevel of the glass are perfect.
(This mirror has a similar look, but I'm especially fond of the shape and details of this one.)


It’s the perfect weird addition to this room, don’t you think!? I’m so happy I found a place for it!
(Visit this post if you’re stumped on how to source vintage picture frames!)
Lastly, I can’t forget to call out the wall-mounted faucet because it’s simply gorgeous.
Not only do I love the look, but I’m pleasantly surprised by how heavy and solid it is. I can’t wait to actually use it!
Oh yeah… we still have to hook up the drain line for the sink, ha! Soon!
Final Thoughts

I’m giddy with excitement over how this bathroom turned out, and so, so proud that I made it happen from start to finish. I had so much fun pushing the boundaries with this design. I can’t wait to do it again in the next room!
What do you think of this space? Let me know in the comments!

Catch up on all the projects in this One Room Challenge:
Small Powder Room with a Big Impact: Before & After

How to Convert an Antique Dresser into a Vanity
Converting an old piece of furniture into a one-of-a-kind custom vanity is a great project to add a unique style to your bathroom. In this post, I’m sharing the step-by-step process for how I turned a dresser into my new bathroom vanity!
Repurposed Dresser Turned Bathroom Vanity Tutorial - Fall ORC ‘23 Week 7
Converting an old piece of furniture into a one-of-a-kind custom vanity is a great project to add a unique style to your bathroom. In this post, I’m sharing the step-by-step process for how I turned a dresser into my new bathroom vanity!

We’re less than ONE week away from the end of the One Room Challenge and the reveal of my half-bathroom makeover! The vanity is, obviously, a huge part of the design of this tiny space, so I’m excited to share how I gave this old piece of furniture destined for the landfill new life as my vanity.

Because this DIY is typically done with dressers, for SEO purposes, that’s the term I’ll be using (Mama didn't raise no fool!). However, I think my piece of furniture is actually a console/buffet/credenza (whatever you choose to call it). Either way, the same steps apply.
You’ll also notice that I converted my dresser out of the order of the steps provided. I was nervous to start cutting my piece apart so I started with what I felt most comfortable with. In the end, it doesn’t really matter, but following the steps in the order below is a little more efficient.
Let’s jump in!
As an Amazon Associate and partner with other brands, I earn from qualifying purchases. This post may contain affiliate links, meaning I receive commissions for purchases made through those links at no cost to you.
Materials and Tools:
- Dresser or Console Table
- Sink and faucet
- Jigsaw
- Drill
- Drill bit
- Hole saw or spade bit
- Orbital sander
- Sandpaper
- Primer and paint or wood stain
- Paintbrushes and foam rollers
- Sealer
- Drawer pulls or knobs
- Caulk Gun
- Silicone caulk
- Plumbing supplies (P-trap, water supply lines, etc.)
- Adjustable wrench and pliers
- Finish nailer and nails
- Wood glue
Choose the Dresser
Obviously, to convert a dresser into a vanity, you actually need to acquire a dresser. Vanities are expensive! This is a great place to save a little money so you can splurge elsewhere in your bathroom.

Start by taking measurements of your space, taking note of the width, depth, AND height you need. Typically, vanities are around 34” high. You’ll also want to be sure your dresser is deep enough to hold a sink. Then search your local thrift stores or Facebook Marketplace for the perfect piece.
I’ve mentioned that I started designing this bathroom two years ago. I knew at that time the current vanity would need to be replaced. Based on my design, I was looking for a green vanity. I loved this one, but it was out of budget.
So, I hopped on Facebook Marketplace and fell in love with this buffet. Not only was it the perfect dimensions, but I loved the style. I picked it up, and there it sat in my garage, gathering sawdust for a few years until this project rolled around.
Cut the Hole for the Sink and Faucet
Remove the hardware and drawers and set them aside.
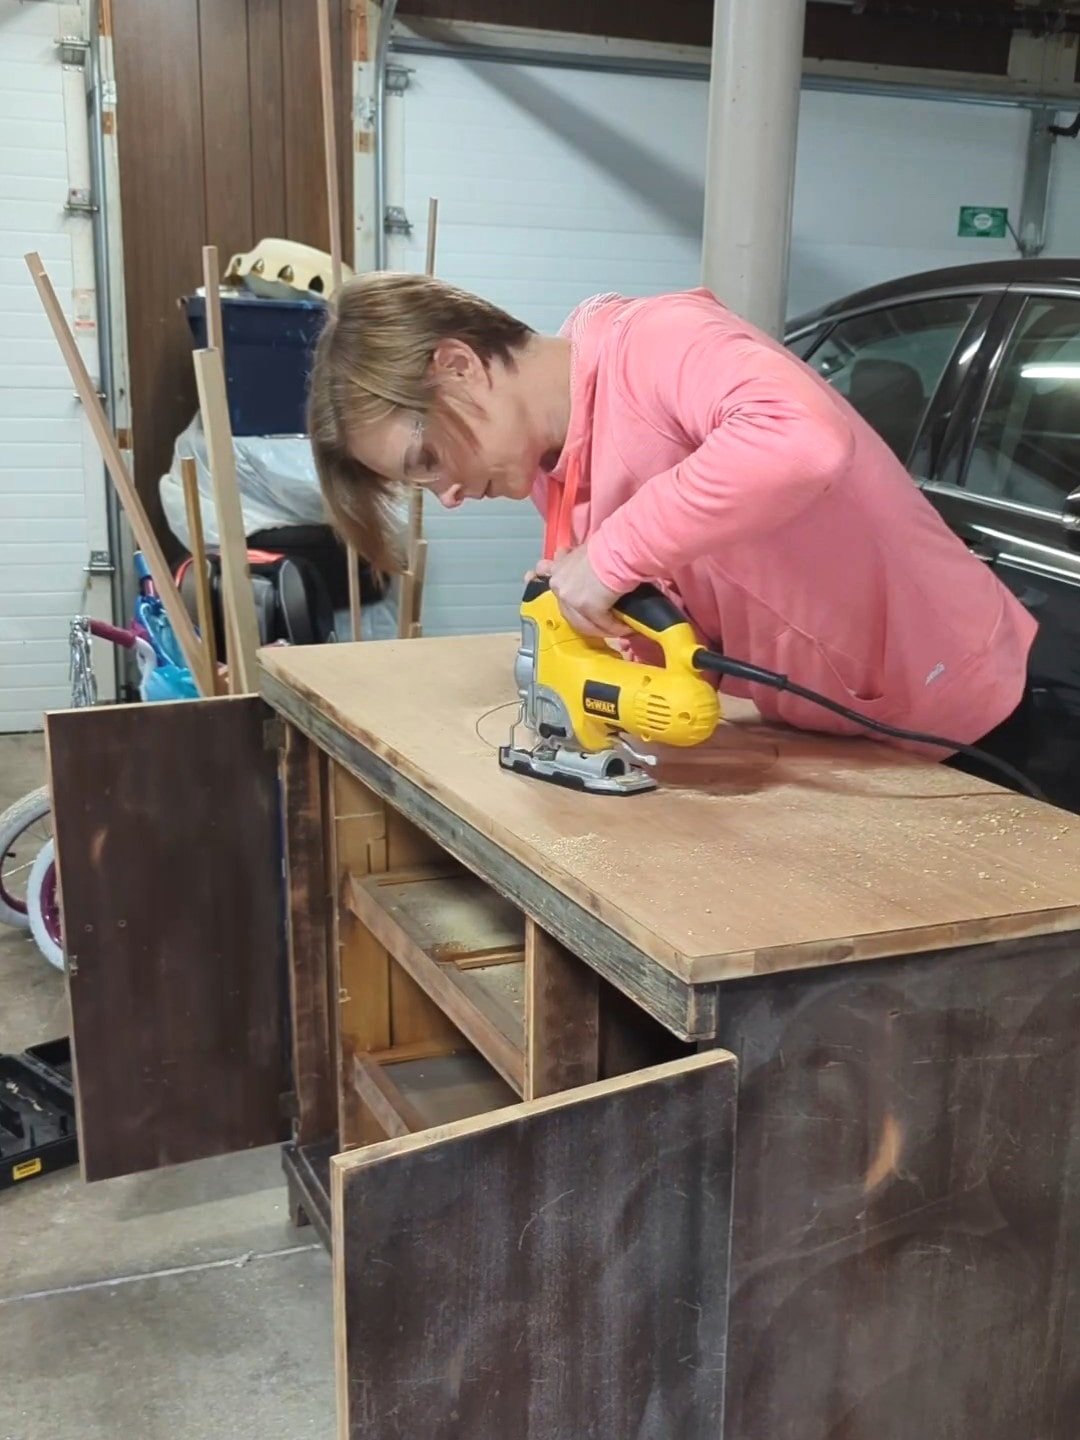
Measure to find exactly where to install your sink (or sinks if it’s a double vanity). Then, using the template that came with your sink, trace the outline. Make sure to leave room for your faucet placement!
Drill a hole large enough for a jigsaw blade to get through on the inner edge of the outline. Then, cut along the outline with the jigsaw until the hole falls out.
Because I’m using wall-mounted fixtures, I didn’t need to drill holes for the faucet in the vanity itself. But if you’re using standard fixtures, you can use a hole saw to make your faucet holes.
Modify Drawers for Plumbing

If your dresser has drawers in the way of plumbing, you’ll need to modify them. There are loads of tutorials online on how to do this. This isn’t one of those tutorials. Instead, I opted to remove the drawers completely and use the fronts to create a faux door for easier access to the plumbing if something goes wrong down the line.
First, I separated the drawer fronts from the drawer with a rubber mallet. Then, I cut a scrap piece of 1/4” plywood to the size of the opening on my table saw. Using wood glue and my finish nailer, I attached the doors to the plywood. Then I added some 1x2s for extra support.
Using a Kreg Concealed Hinge Jig, I drilled the holes for my hinges to sit in.
Sanding and Staining/Painting
How you prep for paint or stain will vary slightly. If you’re staining, you’ll want to sand off the existing finish to bare wood, beginning with a medium grit (120) and moving down to a high grit (220). If you plan to paint your piece, you’ll likely just need to scuff up the surface.
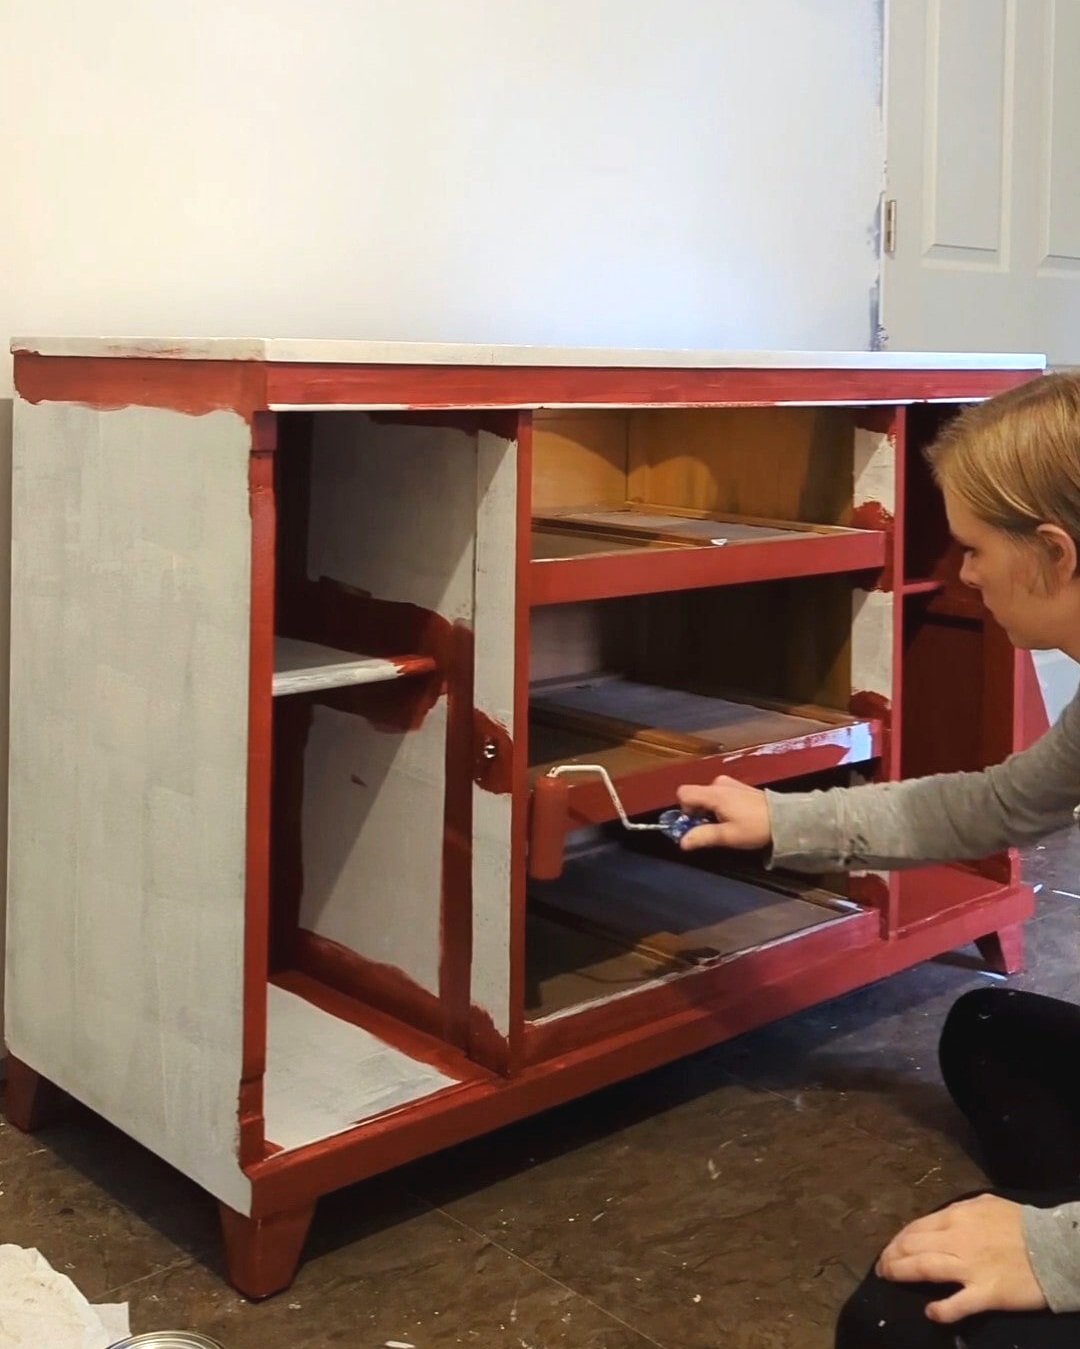
I sanded my piece down with 150 grit, primed it with an oil-based primer, and then painted it with Valspar’s Cabinet and Furniture Enamel.
I mentioned above that I originally wanted a green vanity. But when I started choosing colors, green didn’t feel right in the space anymore. I shocked the heck out of myself when I ended up going in the opposite direction and choosing Rustic Red by Sherwin Williams.
I sealed the top of the vanity with a couple of coats of semi-gloss Polycrylic.
Once everything is dry, apply silicone caulk to the sink and faucet where they meet the vanity top to prevent water seepage.
Connect Plumbing
Connect the water supply lines to the faucet and the drain to the sink. You’ll probably need to cut holes in the back of the dresser to accommodate the plumbing lines, which can be done with a hole saw. Make sure there are no leaks and that the plumbing functions correctly.
Finishing Touches
Lastly, reinstall your doors and drawers and add knobs or pulls. I cleaned up the pulls that came with my dresser and spray-painted them Rustoleum Antique Brass.
Your vanity is now complete!
Final Thoughts
I’ve always wanted to tackle this type of project, and I’m excited to have had the opportunity! I love how much more customized my half-bathroom is now. Besides, I always love tackling a project I’ve never done before.

This room has come such a long way from where it started just seven short weeks ago. Be sure to follow along for the reveal of this room next week!


Catch up on the rest of the One Room Challenge:
How to Turn a Vintage Dresser into a Custom Vanity
The Easiest Wallpaper for Beginners - Tutorial
Several years ago, I hung peel-and-stick wallpaper in my (still unfinished) closet thinking it would be the easiest kind of wallpaper to install. Boy, was I wrong! Although I wouldn’t go so far as to say any wallpaper is “easy” to hang, the experience between hanging paste-the-wall vs. peel-and-stick is worlds apart.
Paste the Wall Wallpaper Tips - Fall ‘23 ORC Week 6
Wallpaper is a great way to add character and personality to a room. This detailed tutorial shares the step-by-step process for hanging paste-the-wall wallpaper, including a round-up of moody wallpapers I love!
Several years ago, I hung peel-and-stick wallpaper in my (still unfinished) closet, thinking it would be the easiest kind of wallpaper to install. Boy, was I wrong! Although I wouldn’t go so far as to say any wallpaper is “easy” to hang, the experience between hanging paste-the-wall vs. peel-and-stick is worlds apart.
It’s week six of the One Room Challenge, and there are only TWO weeks until the finale! This week, I made big strides in the half-bathroom by hanging this dramatic paste-the-wall wallpaper, and I have to say, I’m never going back to peel-and-stick!

What Are The Different Types of Wallpaper?
Peel-and-stick wallpaper is essentially a sticker that clings to everything it touches. While it’s removable and repositionable, it can stretch and lose tackiness.
Traditional wallpaper, on the other hand, requires a large workspace and careful precision to apply paste directly to the paper.
Paste-the-wall wallpaper is probably the simplest because you apply the adhesive directly to the wall, which lessens the mess and allows you to easily reposition the wallpaper as needed.
Here’s how I hung the wallpaper in my half-bathroom:
As an Amazon Associate and partner with other brands, I earn from qualifying purchases. This post may contain affiliate links, meaning I receive commissions for purchases made through those links at no cost to you.
Materials and Tools Needed:
- Paste-the-wall wallpaper
- Wallpaper adhesive
- Wallpaper smoother
- Utility or X-Acto knife (with extra blades!)
- Scissors
- Measuring tape
- Level
- Pencil
- Step ladder
- Paintbrush
- Paint roller & Cover
- Paint tray
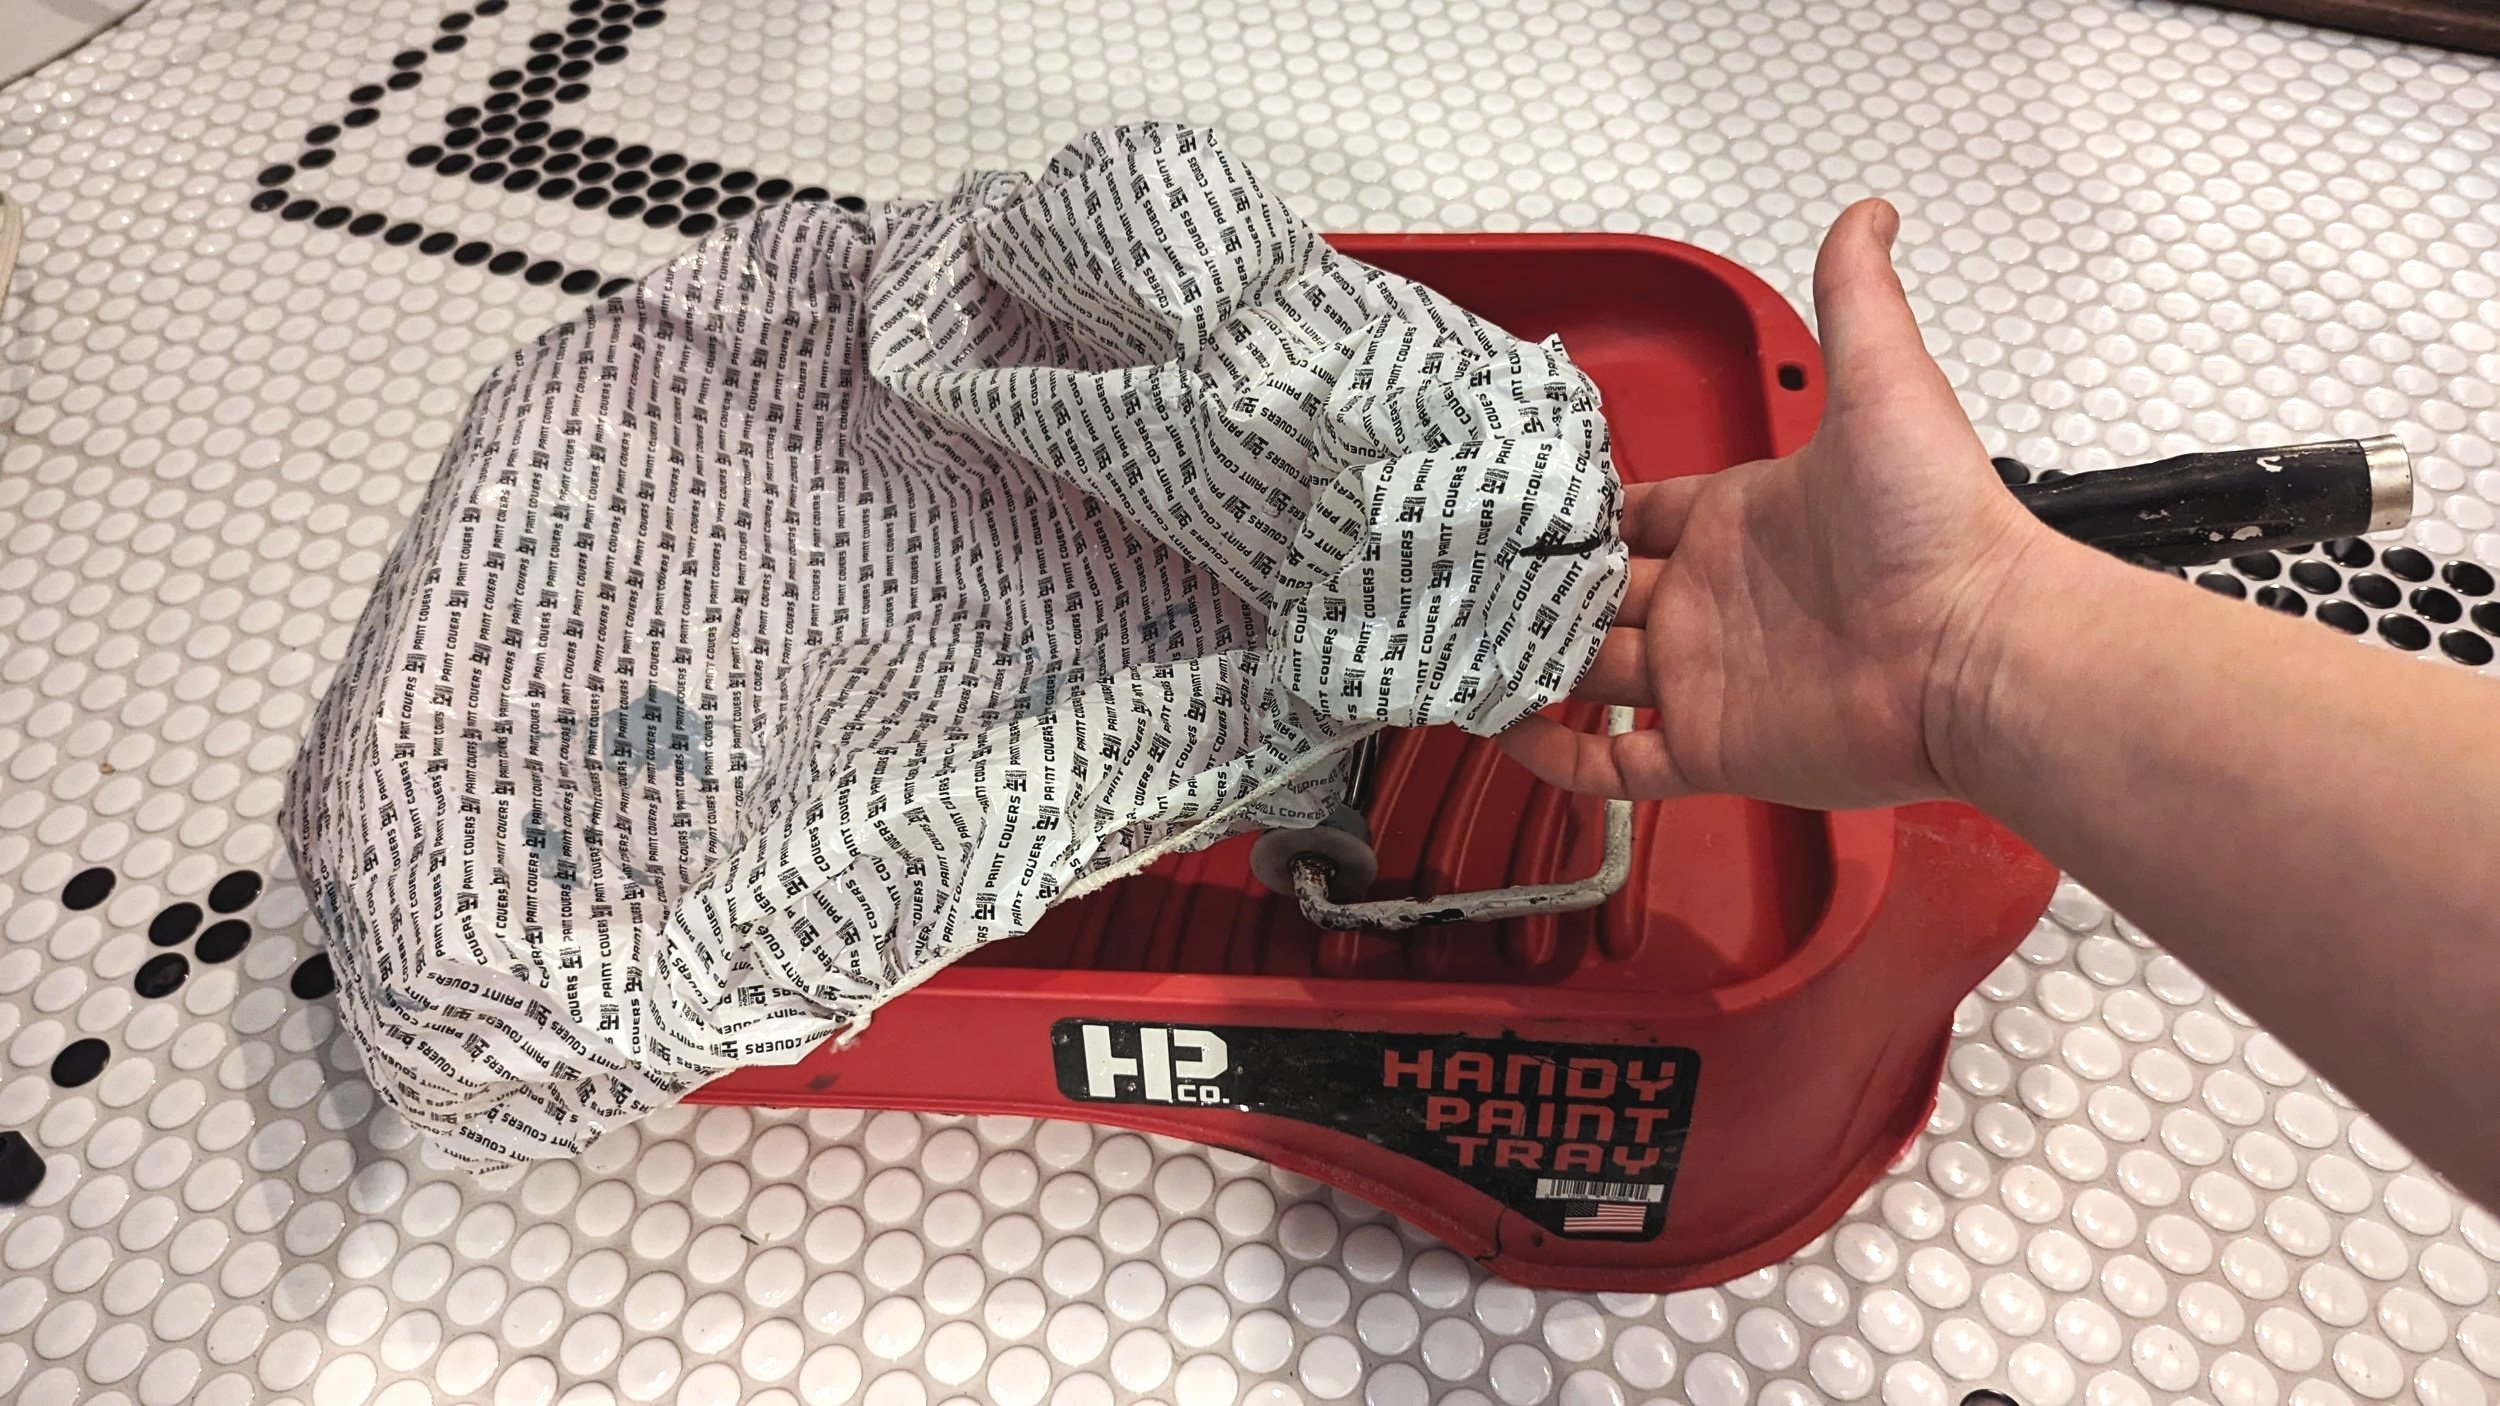
- Handy Paint tray cover
- Clean sponge and water
- Drop cloth or plastic sheeting to protect the floor
- Wallpaper primer*
*If your walls are finished, primer may not be necessary.
Prep
Check Your Wallpaper Batches
Like tile, wallpaper color can vary from batch to batch. When you receive your wallpaper, I highly recommend checking that it’s all from the same batch number.
Clear the Room

Before you begin wallpapering, move any obstacles away from the walls. Wallpapering is hard enough. Don’t make it more difficult by having a bunch of stuff in your way - this is why I’ve been waiting to install the new toilet in my bathroom!
Prep Your Walls
My walls were a doozy to prep for wallpaper. If you remember, I had to remove multiple layers of wallpaper and texture to get to the drywall underneath… which was unfinished.
After removing the old wallpaper, I had to skim-coat the walls, sand them smooth, then prime them. I used Shieldz Wallpaper Primer and asked the hardware company to tint it as dark as possible since my wallpaper is almost black.
If your walls are finished, you’ll just need to clean the walls and fill any holes.
Determine Your Starting Point & Draw a Level Line

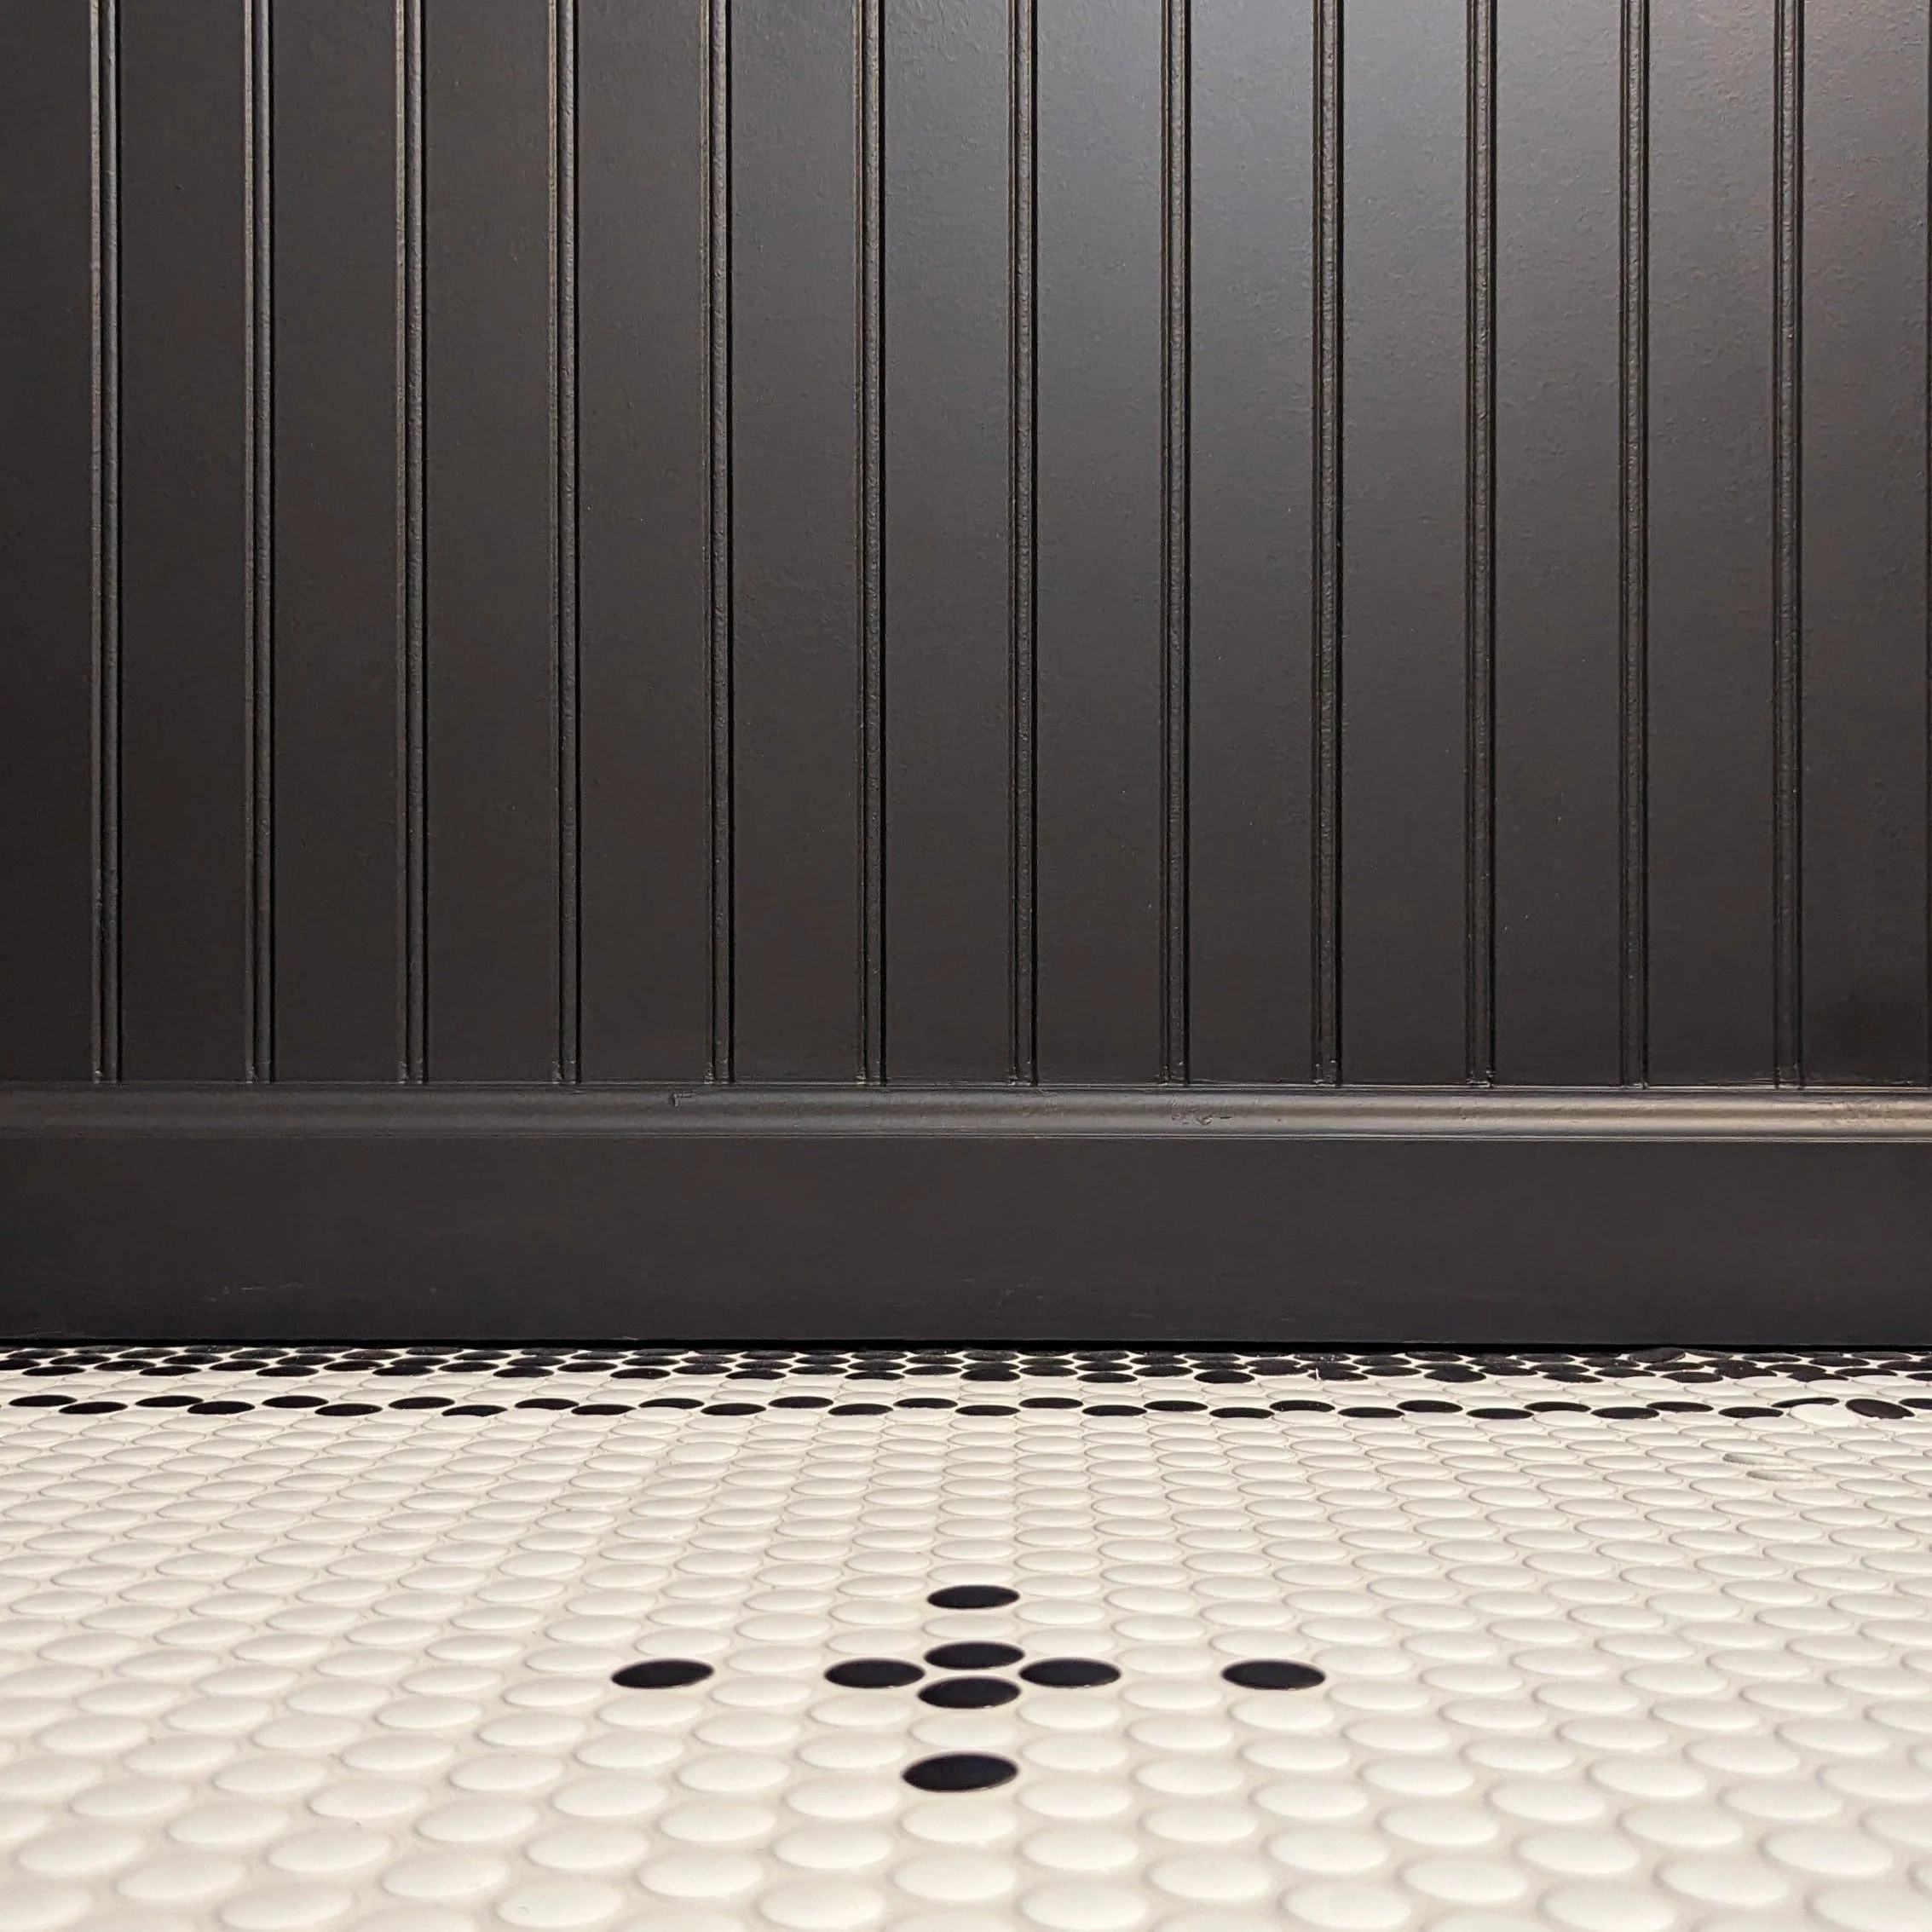
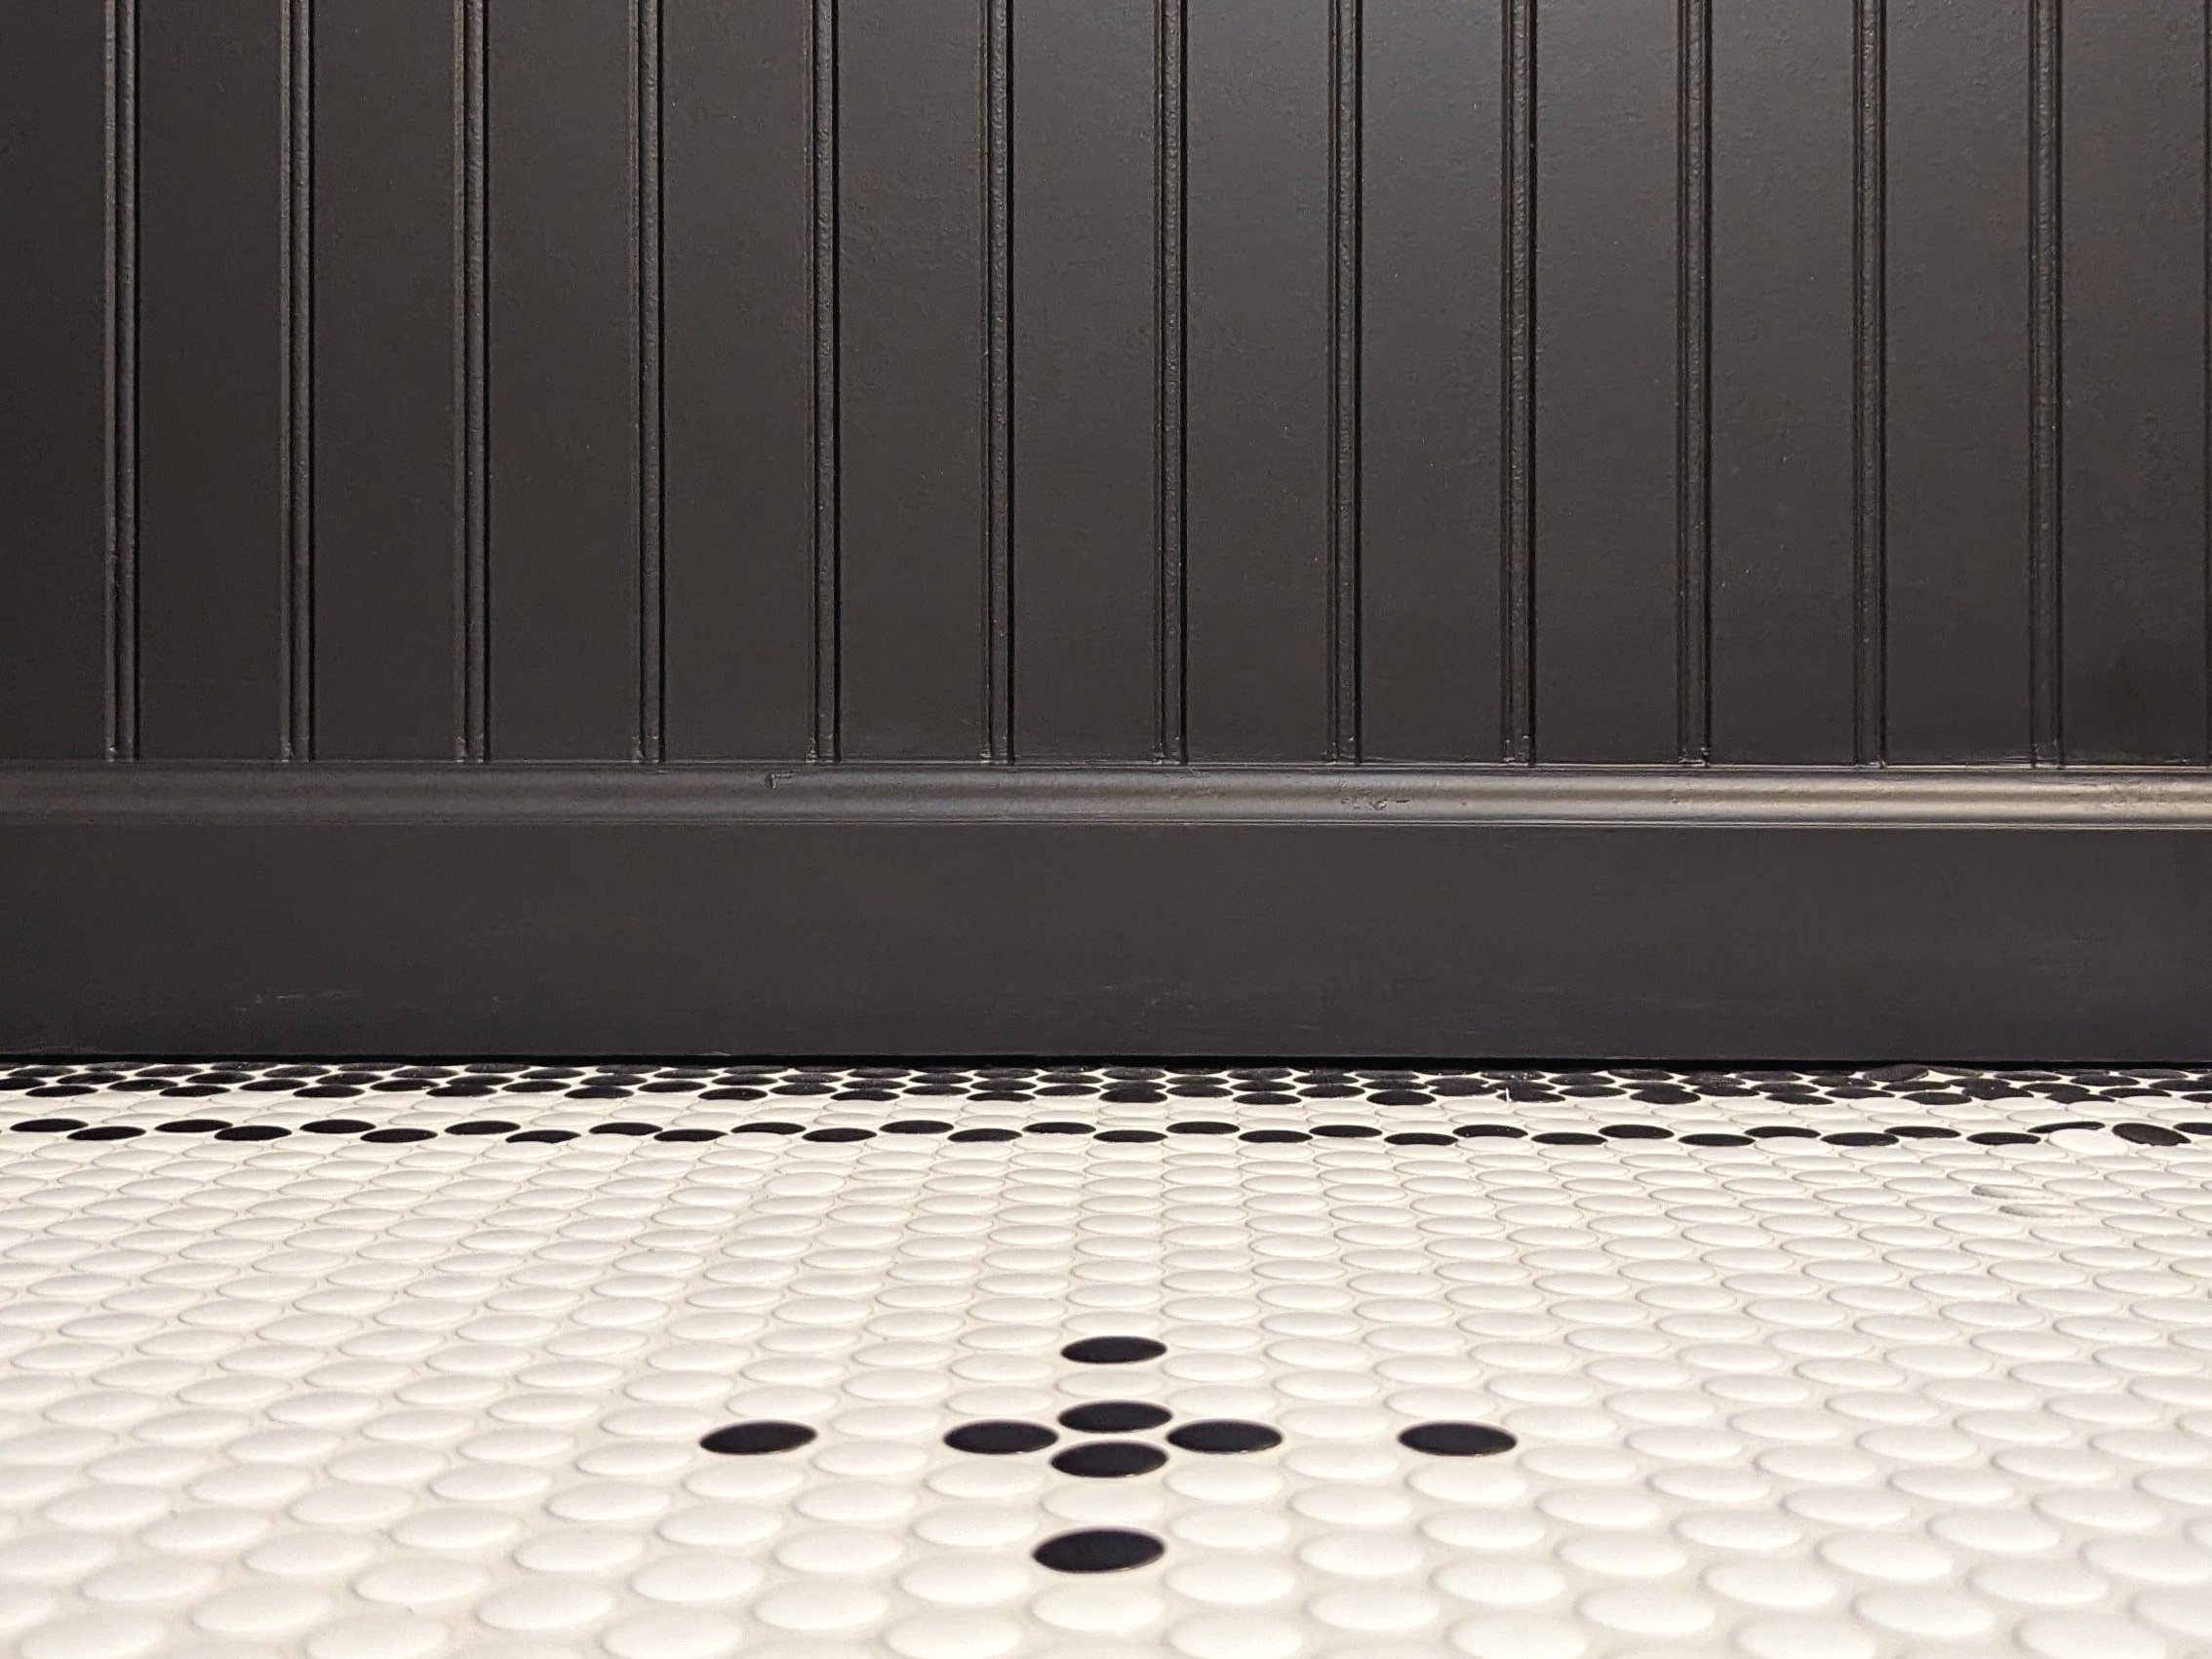
If you’re wallpapering a whole room, your starting point will also be your endpoint - and the pattern absolutely won’t line up perfectly when they come together. Because of this, choose a starting point in the least conspicuous area of the room. Then, draw a level line to use as a guide when placing your first strip of wallpaper.
In my case, I started/ended my wallpaper above the doorway since it’s a small stretch of wall that doesn’t draw a lot of attention. Can you find the seam??
Measure and Cut a Few Sheets of Wallpaper
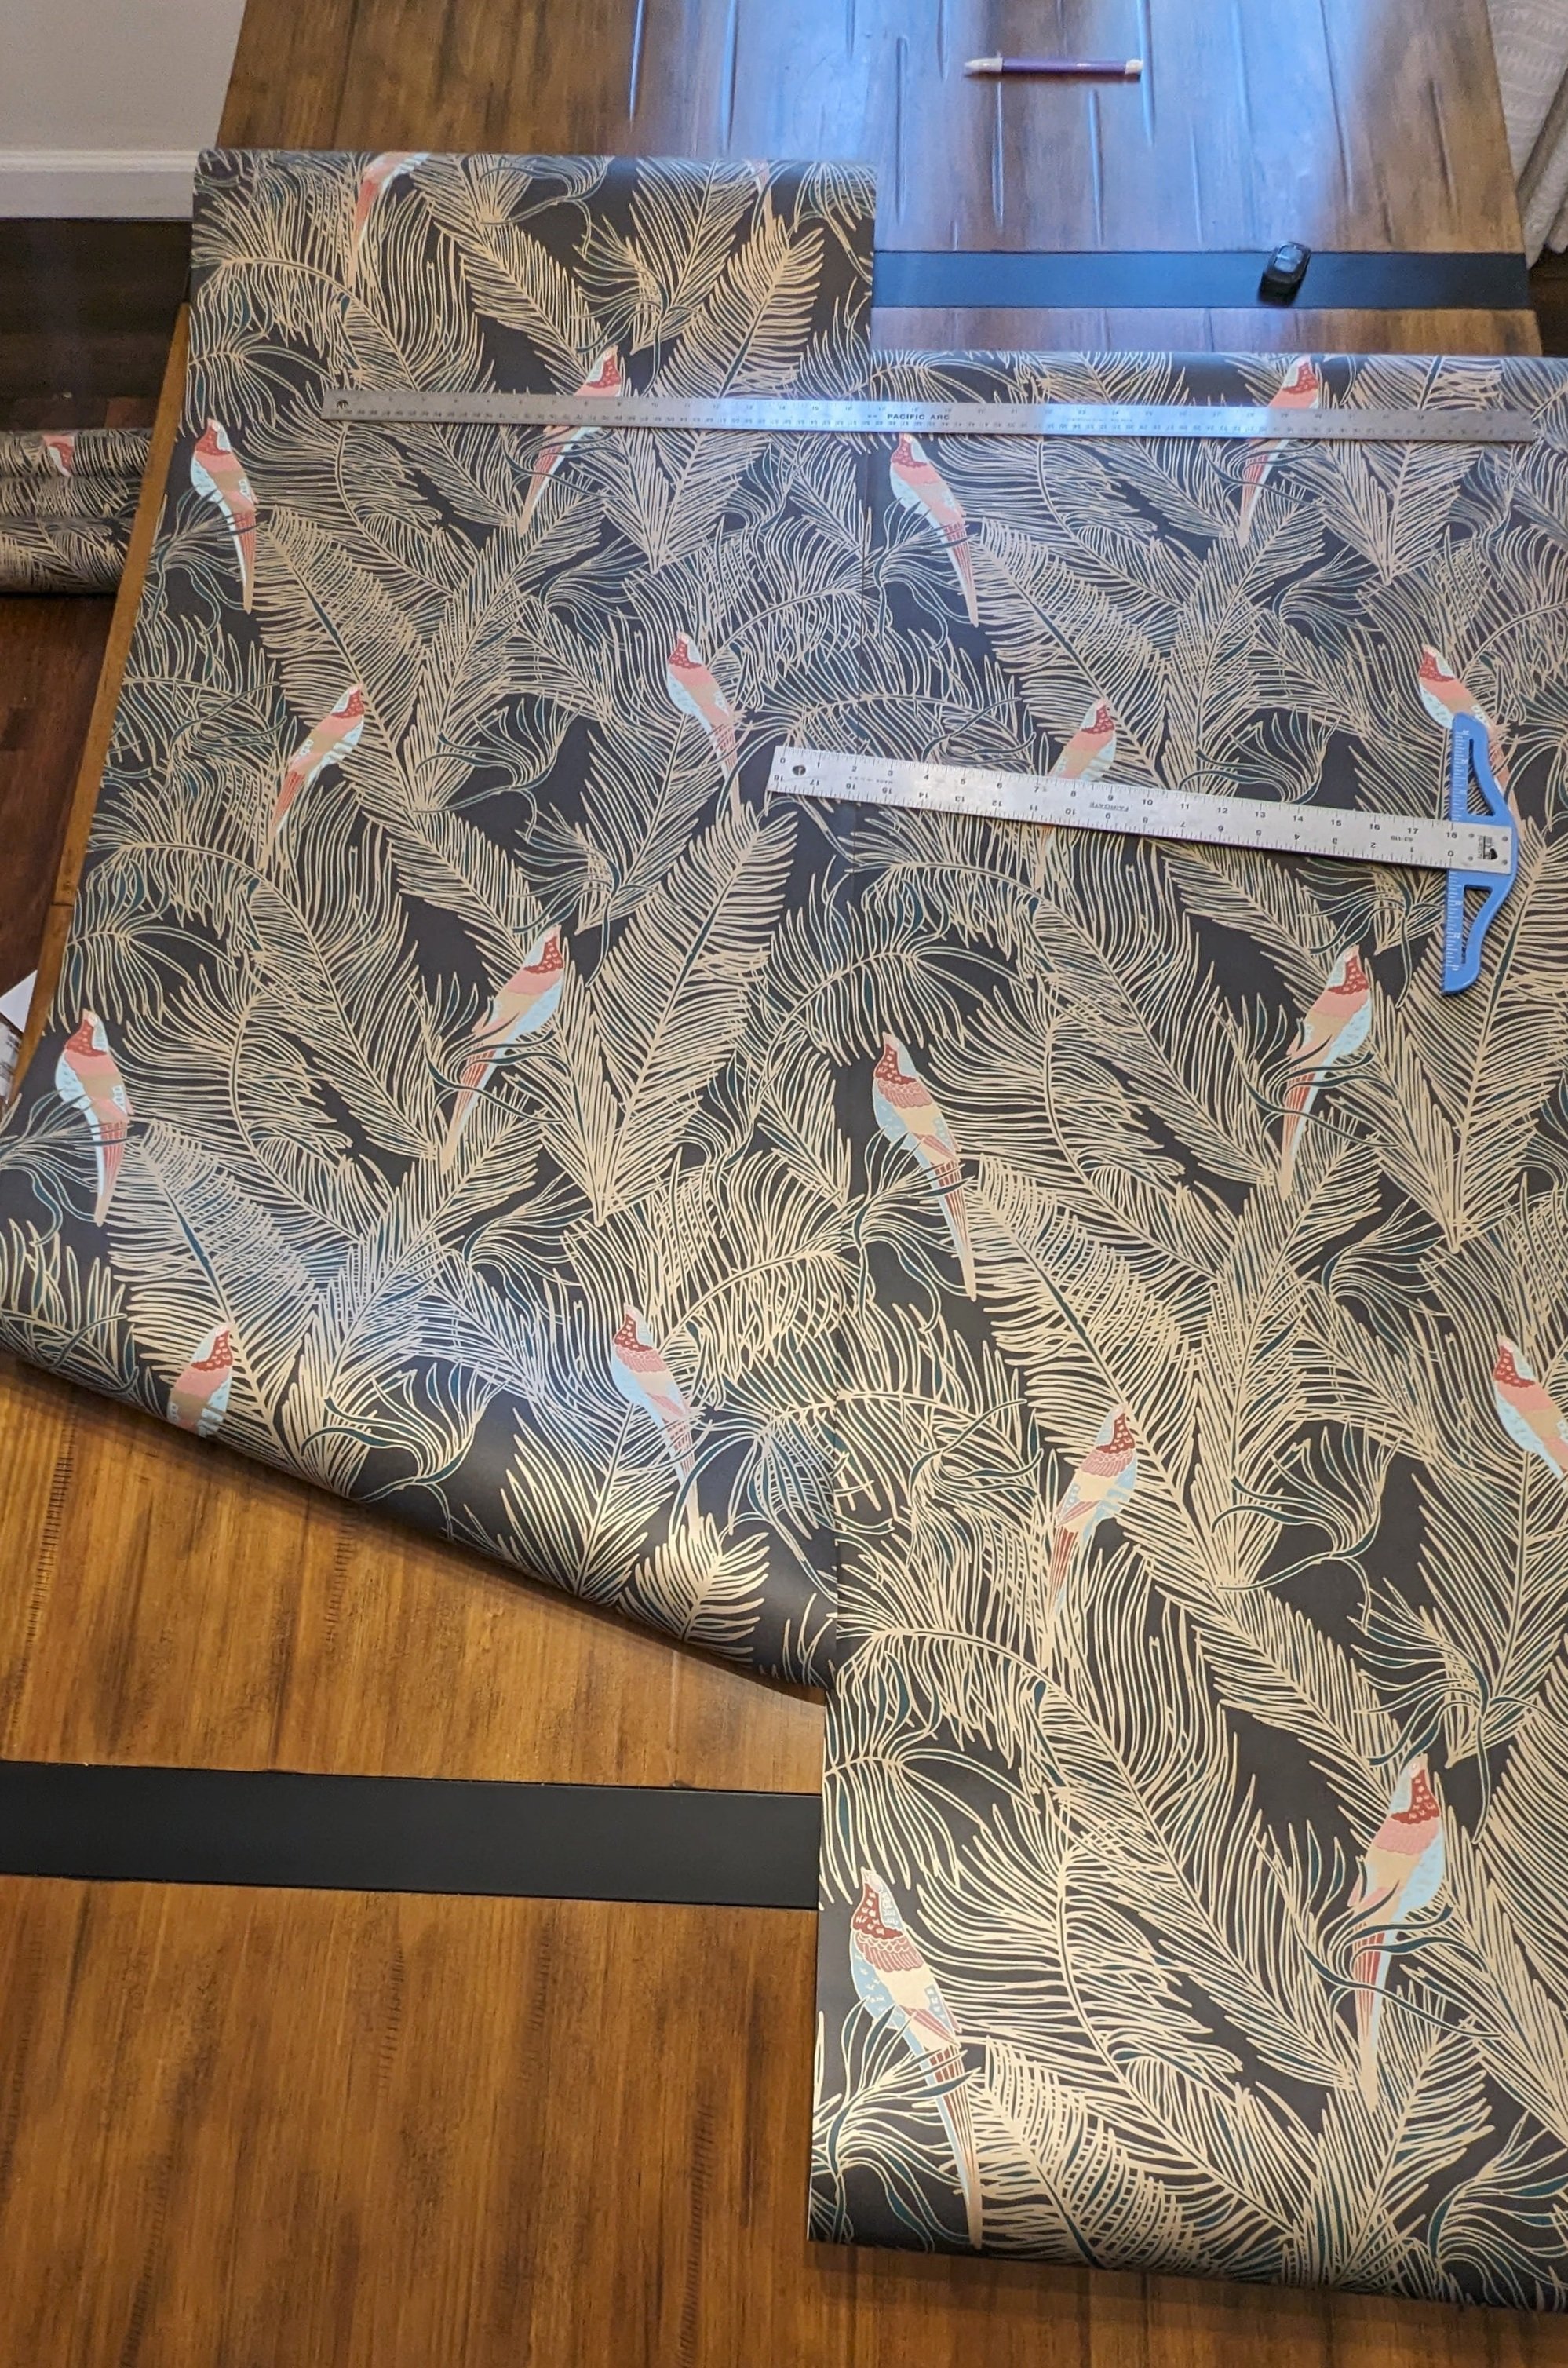
Measure the height of your wall. Roll out the wallpaper on a clean, flat surface. Then, measure your wallpaper and add a few inches to allow for trimming at the ceiling and baseboard (or, if you're doing a half-wall, the chair rail).
Mark your cut line with a pencil, and cut a few strips to the appropriate length. This T-square was perfect for making sure I drew a straight line to cut.
Line up your pattern before you cut each strip and cut off the excess. You’ll definitely feel like you’re wasting a lot of paper (and you are), but it’s a necessary evil.
I got into a rhythm where every time I hung a piece of wallpaper, I cut a new strip. This was helpful to ensure I didn’t cut more than I needed.

Apply Wallpaper Adhesive to the Wall
Using a paint roller, apply your adhesive on the wall to cover just a little more than the width of your paper. Then, cut in around the edges with a brush.
I used Roman Wallpaper Adhesive, a standard 3/8” roller cover, and a 2” angled paintbrush.
I also made sure I had some Handy Paint Covers nearby to cover my adhesive and roller between hanging strips of wallpaper so they didn’t dry out. They’re like little shower caps for your paint tray and are super easy to take on and off as many times as you need!
Hang the First Strip of Wallpaper

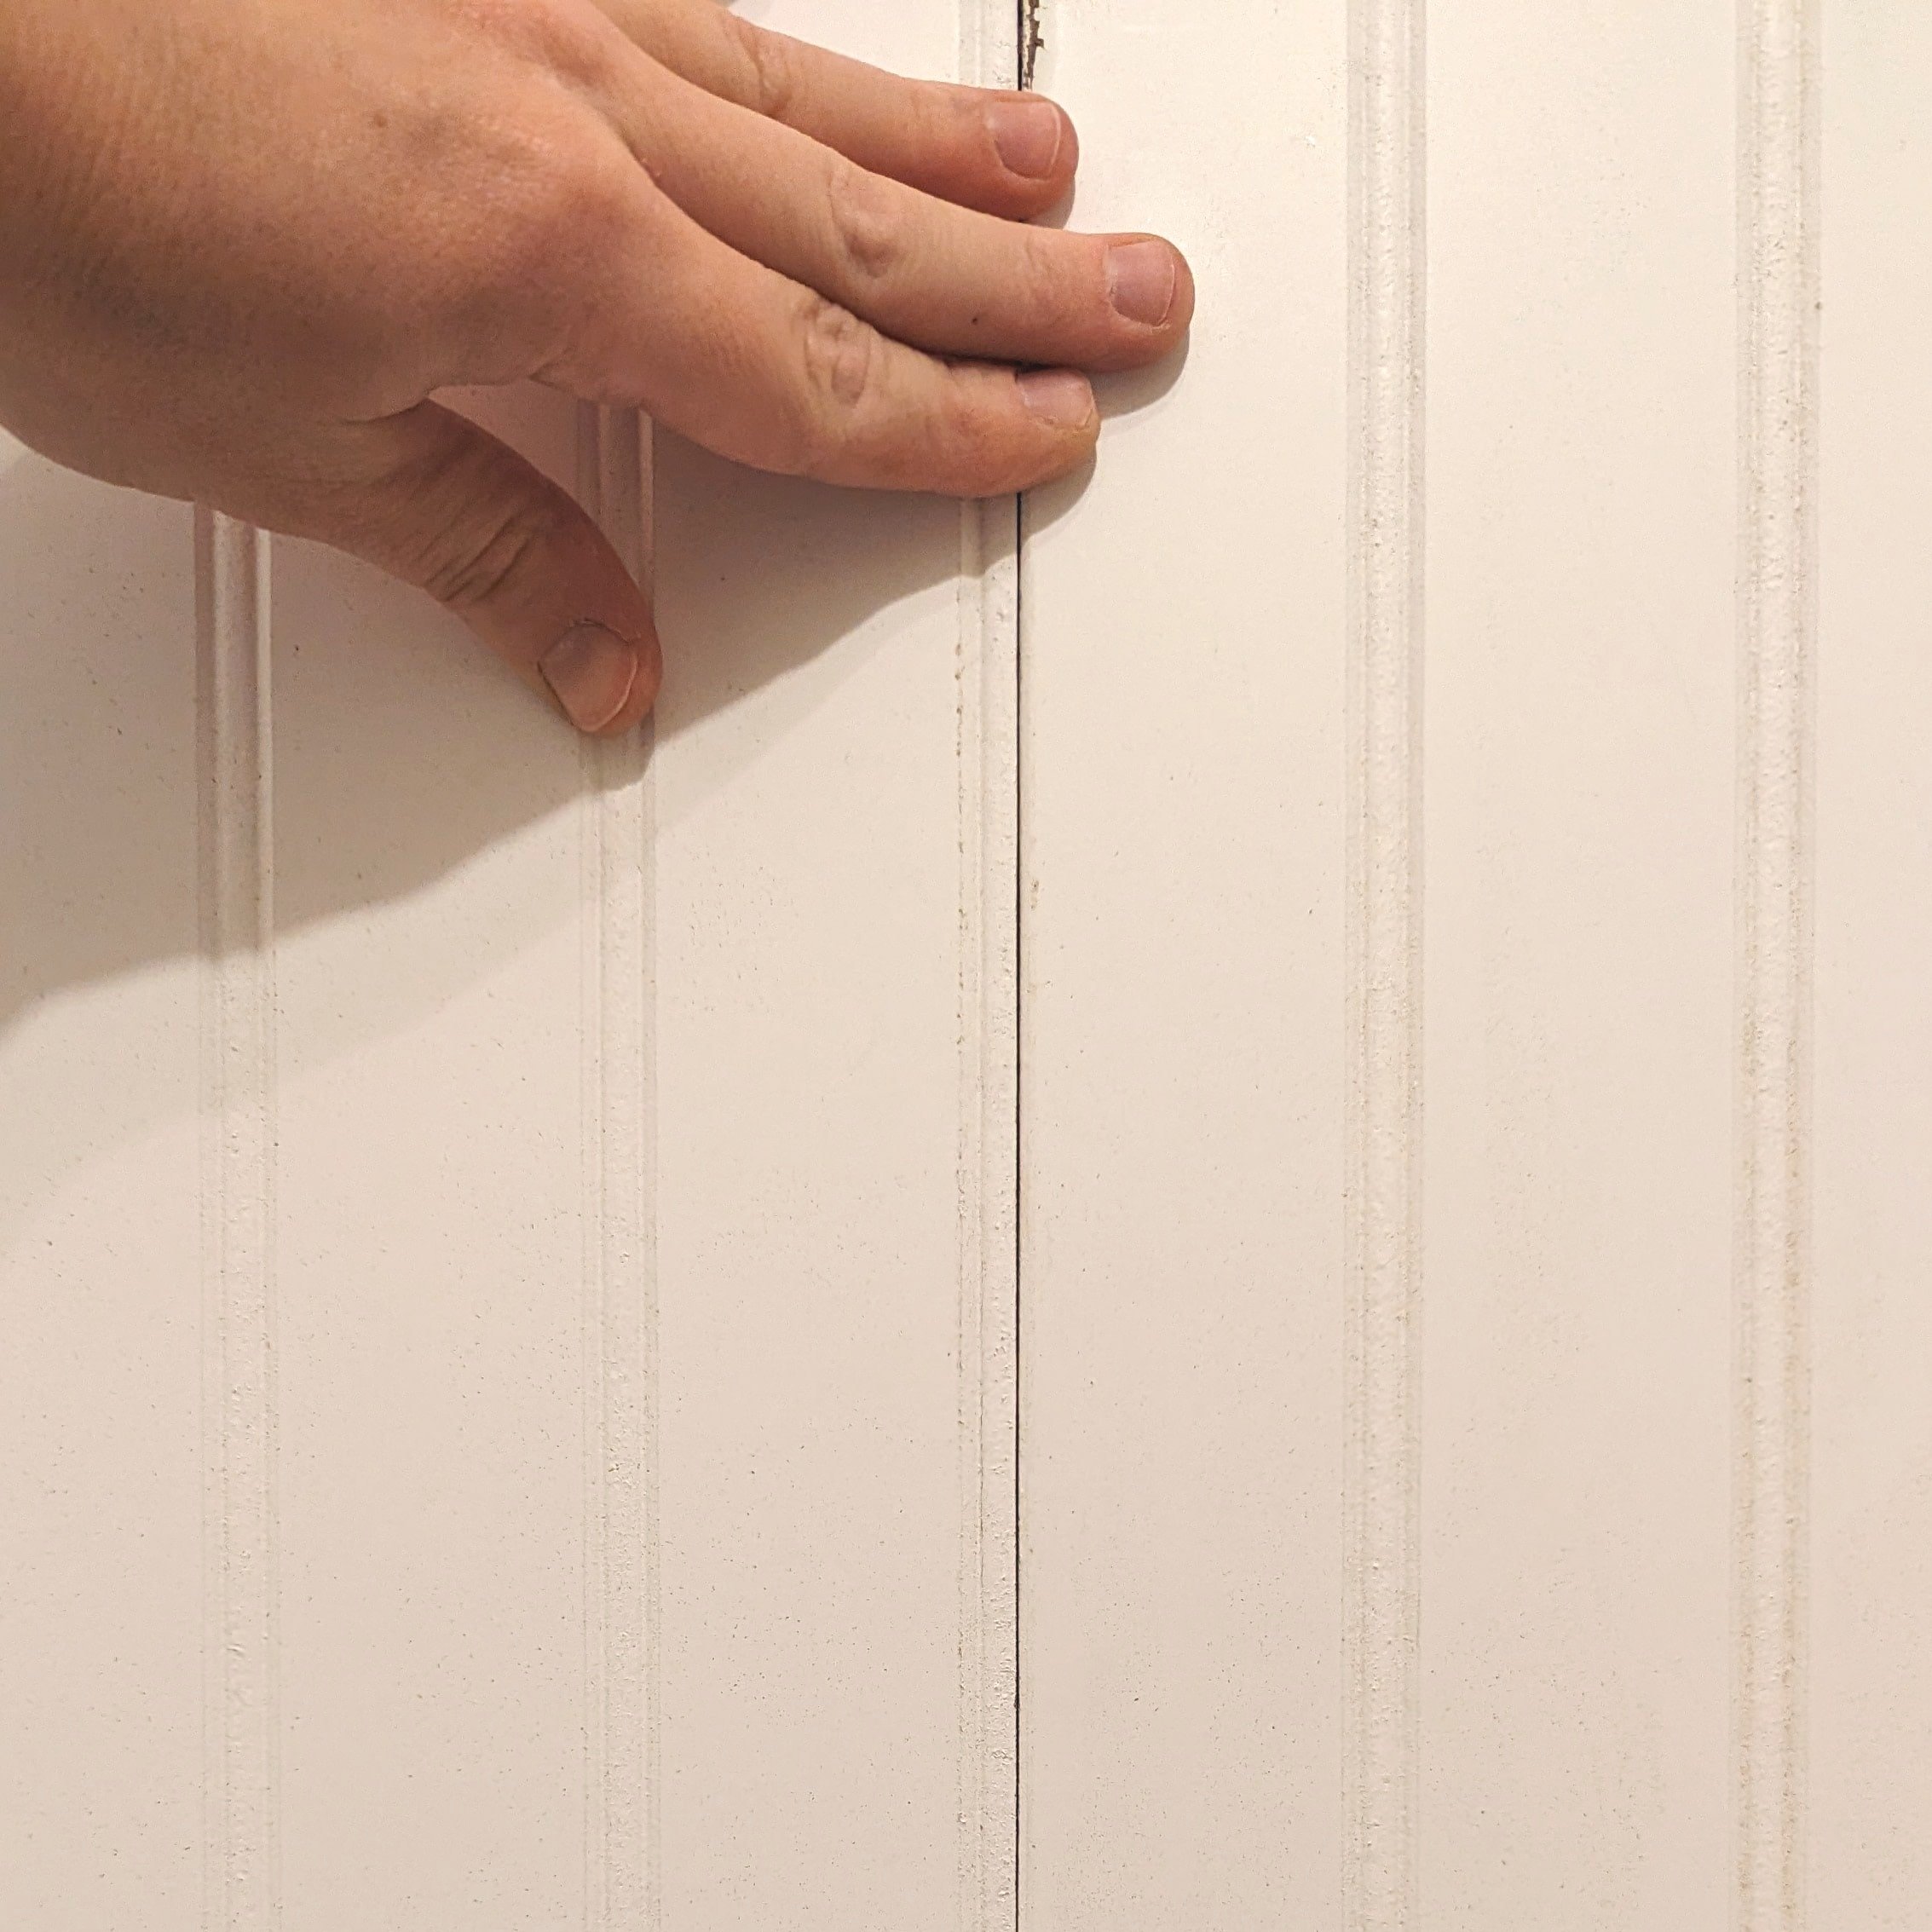
Line the edge of your first strip of wallpaper up with the level line you drew, leaving extra wallpaper at the top and bottom for trimming. This first strip is the most important to get level because it will dictate how the rest of your wallpaper hangs.
I didn’t have a good image of me hanging the first strip of wallpaper, but for the subsequent strips, keeping a level line is just as important.
Gently smooth out any air bubbles or wrinkles with your hand. Then, using your wallpaper smoother, push out any leftover air bubbles, working from the center towards the edges.

Trim Excess Wallpaper
After hanging each strip, trim the excess at the top and bottom using a utility or X-acto knife and a straight edge. I ran my wallpaper smoother along the edge as I cut to ensure a straight line.
Swap out your blades every few strips to avoid snagging and tearing your wallpaper.
Clean Up
Keep a bucket of water and a sponge handy to wipe off any stray adhesive. I changed my water frequently.
Hang the Remaining Strips of Wallpaper

Repeat the process for the remaining wallpaper strips, ensuring that the pattern of each strip lines up with the previous one. Also, occasionally take a moment to check the levelness of your wallpaper.
Wallpapering Around Obstacles

You’ll likely have to work around windows, door frames, corners, or other obstacles during your wallpapering adventures. While I can’t advise you on every hurdle you’ll encounter, I can tell you that relief cuts are your friend.
A relief cut is a small cut in the paper to help it wrap around whatever is in the way and lay flat against the wall. These cuts are made at the corners at a diagonal angle.
I relied on my scissors to make a clean cut rather than my utility knife. Typically, I had to make several small cuts to get my wallpaper to wrap the way it needed to. As long as you’re patient and take it slow, you’ll be able to work through these obstacles just fine!
Final Thoughts
I’m completely taken aback by the transformation this room has undergone in just the last week alone. The wallpaper made SUCH a huge difference, and now I’m really seeing my vision come to life (my favorite part of any design project!) I can’t get over the wallpaper, beadboard, and floors together. I love them so much!

While wallpapering isn’t the easiest DIY, with a little patience, it’s a completely doable beginner’s project and makes such a dramatic impact. Don’t forget to follow along to catch the final reveal of this space!
Moody Wallpaper Round-up!
While designing this room, I looked through countless wallpaper designs to find the perfect moody design for my space. If you love dramatic wallpaper too, below I’ve put together a round-up of some of the other wallpapers I considered!

These wallpapers were sourced from Wallpaper Direct, Photowall, Milton & King, Hygge & West, Lionheart Wallpaper, The Pattern Collective, Etsy, and Home Depot.

Catch up on the rest of the One Room Challenge:
How to Hang Paste-the-Wall Wallpaper
Beadboard: Instant Character on a Budget
Beadboard is an easy and cost-effective way to add texture and character to any room. In this post, I’m sharing all the details of how I hung the beadboard in our half-bathroom, including the mistakes I made so you know what NOT to do!
How to Install Beadboard Paneling - Fall ‘23 ORC Week 5
Beadboard is an easy and cost-effective way to add texture and character to any room. In this post, I’m sharing all the details of how I hung the beadboard in our half-bathroom, including my mistakes, so you know what NOT to do!
It’s week 5 of the One Room Challenge!

This week, I focused not only on hanging the beadboard but also on installing the door, door casing, baseboard, chair rail, AND crown molding. Woo! It was a busy week.
Add in a slight water leak, which set me back a bit, and I was RUSHING to get this post out in time. But I did it! So let’s dive into the tutorial, shall we?
As an Amazon Associate and partner with other brands, I earn from qualifying purchases. This post may contain affiliate links, meaning I receive commissions for purchases made through those links at no cost to you.
Materials and Tools You'll Need:
Materials:
- Beadboard panels
- Construction adhesive
- Finish nails (I used 1 3/4”)
- Sandpaper
- Wood filler or spackle
- Paintable caulk
- Paint
Tools:
- Measuring tape
- Standard level or laser level
- Pencil
- Stud finder
- Table saw or circular saw
- Caulk gun
- Finish nailer
- Paintbrush
- Paint roller and cover
- Oscillating Multi-Tool
- Drill
- Spade Drill Bit or Hole Saw (if you're working around plumbing)
Prep the Wall
Start by removing any baseboards, switch plates, and outlet covers.

In my case, I had to remove the texture that was on the walls originally. I also had to replace some drywall we tore out when we re-routed the plumbing. However, I didn’t bother finishing the drywall since it will be covered with beadboard anyway.
Then, draw a level line around the room about a half inch higher than the top of where your beadboard will stop. Don’t skip this step. I did, and it bit me in the butt later on.
Lastly, find and mark your studs on or above that line.
Cut Your Beadboard
Beadboard is kind of great because it typically comes in 4x8-foot sheets, which is perfect for covering the entirety or exactly half of a standard-height wall.
How to Cut Your Beadboard to Length

Because I have this gorgeous wallpaper I’ll be installing above the beadboard, I chopped mine right in half at 4 feet high with a circular saw.
Then, I cut my beadboard to length for each stretch of wall. I used my table saw for this, but since beadboard is pretty thin and flimsy, I recommend having a helper or just using a circular saw. It felt pretty sketchy doing it by myself TBH.
One thing you need to consider when cutting beadboard is to make your cuts along the pattern so that the piece that butts up against it looks seamless.
How to Cut Around Plumbing and Electrical

You’ll inevitably run into at least a little electrical and possibly some plumbing (depending on where you’re installing your beadboard). To work around these obstacles, start by measuring where they’ll hit on your beadboard (or follow this hack that seems ridiculous but actually works super well!)
My oscillating multi-tool made quick work of cutting out the holes for my outlets. For the plumbing, we started off by using a spade drill bit, but we didn’t have one that was quite big enough, so we switched to a hole saw. Both worked equally as well.
How to Hang Beadboard
Using your caulk gun, apply construction adhesive to the back of the beadboard in a zigzag pattern.
Remember that level line I had you draw around the room? Line the top of your beadboard up with that line, then press it to the wall.
Lastly, nail the beadboard to further secure it to the wall. I made sure to nail on each stud near the top (where my chair rail would cover), in the middle, and near the bottom (where my baseboard would cover).

Add additional nails where necessary even if there isn’t a stud.
Then, you can install your baseboard and chair rail! This is where the level line would have come in handy for me. Because my beadboard wasn’t a consistent height across the top, I couldn’t hang my chair rail above it like I originally planned without a weird gap in some areas. Instead, I installed the chair rail on the beadboard itself.
It’s a fine solution, but I was hoping to carry the overall look up a little higher on the wall.
Finish It Up!
Using spackle or wood putty, fill your nail holes. Then caulk along any seams with paintable caulk.
Once dry, sand the nail holes and wipe clean. Then it’s on to painting!
I used a paintbrush and roller to cover my entire room in the moody off-black paint I envisioned.
The last step is to reinstall your outlet covers or switch plates.
Congratulations! You've successfully hung beadboard on your wall, adding a touch of classic charm to your space.
Final Thoughts
I’m in love with the look of the classic beadboard paneling next to the penny tile floor.

There’s a reason the top half of the “after” photos is missing in this post, though. My bathroom looks a little insane right now with the lack of… really anything except for the floor and beadboard. I still have modern wallpaper (coming next week!), the vanity, and all the finishing touches to add to this space. Once the rest of the elements are added, this space will make a lot more sense. Do you trust me!?
Be sure to follow along on Instagram and Facebook for all the behind-the-scenes of this remodel!


Catch up on the rest of the One Room Challenge:
DIY Bathroom Beadboard
My Top Tips for Installing Penny Tile
It’s week 4 of the One Room Challenge, and we’re officially halfway there! This week was all about tiling the floors in the half-bathroom. I took a stab at installing penny tile, and I’m in love with how it turned out.
How to DIY a Penny Tile Design - Fall ‘23 ORC Week 4
Looking for a timeless tile for your bathroom? Look no further. Here are all my tips for installing penny tile - with a classic pattern!

It’s week 4 of the One Room Challenge, and we’re officially halfway there! This week was all about tiling the floors in the half-bathroom. I took a stab at installing penny tile, and I love how it turned out.

Admittedly, I was never a big fan of penny tile until I saw Chris Loves Julia use it in their half-bathroom and swooned over the classic design. I felt like it would be the perfect contrast to the more modern elements in my own half-bathroom design.
I once had a contractor refuse to install penny tile in a client’s house because he said it was too difficult. So I was understandably a little nervous about this project. Luckily, I have an inexplicable love for tedious tasks, so this project was right up my alley!
Here’s what you need to lay round penny tile:
As an Amazon Associate and partner with other brands, I earn from qualifying purchases. This post may contain affiliate links, meaning I receive commissions for purchases made through those links at no cost to you.
Materials
- Black and White Penny Tile (Mine is from Floor and Decor, but Home Depot also carries it here and here.)
- Drill
- Mixing Paddle
- Buckets (I used 3)
- Trowel
- Mortar
- Pre-Mixed or Powdered Grout
- Grout Sponges
- Straight Edge
- Utility Knife
- Dry Erase Marker
- Flathead Screwdriver
- Grout Sealant
- Tile Nippers*
- Wet Saw*
*If your tile is bumping up next to a straight edge that won’t be covered by something else (like the edge of a bathtub, for instance), you might need a wet saw for this project. Fortunately for me, all my edges will be covered by the baseboard. In fact, I bought tile nippers but didn’t actually end up needing them at all!
Prep
As with any project, the key to a good end product is in the prep. Before laying your tile, I recommend following the steps below.
Check Your Tile Batches
Tile color can vary from batch to batch. Before you even think about tiling, check the batch numbers on the boxes to ensure they’re all from the same one. (This tip goes for any tiling project, BTW!)
Remove Baseboards
To greatly reduce (or eliminate) the amount of tile cuts you’ll need to make, I recommend removing your baseboards and laying the tile up to the wall. Afterward, you can reinstall your baseboards on top and cover any rough edges or gaps.
Prep Your Floors

If you have a plywood subfloor, you'll need to install cement board before tiling.
Because I installed my tile over a cement slab this wasn't required.
However, before I could lay my new tile, I had to chip up all the mortar left from the old tiles to create a smooth surface. Luckily, it was pretty easy to chip up with my handy dandy 5-in-1 tool.
Plan Your Layout

Now we start getting to the fun part - figuring out your design! Forewarning: this part will probably take longer than you think. But it’s worth it!
I initially assumed I would only use a couple of sheets of tile to plan out my design, but I actually dry-laid the entire bathroom.
This might not be necessary for every project. But it was very reassuring to know exactly what the whole design would look like and that I had enough tile to do what I wanted. It was also fun to play without any commitment.
Additionally, the tile mesh backing is easy to cut apart with a utility knife, so it wasn’t a huge chore to dry-lay.
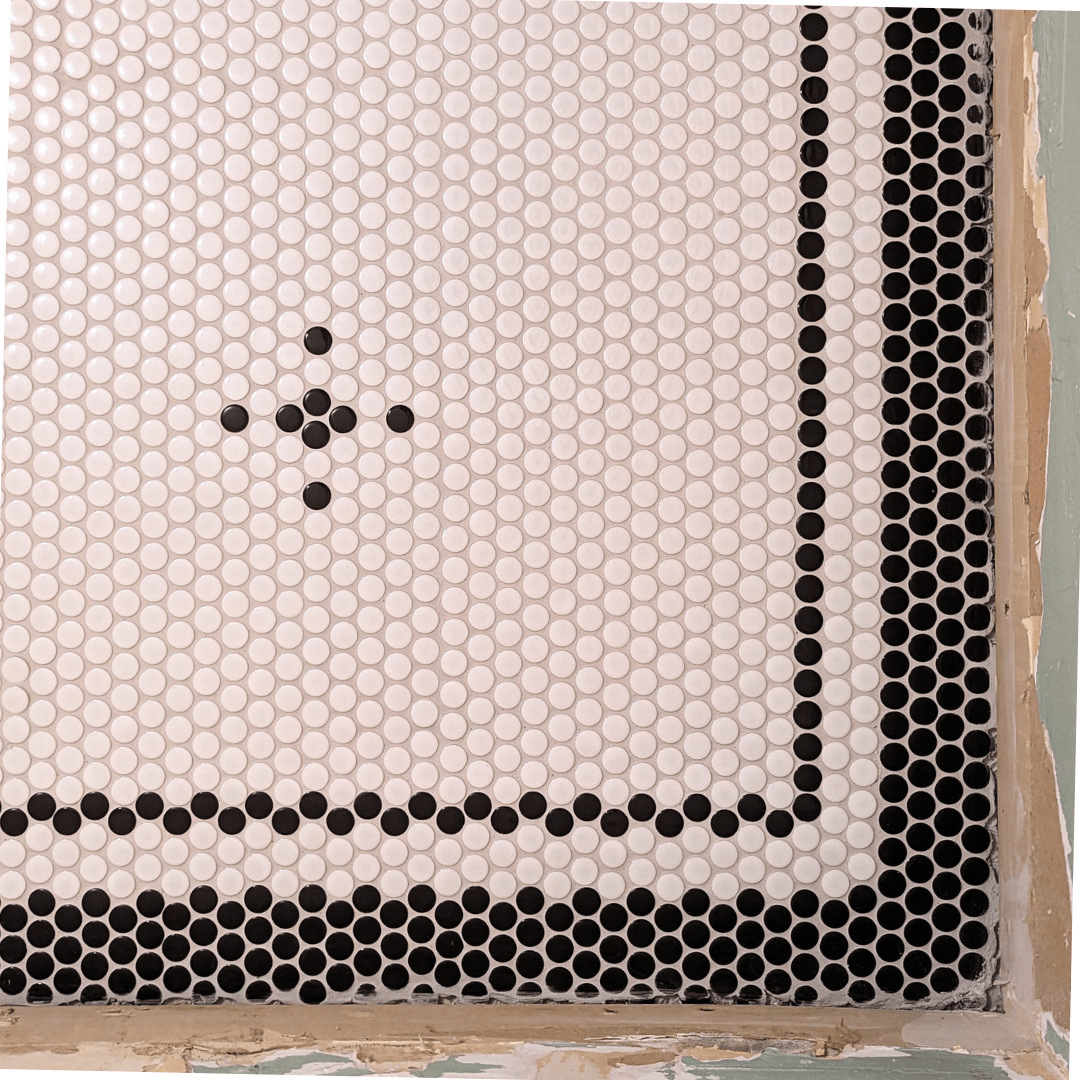
Before I started, I gathered lots of inspiration so I had an idea of the direction that I wanted to go. Each bathroom is unique in its dimensions, so not every design will be exactly the same. And that’s part of the fun of this tile!

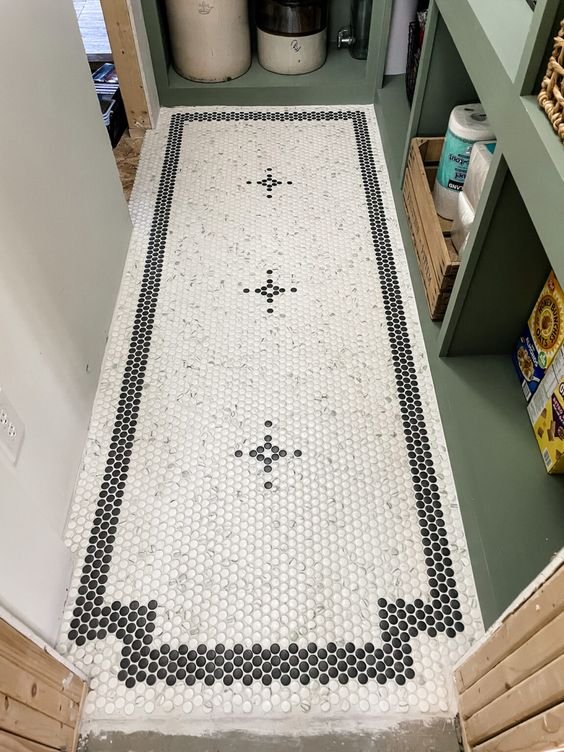
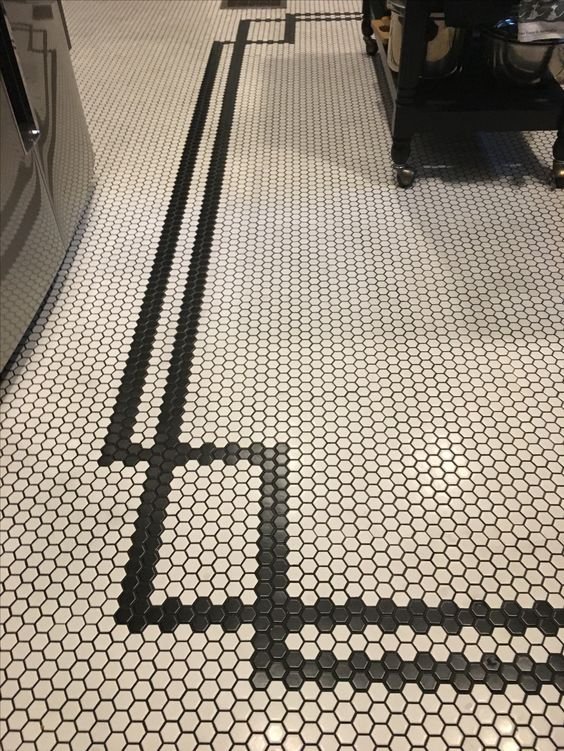
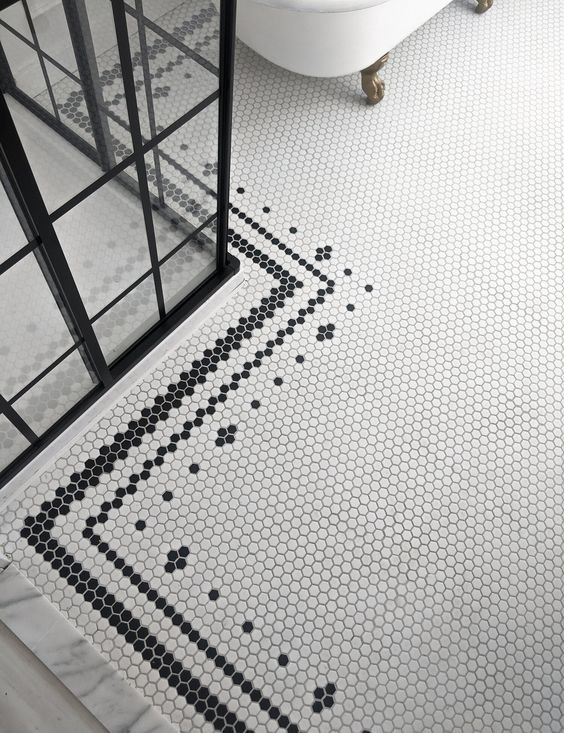
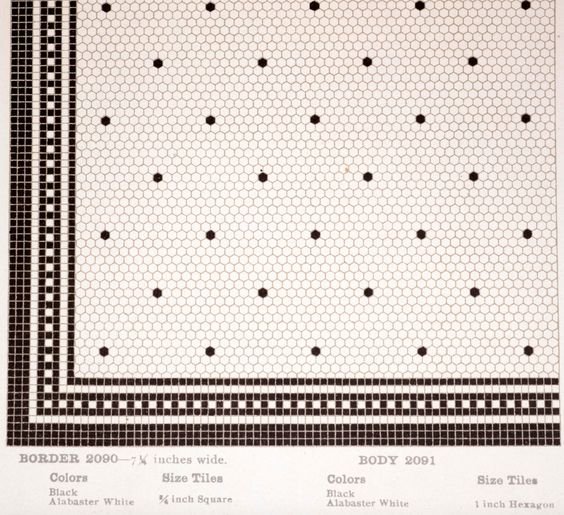
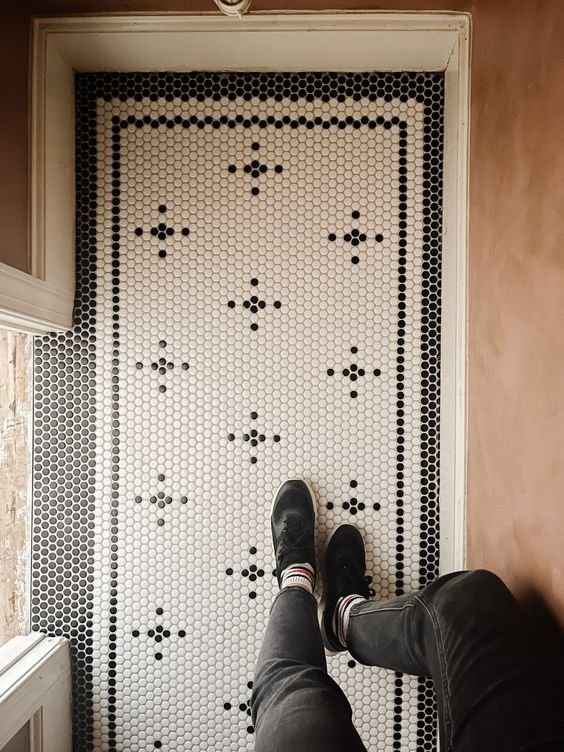
I decided to create a border with my design, which is a recurring theme in all my inspo pictures. But since my vanity isn’t open at the bottom, I opted to run the border in front of the vanity so it wouldn’t be hidden. At the last minute, I chose to add a little bit of a design down the center with the stars, too (asterisks? I don’t exactly know what they are in this case).

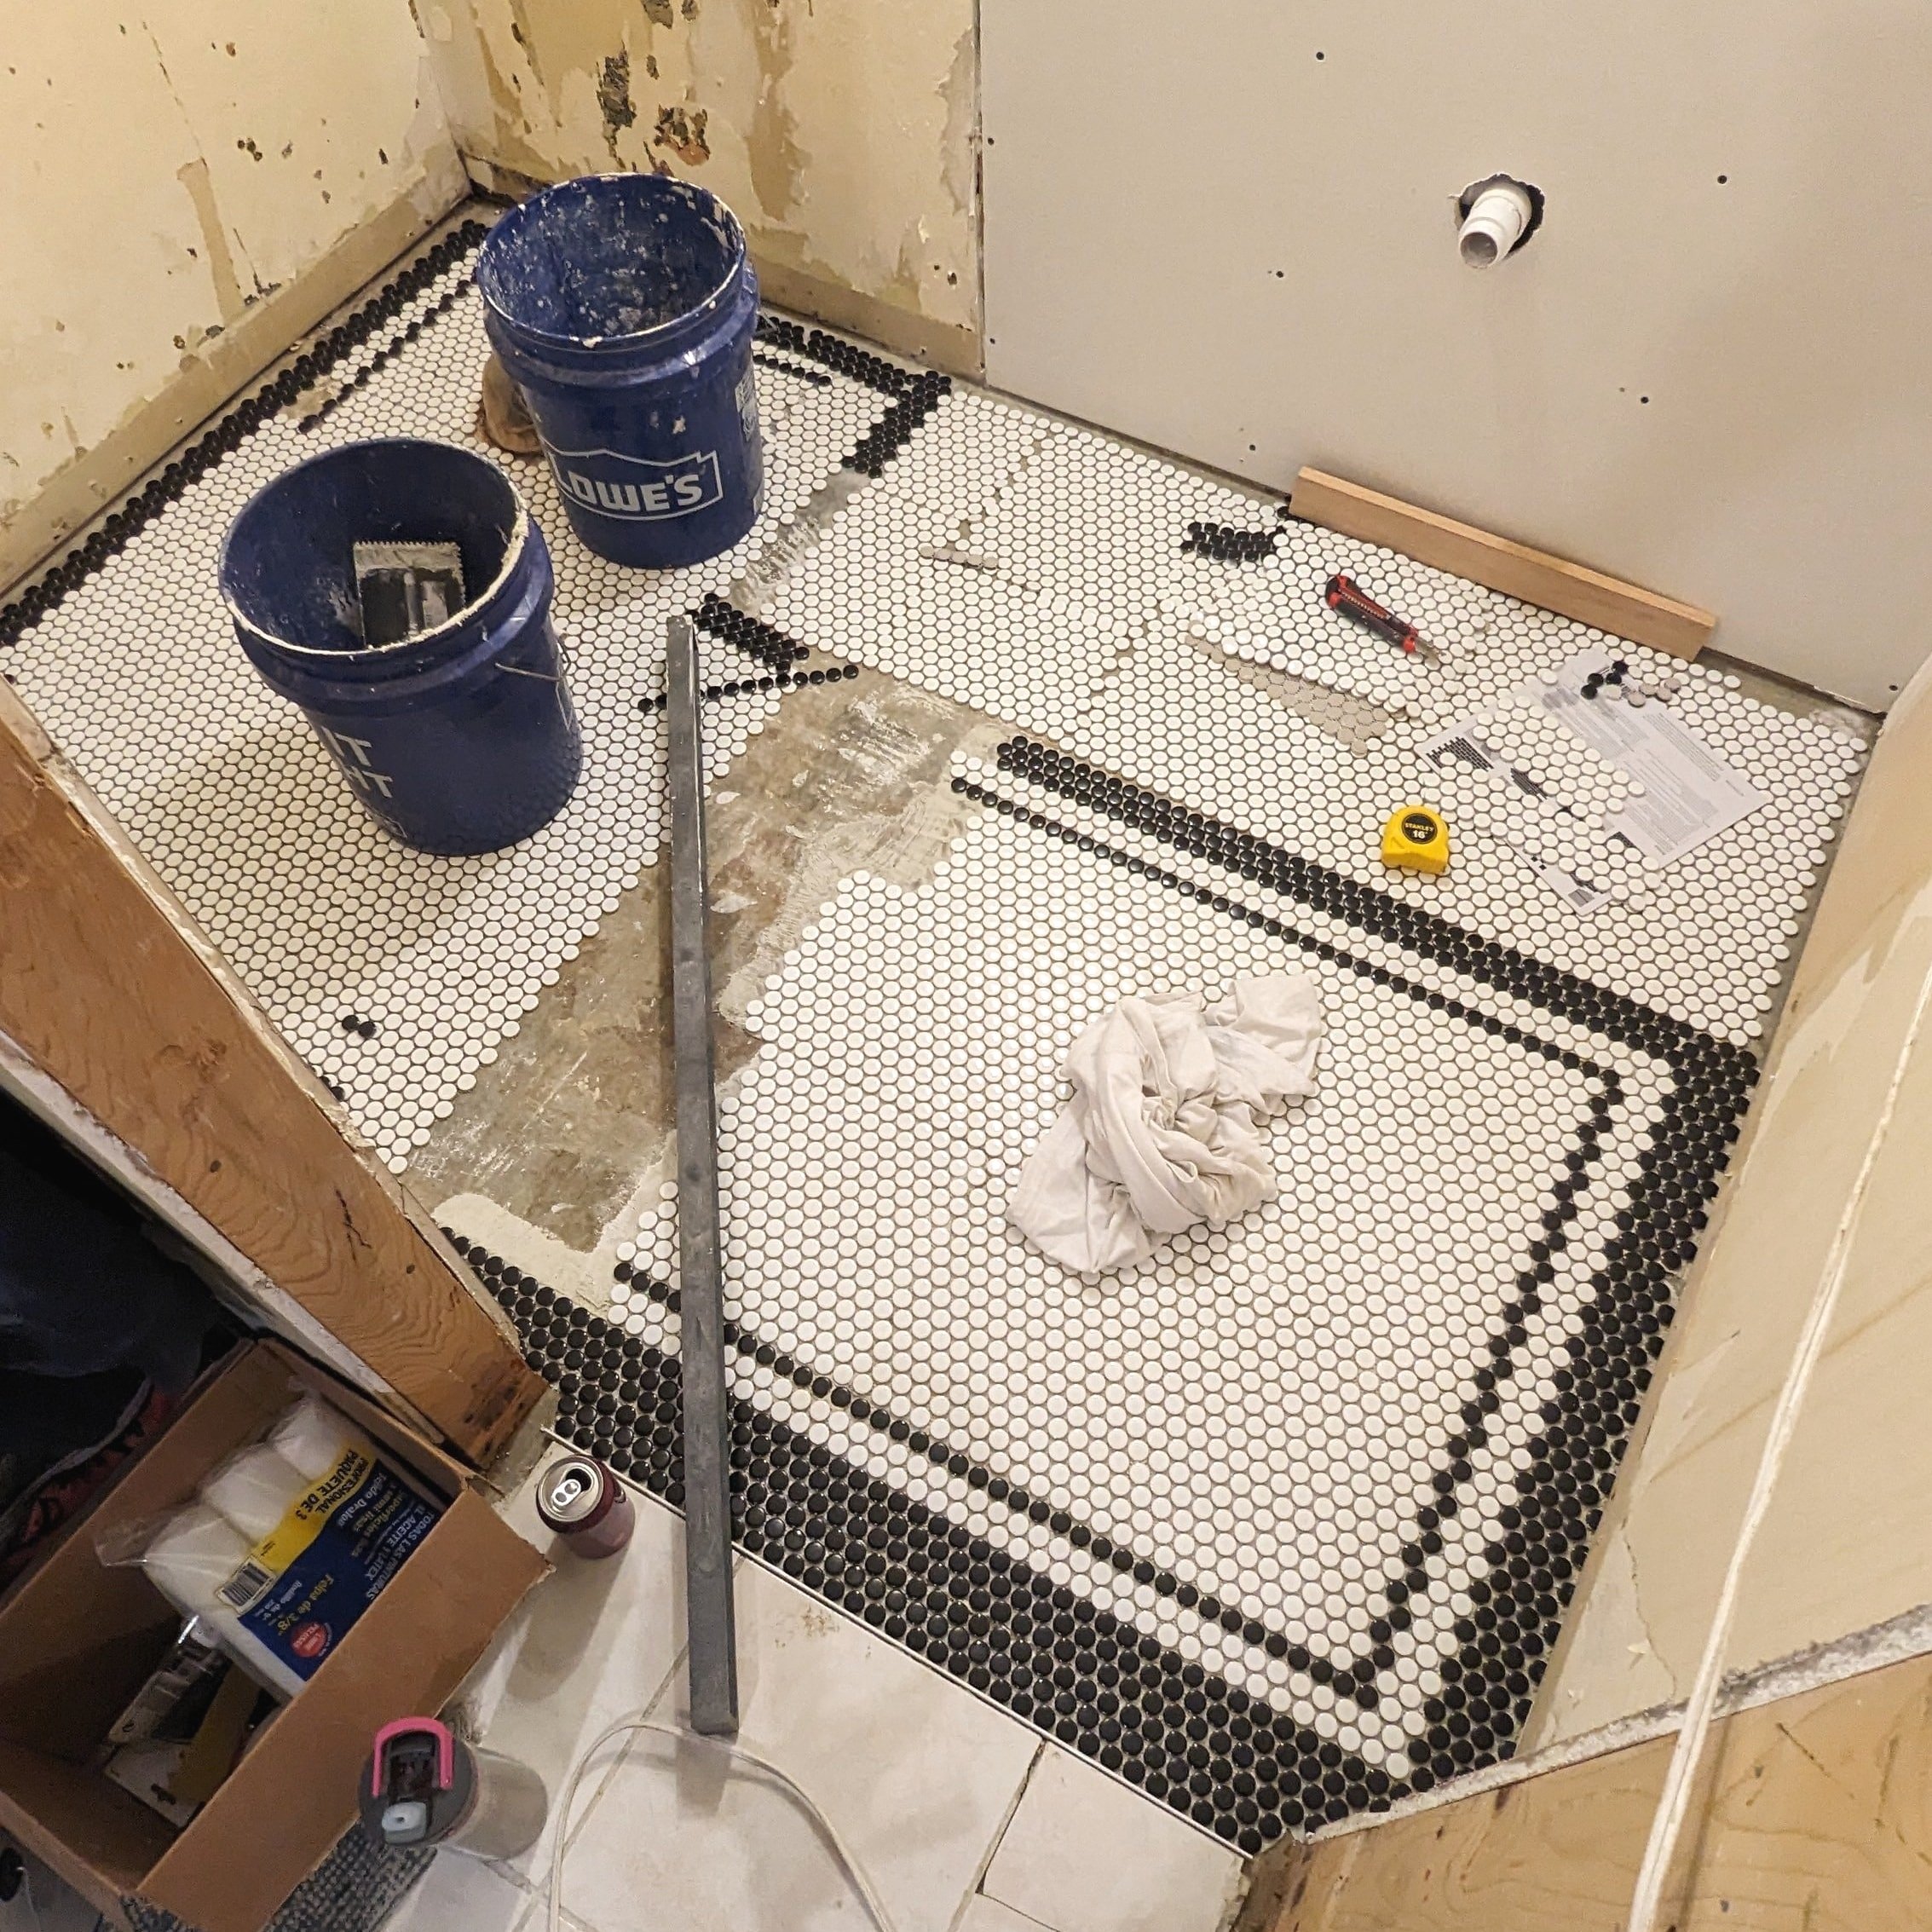
Installation
Finally, we’ve reached the installation stage!
Use The Right Color Mortar
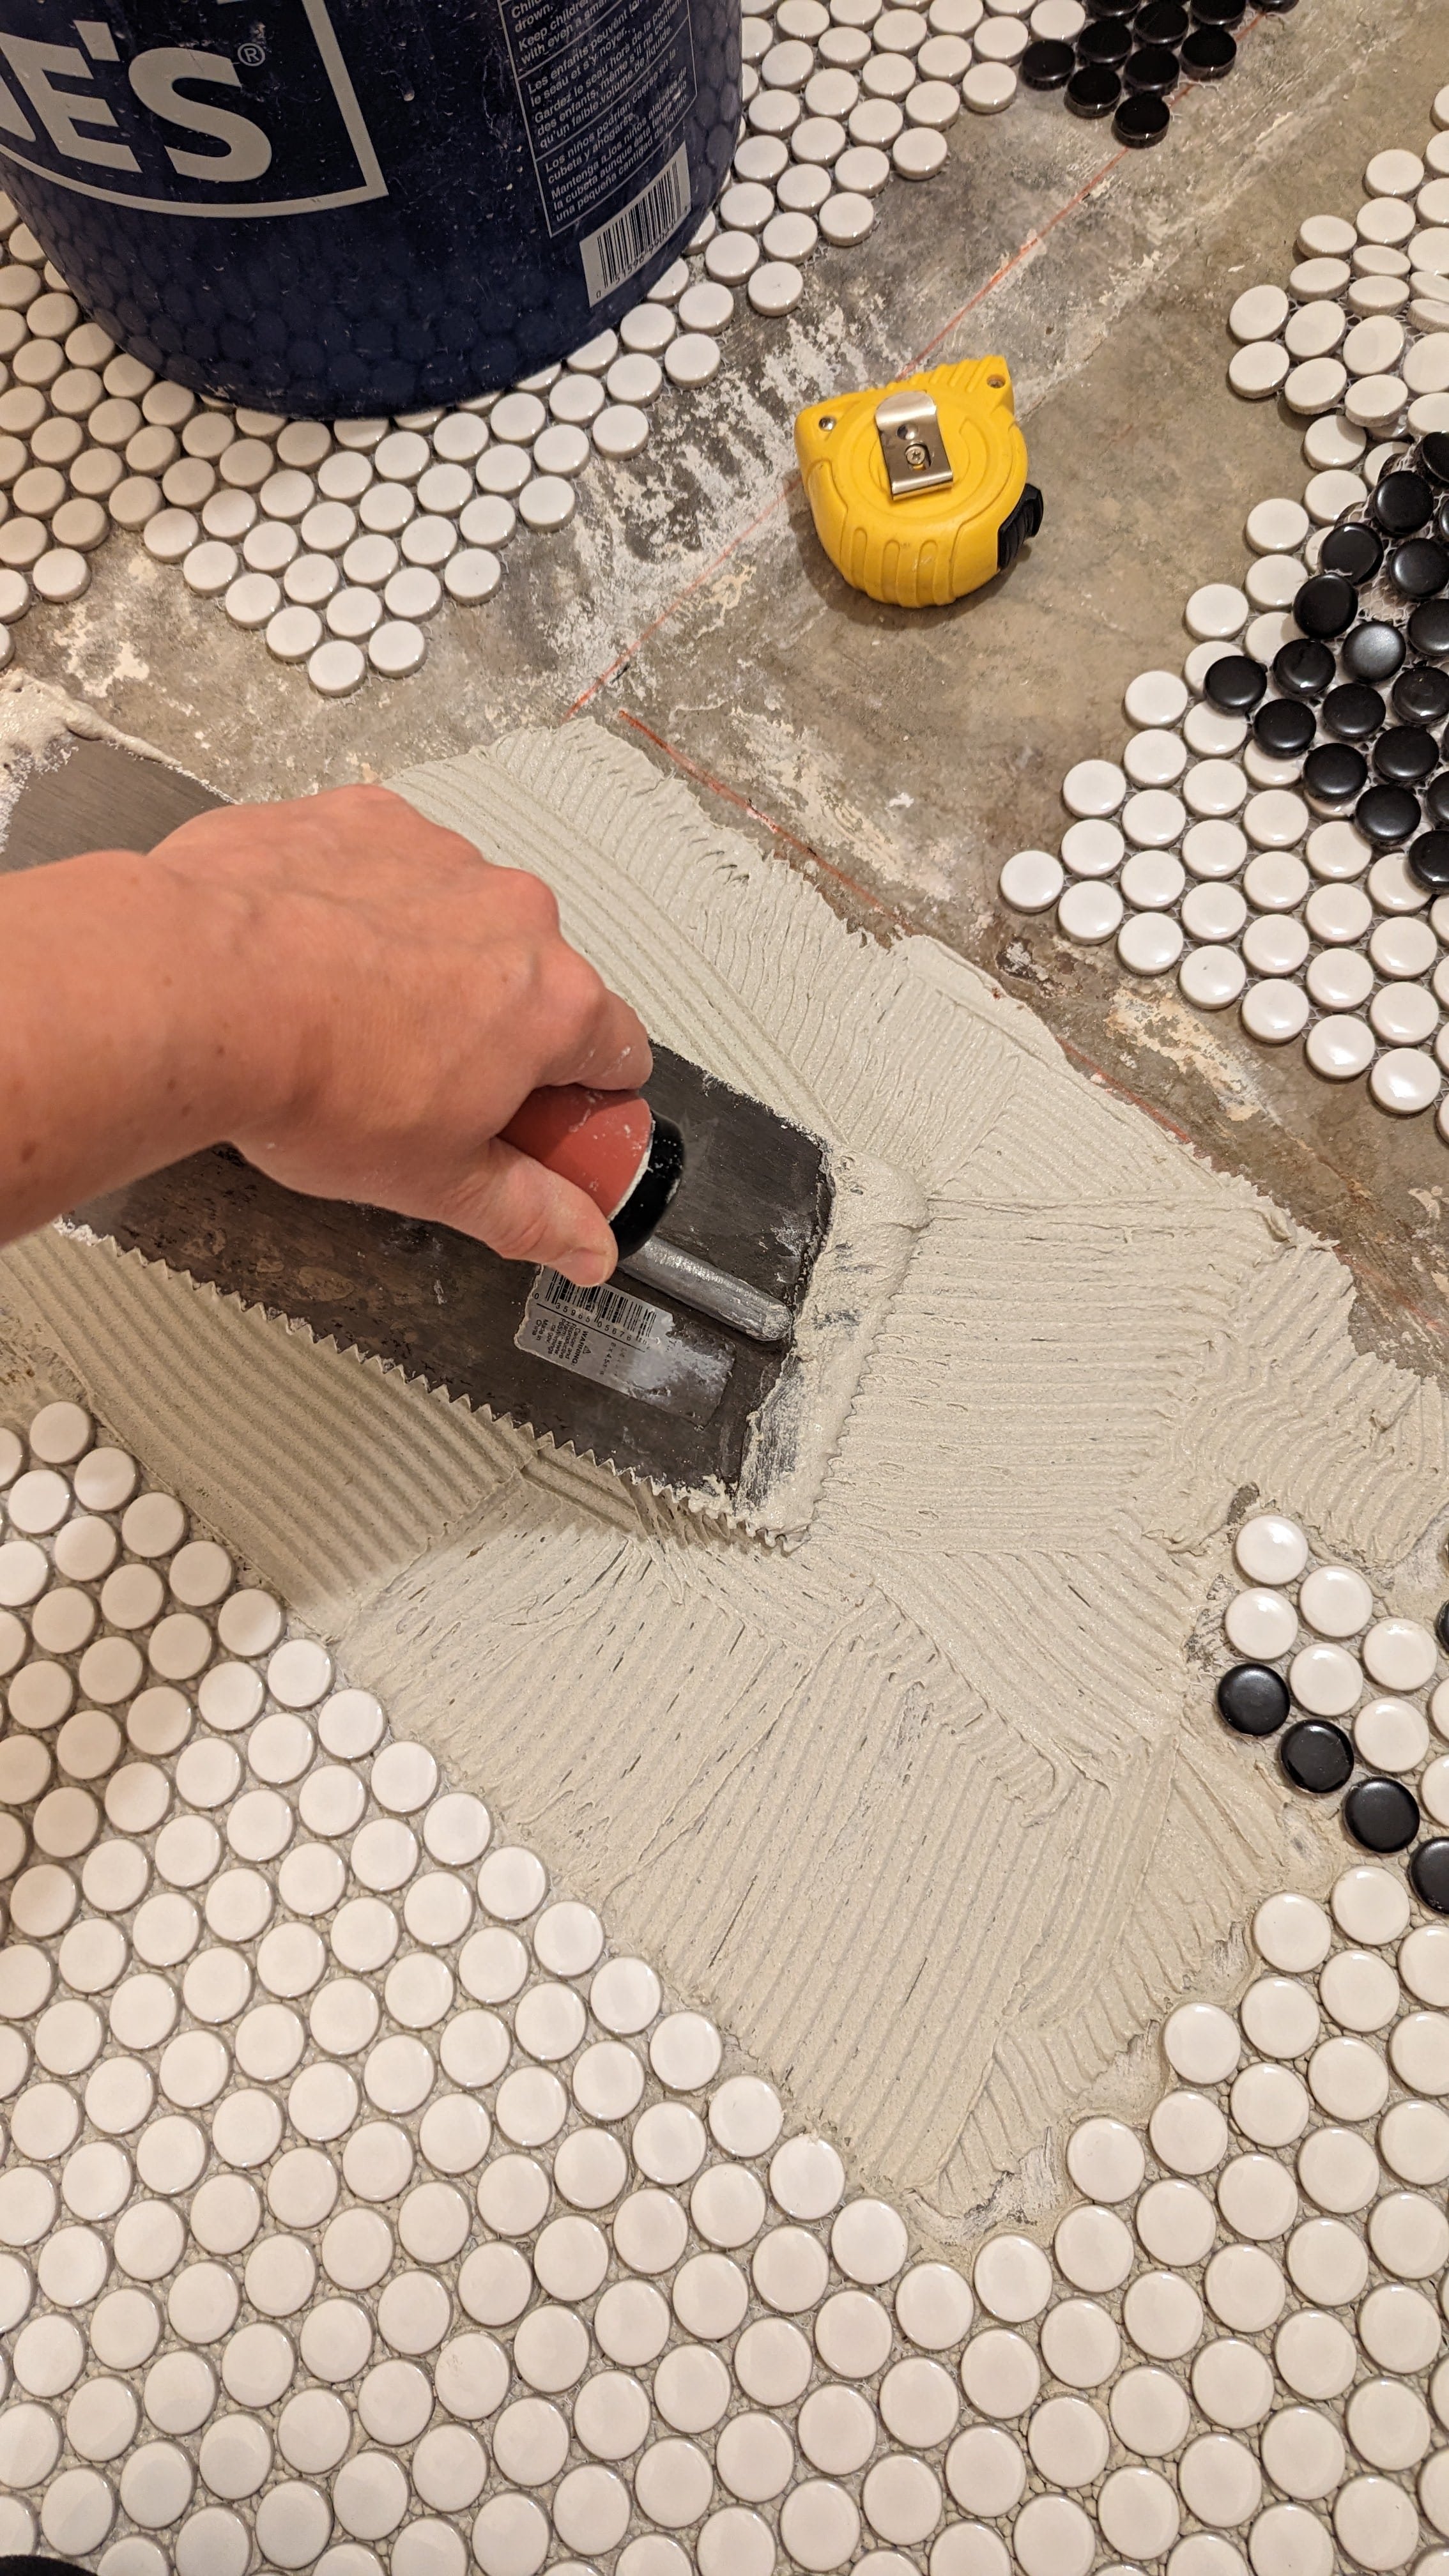
Use mortar in a similar color to your grout in case any pushes up between your tiles, and you don't catch it (trust me, it always happens). Since I used a light gray grout, I chose white mortar.
You can further prevent this from happening by using the right-sized trowel.
Use The Correct Size Trowel
Your trowel size depends on the size of your tiles. The larger the tile, the larger the notches you’ll need on your trowel. This is to make sure the correct amount of mortar is applied for your specific tile and it doesn’t ooze up between them.
For my penny tile, I used a 3/16” x 5/32” v-notched trowel. If you’re not sure what size trowel you need, a quick Google search can point you in the right direction.
Start in the Most Noticeable Spot

This is going to sound counterintuitive because it means I literally tiled myself into a corner, but I started tiling at the doorway. By doing this, I was able to ensure that the most commonly viewed part of the tile was perfectly aligned. That way if things got wonky further into the room, they’d be hidden by the vanity or toilet.
Install in Small Sections
Installing penny tile with a pattern is a meticulous process. To keep your mortar from drying out while you’re checking your design and spacing, only spread a small amount at a time.

Watch Your “Flowers”
While we’re talking about spacing, a cluster of penny tiles will make a little flower. The best way to make sure your spacing is correct with penny tile is to step back and look at the flowers the different sheets of tile make together. If you can’t tell where one sheet ends and one begins, you’re golden.
Use a Straight Edge
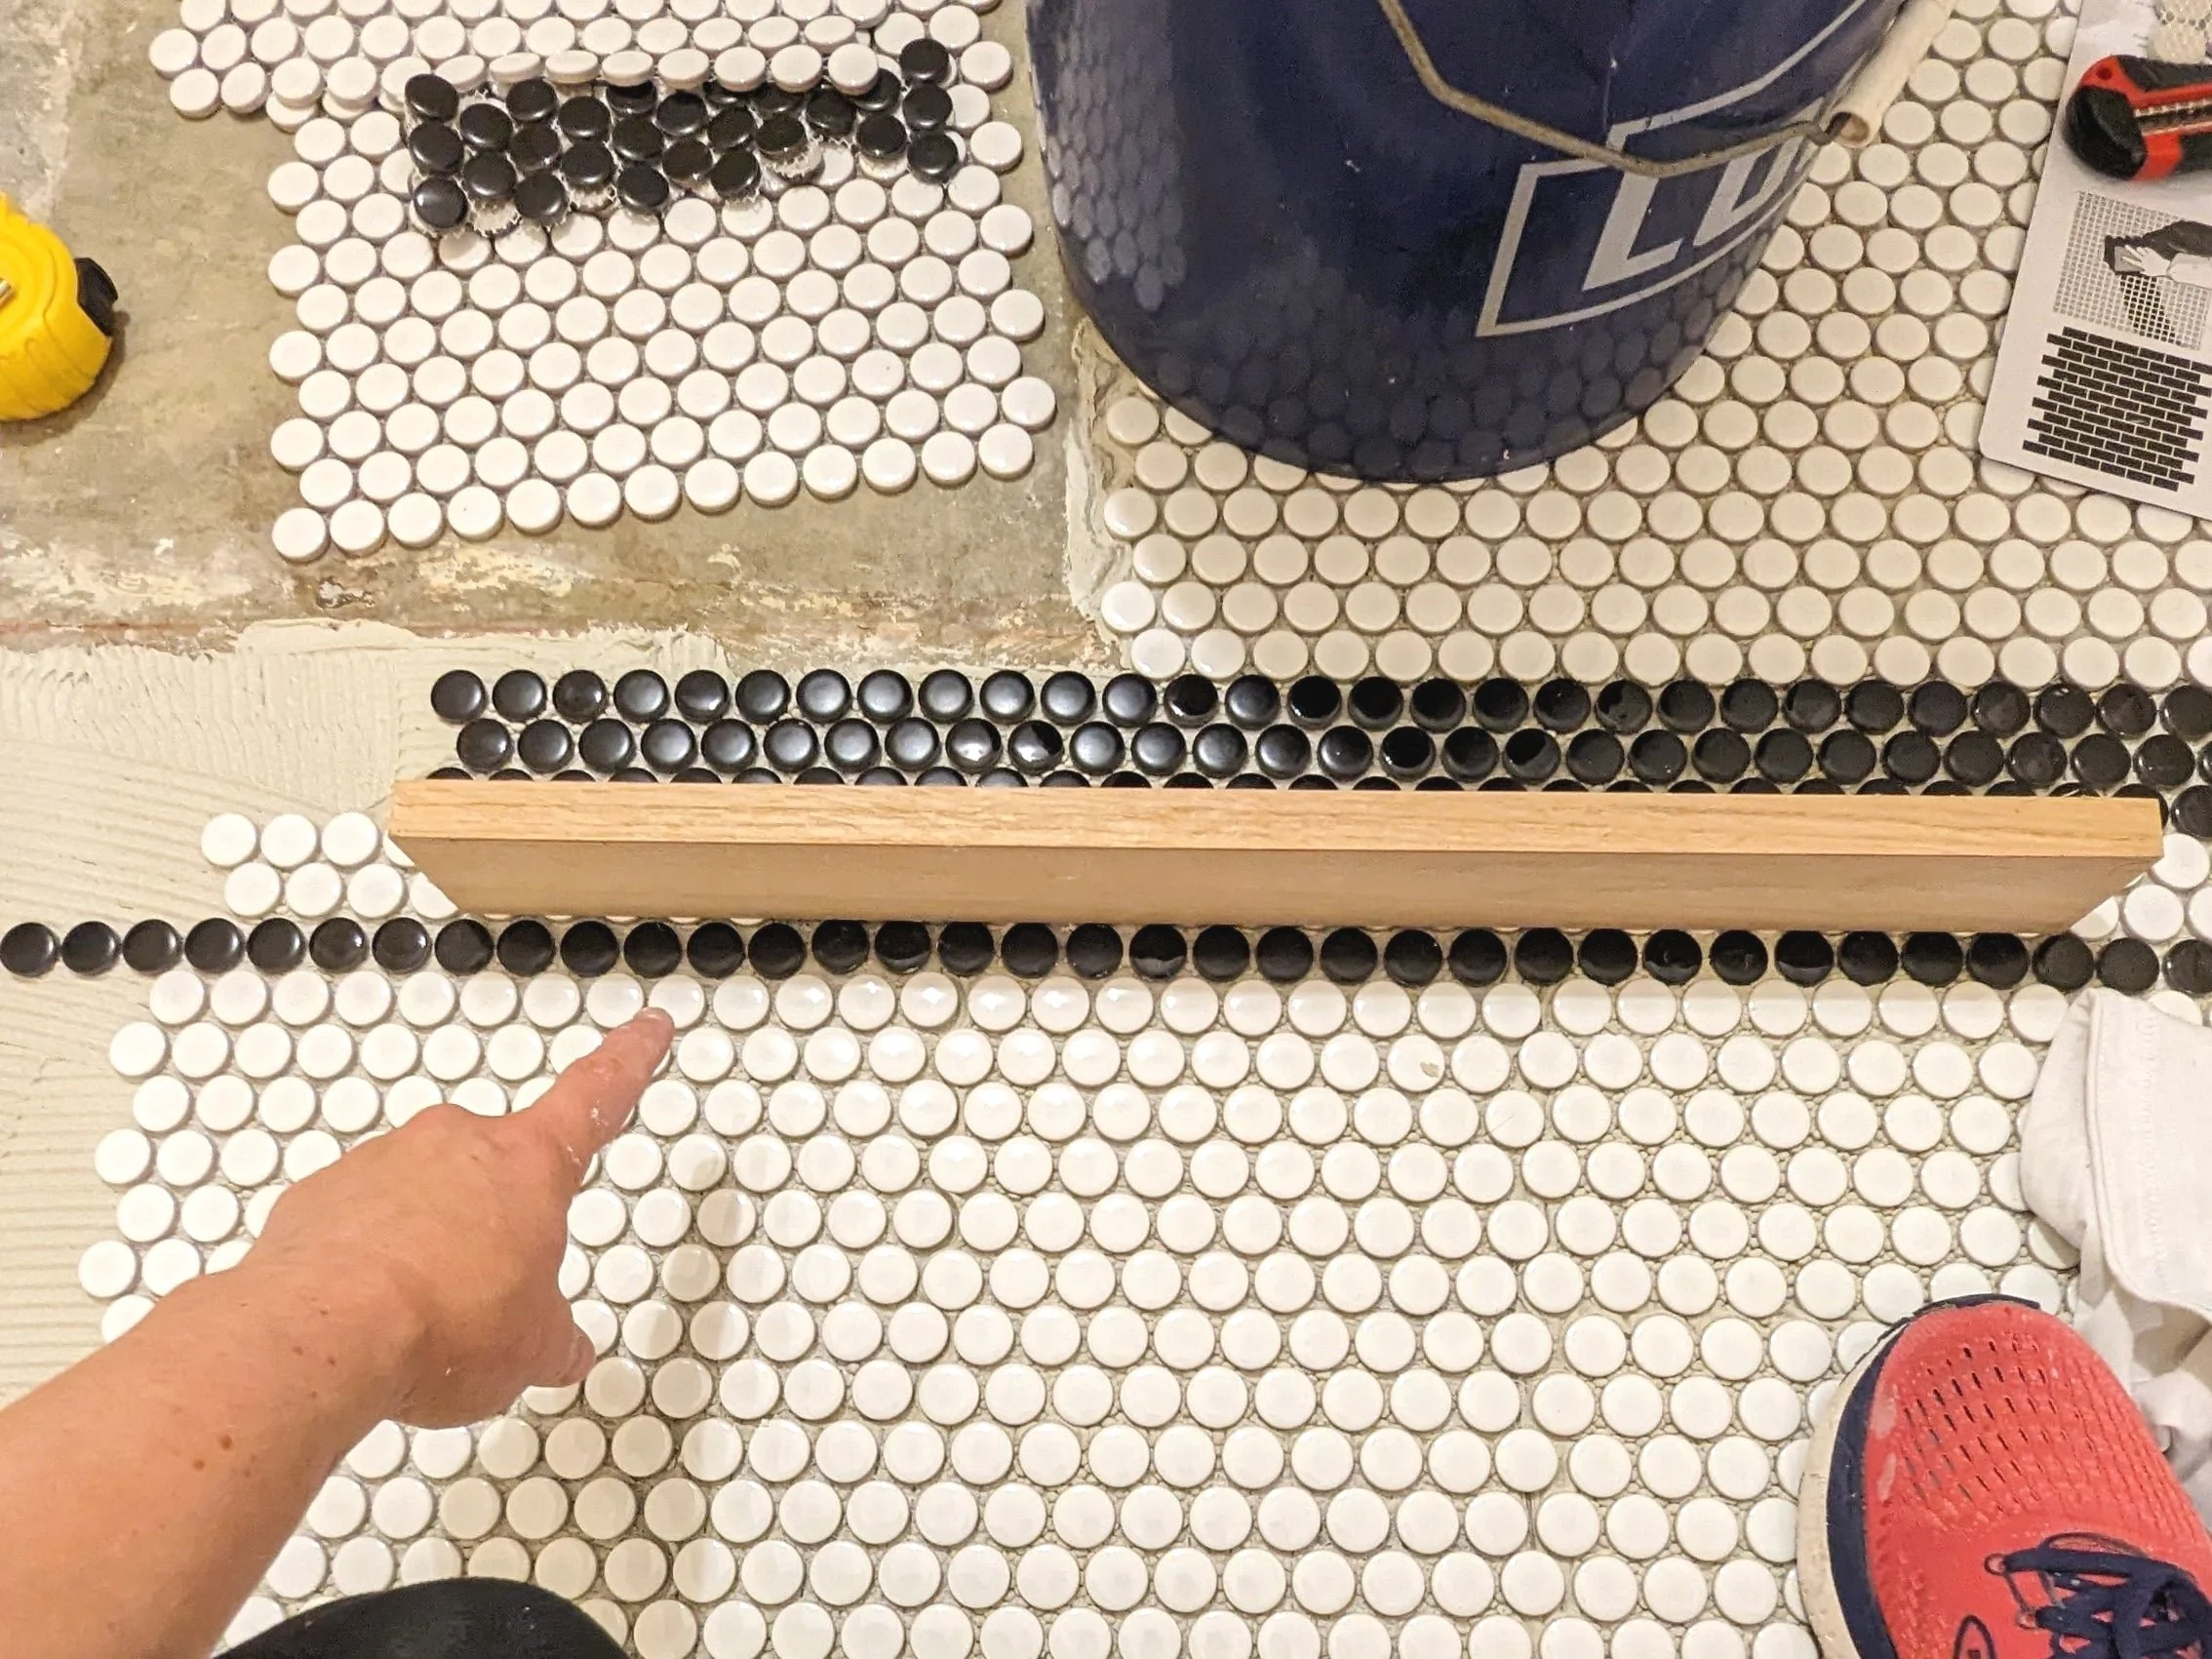
It’s easy for your pattern to start to slip out of alignment as you’re installing your tile. Use a straight edge like a scrap piece of wood or a level to check that your sheets are lining up evenly as you go.
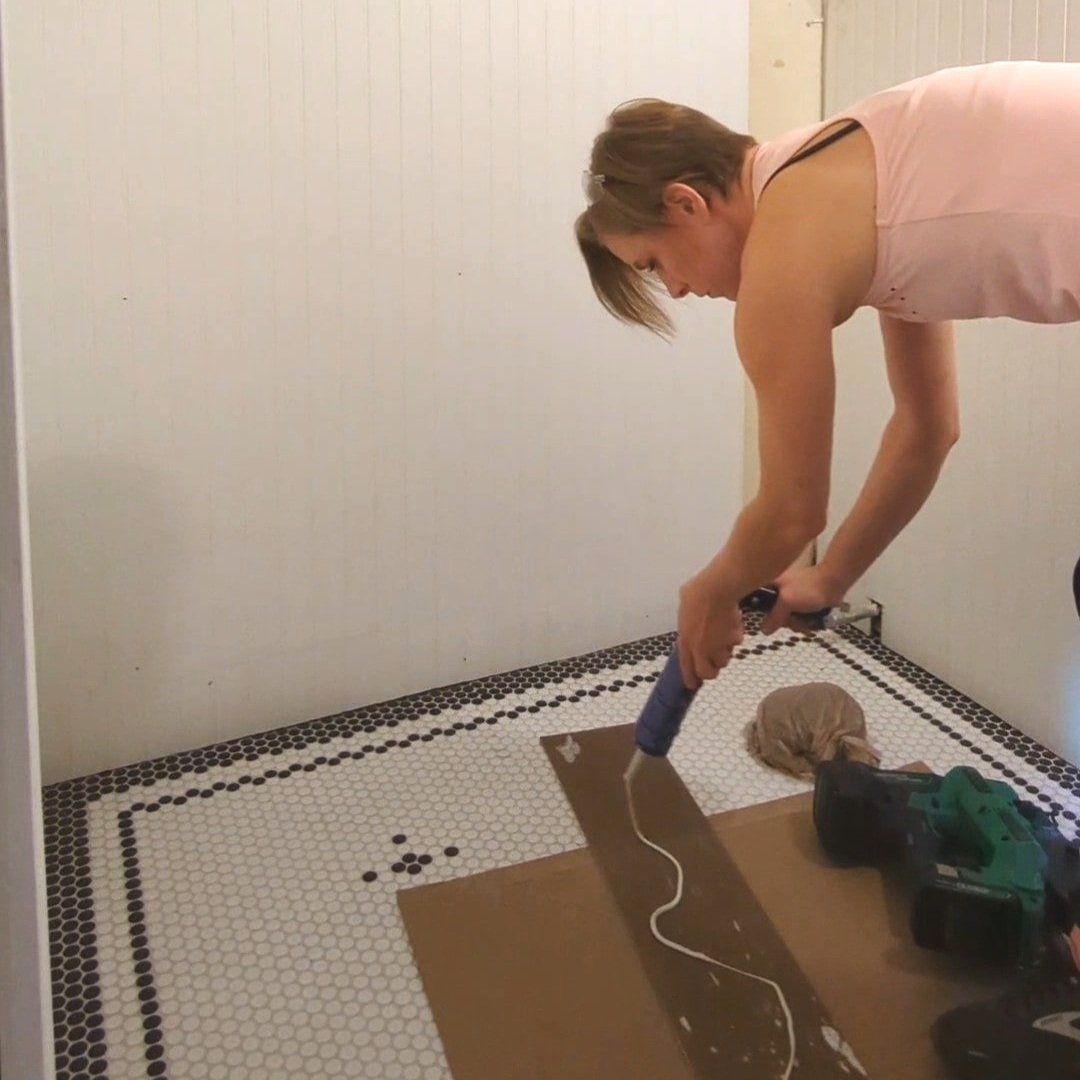
Adding a Pattern
So you’ve installed your penny tile, and now you want to add the pattern to the middle, eh? This is actually really simple to do!
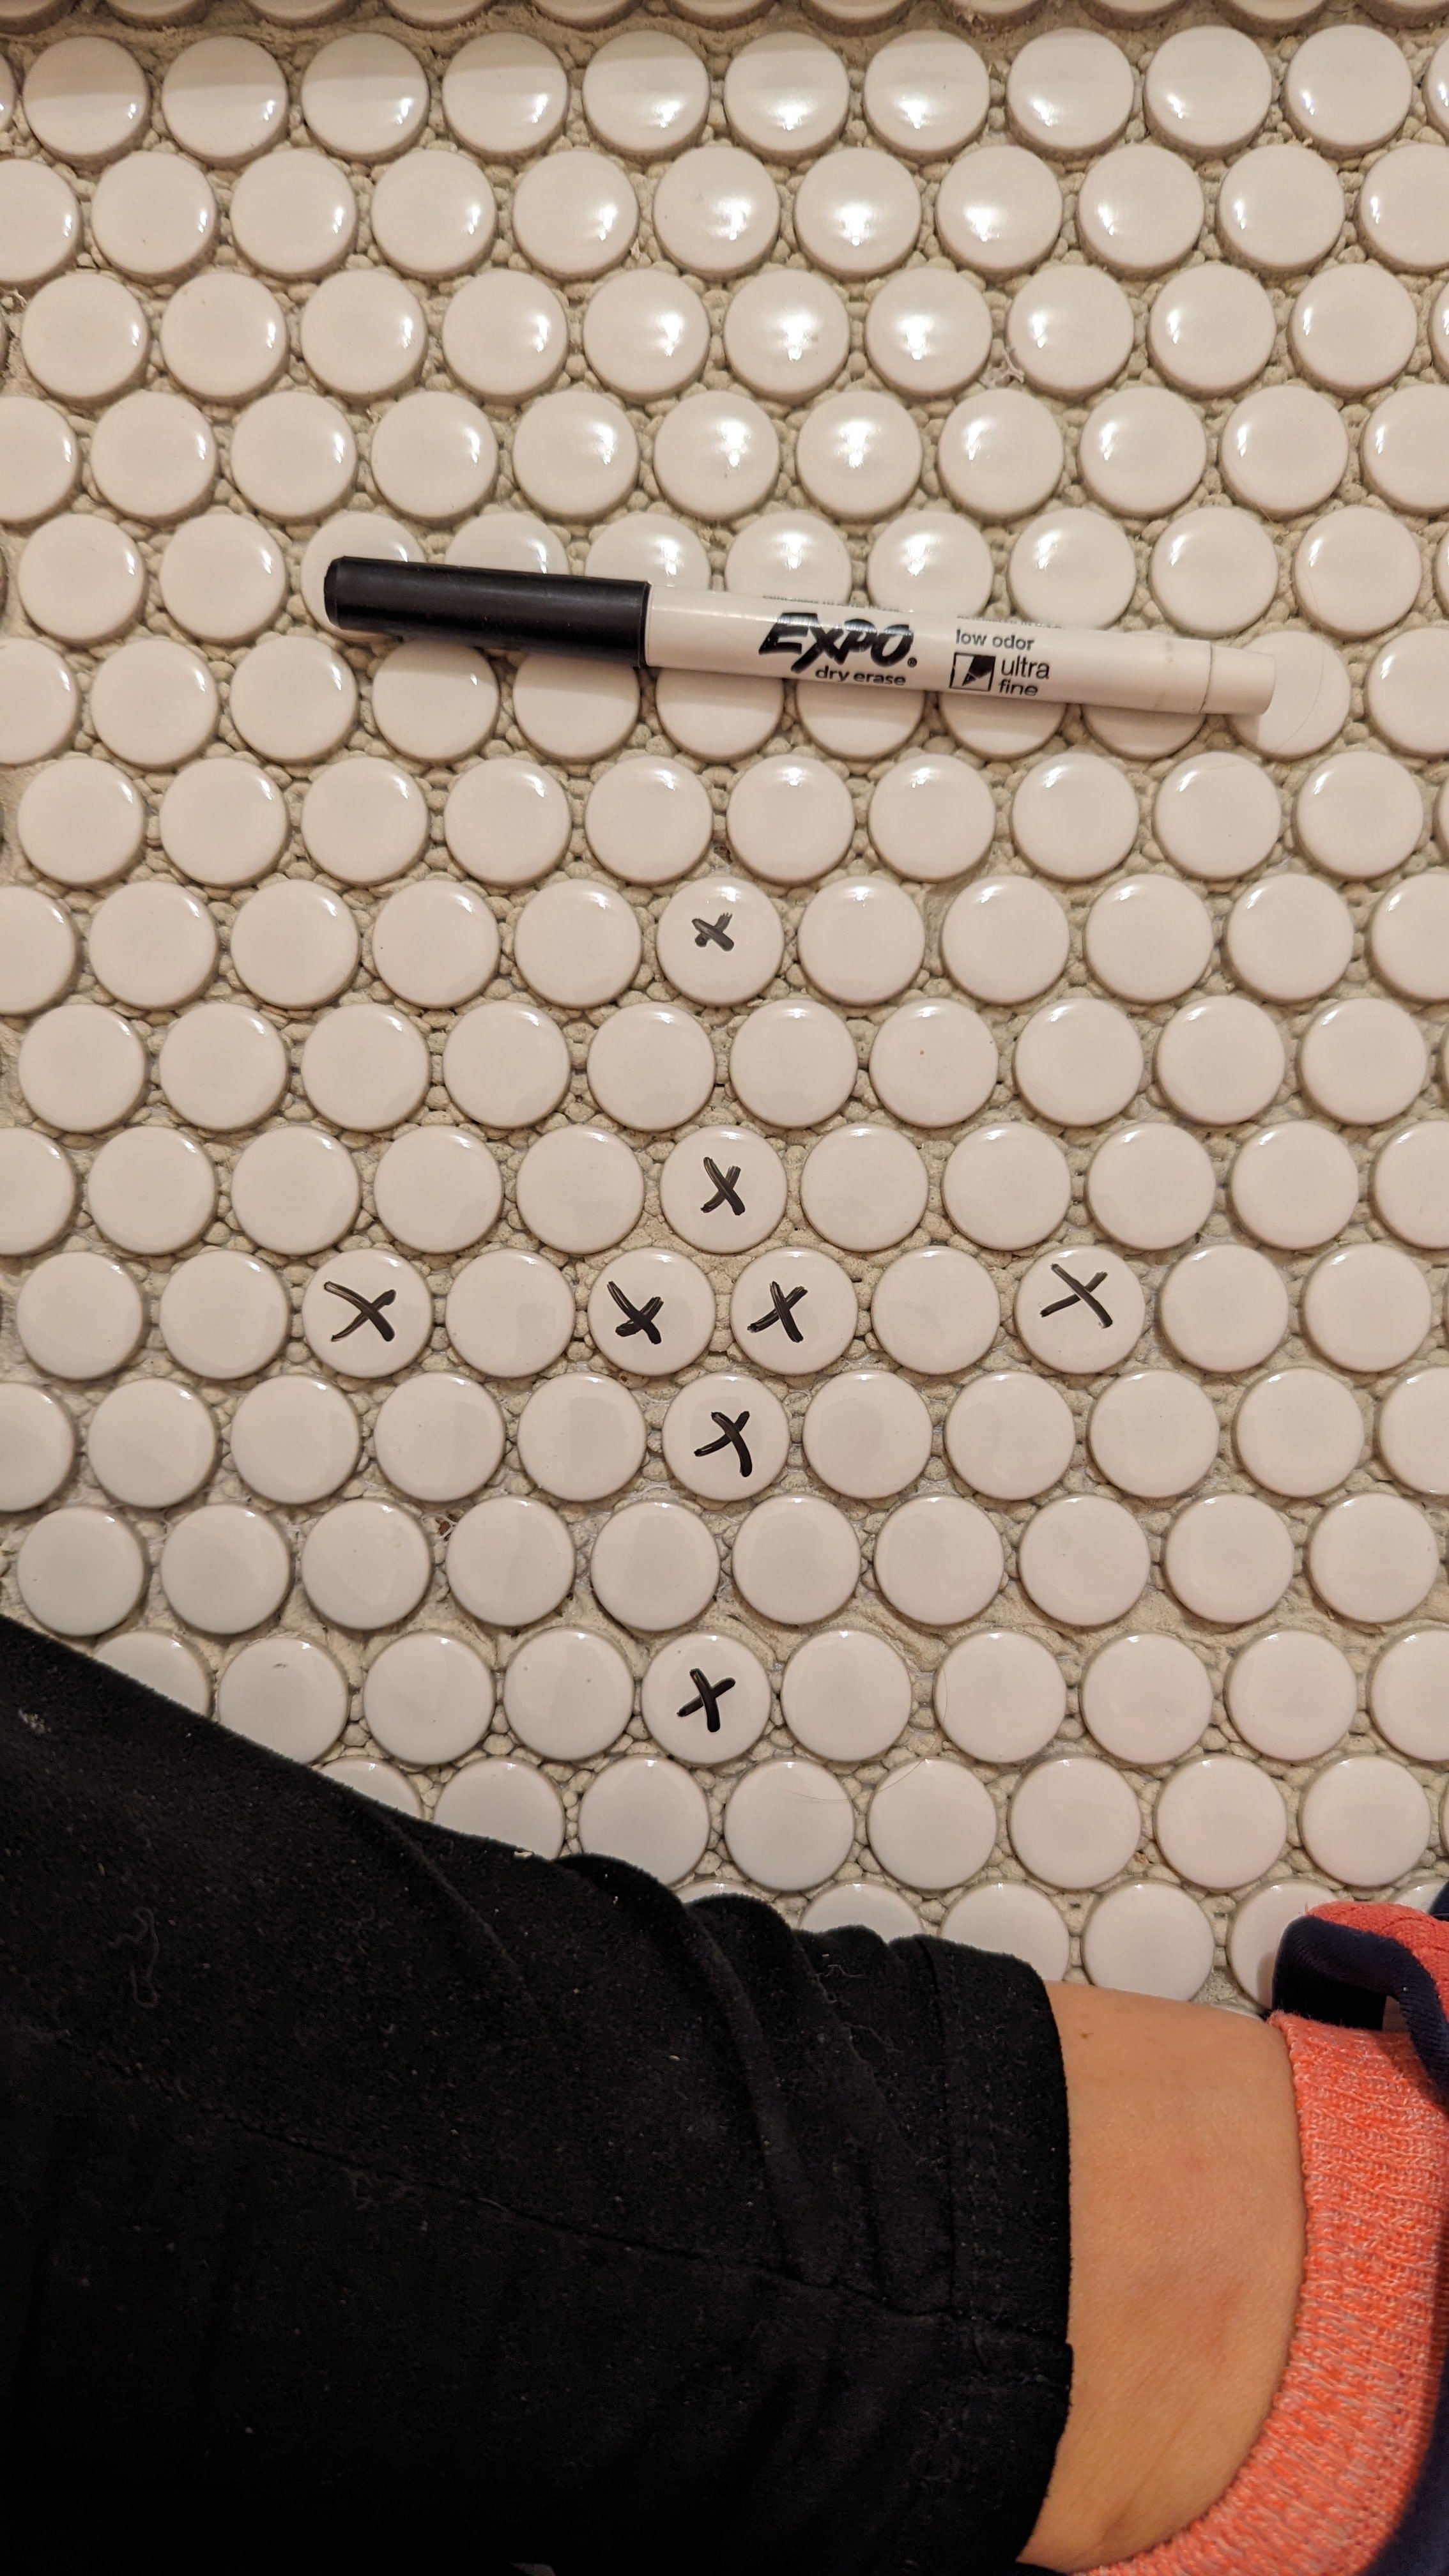
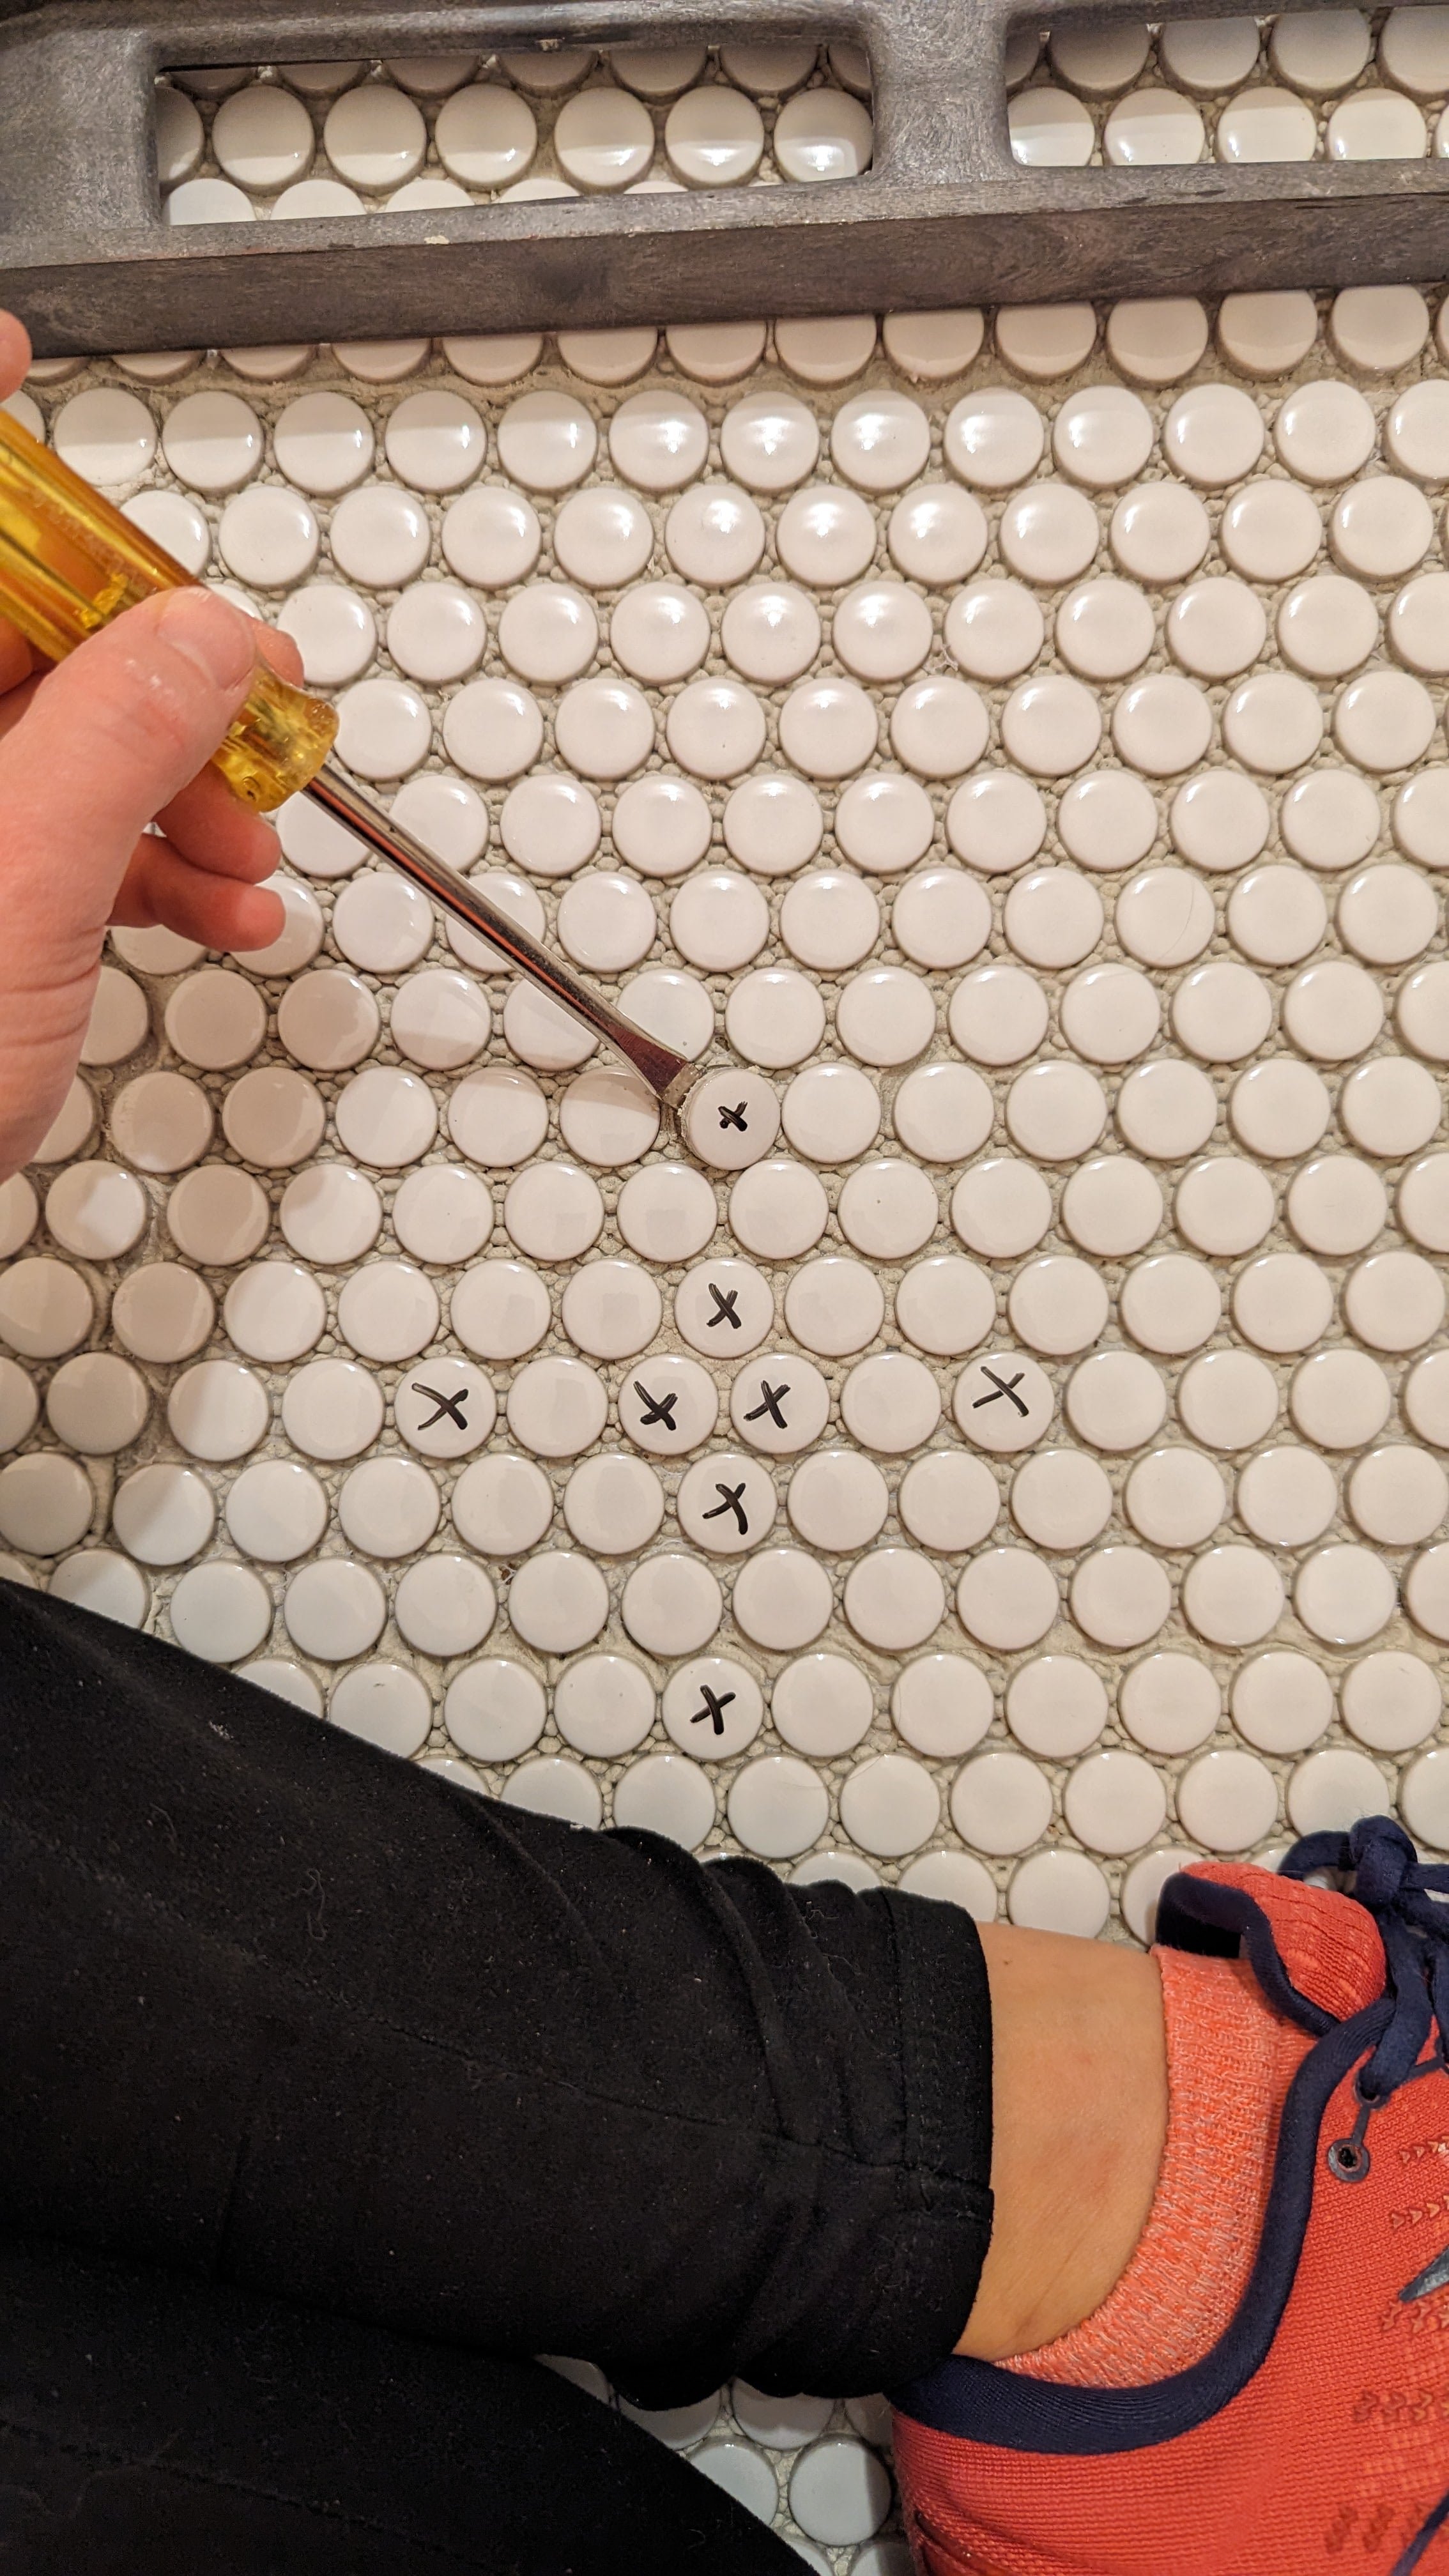

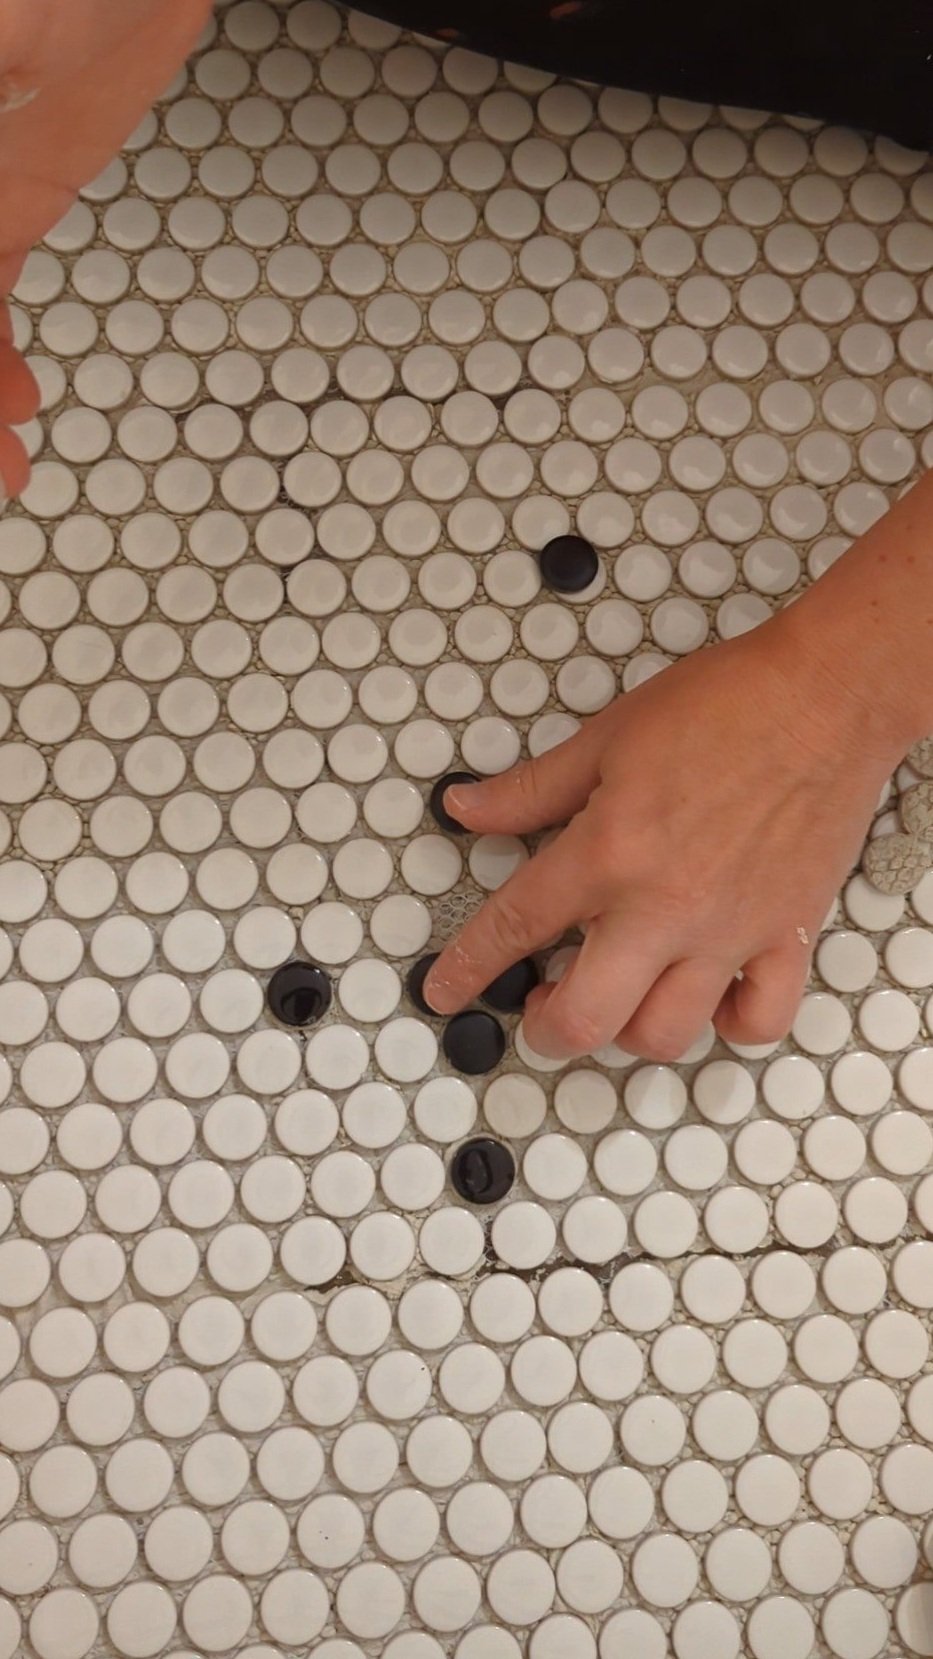
Start by marking the tiles you want to replace with a dry-erase marker. Then, using a flathead screwdriver, pop them out. Next, dab a little mortar on the replacement tile and pop it into place.
Voila! Easy peasy.
Grouting
After the mortar has dried the recommended amount of time, you’ll need to grout. Here are my tips:
Buy Plenty of Grout

Because penny tile is small, there are a lot of gaps to fill with grout. You’ll end up using more grout than you think, so make sure you buy plenty.
Consider Grout Color
Tone-on-tone grout color can minimize mistakes. This is true not only for penny tile but really for all tile. However, with the amount of joints in penny tile it's especially noteworthy. I chose to use Mapei’s Warm Gray grout. The pre-mixed kind is more expensive but worth it to ensure a consistent color.
Grout Haze Hack
After your grout has dried, you’ll need to clean off the grout haze. If you have porcelain or ceramic tiles, mix 1 part vinegar with 4 parts water and scrub off the grout haze with a cloth. I just learned this hack during this tile project, and it saved me a ton of time, so I wanted to share it here!
Seal Your Grout
If your grout requires it, don’t forget to seal your tile after the grout dries! This is my preferred grout sealant.
Final Thoughts

Penny tile is unlike any other tile I’ve ever installed - which isn’t necessarily a bad or good thing. It’s just different.
I really enjoyed the ability to customize my pattern to my space and the flexibility penny tile offers. It was also pretty nice not having to run to the wet saw to make a million cuts, ha! But it’s definitely easier to make mistakes when you’re dealing with so many grout lines. Regardless, I would absolutely tackle this project again.
If you found this post helpful, please share! And be sure to follow along during the rest of the One Room Challenge on my Instagram where I’m sharing every step of the process!


Catch up on the rest of the One Room Challenge:
How to DIY Penny Tile Floors in the Bathroom
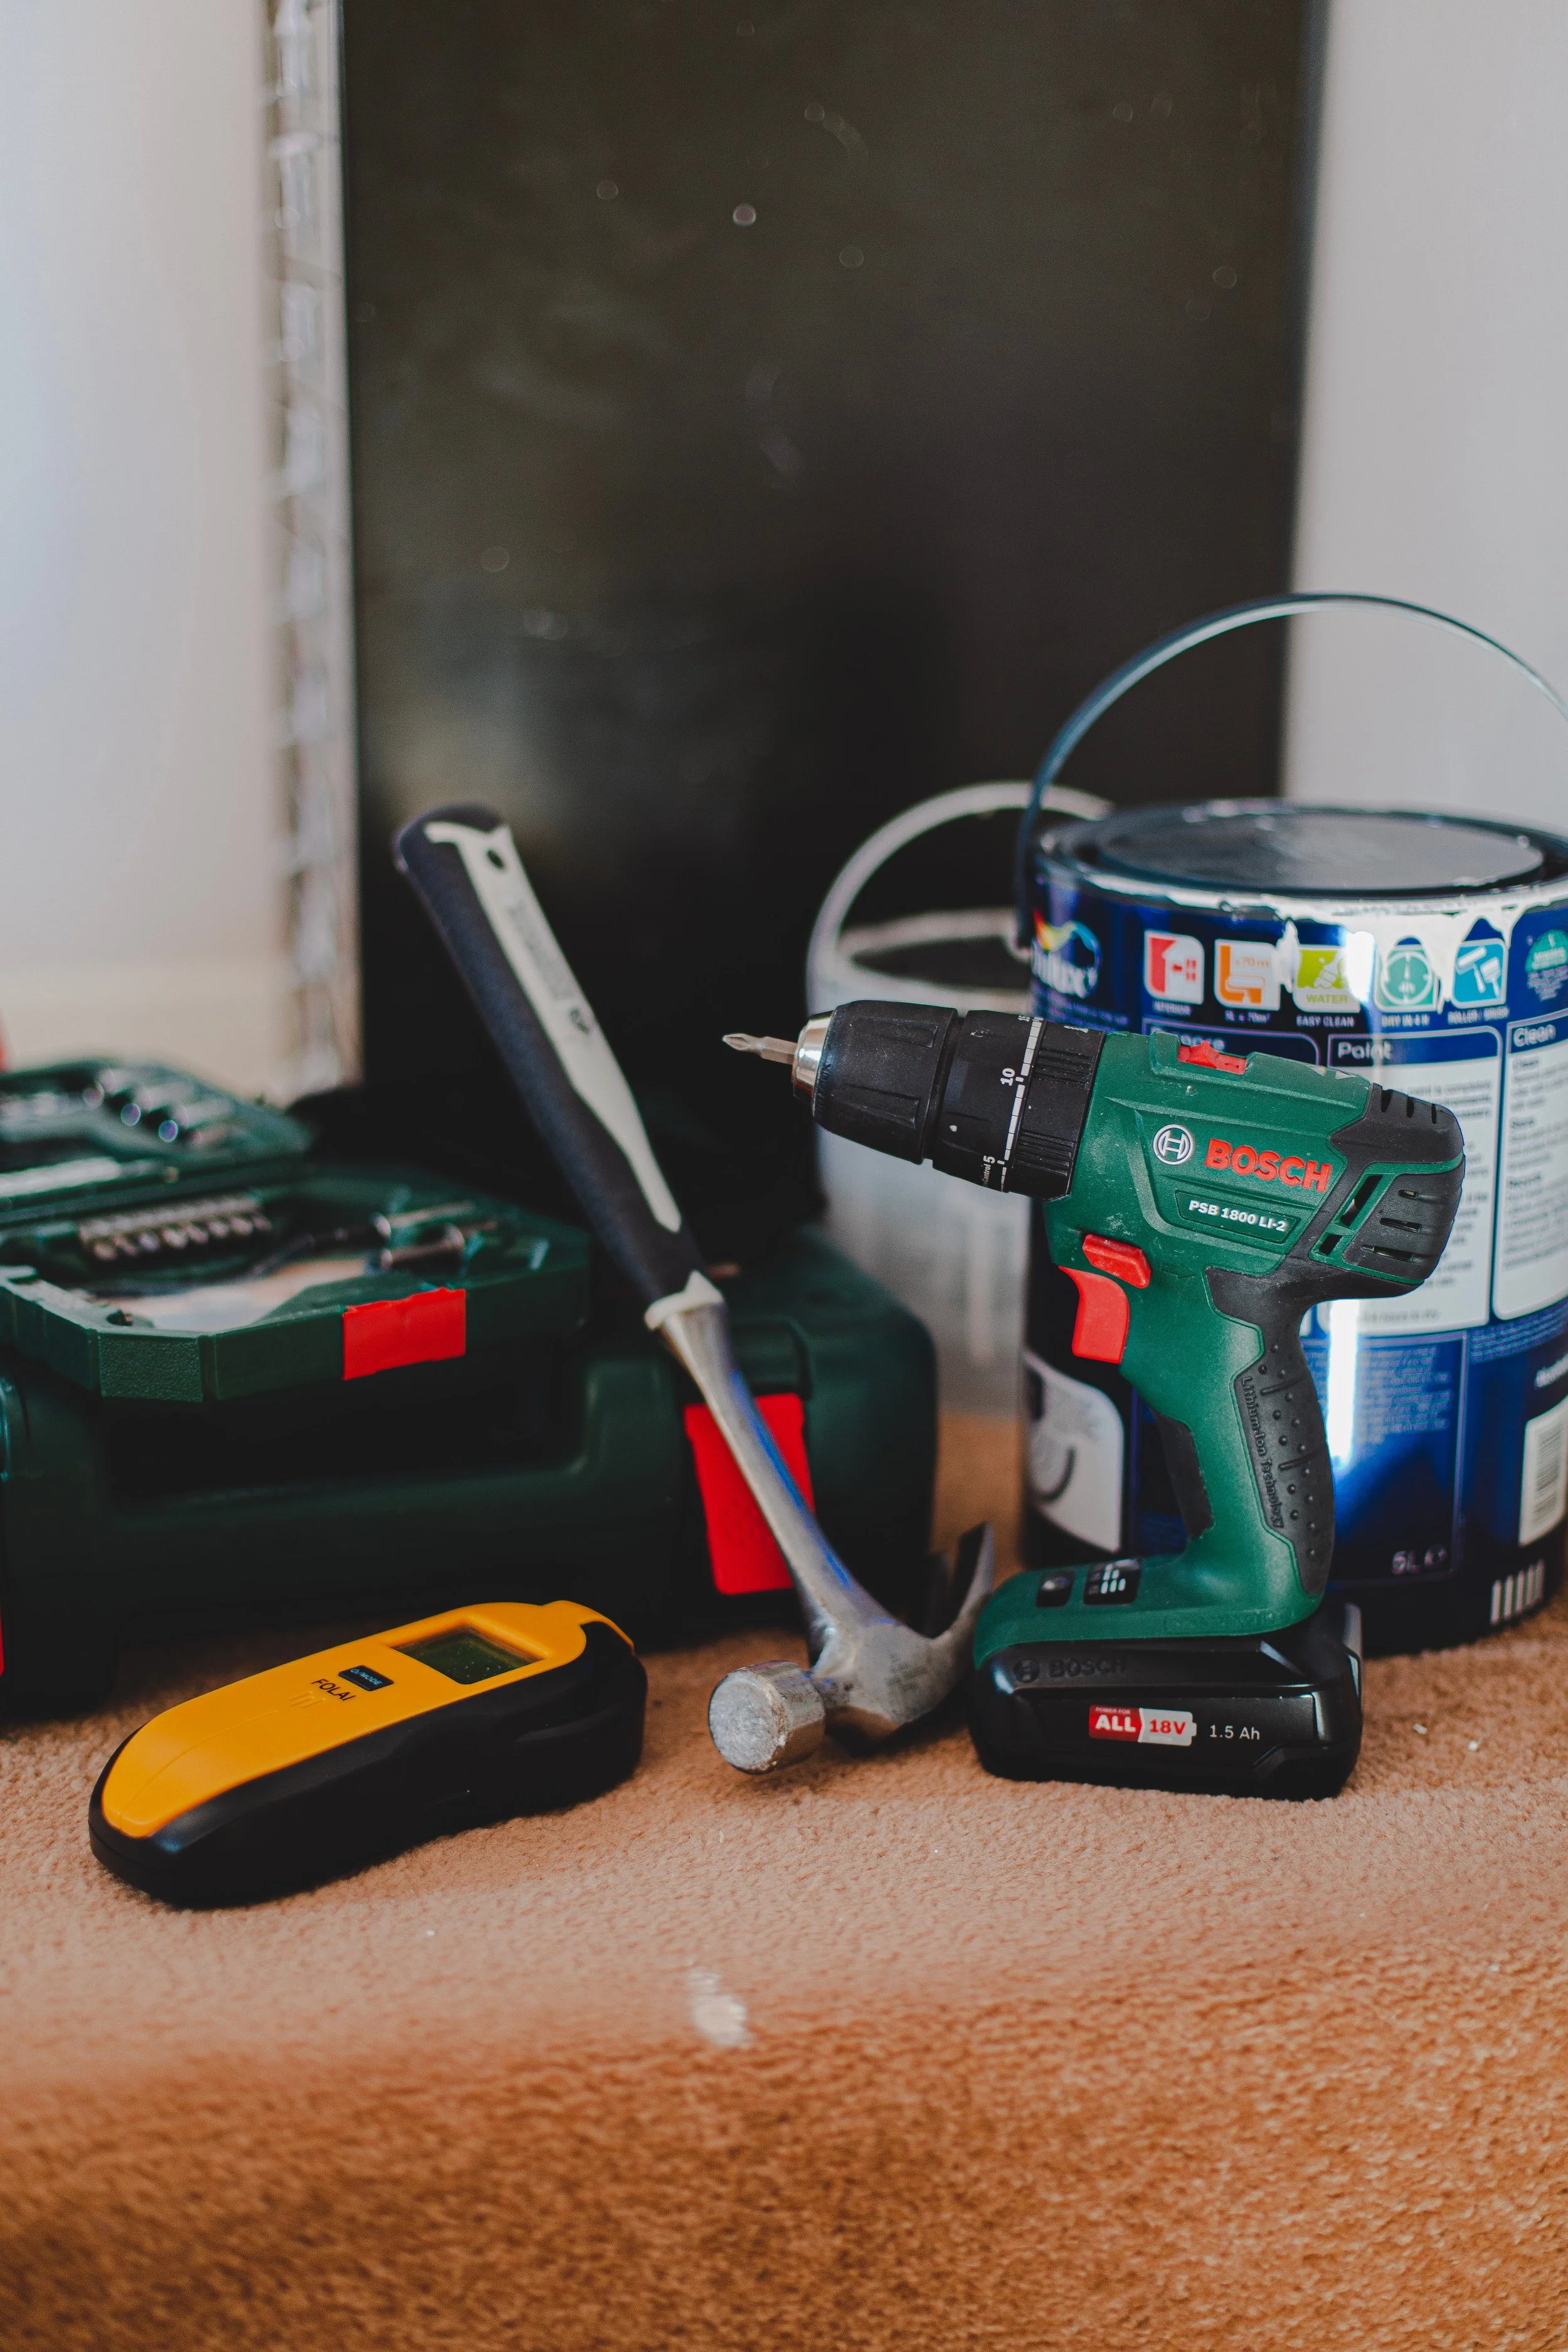
10 Best Tools for DIY Beginners
Do you find yourself hesitating to start a DIY project because you don't know what you're doing? Then this post is for you! Keep reading for the essential tools for beginner DIYers!
Must-Have Tools to Get Started with DIY - Fall ‘23 ORC Week 3
Do you find yourself hesitating to start a DIY project because you don't know what you're doing? Then this post is for you! Keep reading for the essential tools for beginner DIYers!

You might be surprised to hear that in a lot of ways I still consider myself a beginning DIYer.
In fact, until recently, I had never used a circular saw! I still don’t trust myself to do electrical. And plumbing is, frankly, overwhelming. Regardless, I've DIYed my way through project after project.
Between you and me - I STILL get nervous before every DIY project! But I know by the end of it, I will have learned something new and gained tons of confidence. I want that for you, too.
But first, a little update about week 3 of the One Room Challenge!
What's The One Room Challenge?

The One Room Challenge is a celebration of creativity, inspiration, and original ideas where creators encourage and motivate one another as they transform a room over a period of 8 weeks. I’ll be sharing a new post with my progress each Wednesday until the final reveal on November 15, 2024!
ORC Week 3 Recap
As an Amazon Associate, I earn from qualifying purchases. This post may contain affiliate links, meaning I receive commissions for purchases made through those links at no cost to you.
Full disclosure: this post was supposed to be about laying penny tile (you can find that post here!), but getting the bathroom to a blank slate took longer than anticipated. Anyone who's taken on a home renovation project knows that they often take longer than you think they will.
In last week's post, I shared that I demoed the room - including the time-consuming task of stripping wallpaper.

After that was complete, it was time to run new plumbing and electrical, hang new drywall, mud that drywall, and chip the mortar off the floor in preparation for tile. I was even able to finally remove the old lantern and put up one of the new lights (minus the shades)!
While working through that punch list, I thought a lot about how far I've come with becoming comfortable using a wider variety of tools and taking on more challenging projects. I was inspired to share the best tools for beginner DIYers so you can take on your own projects, too!
What Are The Best Tools For Beginners?
I do want to say that depending on what type of project you’re doing, the tools you need will vary. In my personal experience, these are the tools that I started off using on my projects (and the actual tools I own and use) as I grew my confidence and skills.
Measuring Tape
Starting with the basics.
A tape measure is quite possibly the least intimidating tool there is. And it’s a must! In fact, it’s likely you already have one of these in your home. But if you don’t, this one is a great length (yes, they come in different lengths!) and has the measurements broken out very clearly (not all of them do!).
Screw Driver Set
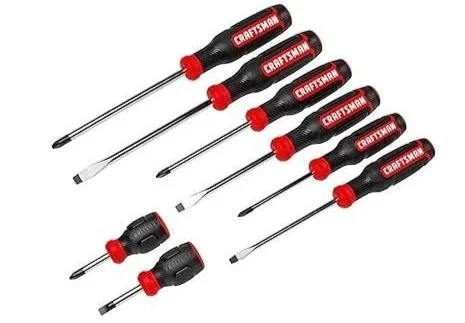
Another low-key must-have tool is a screwdriver set. Having a set of flatheads and Phillips in various lengths will get you a long way on your DIY journey.
Hammer

Another tool you may already have in your toolbox is a hammer. But if you don’t, this little guy is the perfect addition!
Drill with Bits

While a set of screwdrivers is a must, they’ll only get you so far before you’ll need to invest in a drill. A drill is perfect for introducing you to using power tools.
I prefer a cordless drill whenever possible because of their convenience. And don’t forget to grab a screwdriver bit set to go with it!
Level
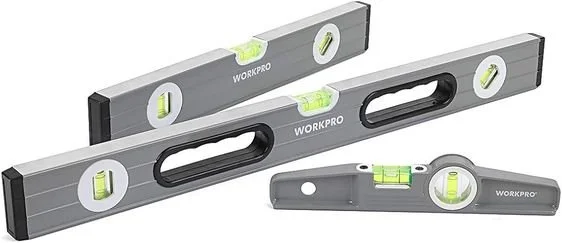
Depending on your project, you’ll need a level from time to time. I recommend buying a set of different-sized levels, so you always have the right one for the job (no, you can’t use the tiny level for everything).
While standard levels typically work just fine, sometimes a laser level is better suited for the project at hand. I have and use this Bosch laser level quite a bit for projects where I just don’t have enough hands.
Caulk Gun
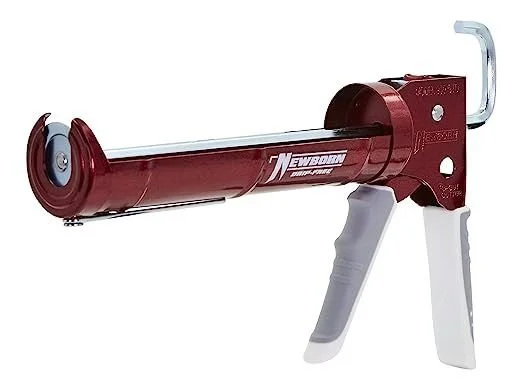
Caulk is the MVP of finishing work. But to take advantage of it, you’ll need a caulk gun.
Get one with a built-in nozzle cutter (that little hole near the handle) and boasts that it’s drip-resistant for the least frustrating experience - like this caulk gun by Newborn.
And to go with it, this is my go-to for paintable caulk.
Orbital Sander
Once I started using more and more power tools, I used a palm sander for my sanding projects for a long time. Take it from me: a random orbital sander is a much more versatile electric sander.
While you can buy cordless versions, I’ve always used corded sanders, and it’s rarely an issue. And don’t forget that you’ll want to have a variety of different-grit sanding discs on hand!
Paint Supplies

Okay, okay. I know “paint supplies” encompasses more than just one tool. However, paint can easily make such a big impact I’d be remiss to leave it out. So I’m making an exception. Here’s what you’ll need to take on a basic painting project.
Miter Saw

We’re getting into the big guns now. But there will come a time when your projects will get more advanced, and you’ll need to cut some wood. Personally, I was terrified of the table saw for a long time, so I made do without it and got along just fine with a miter saw. This is the miter saw I use and love.
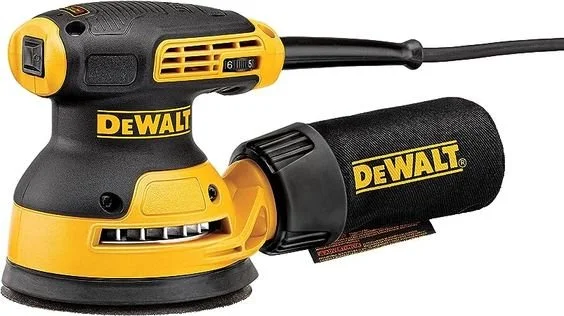
However, I will say that a table saw can make miter cuts and more with the right kind of jig. I own this Dewalt table saw.
I recommend weighing your options and making an educated decision on which type of saw is right for you when you’re just starting out. And, of course, wear your safety glasses!
Finish Nailer

If you’ve gotten to the point where you’re cutting wood, you'll likely need to nail it back together. That’s where the finish nailer comes into play.
I used a pneumatic nailer for a long time, and it was a huge pain in the butt (it was also super loud because it had to be hooked up to an air compressor). We just got this Metabo cordless finish nailer last summer, and I love it!
Final Thoughts
I get it, that urge to DIY but the hesitation to start because you, well, don’t know WHERE to start. Hopefully, with this list, you’ll feel a little more confident taking the reigns and jumping right in. Don’t forget to save the Pin below to come back to this post later!


Get started on your first DIY project with these tutorials:
Don’t forget to follow along on this year’s One Room Challenge journey!
Essential Tools for Beginner DIY
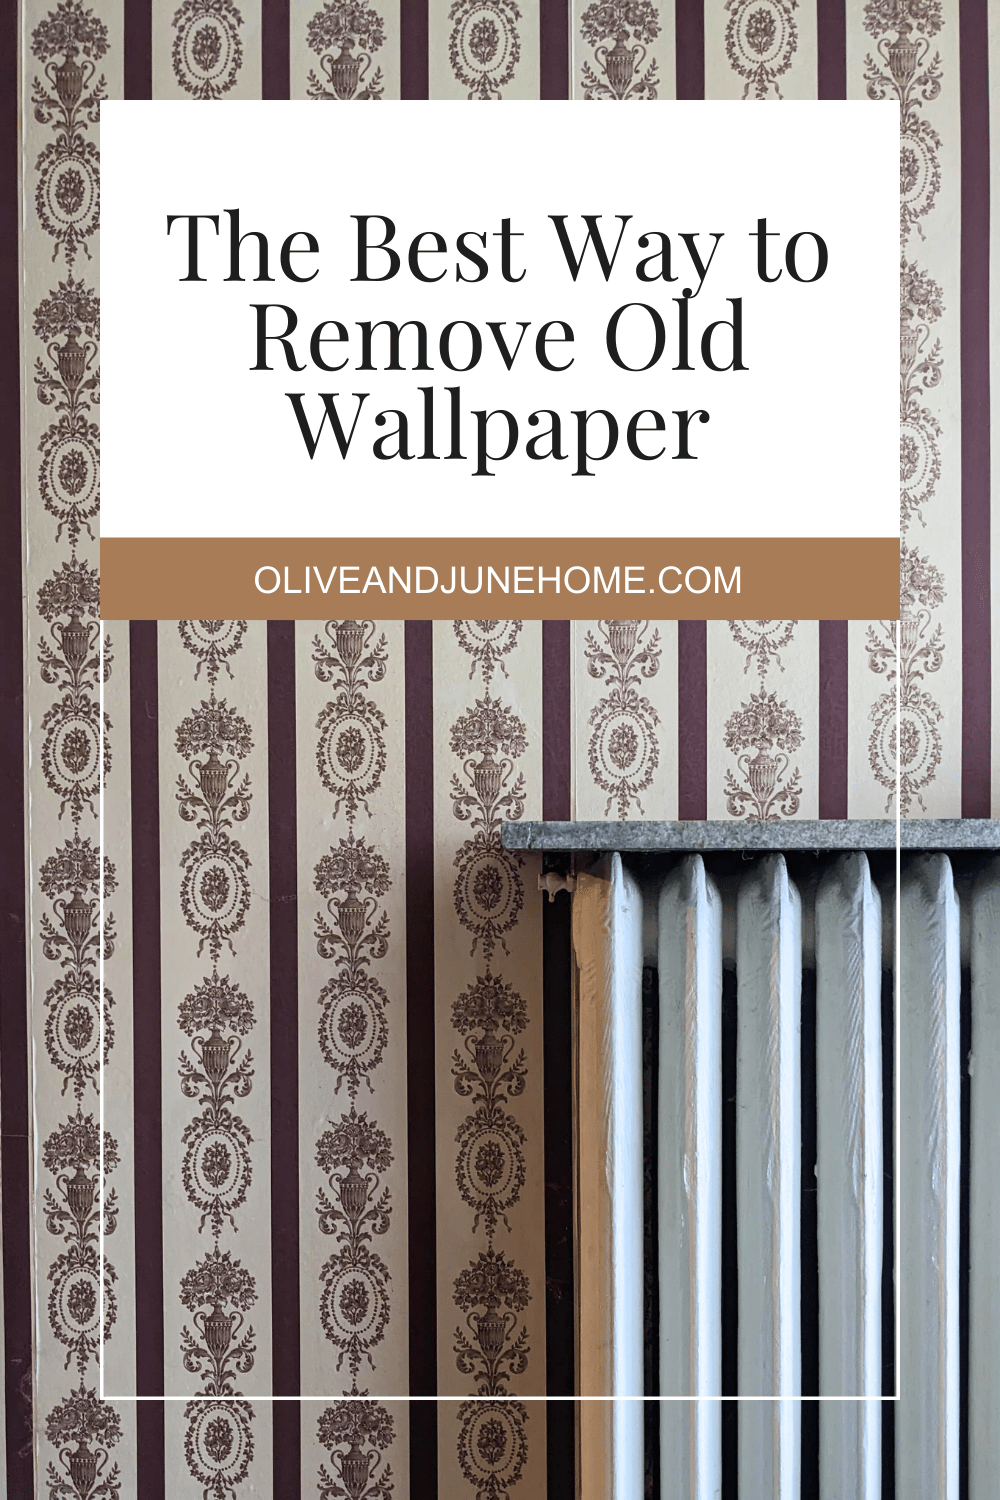
3 Ways to Remove Stubborn Wallpaper
I've owned three houses in my lifetime, and I've removed wallpaper in each of them using a variety of methods. In this post, I'm sharing three ways to remove wallpaper - including my favorite way!
How to Easily Strip Wallpaper - Fall ‘23 ORC Week 2
I've owned three houses in my lifetime, and I've removed wallpaper in each of them using a variety of methods. In this post, I'm sharing three ways to remove wallpaper - including my favorite way!

All the houses I've owned have been older, i.e. before removable wallpaper was popular. Therefore, I've never had the luxury of simply peeling it off the wall and moving on with my day. As I learned during week 1 of the One Room Challenge, my half-bathroom was no exception.
What's The One Room Challenge?

The One Room Challenge is a celebration of creativity, inspiration, and original ideas where creators encourage and motivate one another as they transform a room over a period of 8 weeks. I’ll be sharing a new post with my progress each Wednesday until the final reveal on November 15, 2024!
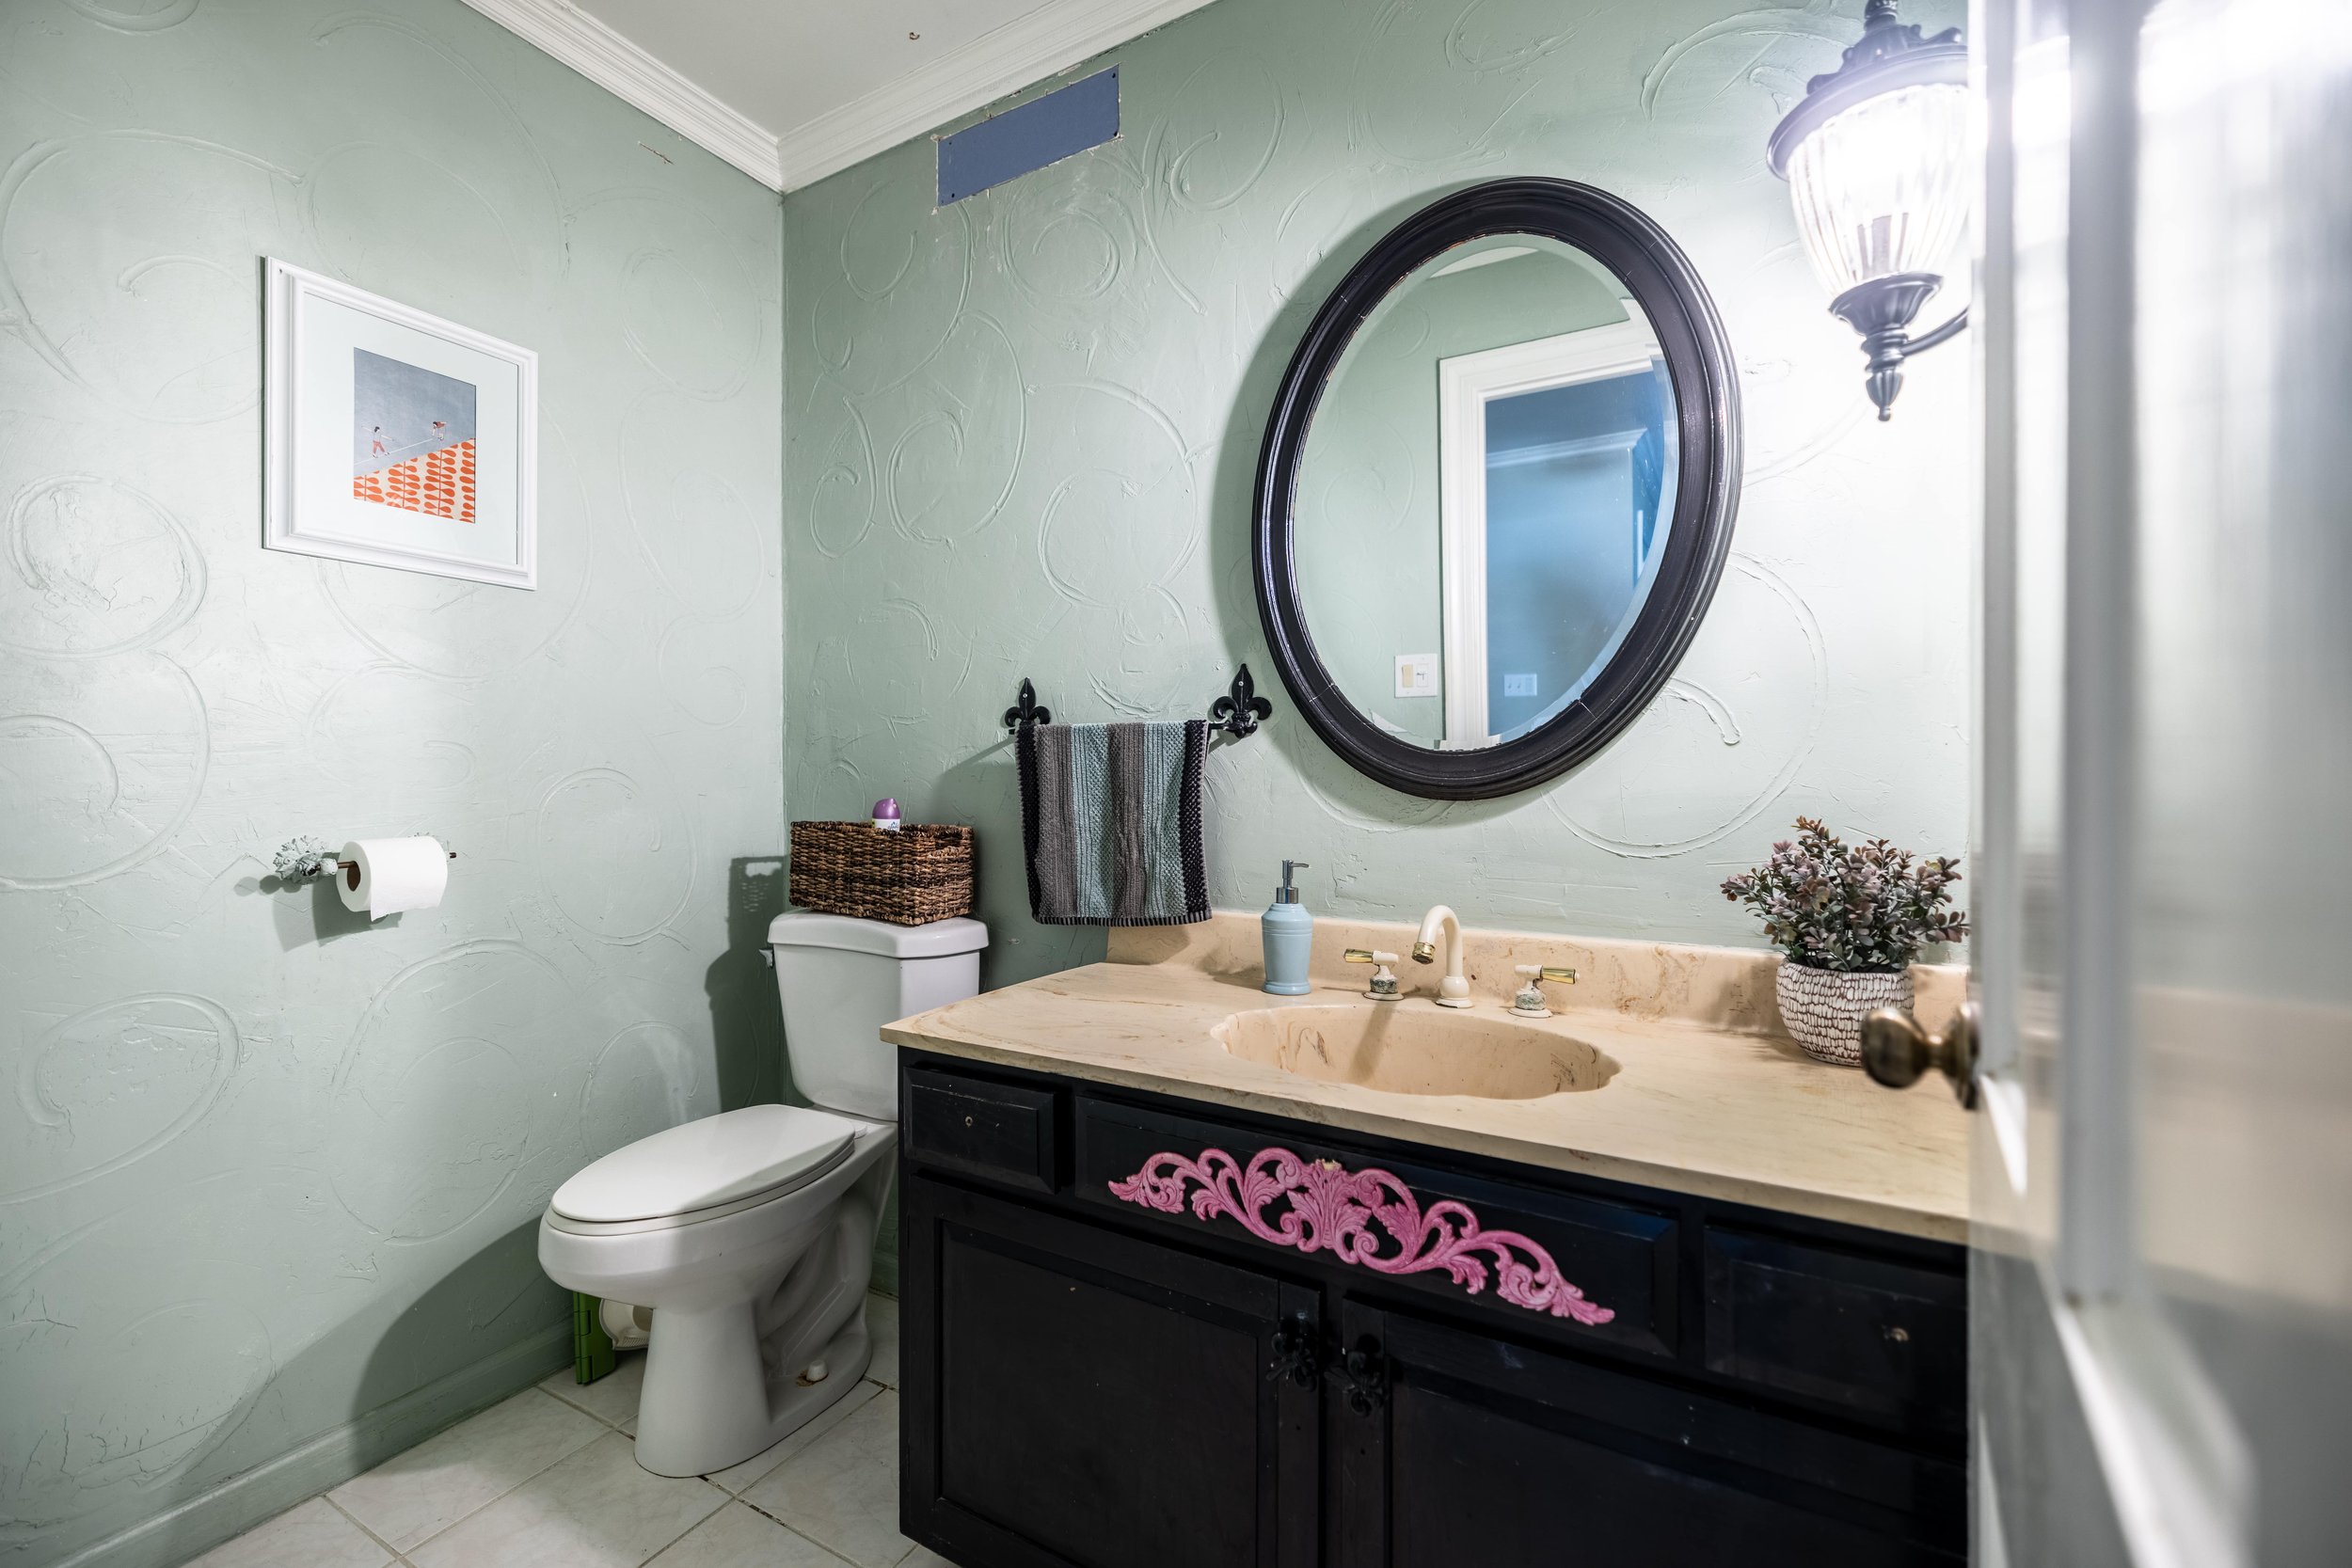
Where We Started…
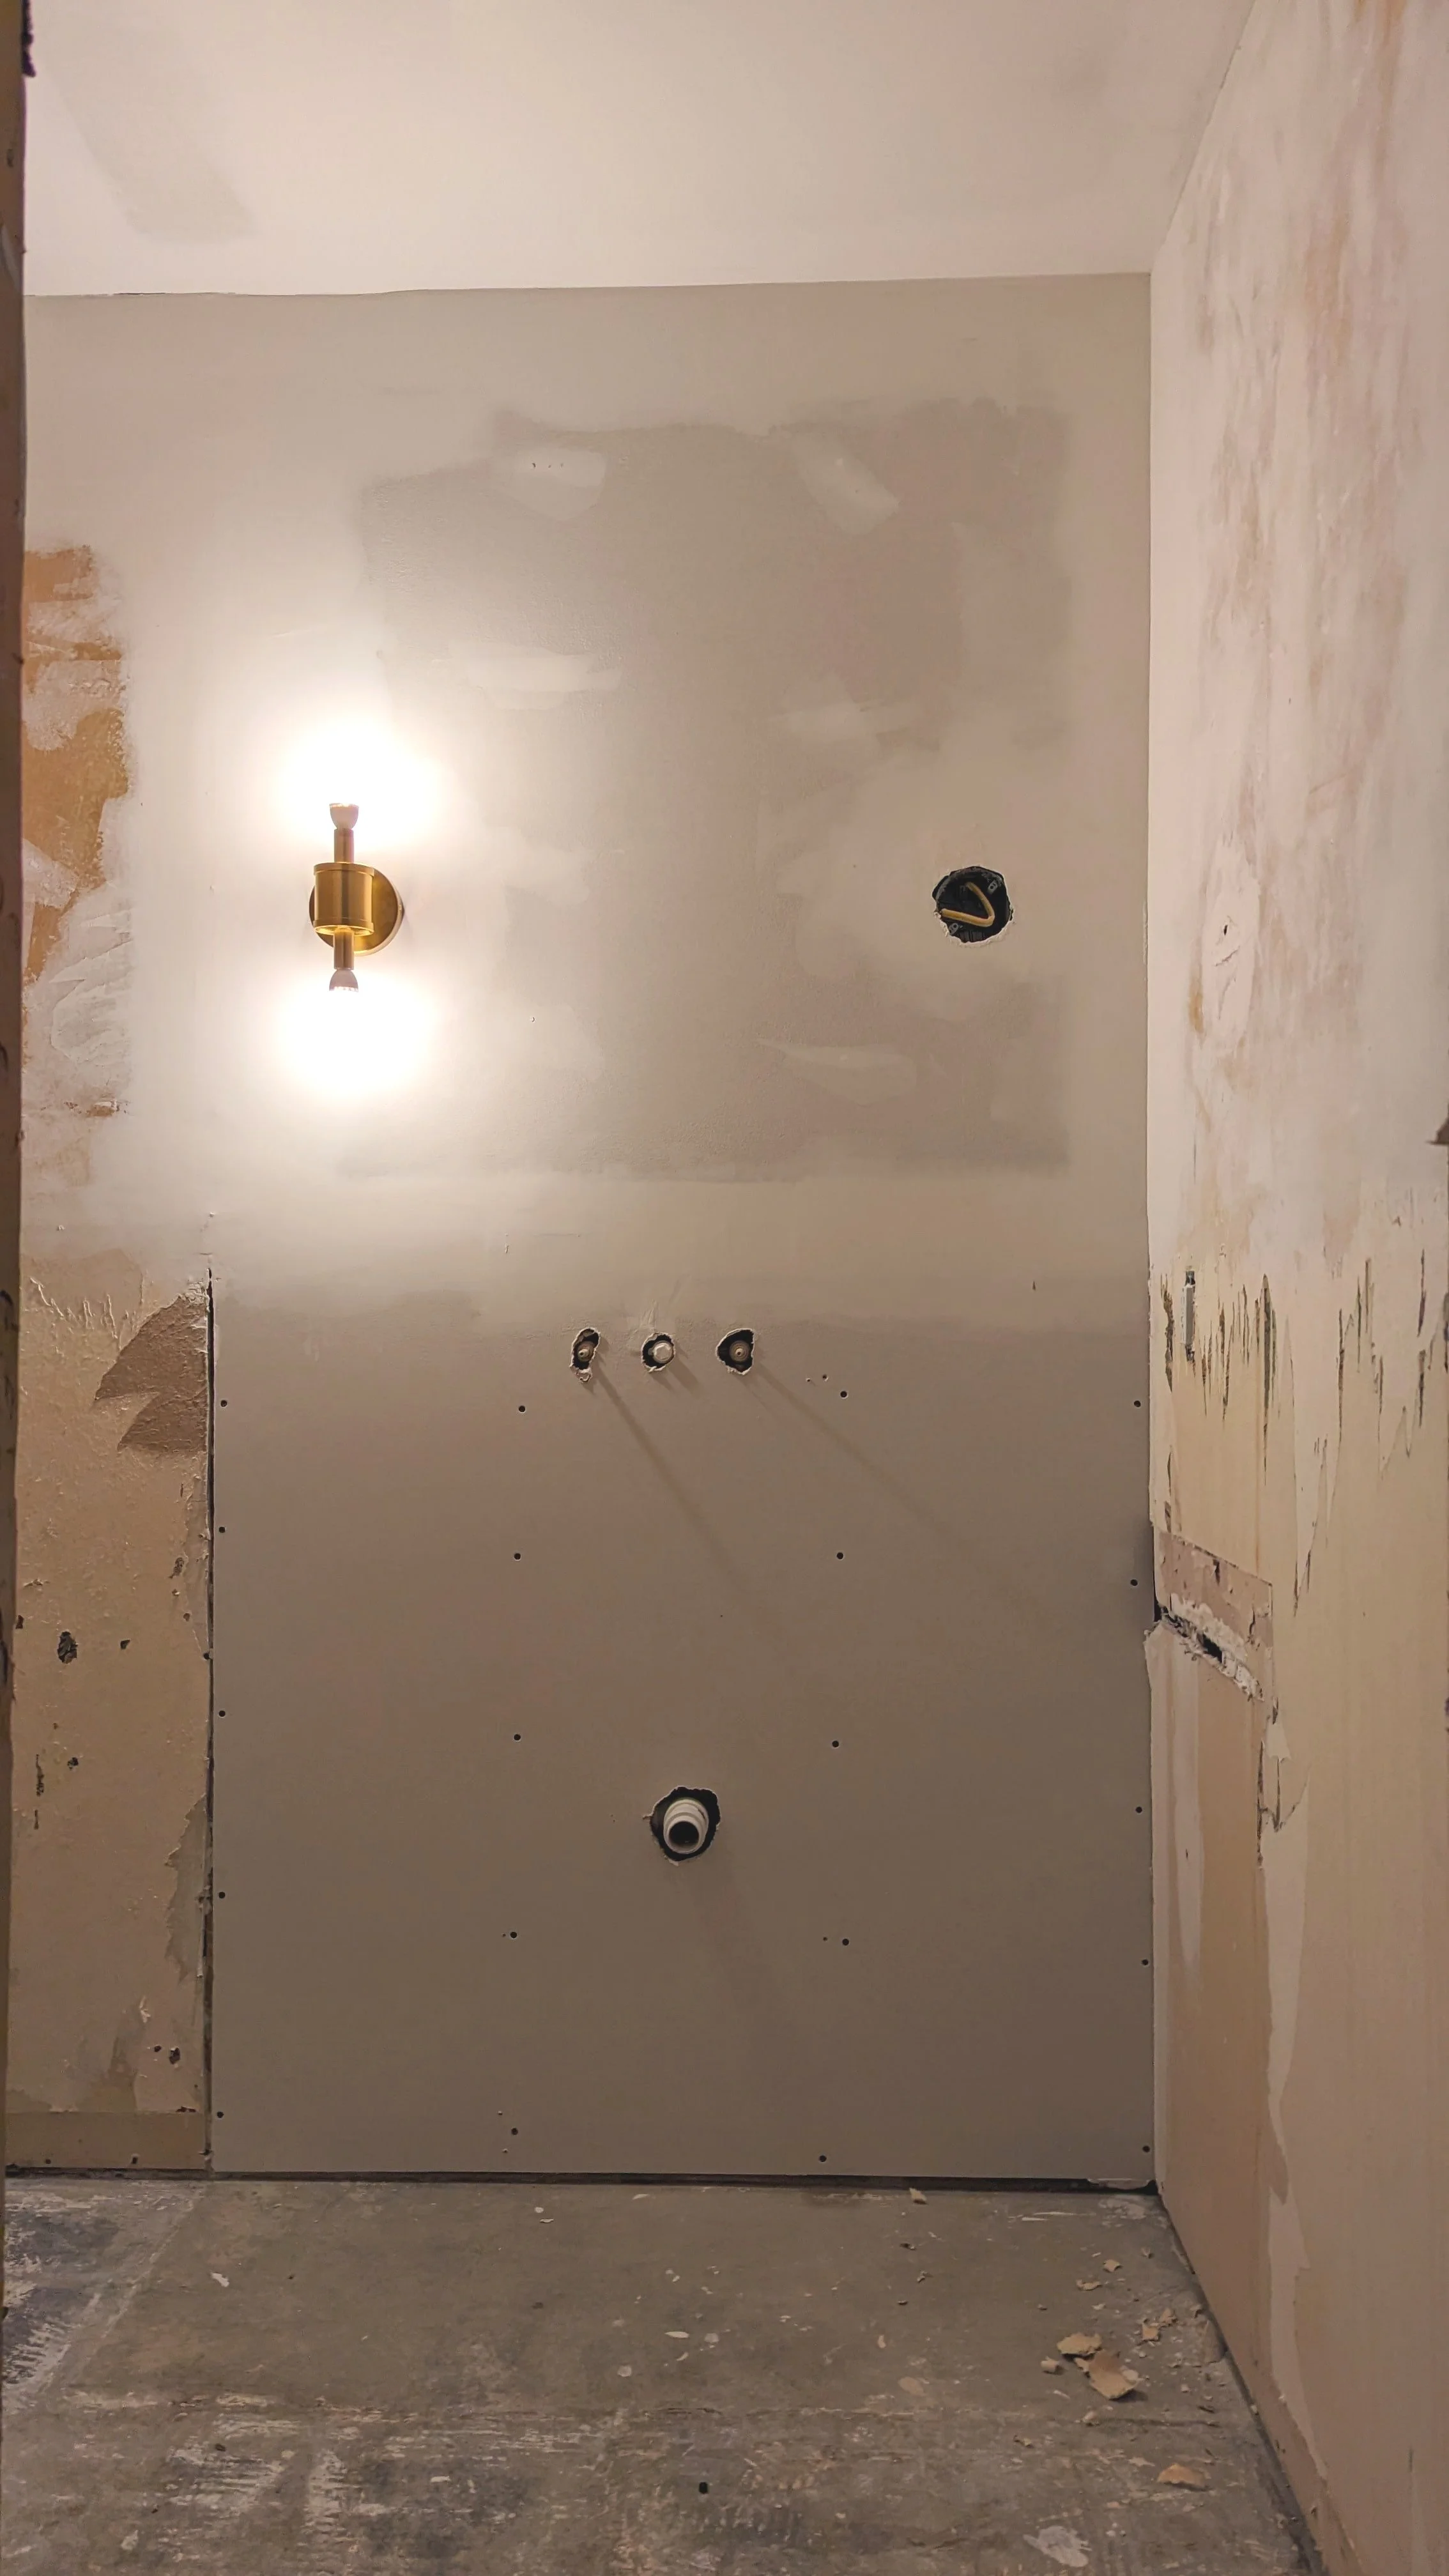
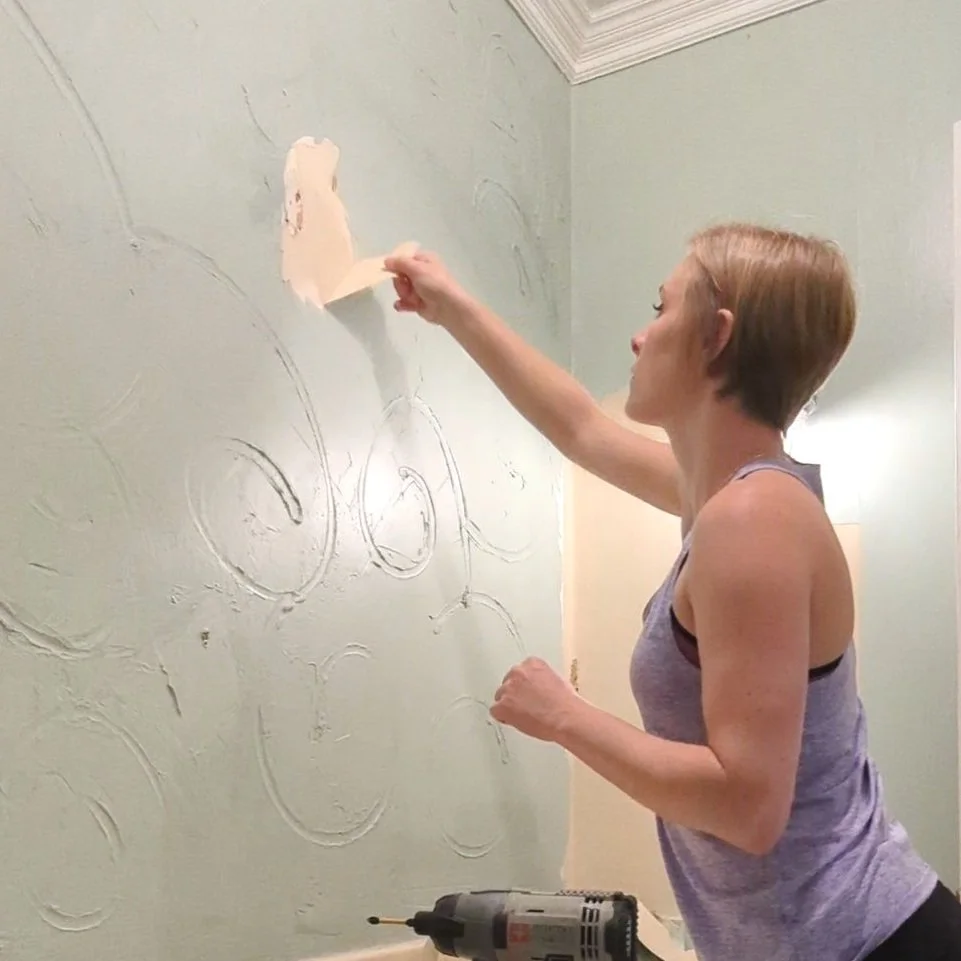
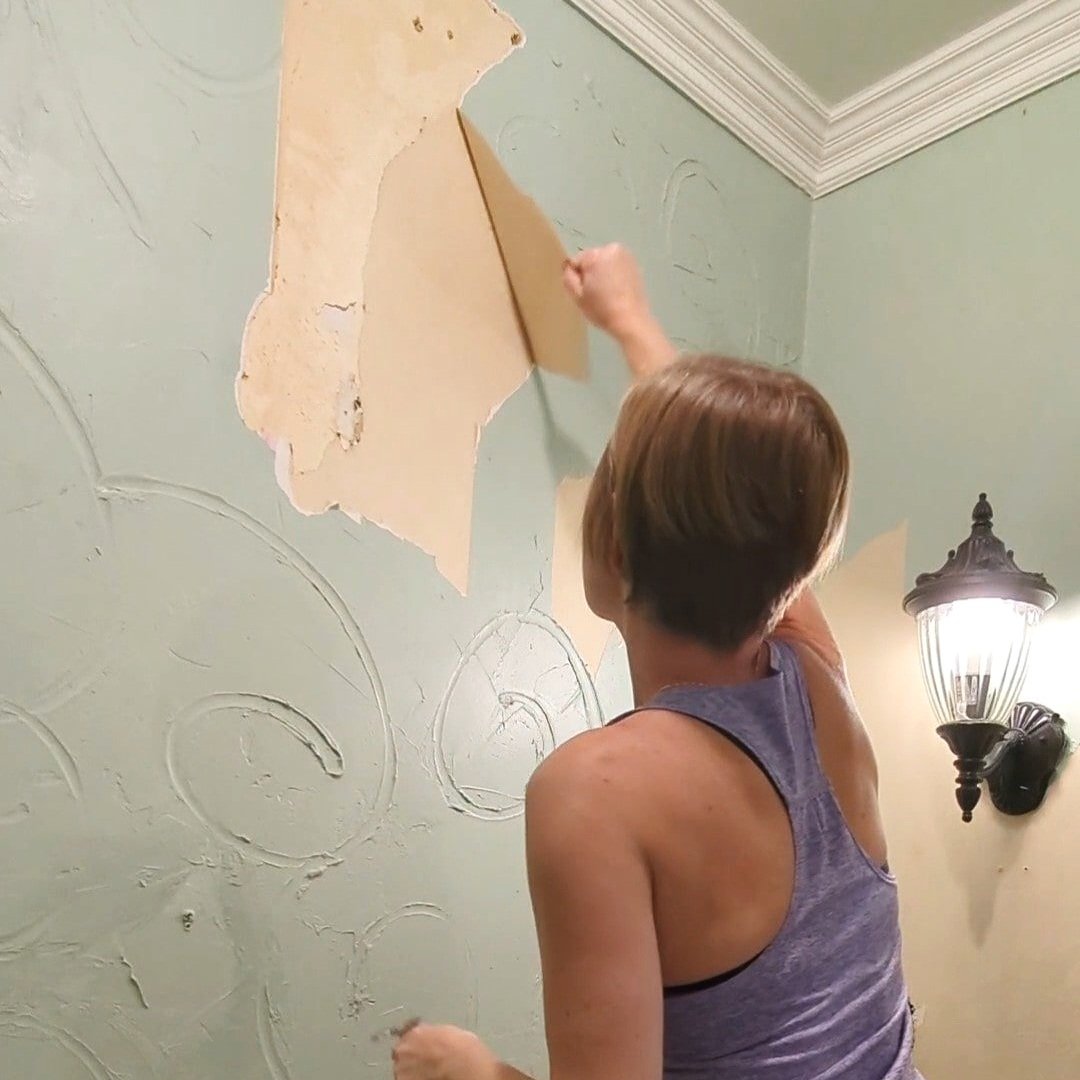
In last week’s post, I shared the current state of the half-bathroom and mentioned the weird wall texture that was on top of wallpaper. Here’s a reminder:
What I didn’t realize at the time was that the texture was actually on top of TWO layers of wallpaper.
I initially thought I would have to gut the entire room because of the wall texture. Much to my surprise, the wallpaper actually worked out in my favor because it allowed me to peel the texture right off with the top layer! However, there was still a considerable amount of wallpaper backing left to deal with.
Below, I’m sharing how I removed my wallpaper, as well as some other methods you can try.
Quick note: Before you try any of the methods below, if there's even a slight possibility that your wallpaper is removable, try simply pulling at a loose corner to see if it comes off. If so, consider yourself lucky!
If not… you've come to the right place. Keep reading!
As an Amazon Associate, I earn from qualifying purchases. This post may contain affiliate links, meaning I receive commissions for purchases made through those links at no cost to you.
Materials Needed*
- Plastic Dropcloth
- Painters Tape
- Trash Bags
- Wallpaper Scraper, Putty Knife (or my favorite: 5-in-1 Tool)
- Wallpaper Scorer
- *Additional materials needed for each method are listed within those sections
Step 1: Clear the Room & Protect the Floors
Start by moving everything away from the walls and give yourself plenty of room to move around. For me, this meant removing everything from the room since I’m not keeping any of it anyway!

Next, remove the outlet covers and put painters tape over the outlets.
Lastly, wallpaper is sticky. If you like your floors, throw down a dropcloth so your discarded wallpaper doesn’t stick to it.
Step 2: Pry Up the Wallpaper
Find a loose edge or corner and try to peel the wallpaper off the wall. If you're lucky, it’ll come up easily (paper backing and all!). But, to be honest, it’s unlikely that it will all come off cleanly without some elbow grease, especially if the wallpaper is old.
If you're sort of lucky, you'll at least be able to peel up the top layer.
If you can't get at least the top layer up, or some sections won't come up, don’t panic!
Step 3: Use a Wallpaper Scoring Tool
If you’re struggling to get the top layer of wallpaper up, I recommend using a wallpaper scoring tool. Simply run the scorer over the wallpaper, applying enough pressure to puncture the wallpaper but not so much that you’re digging holes into the wall.

This will allow water/steam/whatever mixture you’re using to get under that top layer of wallpaper and saturate the backing so it releases from the wall.
From here, there are several ways to remove what’s left of your wallpaper, so I’m breaking them down for you below!
Step 4: Methods of Removing Wallpaper
How to Strip Wallpaper with a Steamer
As mentioned above, I’ve removed wallpaper using several methods over the years. But the one I always defer to? Using a steamer!

Wallpaper steamers are fairly inexpensive (this newer version of mine is less than $75 and comes with an extra attachment for small spaces), and they can even be rented from the hardware store. At this point, mine has paid for itself several times over!
And if you already have one, I’ve even seen people use a clothes steamer as an alternative (though I can’t speak to how effective it is).
Here’s how to remove wallpaper with a steamer:
Fill the steamer with water and let it heat up. Mine starts bubbling like a witch’s brew when it’s ready.
Hold the steamer on the wall for at least 10 seconds. I like to start at the top so any excess condensation drips down to the wallpaper below and begins loosening it up before I even get there.
Move the steamer to a new section of the wall while you scrape off the current section. If you have a stubborn piece of wallpaper, you may need to repeat these steps.
How to Remove Wallpaper with Wallpaper Stripper
The one and only time I used a chemical stripper was the first time I removed wallpaper. In my experience, I’ve found wallpaper stripper to be only semi-effective, and it was a goopy mess. With the amount I needed, it ended up being pretty expensive, too. On top of that, my hands were super sore from spraying it by the end.
If you choose to go this route, here’s what you need to do:
Spray the stripper on the wall
Wait 5-10 minutes
Scrape it off (repeat if needed)
How to Remove Wallpaper with DIY Mixtures
Lastly, there are several more cost-effective wallpaper stripper mixtures you can use, including fabric softener, vinegar, or dish soap mixed with hot water. After I tried the wallpaper stripper in my first house, I finished the task with fabric softener and water.
While this method was effective, the smell… oh man. The smell of fabric softener was STRONG and lingered for quite a while. Regardless, I’m not here to gatekeep. Here’s how you strip wallpaper the DIY way:
- Mix your solution of choice in a spray bottle, garden sprayer, or bucket
- Equal parts fabric softener & hot water,
- Equal parts vinegar & hot water, or
- Tablespoon of dish soap to a bucket of hot water
- Spray your mixture on the wall or apply it with a sponge
- Wait 15-20 minutes
- Scrape (repeat if needed)
Step 5: Remove Wallpaper Adhesive
Once you’ve successfully stripped your wallpaper, you’ll likely have some paste left behind that you’ll need to remove as well. Here’s where a little bit of dish soap and hot water will go a long way.
Simply use a sponge, wipe the walls down, and you’re ready to go!
Final Thoughts
Yes, removing wallpaper can seem daunting, but hopefully, with this tutorial, you’ll feel more confident to tackle this project yourself. Once you’re finished, let me know which method you chose and what you thought!
And if you found this post helpful, please share!