
How to Install Peel and Stick Wallpaper
I've removed my fair share of wallpaper. In fact, I removed an entire house full of wallpaper at our last place, and I've even removed some in this house too! And let me tell you, it's a huge pain. You'd probably think at this point I loathe wallpaper, but surprisingly that’s not the case at all.
Hang Peel and Stick Wallpaper
I've removed my fair share of wallpaper. In fact, I removed an entire house full of wallpaper at our last place, and I've even removed some in this house too! And let me tell you, it's a huge pain. You'd probably think at this point I loathe wallpaper, but surprisingly that’s not the case at all.
I freaking love wallpaper!
As you may have been able to tell from the Sharpie wall I drew in my office, I love patterns in general. Heck, I've even been working to incorporate more patterns into my paintings! I can't get enough. And there are countless patterns and designs available for wallpaper.
Why I Decided to Install Wallpaper
After I've suffered through hours and hours of removing wallpaper, what in the world would make me want to potentially subject the future owner of my home into doing the same thing? Four words: peel and stick wallpaper.
Peel and stick wallpaper is a huge game changer! While traditional wallpaper I'm sure has its benefits, after installing peel and stick wallpaper, I can't imagine trying to install traditional wallpaper by myself. And I can't justify the likelihood of some other poor soul potentially having to remove it. But peel and stick wallpaper is not only super forgiving during installation - it's easily removable down the line! Win-win!
So one day, a friend texted me to ask my thoughts on leaving the doors off her pantry and installing wallpaper inside. I immediately egged her on to do it and to use a bold and bright pattern. I mean, a pantry is a small space that a bright and fun pattern wouldn't be too overwhelming. And then I went to bed… but my mind didn't. It was dreaming about wallpaper.
The next day I knew I had to find a place to install some of my own. I immediately knew my master closet would be perfect for my first try with wallpaper. It’s a space where I can enjoy it every day and not even have to take into consideration whether anyone else in my family likes it. Perfection.
As I previously shared, we built my master closet to be LARGE. I want to be able to get ready in here in the morning without waking up my husband. It's like its own little room. So why not make it a bit of an oasis?
As an Amazon Associate, I earn from qualifying purchases. This post may contain affiliate links, meaning I receive commissions for purchases made through those links, at no cost to you.
Choosing the Perfect Paper
Typically when I make a purchase I take my tiiiime. I mull it over. I pin tons of options and compare. Then I read the reviews and compare some more. Then I’ll usually put it in my cart and wait a few days before actually making the purchase because apparently, I have commitment issues. It’s a process.
But picking a wallpaper was a shockingly easy decision. I immediately knew I wanted this one:
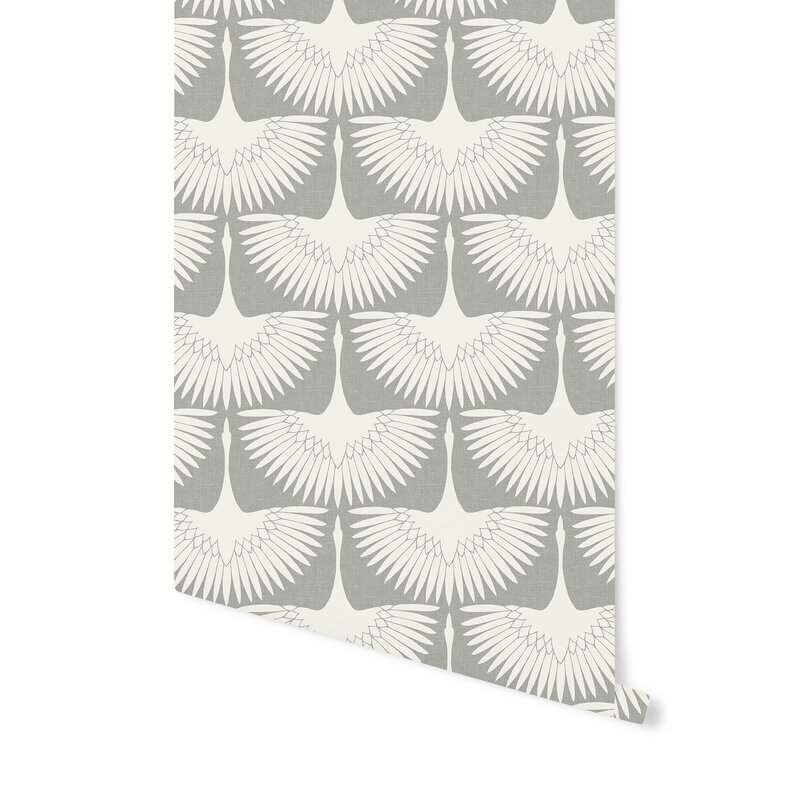
It's a pattern I've been swooning over forever. It feels soothing, yet dynamic. I love the soft tones and how the pattern almost turns the birds into abstraction when you look at a wall full of them. Plus, I figured, hey, it’s a small space that only I’ll see most of the time, why not take my own advice and go bold? So I measured my walls to figure out how much I needed and ordered it!
I didn't waste any time and installed it the day after it was delivered. Here's how to install your own:
Materials

- Step stool
- Level
- Pencil
- Exacto knife or box cutter
- Measuring tape
- Cutting pad
- Squeegee (or an old gift card if you’re me)
- Wallpaper!
Read the Directions!
First thing's first, read the directions before installing your wallpaper. Some designs require overlap between panels for the design to match up, or they may have other special instructions.
I'm not sure if this is standard, but the instructions on my wallpaper advised me to install the paper on a semi-gloss surface. So the day before I wallpapered, I threw a coat of leftover semi-gloss white paint onto the wall I was applying my wallpaper to (it was previously only primed).
Prep Your Panels

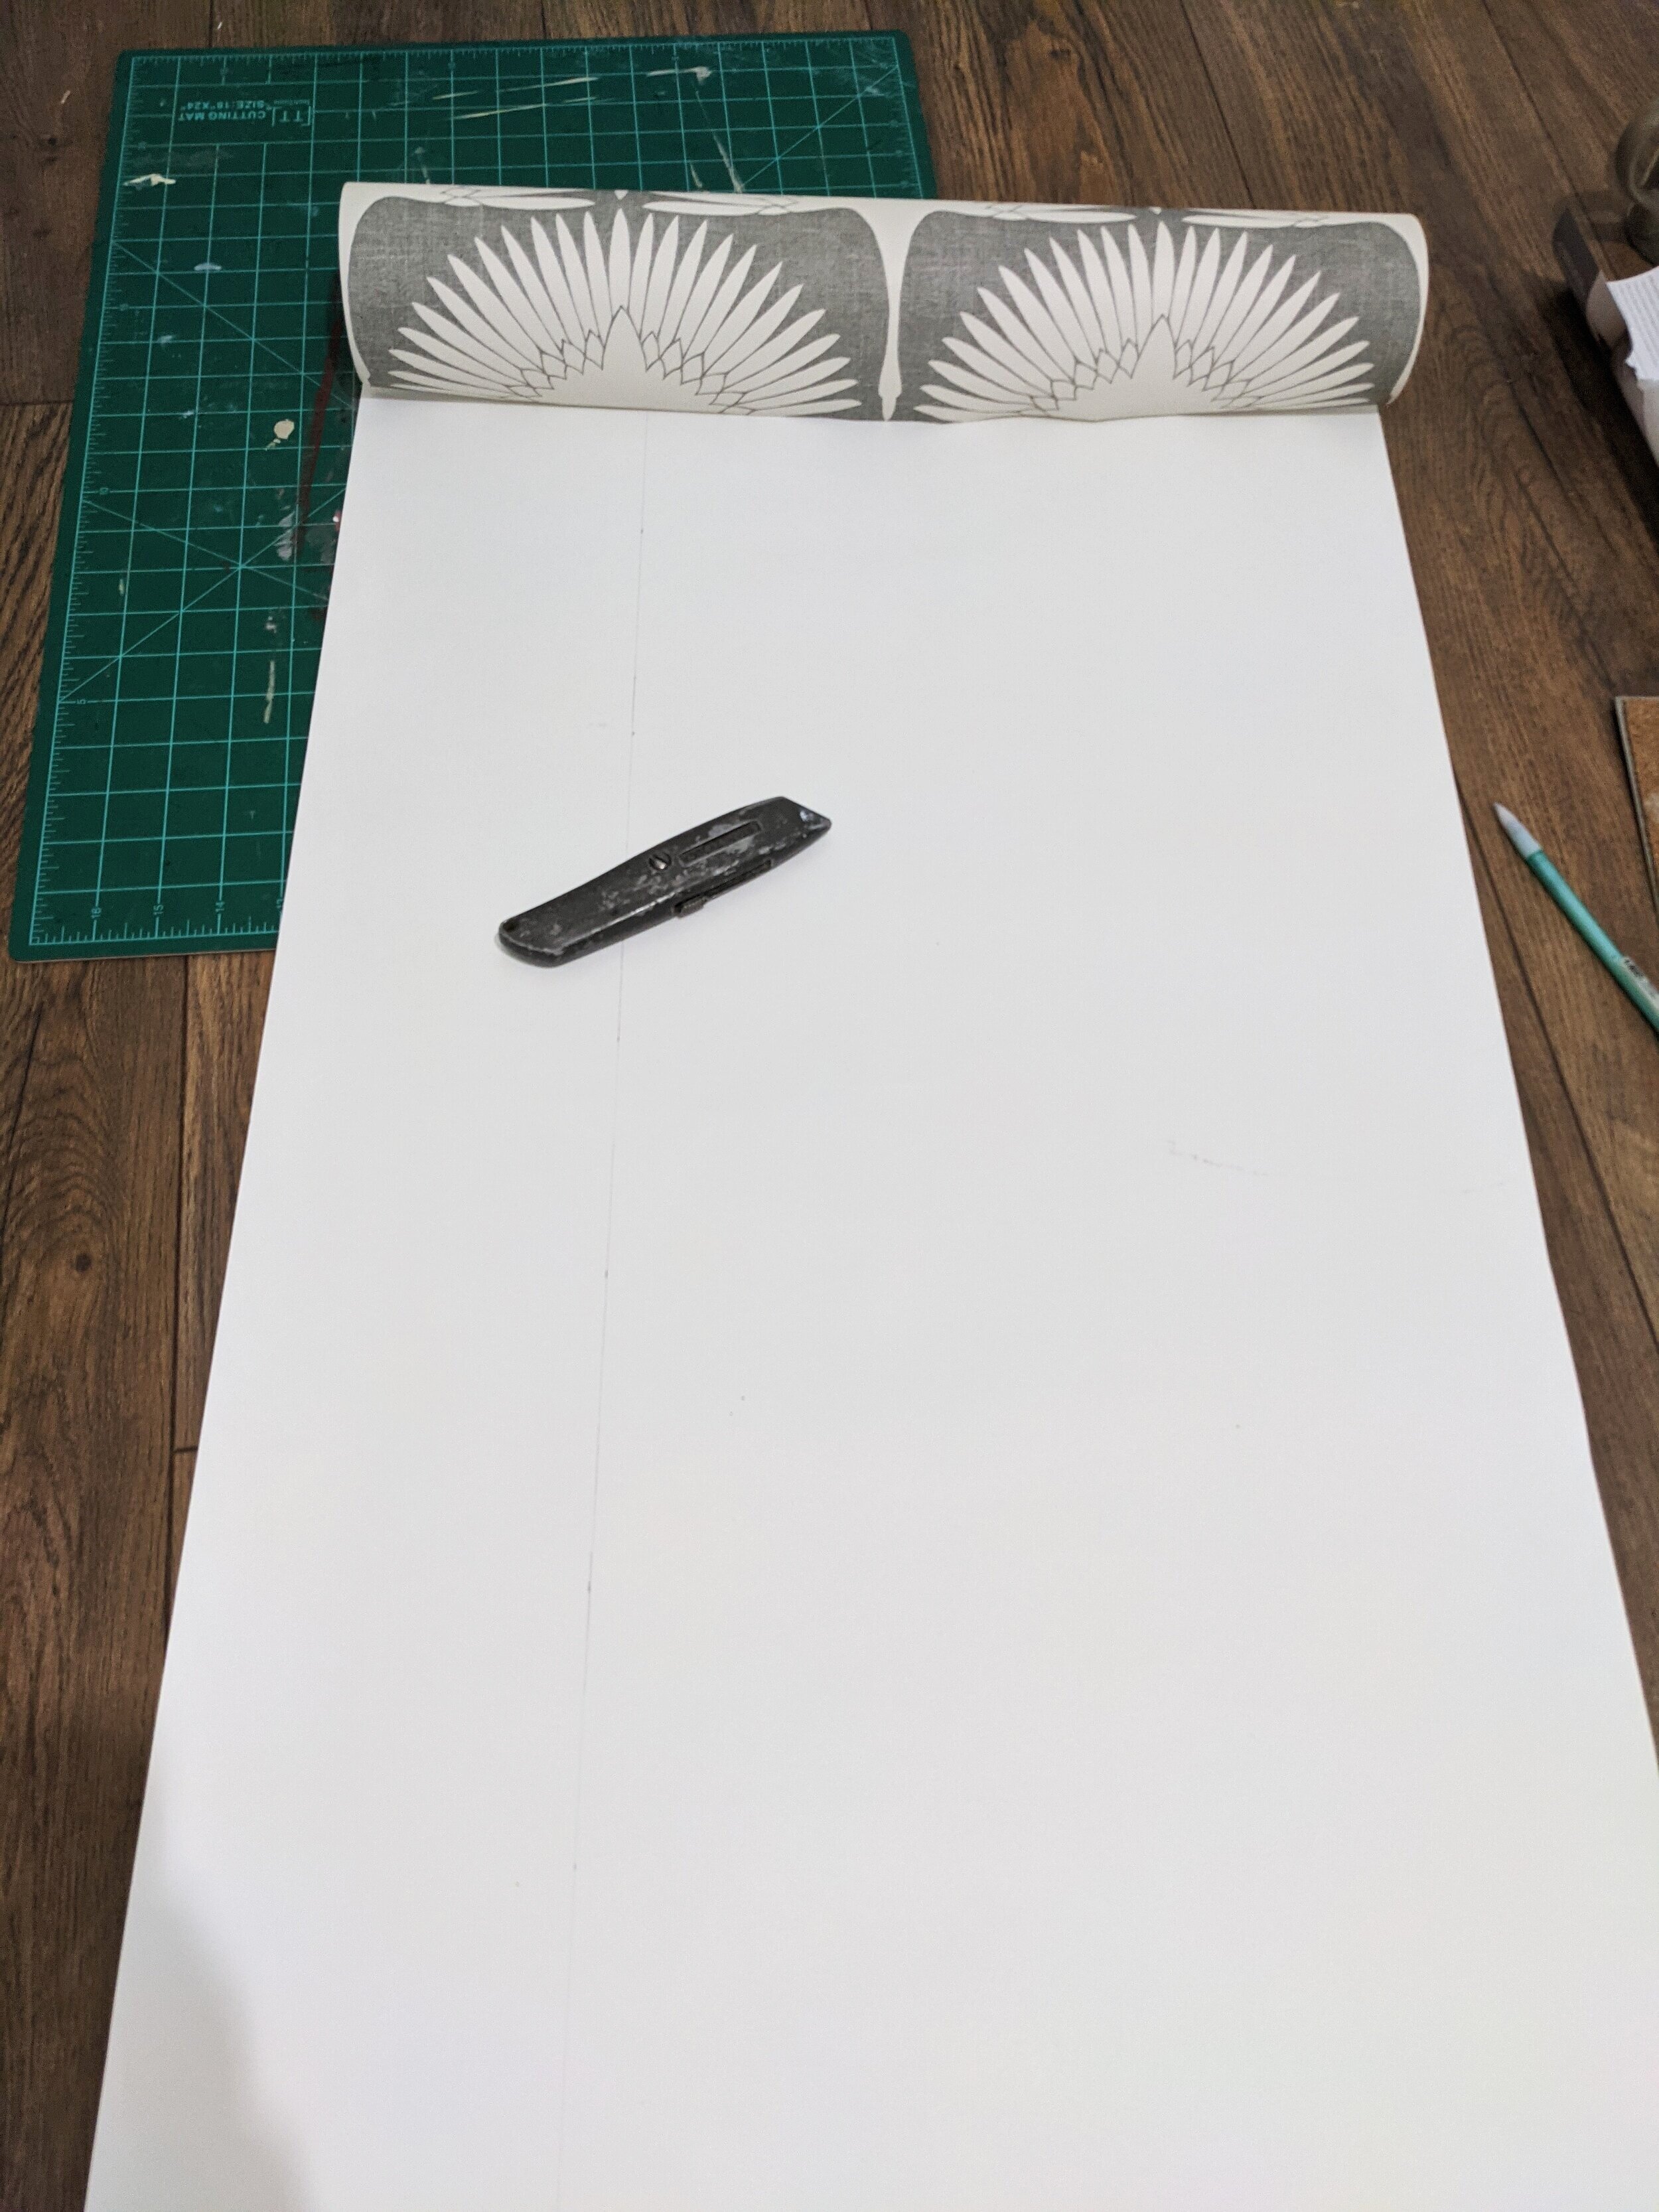
When you're ready to wallpaper, you'll first need to cut your panels down to size by measuring the height of the wall and leaving a couple of inches for wiggle room. It's suggested to cut all your panels before you start the installation, and to match up the design from panel to panel on the floor as you go and number the panels on the back.
Draw a Plumb Line
I rarely dive into a project head-first, and this was no exception. A lot of tutorials I read before wallpapering my closet suggested starting at the top left-hand corner of the wall. But because my closet has an angled wall on the left-hand side, I felt more comfortable starting on the top right. I'm not sure if it makes a difference with other designs - I didn't have any issues starting on the right.
Either way, measure the width of your wallpaper. From whichever side of the wall you'll start hanging it from, mark how far out your first panel will hang. Using your level and your mark, draw a vertical line from the top to the bottom of the wall.
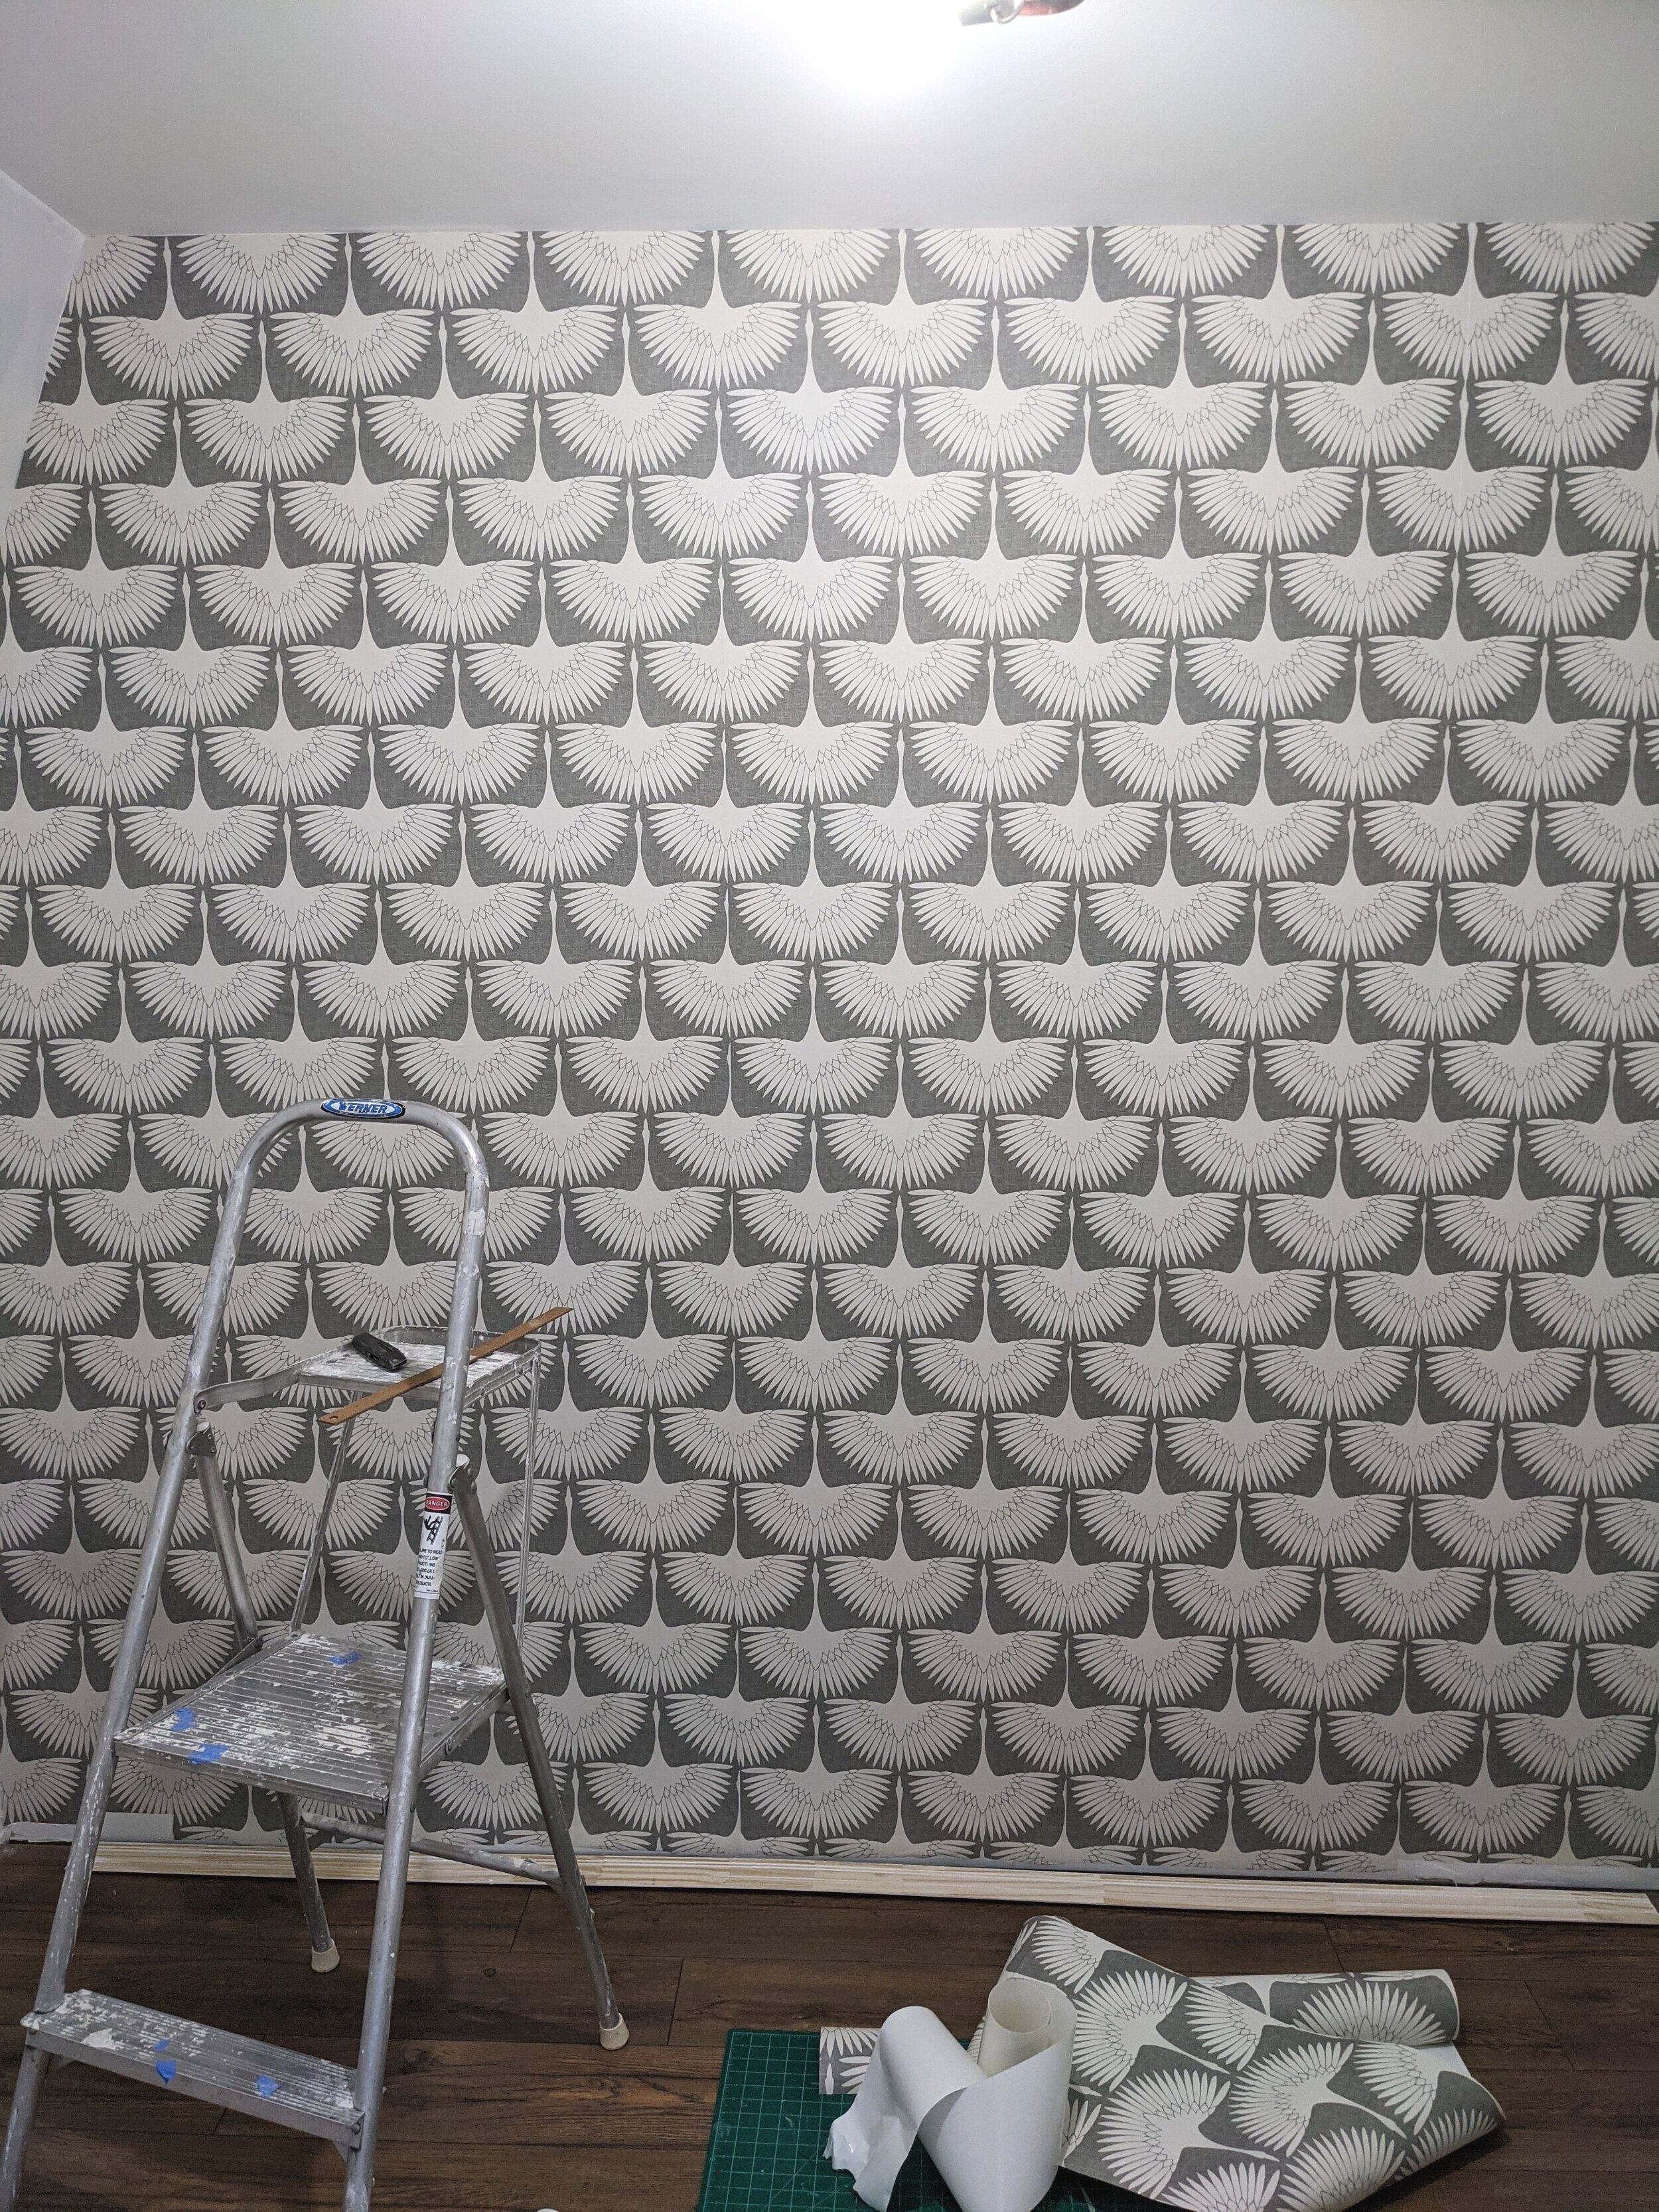
Hang Your Wallpaper
Grab your first panel and try to line it up as best as you can with the vertical line you just drew. Walls are rarely straight, so this line helps ensure the pattern on your design doesn't go completely haywire by the last panel. This being said, it's also not a bad idea to let a little bit of the wallpaper wrap onto the ceiling too. Don't worry - you'll cut off any excess later.
Peel back about 12-18 inches or so of the backing and carefully stick your wallpaper to the wall.

Using your squeegee (or in my case, an old gift card - which worked just fine!) as you apply the wallpaper, push out any bubbles to the edge of the paper. Continue peeling off the backing and squeegeeing out the bubbles until you get to the end of your panel.

If you start to notice that your panel isn't lining up with your guideline, simply peel it off and reapply! The earlier you do this while applying the panel, the better. It's much easier to work with a small area that is missing the backing than a large area that wants to stick to literally everything it touches (including itself).

Once you get to the bottom of the wall, carefully use your Exacto knife to trim off the excess wallpaper. You can trim off any overhang on the ceiling or adjoining walls (if you're only doing an accent wall) at this point as well.
Next, line up your second panel and follow the same steps, being careful to pay close attention to how the pattern is matching up.
Finishing Up
For my last panel, I only had about 6 inches of wall space to cover. I figured it would get a little hairy if I tried to use the entire width of the panel and them trim off the overhang because there would be so much. So before I applied my last panel, I cut it closer to the size I needed it, leaving a little extra in case the wall wasn't entirely square (it wasn't).
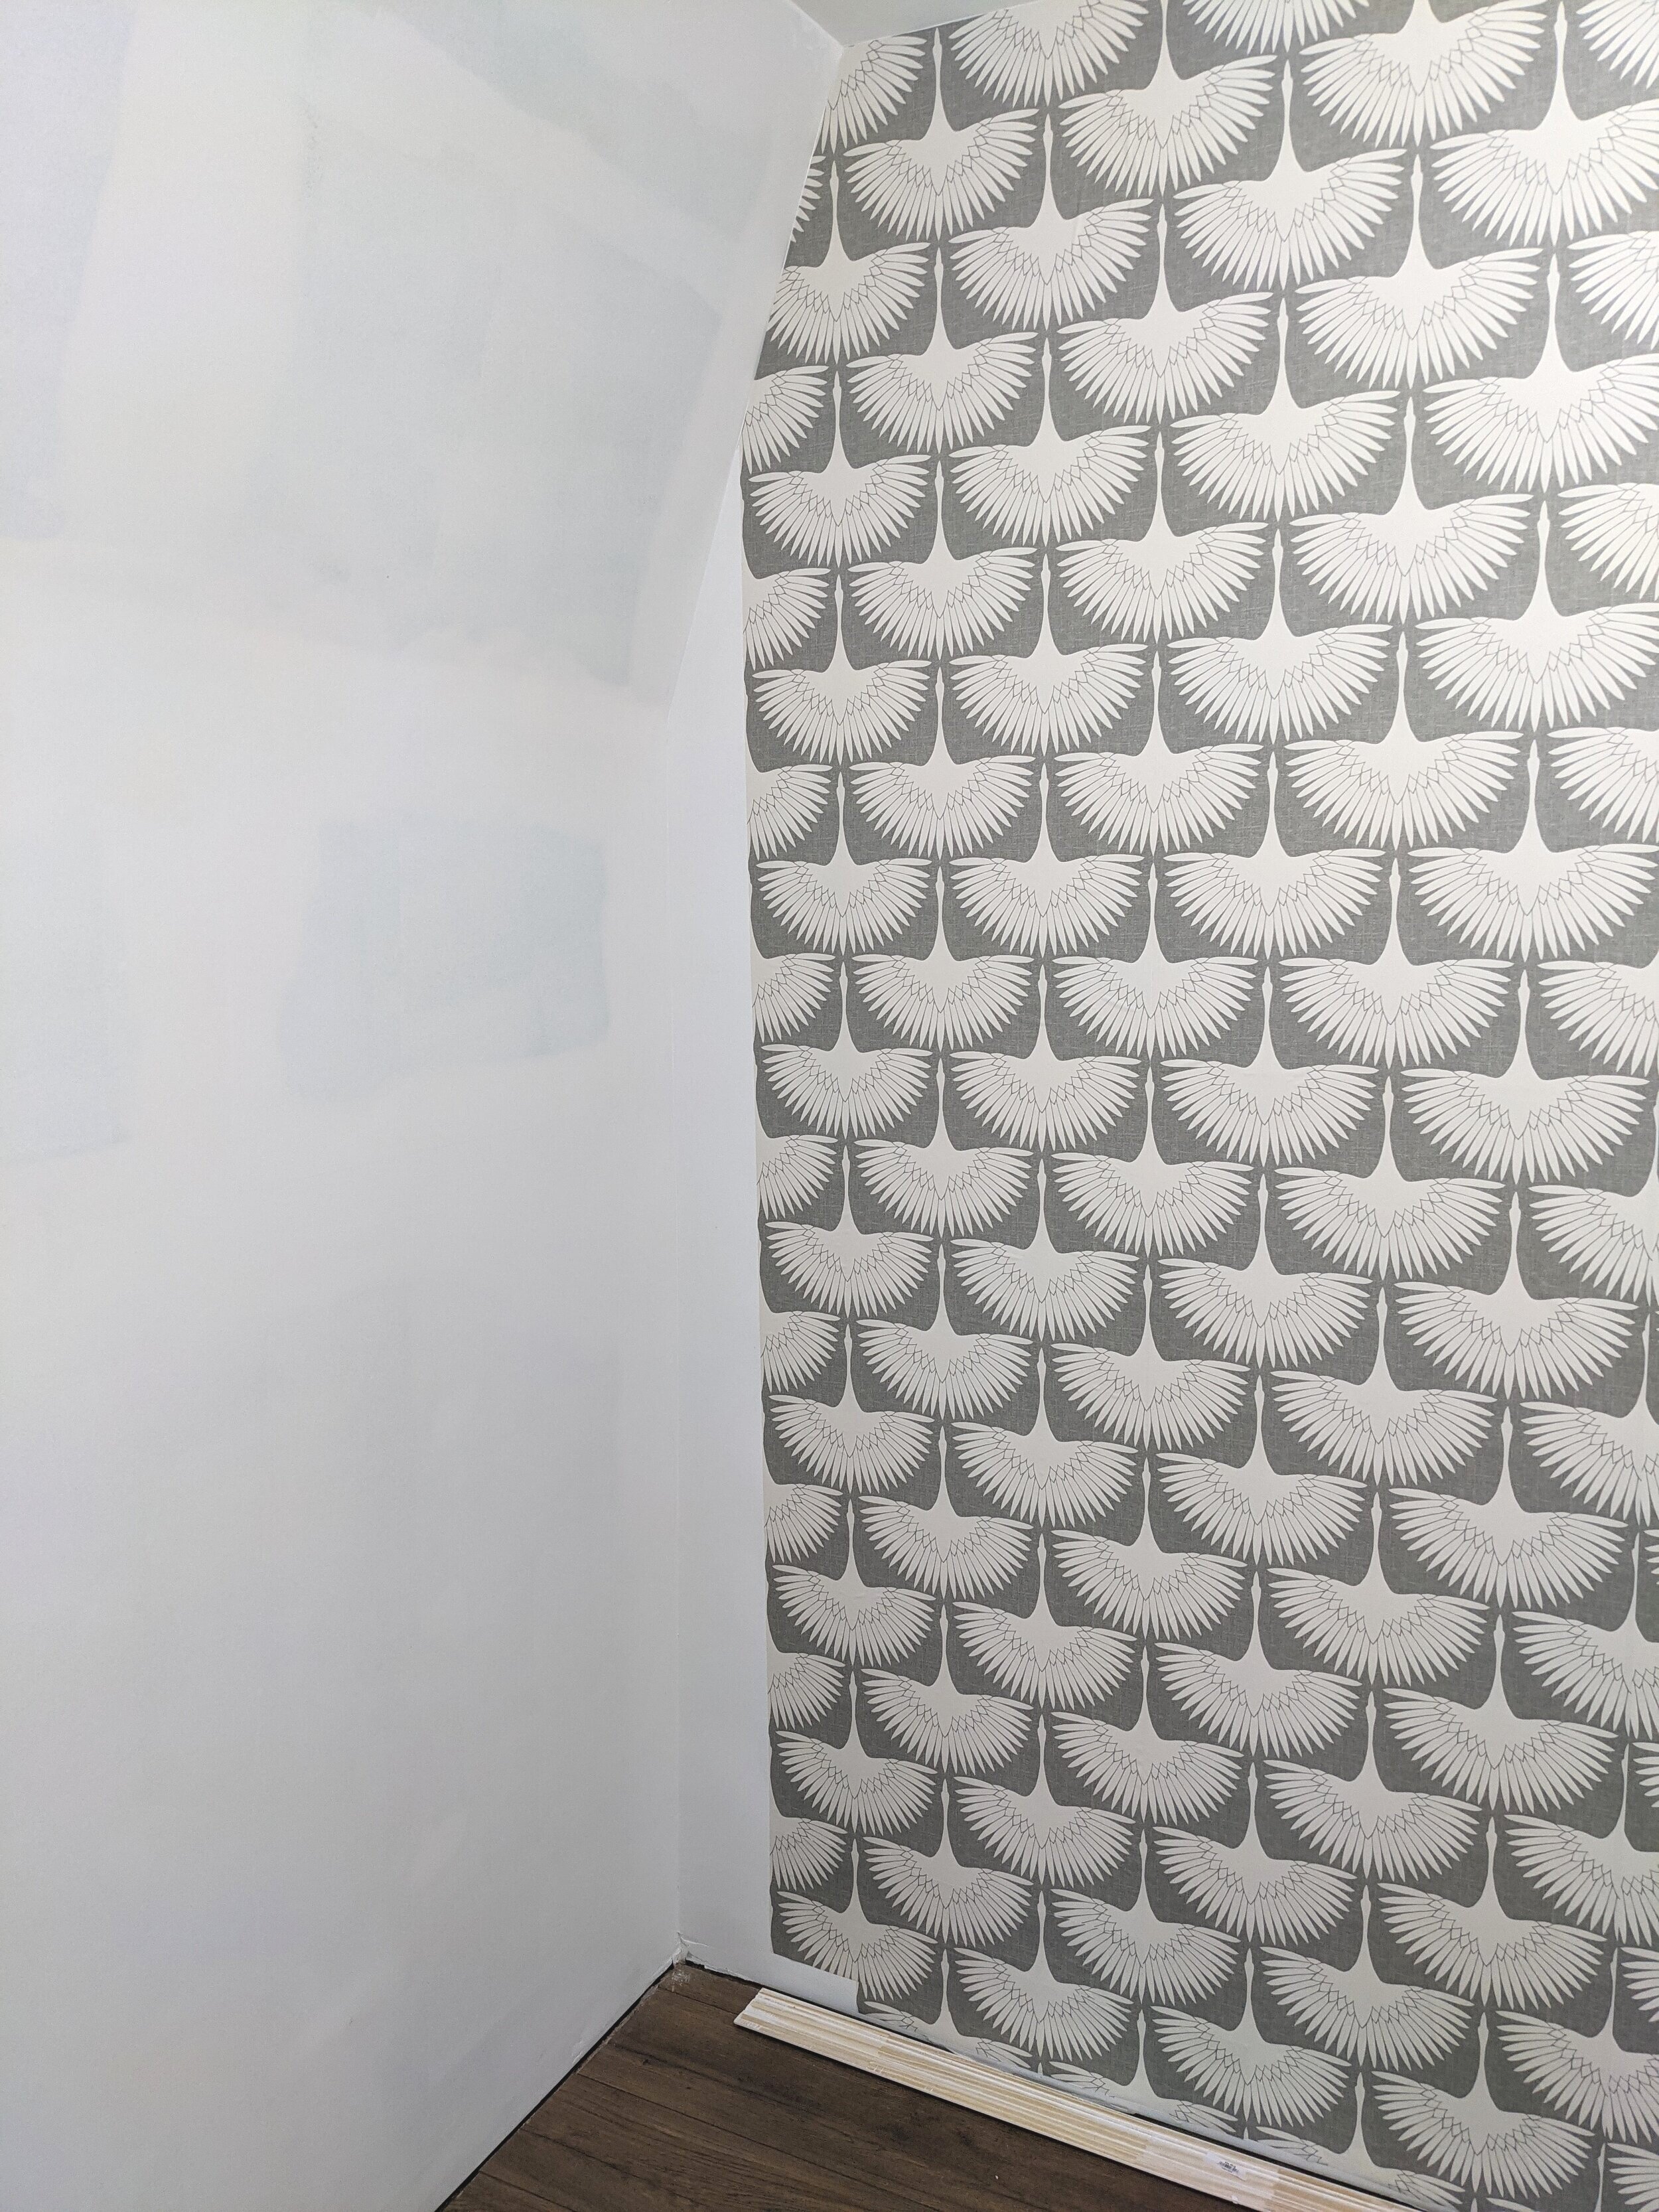
Since this is where the adjoining wall angles, I was especially concerned I would mess this panel up, but it was easier than I expected! I just took it slow and cut the backing off as I removed it so it didn’t get in the way.
Admire Your Work
Now that your wallpaper installation is complete, stand back and take it all in! You deserve it.
Final Thoughts
While hanging wallpaper wasn’t necessarily easy, it was an easy enough project for me to be completely willing to attempt it again. The payoff of seeing that beautiful design and creating a more interesting and dynamic space is totally worth it. Though I did learn some things along the way that I summarized for you below.
Tips for Installing Wallpaper
Start Small
While peel and stick wallpaper is forgiving, it's still not an easy job! I recommend sticking to a small surface area if you're a newbie wallpaperer until you can get the hang of it.
Choose a Forgiving Pattern
I didn't realize how tricky my pattern would be to line up from panel to panel. I love how it turned out, and I think any imperfections will be hidden, but if I knew then what I know now, I would choose a more abstract and less grid-like pattern for my first wallpapering extravaganza.
Know How Long Each Roll of Wallpaper Is
Make sure you know how long each roll of wallpaper is before you start cutting your panels. I didn't realize that one roll of mine was only enough for two panels. Luckily this didn't become an issue, but I cut it verrrrry close. (Get it!?)
Grab an Extra Pair of Hands
If you have someone to help you, utilize them! I did this project by myself. And while I'm really happy with the outcome, there probably would have been fewer curse words if I had another pair of hands.

Related Master Closet Posts
How to Hang Removable Wallpaper
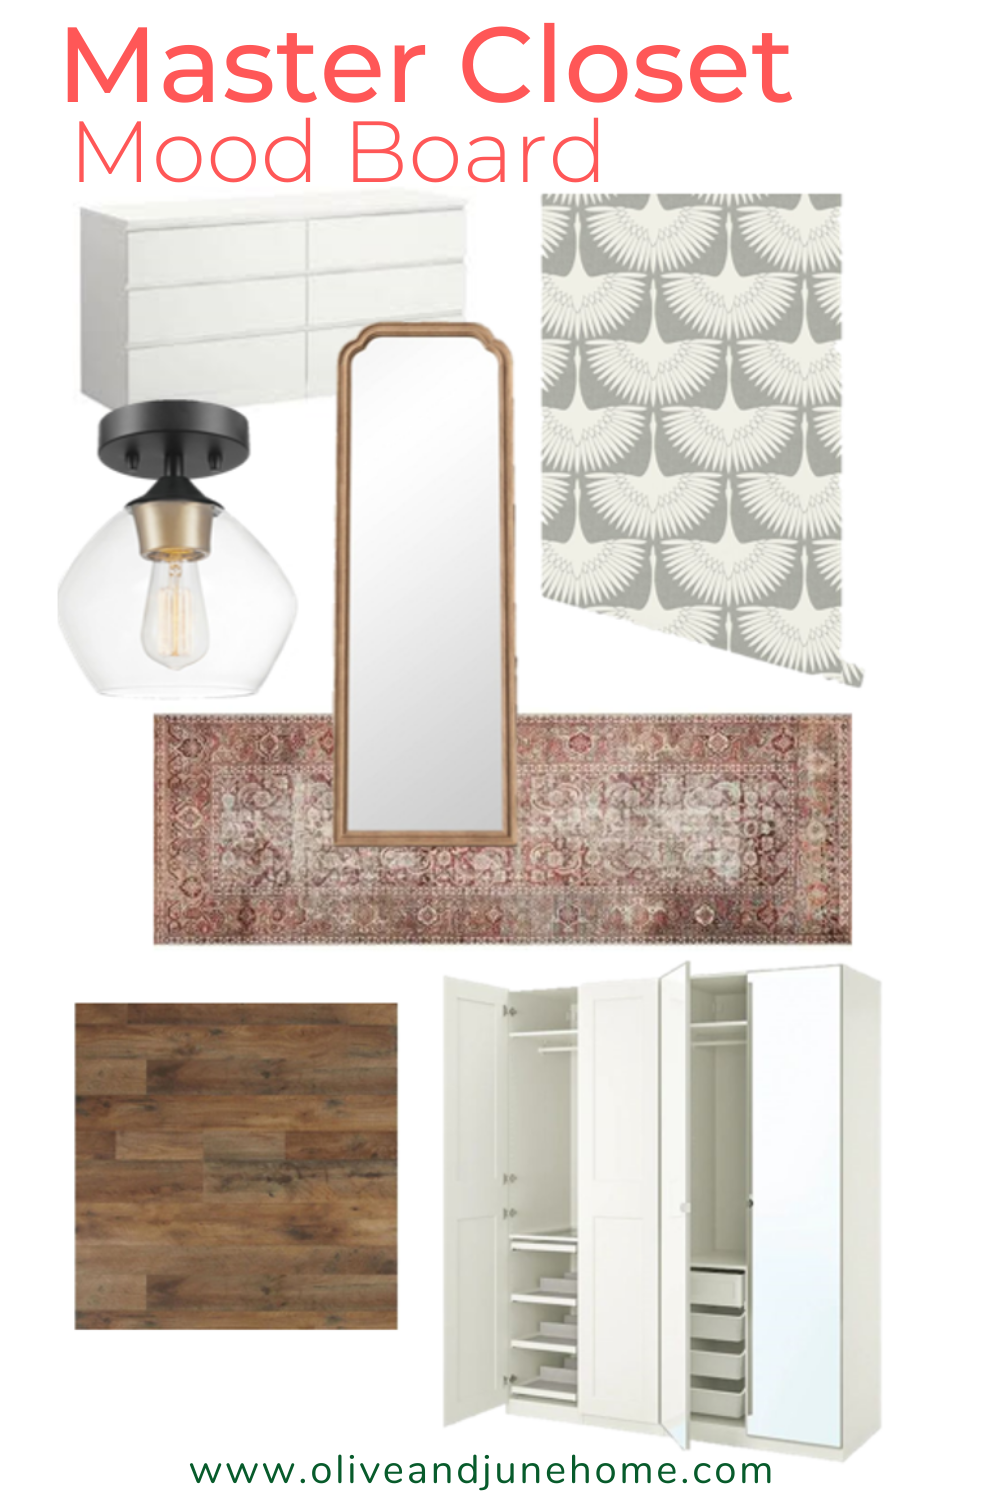
Master Closet Mood Board
We built my master closet with the intent that it would be like its own little room inside of our bedroom. So of course, since I have this little space that is truly all my own, I'm going all out and REALLY making it my own. Which is why I created a mood board to plan out the entire design of my closet. (Also, I love mood boards.)
Master Closet Mood Board
You may not think that you need an entire design scheme for a master closet. But you'd be wrong.

Just kidding! To each his own. BUT on that note… we built my master closet with the intent that it would be like its own little room inside of our bedroom. My goal is to use that space to get dressed in the morning without waking Lucius up by turning on a light or trying to get ready by fumbling around in the dark.
And yes, you read that right, MY master closet. Lucius has his own (much smaller and much less exciting) closet.
So of course, since I have this little space that is truly all my own, I'm going all out and REALLY making it my own. Which is why I created a mood board to plan out the entire design of my closet. (Also, I love mood boards.)


So while mine may not be quite at the level as some of the spaces I've been fawning over, it'll be perfect for me. Here are my plans.
Accent Wall
As an Amazon Associate, I earn from qualifying purchases. This post may contain affiliate links, meaning I receive commissions for purchases made through those links, at no cost to you.

I decided to put an accent wall in my closet because, why not? And I'm head over heels in love with it! The best part was that I didn't have to run the idea past anyone else before diving right in. A tutorial is coming soon!
Storage
I really wanted to install floor-to-ceiling storage on either side of my closet like many of my inspiration pictures, but because of our roofline, the left side wall of my closet slopes in about 3/4 of the way up.
My new plan is to install an IKEA PAX system on the right-hand side of the closet and build it in to really look seamless. It won't be exactly like this example, but it'll be similar.

On the left-hand side of the closet, I plan on buying a white IKEA MALM dresser and putting a hanging rod above it.

With this layout, I should have more than enough storage and I think it'll make the best use of the space.
Paint
Because I want to build in the PAX system, and it already comes in white, I'm going to try to match the white as closely as possible and paint all the walls the same color.
Flooring
At this point, we've installed the flooring in the bedroom and carried it into the closets. It.is.beautiful! It's a gorgeously rich mid-tone that really grounds the space.

Rugs
But to make my closet really cozy, I've been researching runners like a madwoman. I mean, who wants to walk on a cold floor first thing in the morning? C'mon! I've narrowed it down to two runners.
I included this Chris Loves Julia x Loloi runner in my master bathroom mood board and I still can't stop thinking about it. I can really see it working in my closet too. There is a possibility that I'll buy the same rug for both spaces, but there's another contender that might just make the cut in the closet.

This runner also looks beautiful in the mood board. I'm having a really tough time making a decision, so I might just have to see each of them in the space and go from there.

As an aside, it's surprised me that I've been gravitating towards rugs with more red tones in them. I don't hate red, but it's just never been the color I've been most drawn to. But it seems like ever since I bought our bedroom rug, which has a lot of rust and orange in it, my tastes may be starting to shift.
Mirror

Of course, any good closet needs a full-length mirror! There were several that I considered, like this one and this one, but I kept coming back the one above.
I really like the natural wood tone and the softness of the curves at the top. I think it has a feminine touch that will go nicely against the wallpaper and either runner option.
Lighting
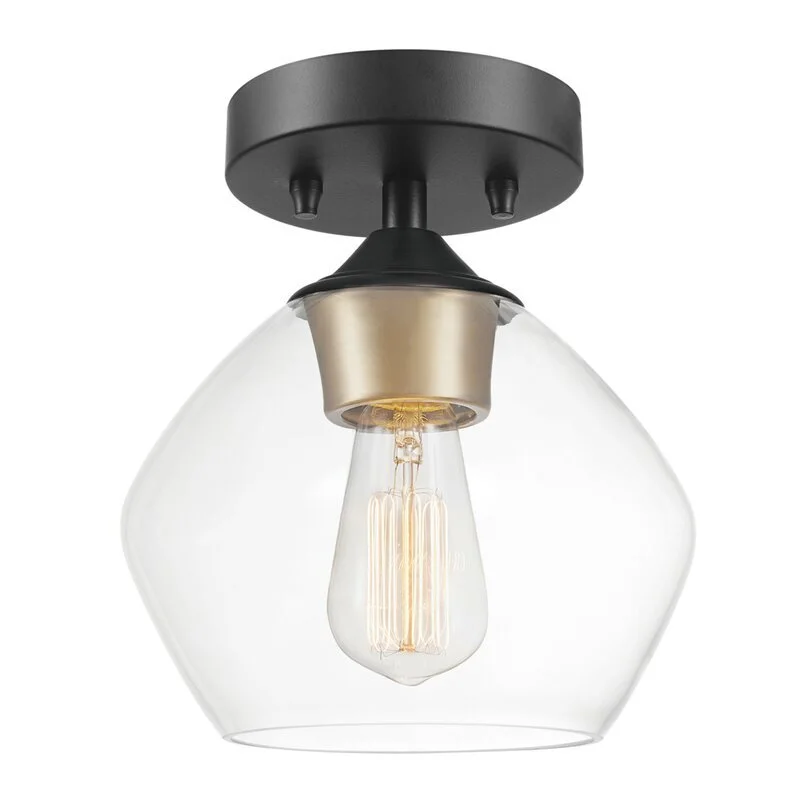
For now, I'm keeping the light fixture in here pretty simple. I snagged several of these lights from Amazon for my closet, Lucius' closet, the laundry room, and the hallway. I really like the two-toned metal and the shape of the glass. Plus, they were crazy affordable! I may splurge and get something nicer for my fancy pants closet later on, but for now, it'll do just fine.
Final Thoughts
So there you have it - who knew you needed a mood board for a closet, eh? (I'm starting to think I can find any excuse to make a mood board though.)
I'm really looking forward to finishing up my closet and getting my clothes off my office floor. Yes, since I moved my old dresser to the dining room and turned it into a buffet table, my clothes have been living on the floor of my office.
If that's not motivation to finish the closet, I don't know what is!
Related Moodboard Posts

Master Closet Moodboard
Easy Ways to Make Your Faux Plants Look Real
There’s no shame in incorporating fake plants into your decor BUT, you don’t necessarily want people to realize they’re fake. So in this post, I’ll share an easy DIY and some tips to help make your faux plants look real.
How to Make Fake Plants Look More Lifelike
Are you a proven plant killer? Maybe you’re just afraid to bring live plants into your home for fear of not being able to keep them alive. Perhaps you don’t want the responsibility. Or maybe, like me, you just want MORE plants and need some of them to be as low-key as it gets.
No matter your reasoning, there’s no shame in incorporating fake plants into your decor! BUT, you don’t necessarily want people to realize they’re fake. So in this post, I’ll share an easy DIY and some bonus tips to help make your faux plants look more realistic.
Believe it or not, a year ago, I only had two plants in my house. They were little succulents that I snagged from the park and potted to see if I could actually keep them alive. And they survived!
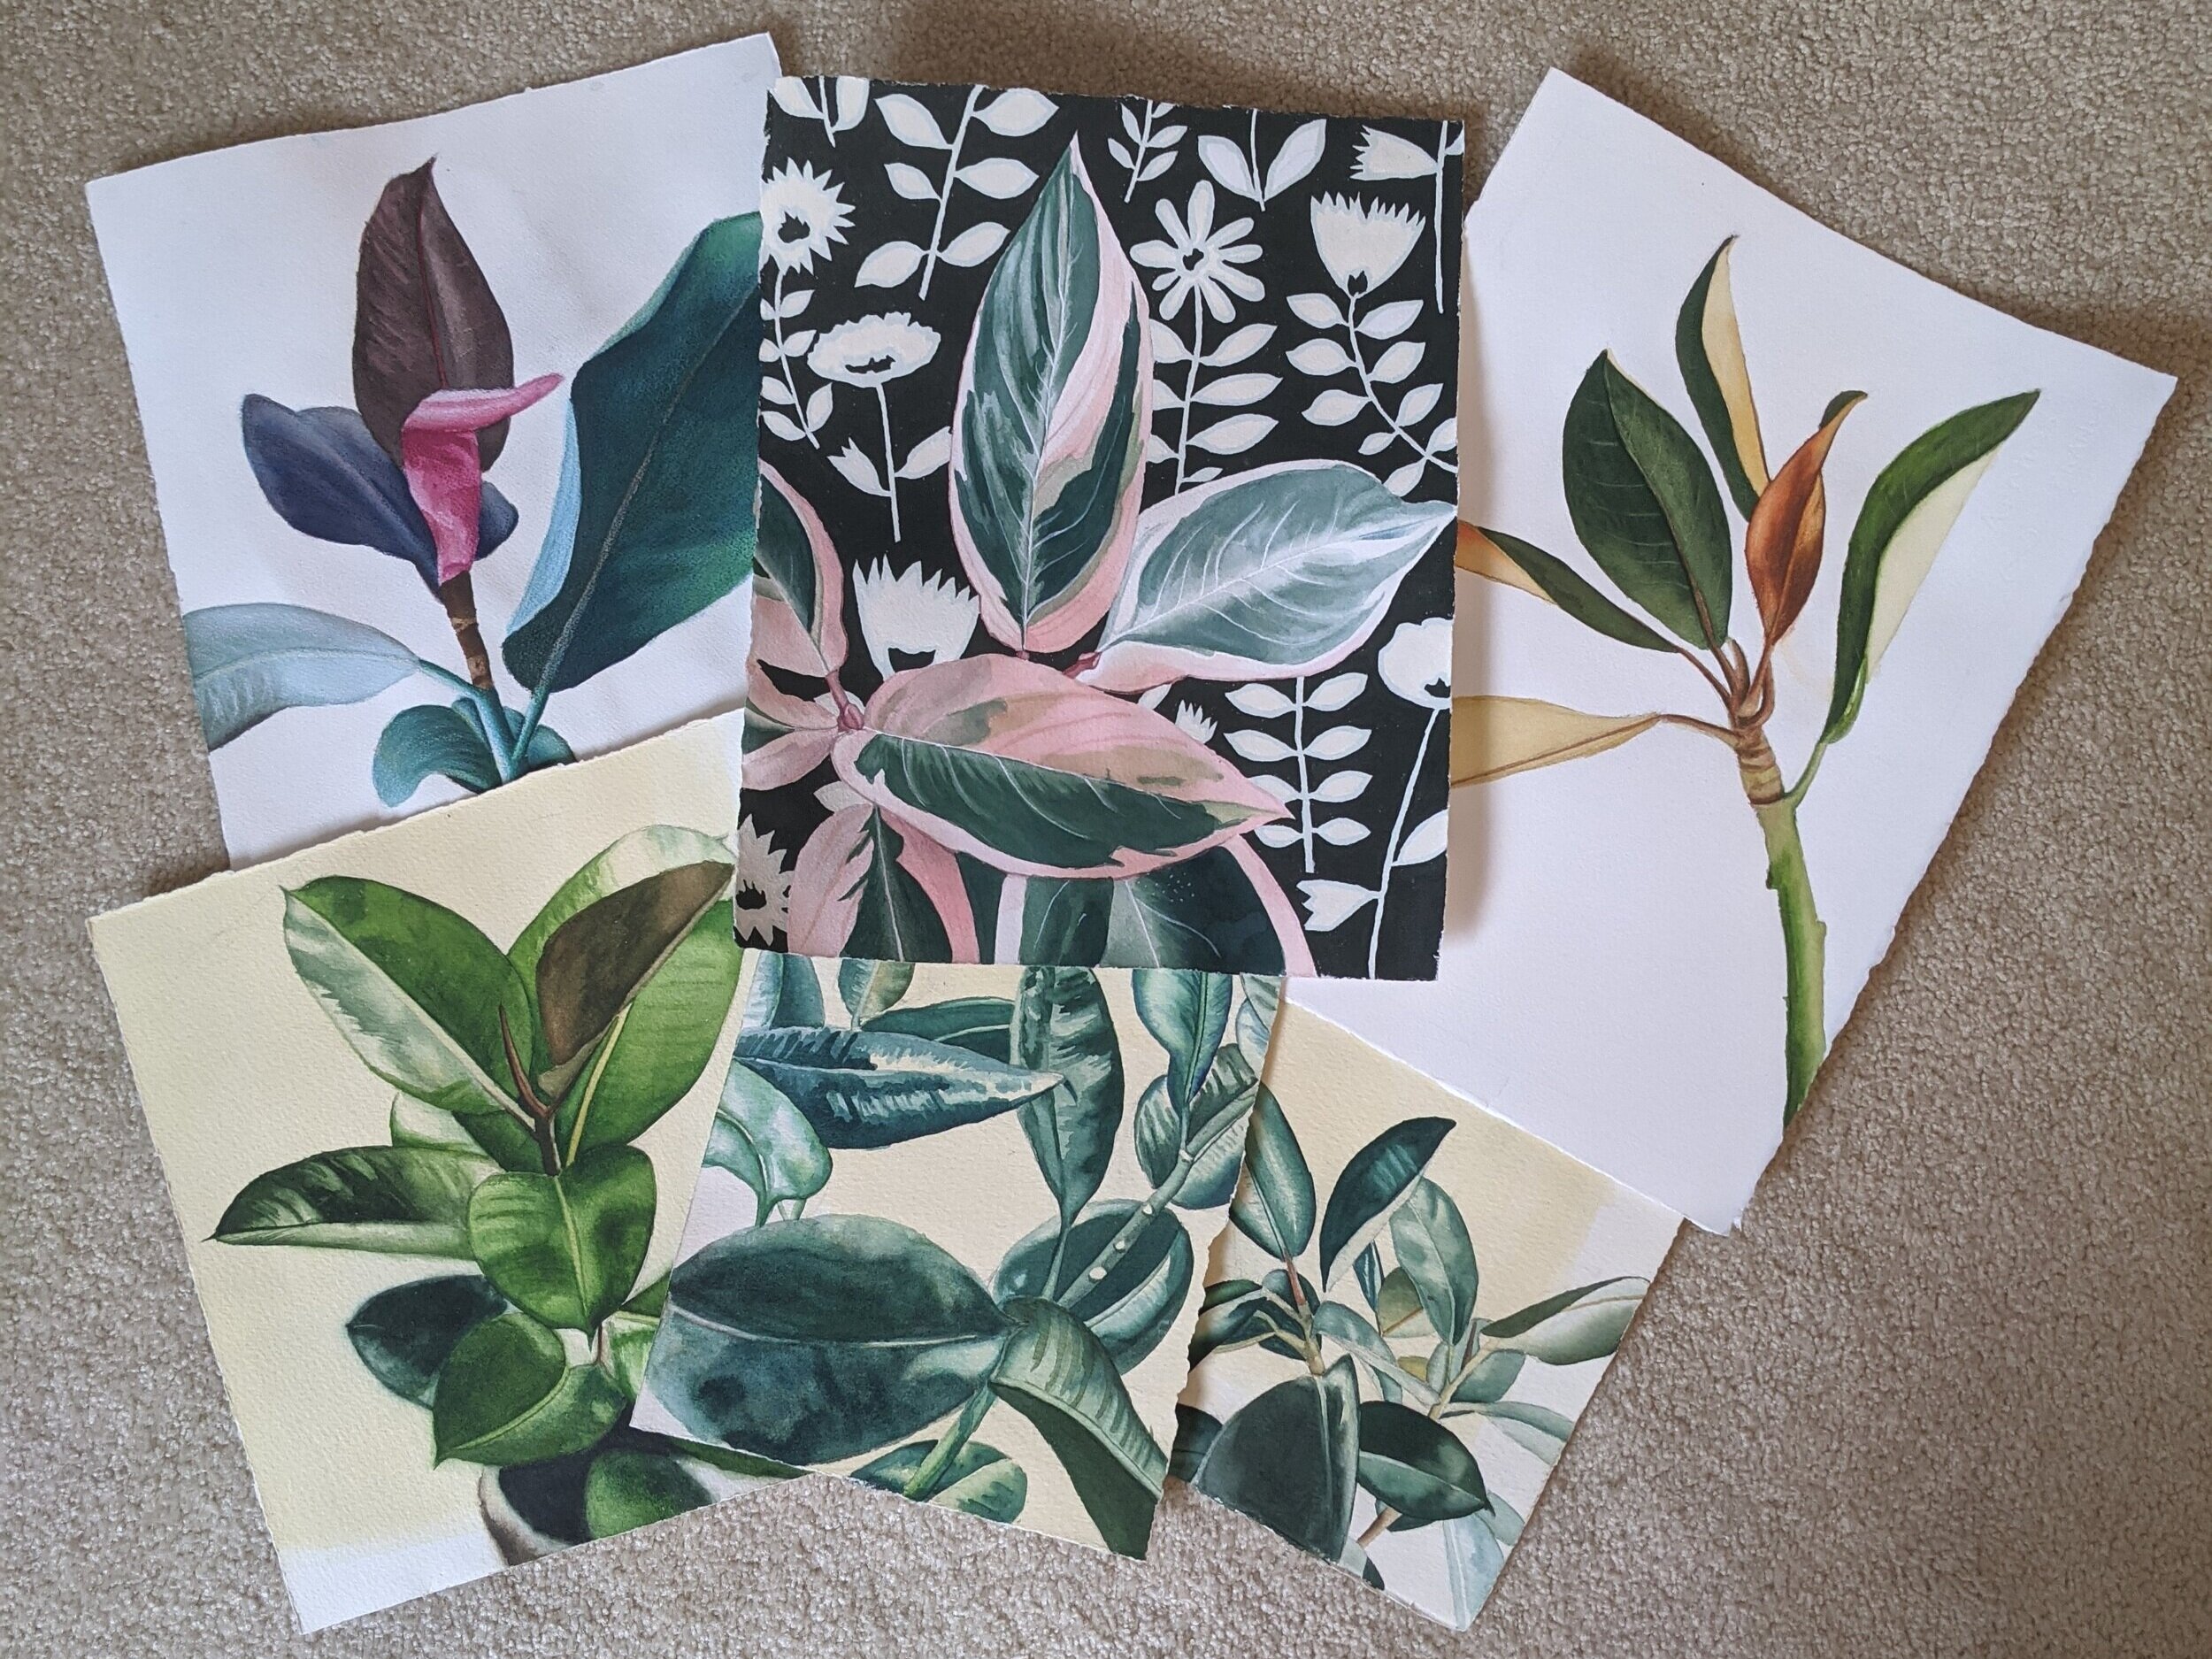
Since then, I’ve become OBSESSED with adding plants to my home (at this moment, I have 23!). Heck - I even enjoy painting plants! Not to mention my beautiful plants outside.
I didn’t realize how much my decor was missing by not having the splash of color and softness that plants can bring. But, there are simply some areas of my house that aren’t the best for plants to survive, not to mention that it can be a little stressful having loads and loads of plants to care for (“When did I water these ones last?” “Oh crap, did I just overwater them?” “Should this guy be repotted?” “Is this one happy on this shelf?”).
So what do you do when you want to add more plants, but don’t want to risk killing them? You go out and buy some faux plants!
(As an aside, there are countless places to buy faux plants. If you’re looking for a little help deciding where to buy some realistic-looking ones, Apartment Therapy has a couple of articles comparing faux fiddle leaf figs and snake plants from different companies.)
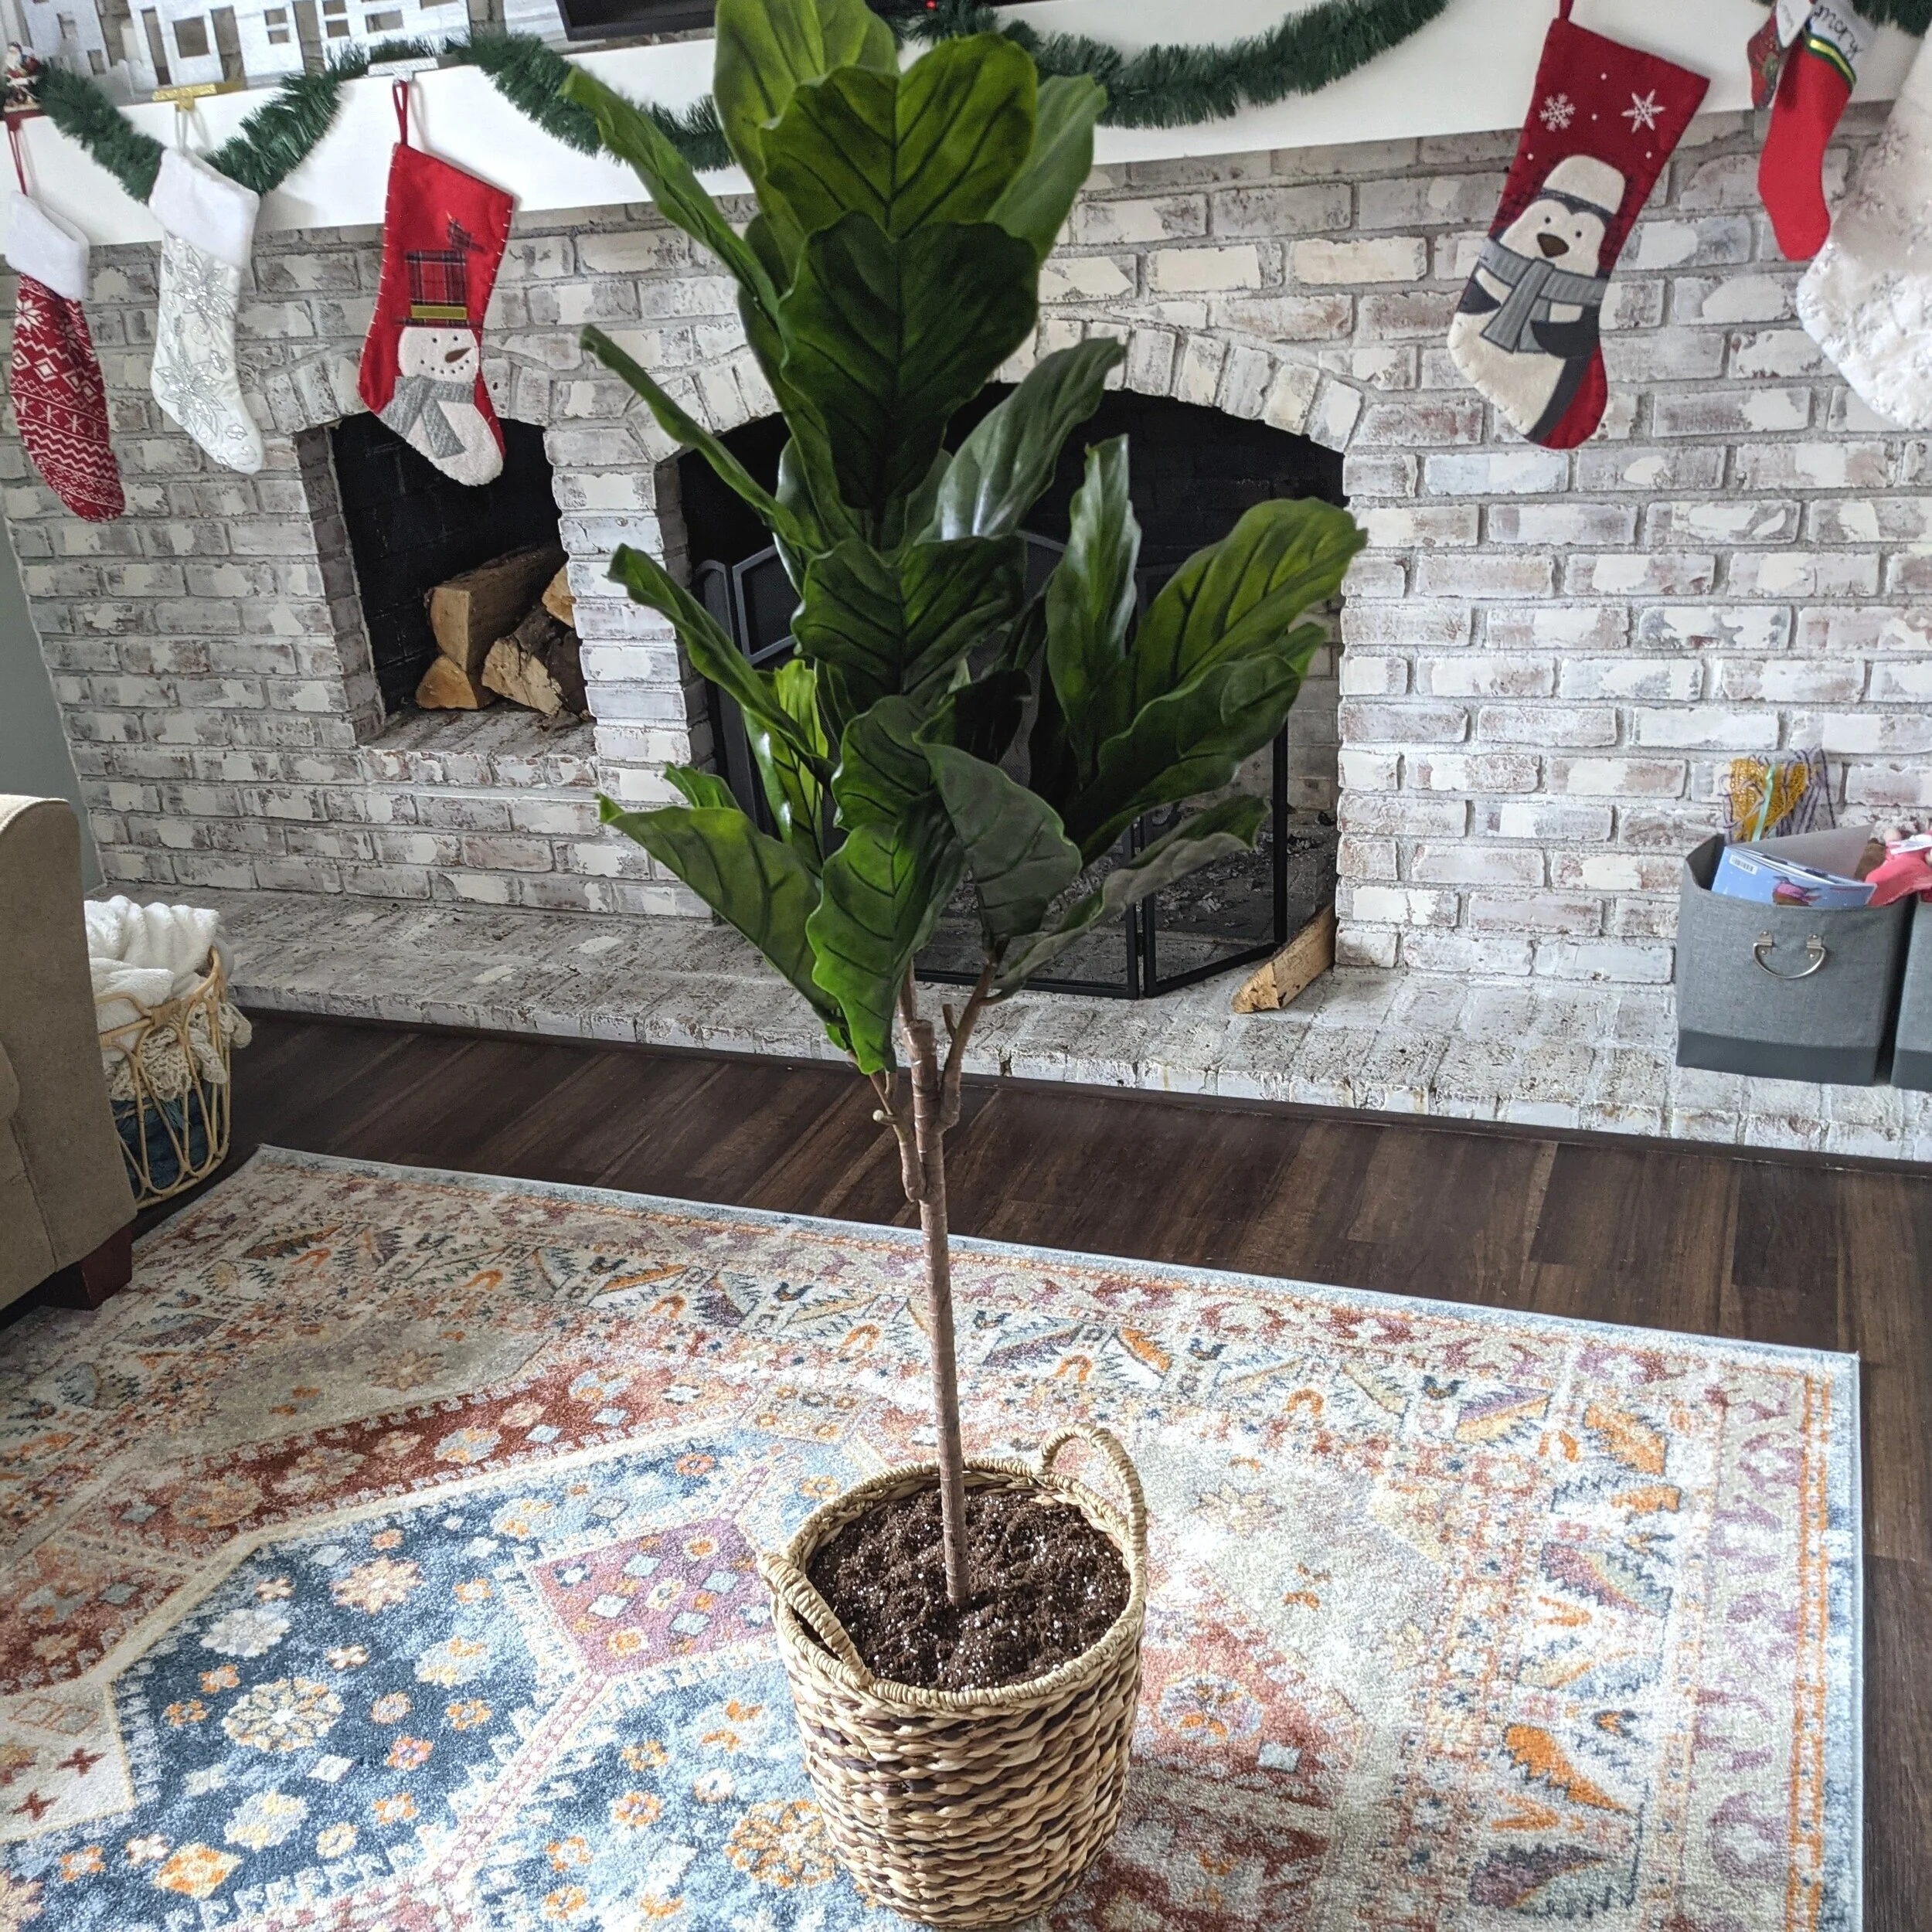
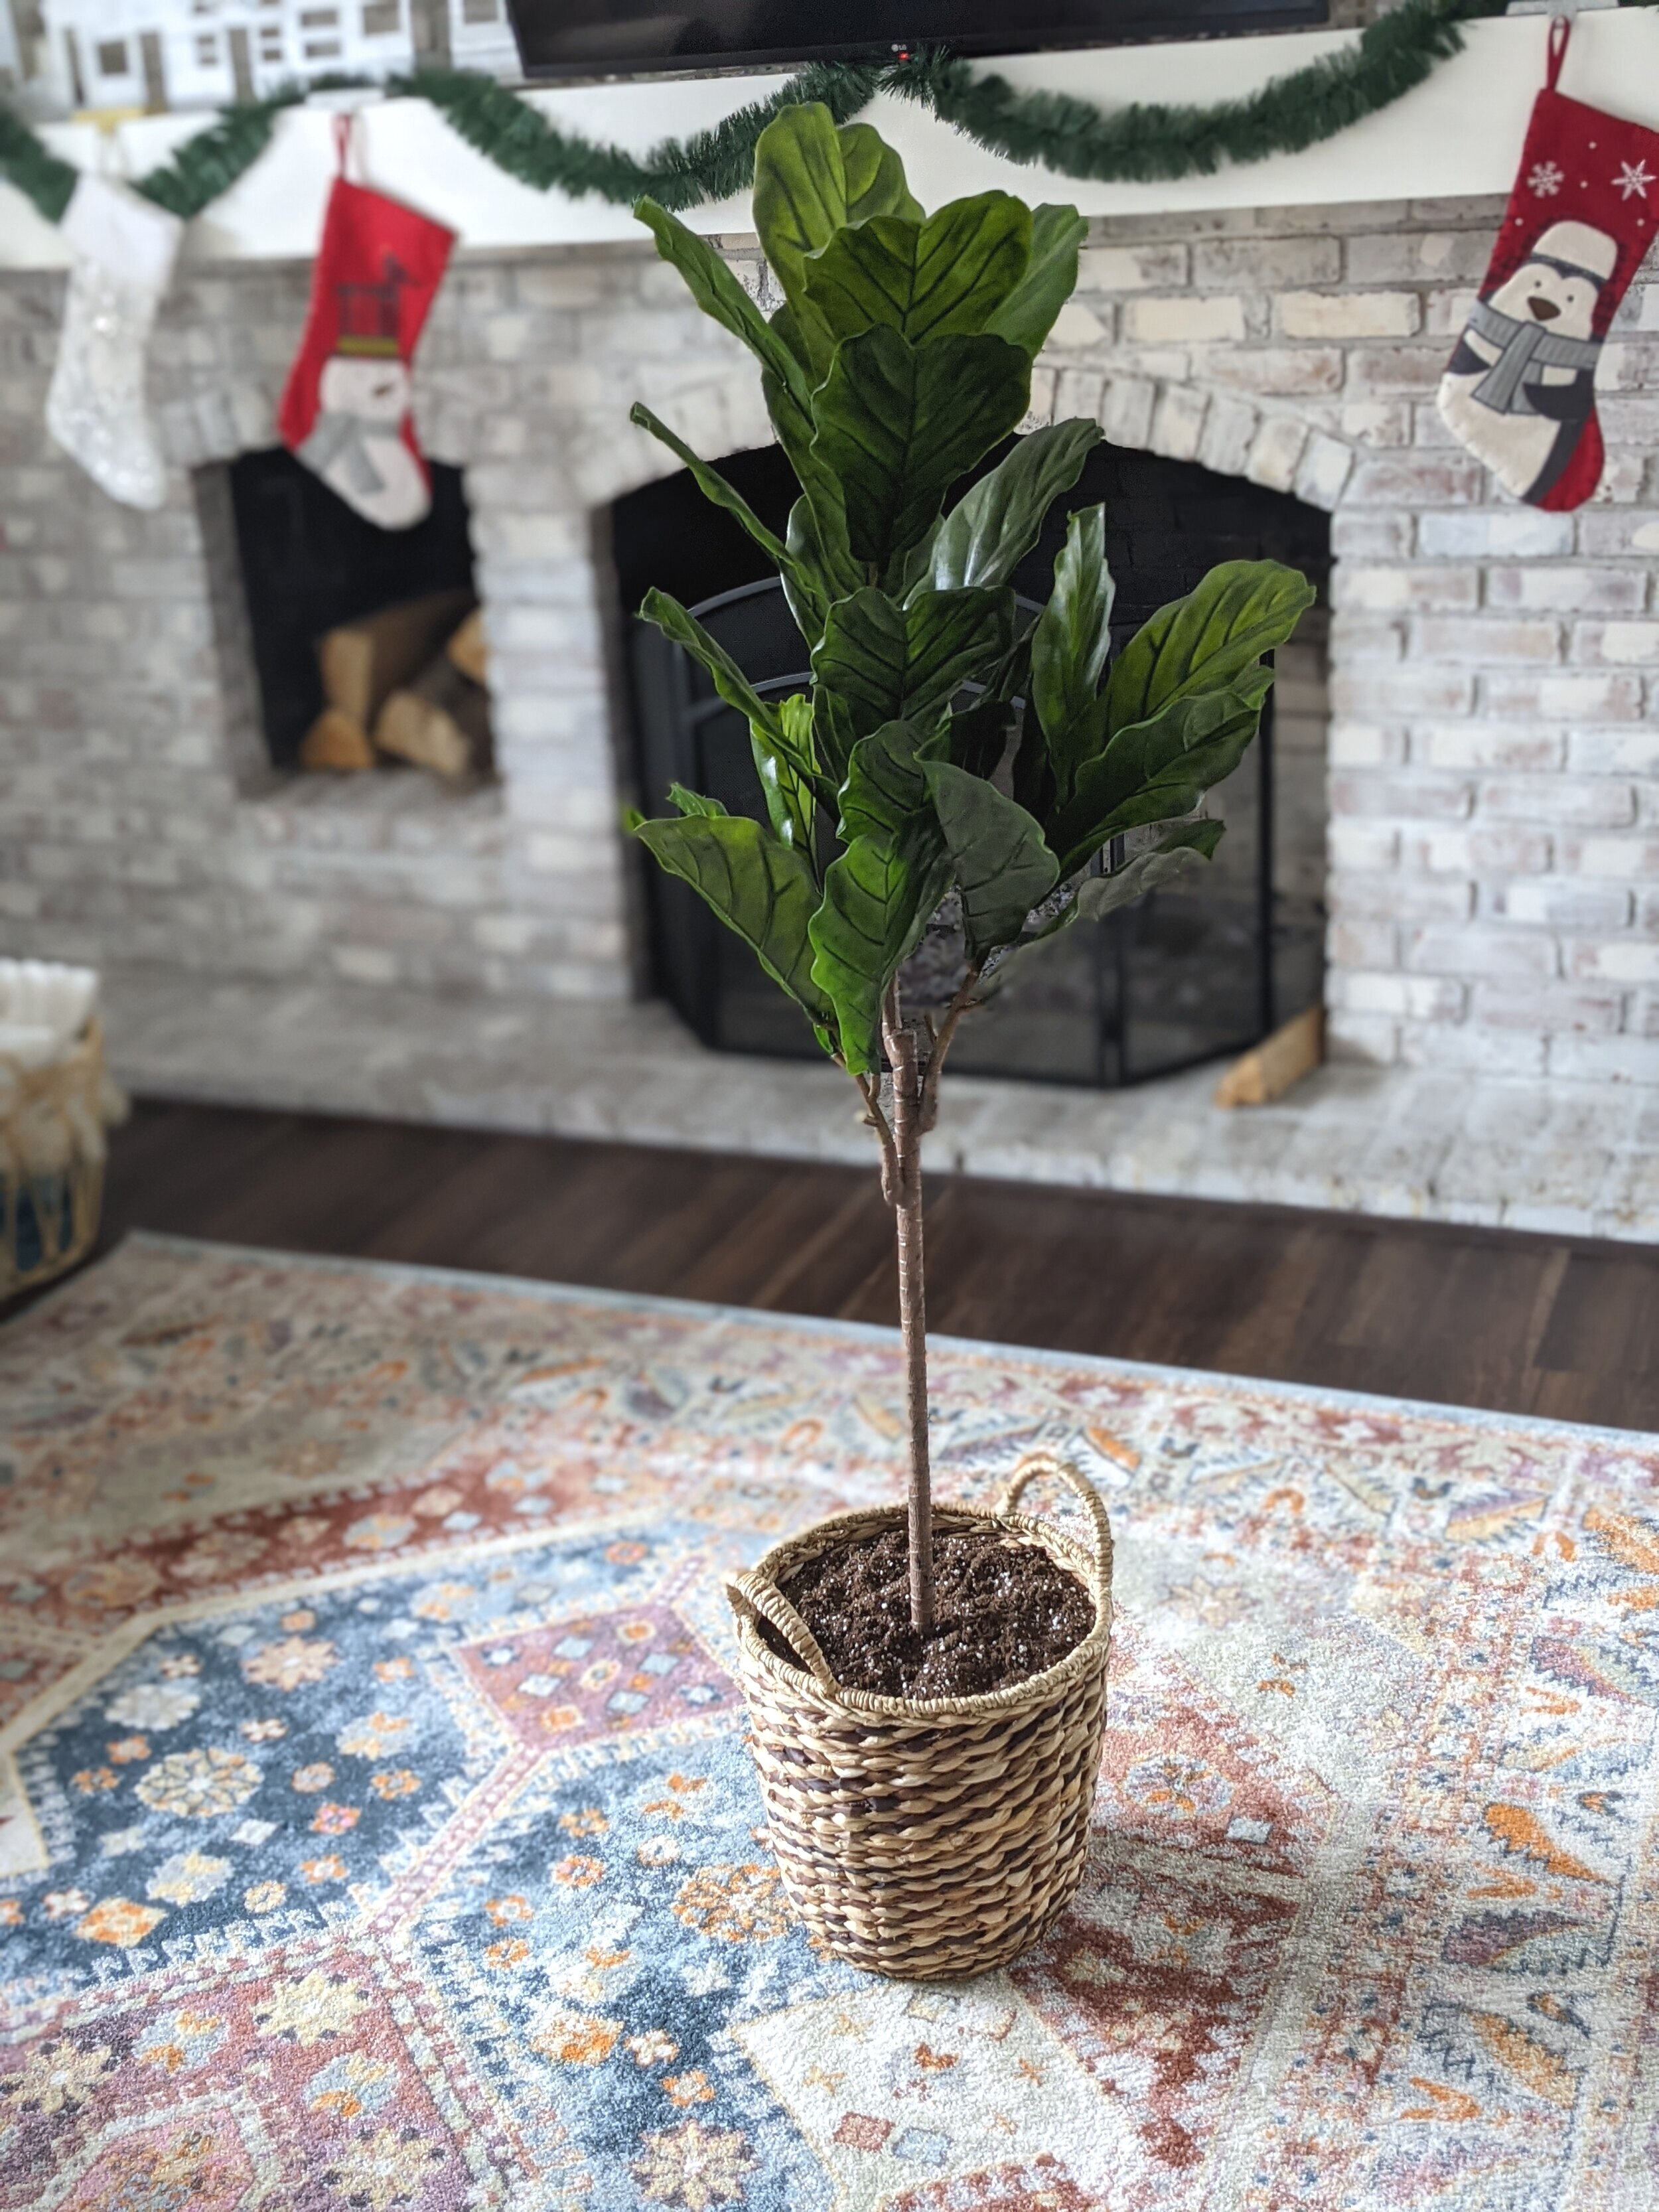
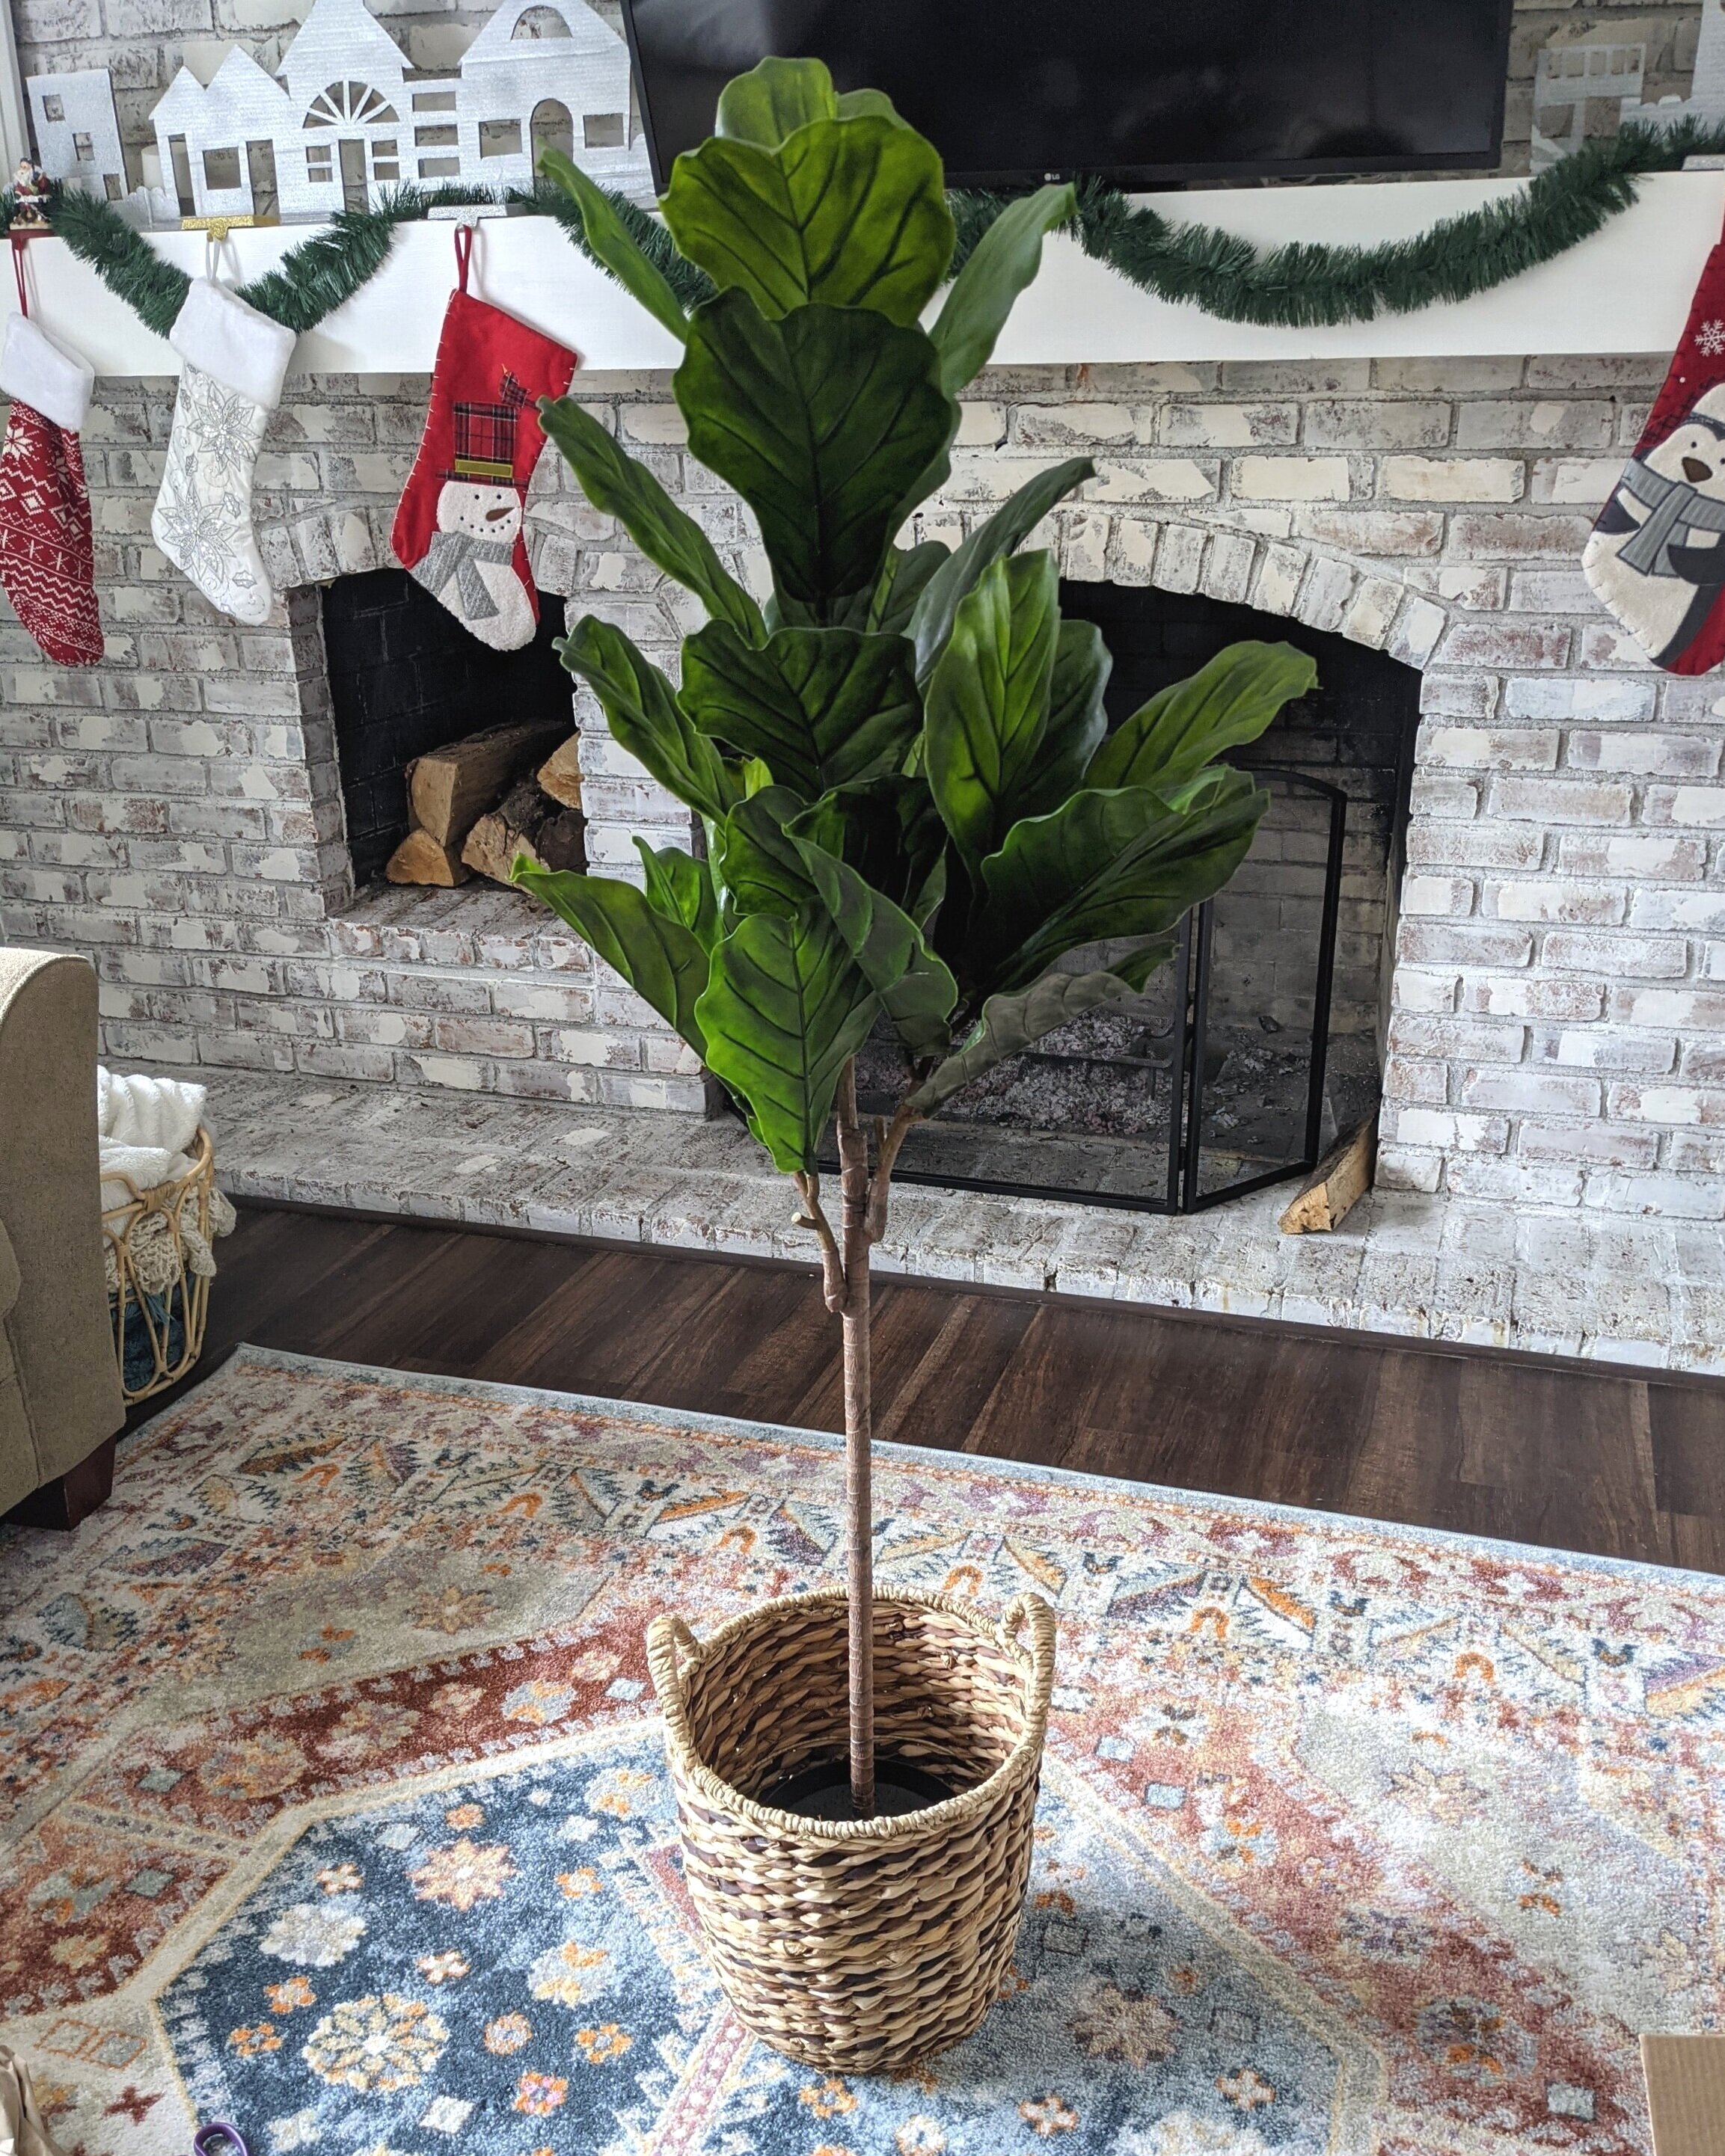
The last time I was at IKEA I picked up this faux fiddle leaf fig for an empty corner in my living room that just needed SOMETHING. It’s definitely not the most realistic-looking plant out there, but what makes it more unrealistic is the hilariously small base. To help up the “real” factor I put it in a basket, but that dinky little base in a giant basket still looked impractical.
So what’s a girl to do but to fill the basket with potting soil? However, instead of filling the whole thing with dirt (which is kind of a waste, not to mention the basket isn’t lined), I only filled it with a tiny bit of dirt but made it look completely full. And whaddyaknow, I have a little tutorial to show you how to “fill” your faux plant’s pot with dirt without actually filling it with dirt. Here’s what you’ll need:
Materials

As an Amazon Associate, I earn from qualifying purchases. This post may contain affiliate links, meaning I receive commissions for purchases made through those links, at no cost to you.
- Faux plant
- Basket or pot
- Empty box or other cardboard
- Filler material (I used some paper that came with one of our packages)
- Scissors
- Writing utensil
- Potting mix or dirt
- Black or brown craft paint (not pictured)
- Craft brush (not pictured)
- Tape meausre (optional)
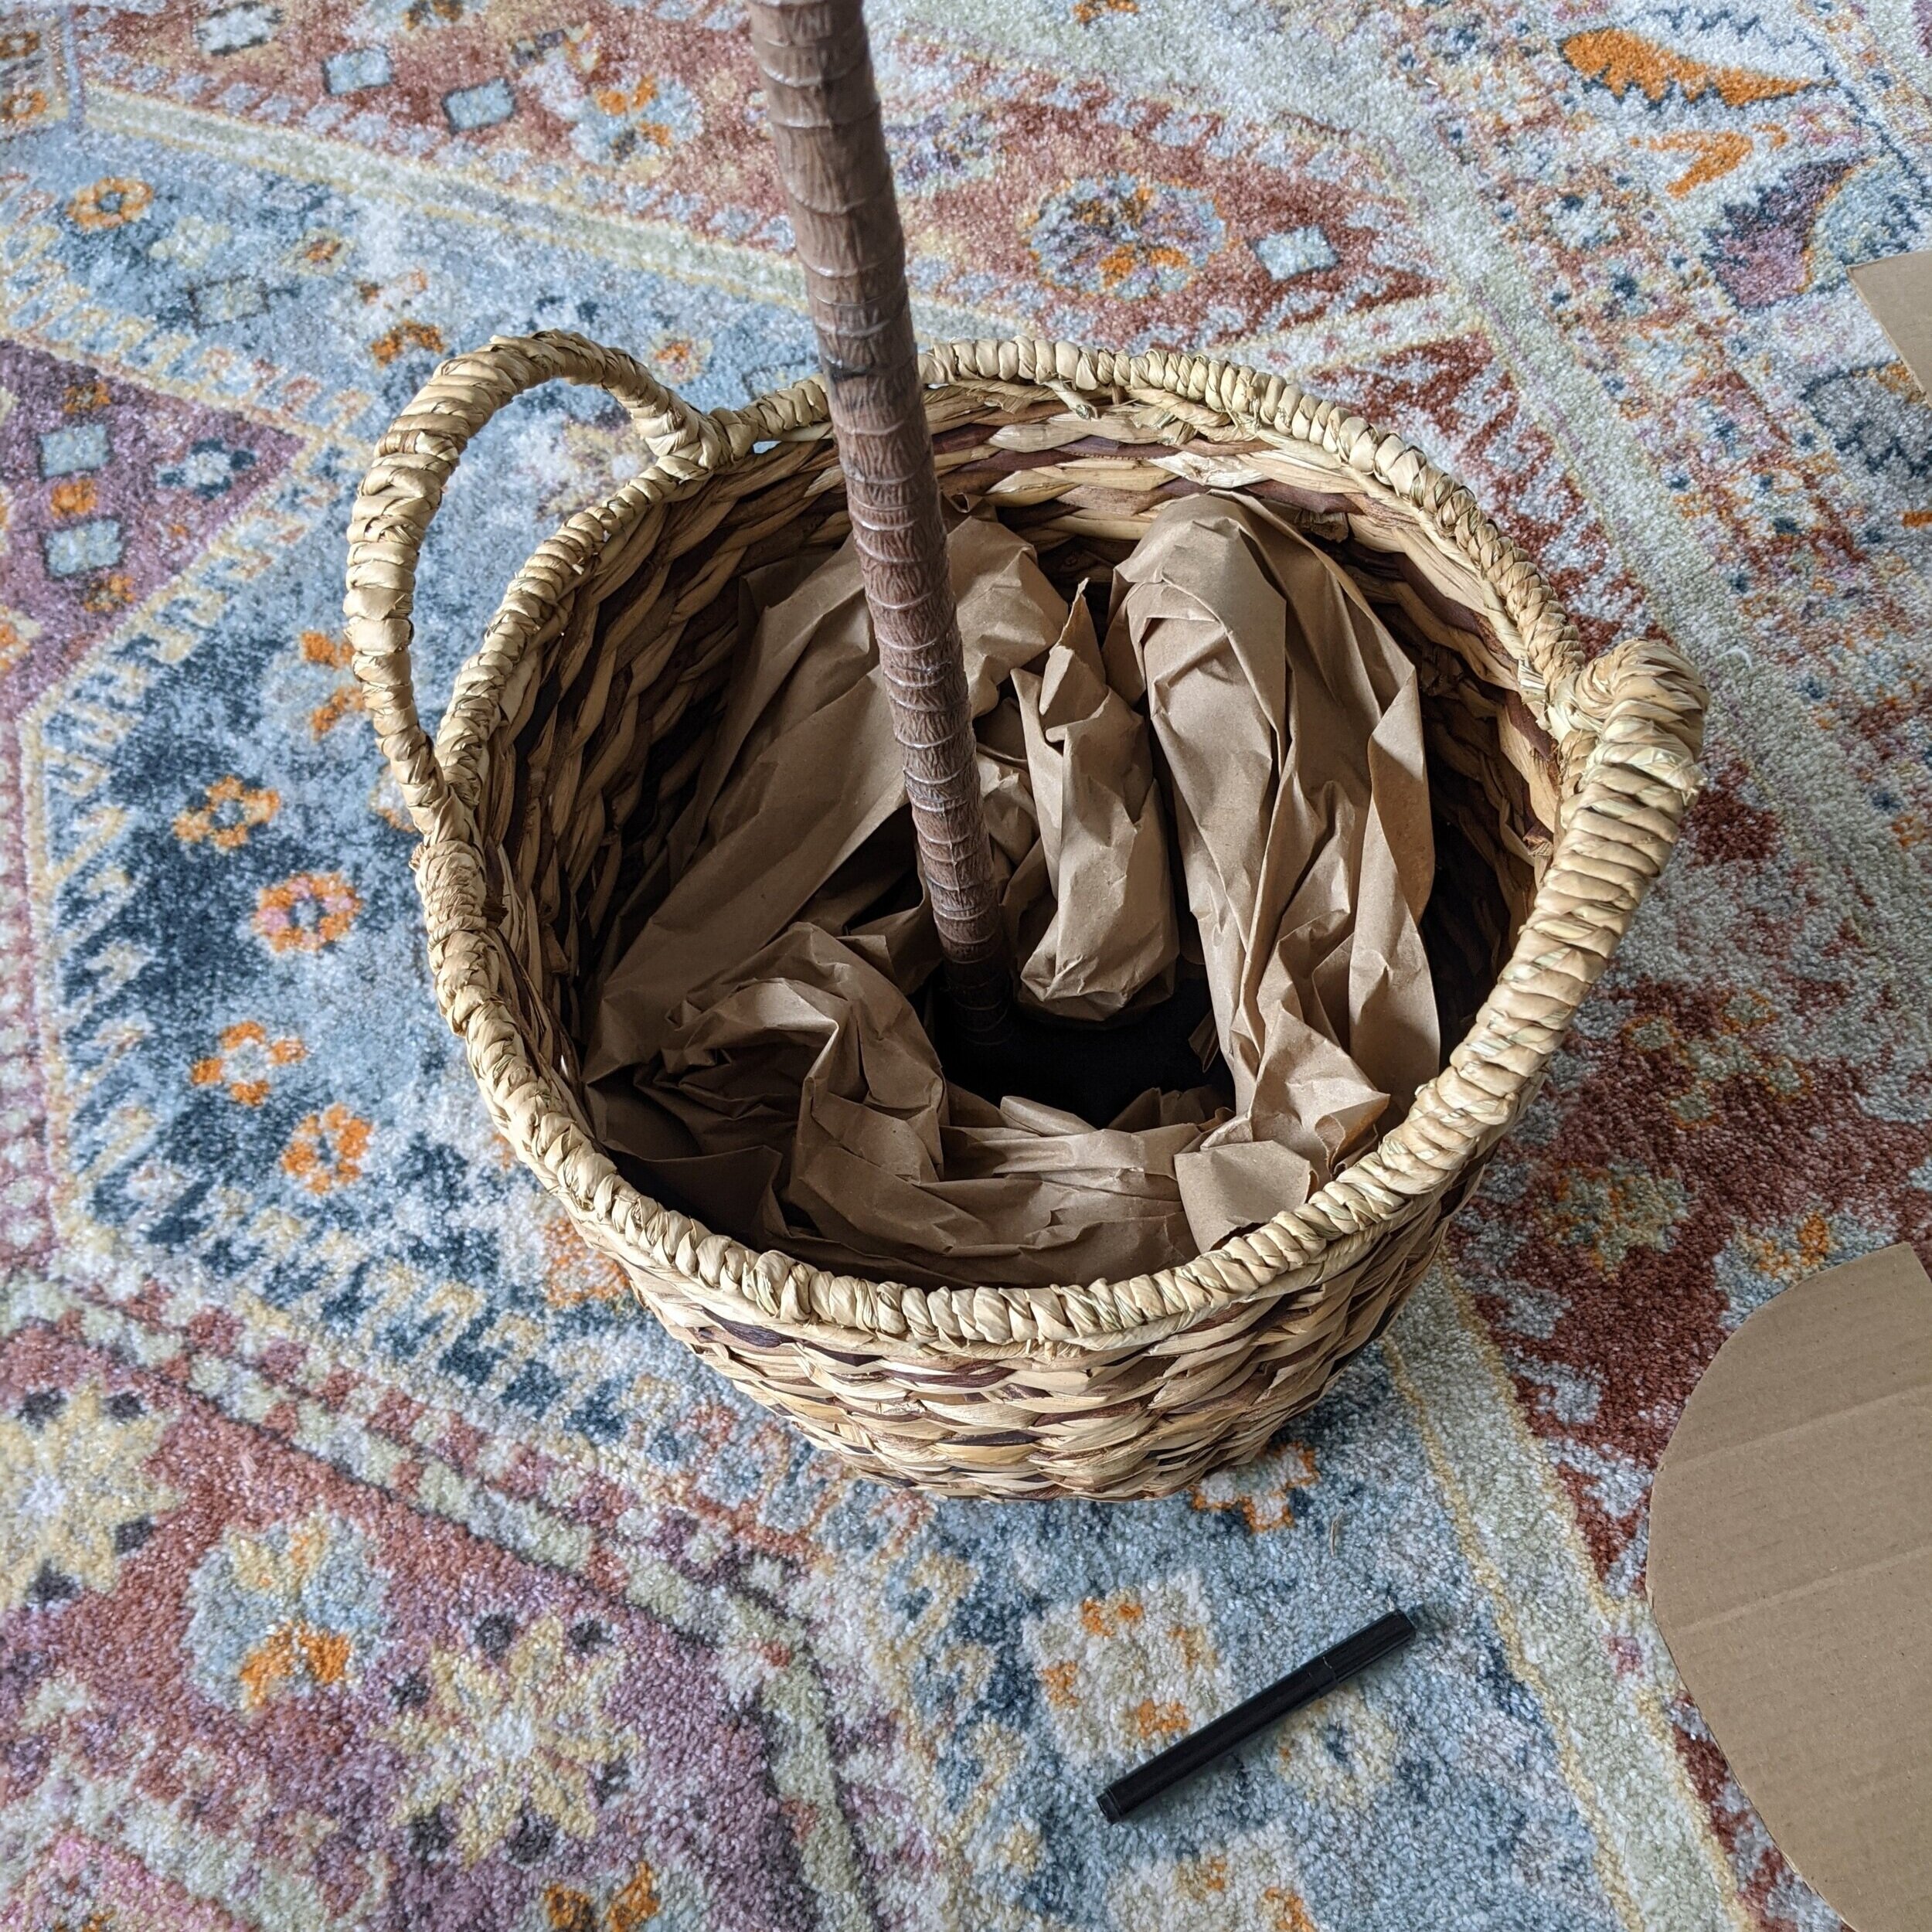
Make A Cardboard Base
The cardboard will serve as the base for your dirt or potting soil to sit on - this may be the most important part of the project - but that doesn’t mean it’s hard!
First thing’s first, you’ll need to figure out the dimensions of the interior of your pot or basket and trace it on a piece of cardboard. You can use your measuring tape to measure the opening, or simply trace the base of your pot.
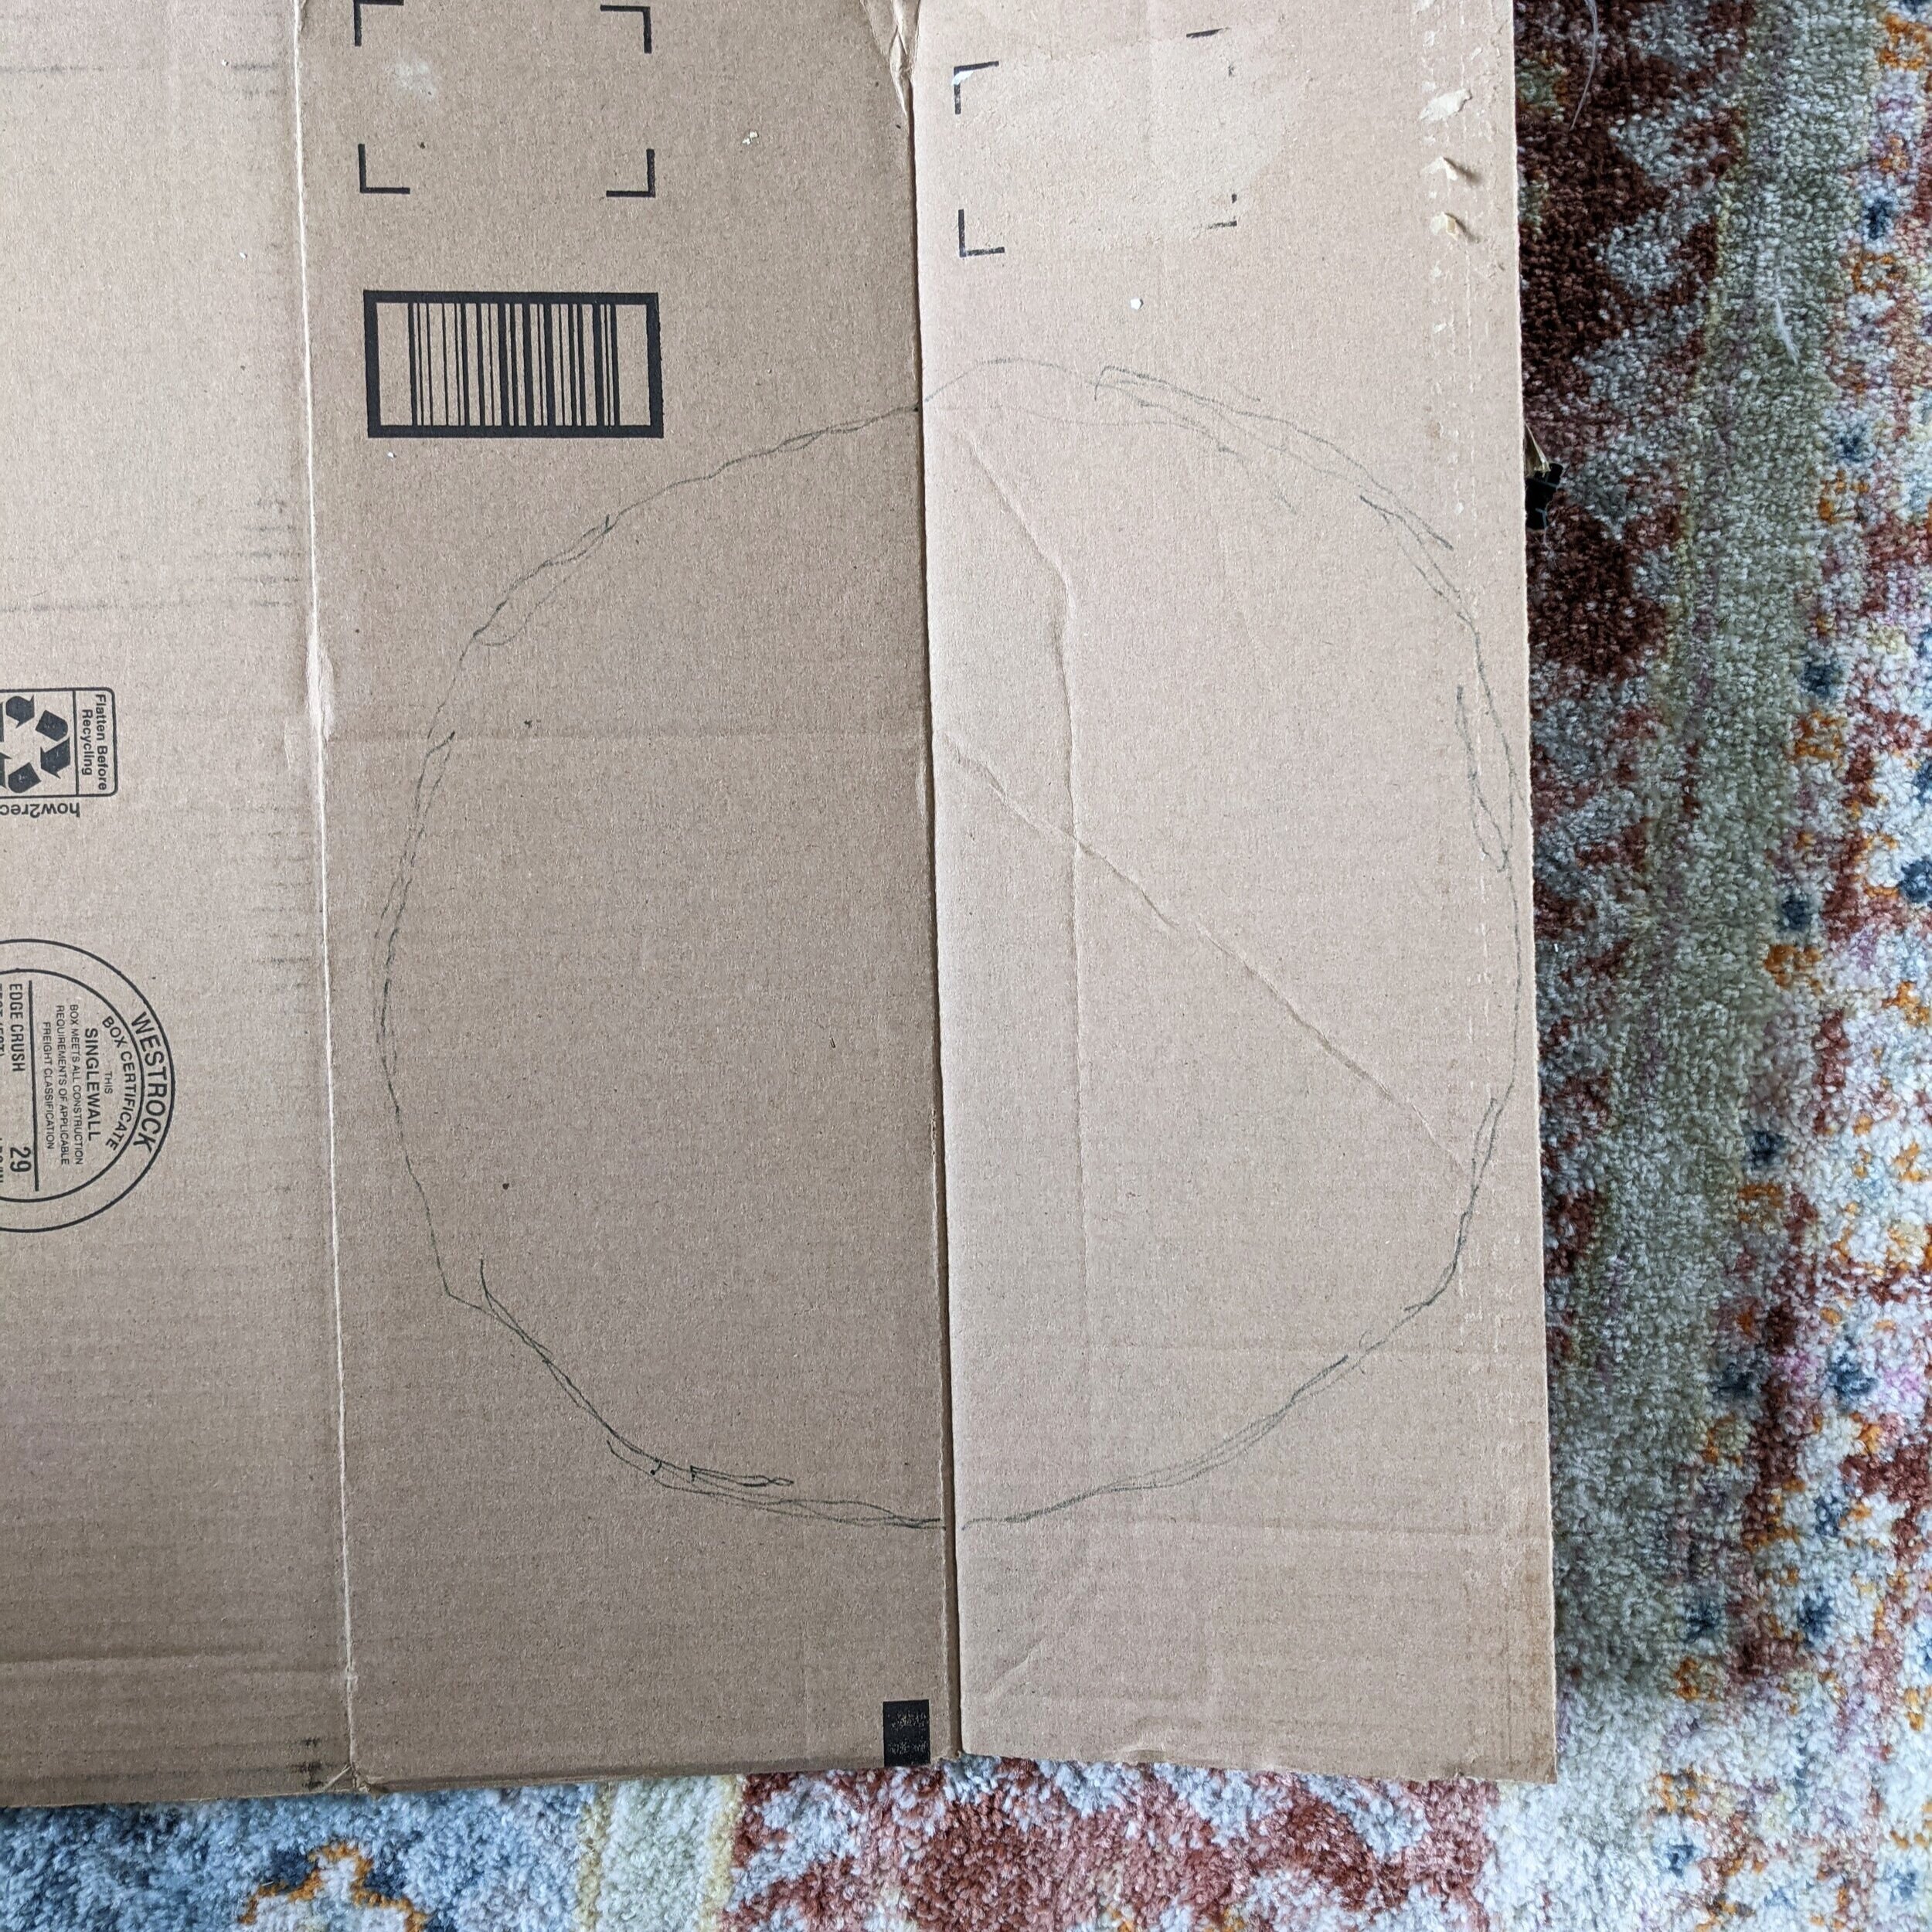
Then, cut out your circle and cut your circle in half.

Fit your semi-circles in your pot and trim as needed.
Once you have a good fit, trace a circle in the middle of the semi-circles and cut it out. This is where your plant will stick out of the pot, so get some rough measurements of how large this circle should be.
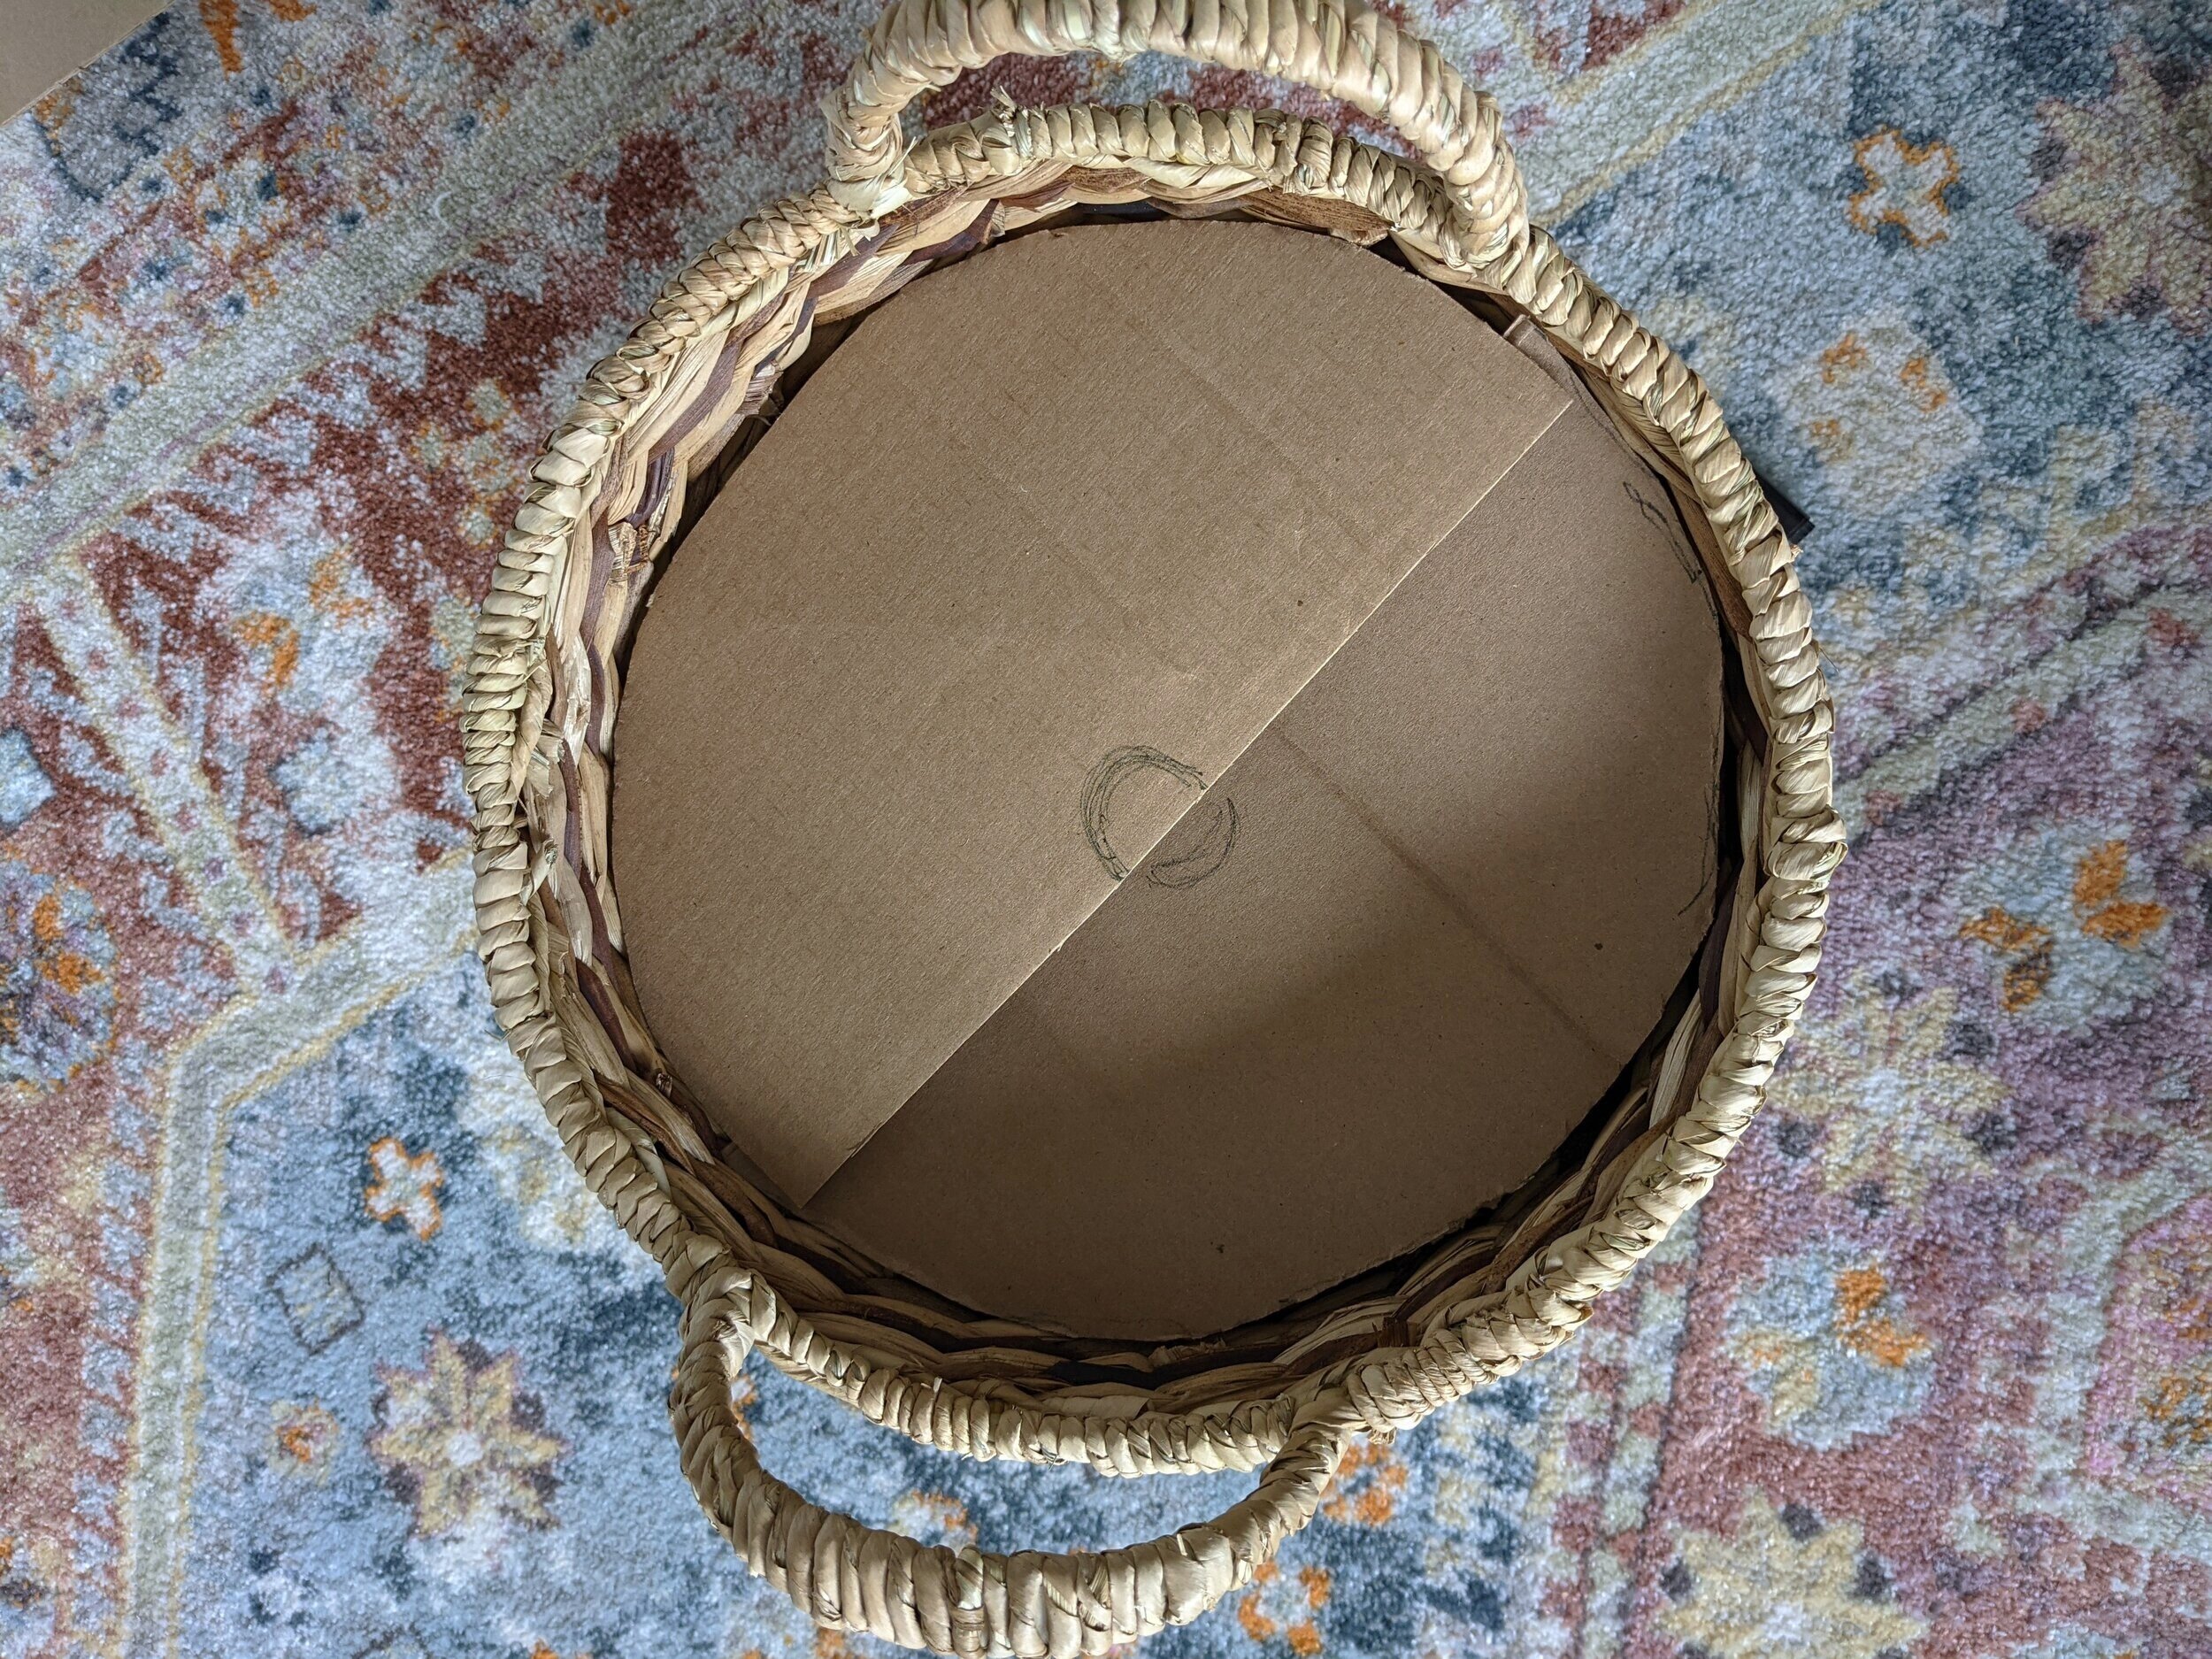
Using black or brown paint, paint the cardboard base. I used black acrylic craft paint, but this could be done with leftover spray paint or house paint too. It doesn’t have to be perfect, you’re just trying to camouflage the cardboard.
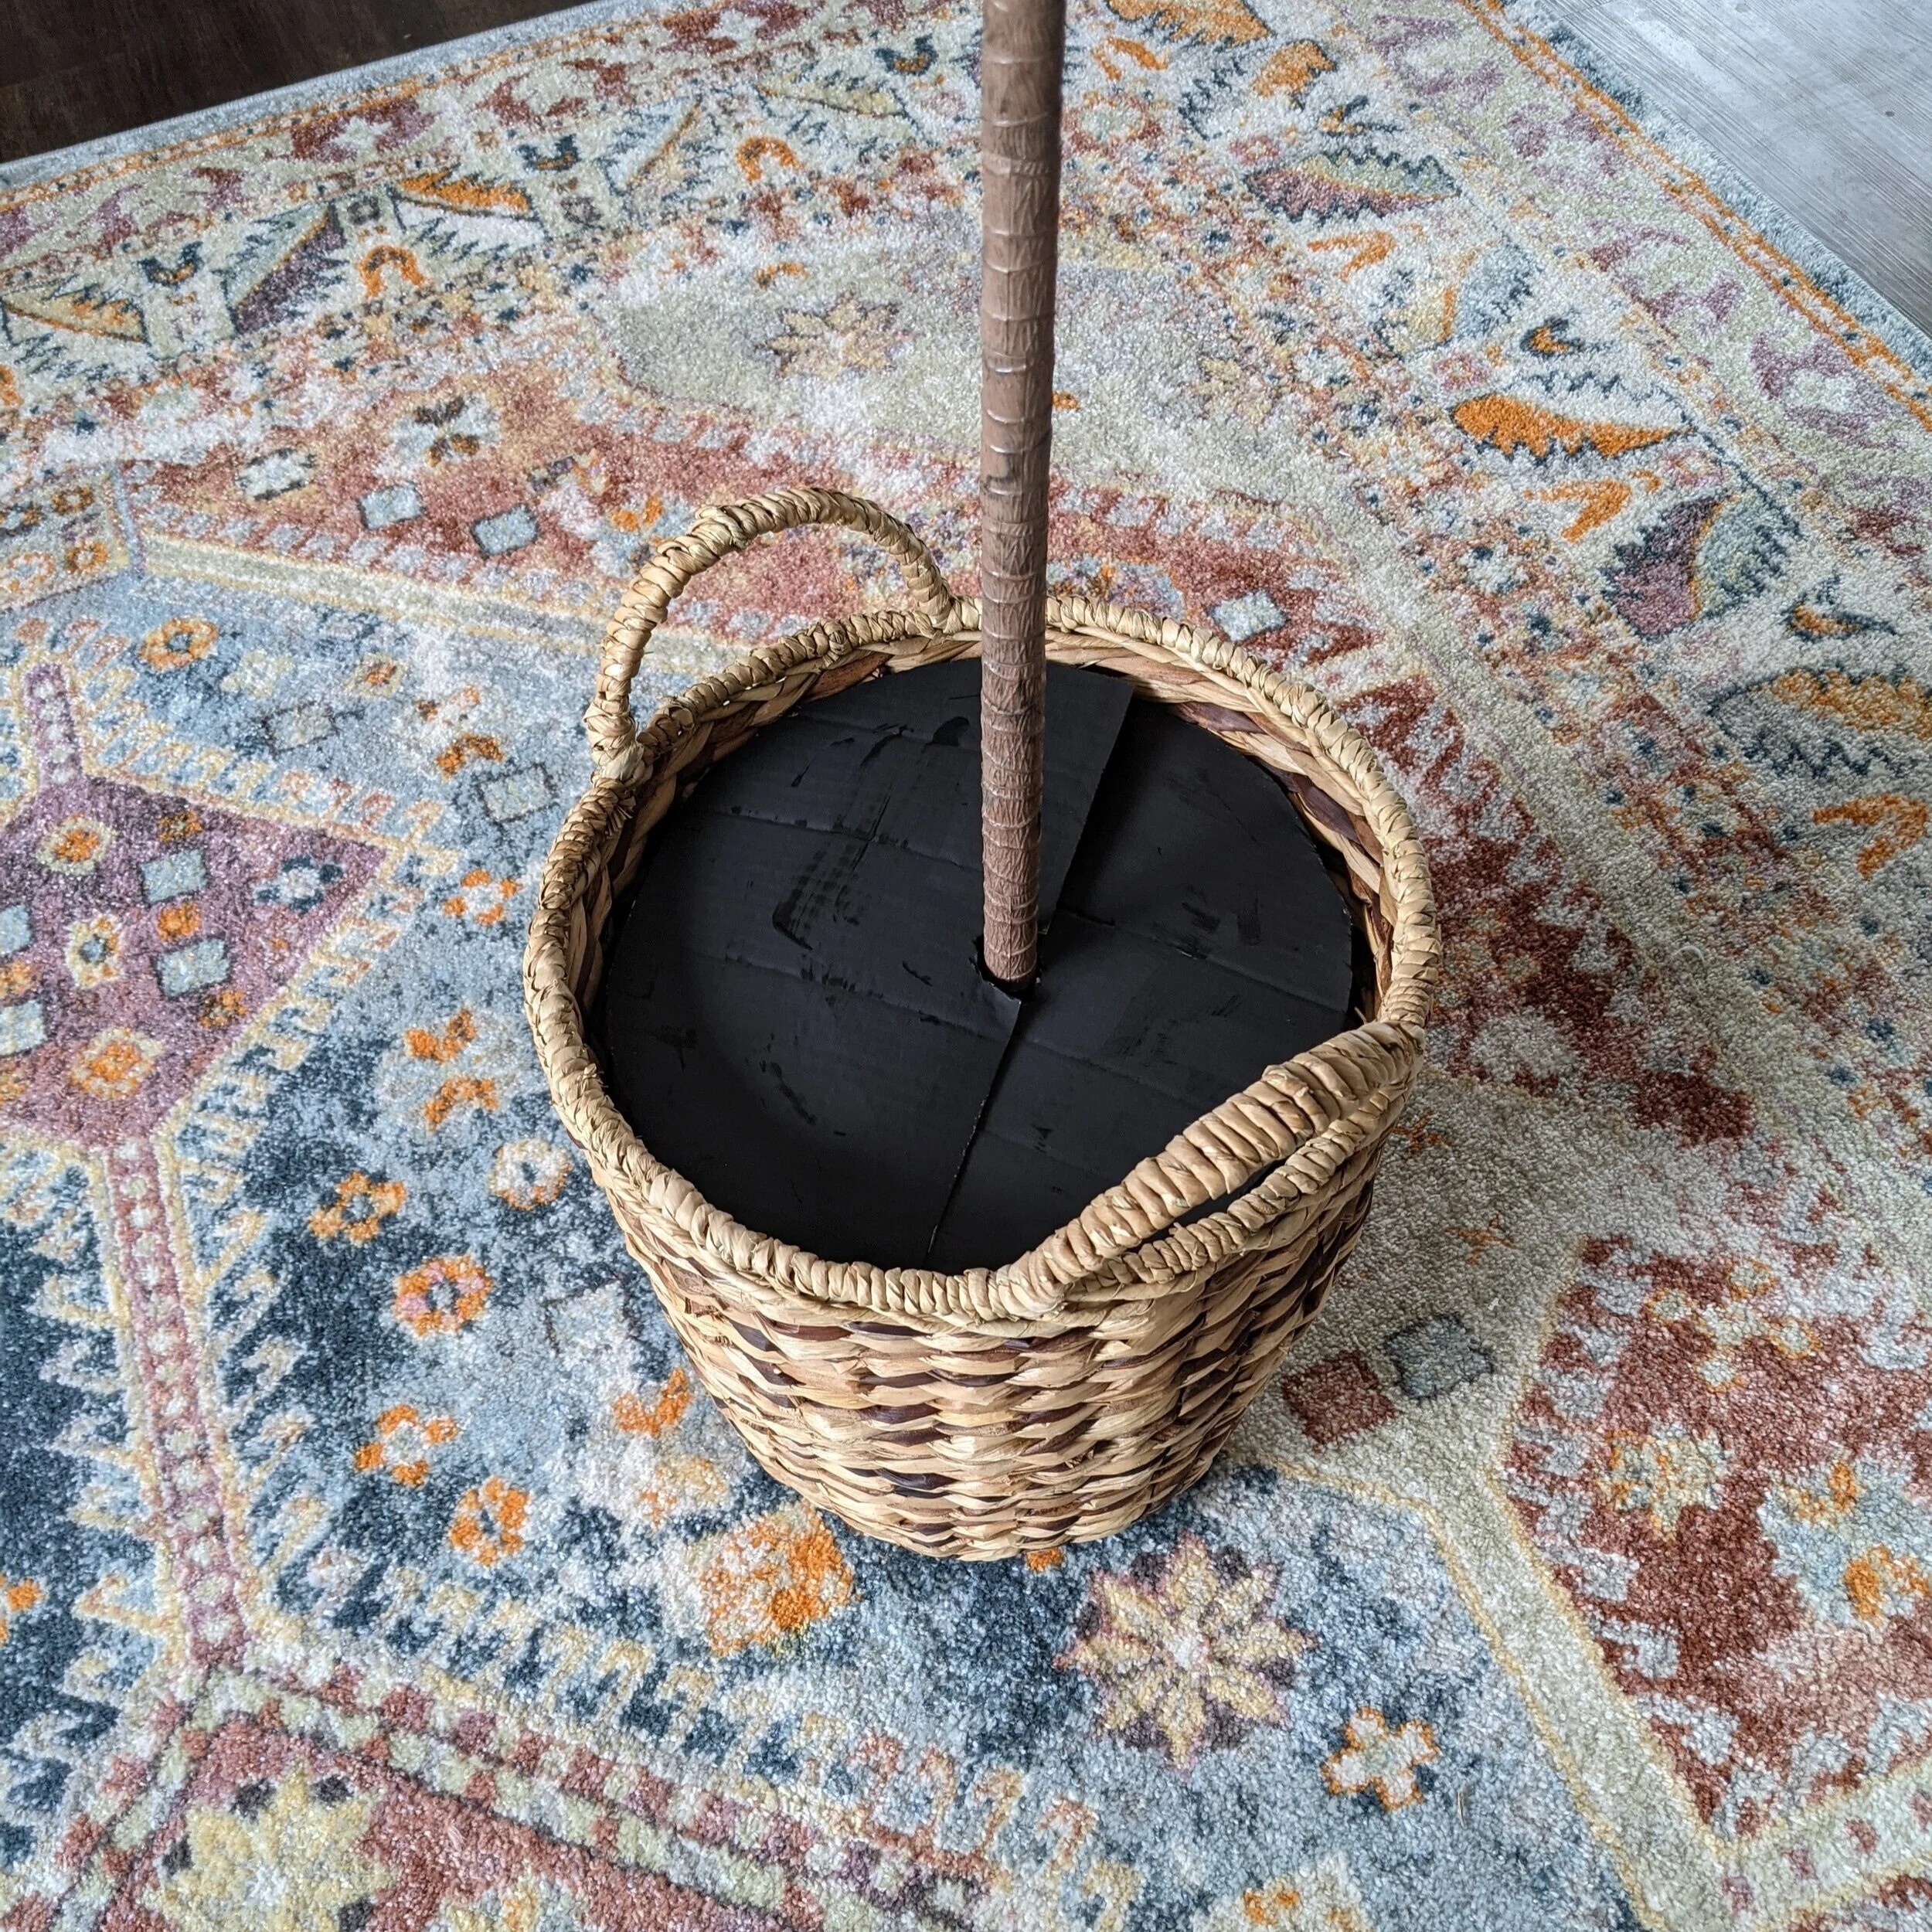
Put Everything Together
Now you just have to put everything together!
Start by placing the plant in your pot or basket, then layer in your filler. As mentioned above, I used some leftover paper that was used for packing material with one of our packages, but whatever you have on hand works - newspaper, plastic bags, styrofoam, etc.
Next, place your painted cardboard semi-circles on top of the filler, making sure they’re a little below the lip of the planter.
Then, pour in some dirt! You really just need enough to cover the surface (using as little as you need is kinda the whole point of this project, after all).
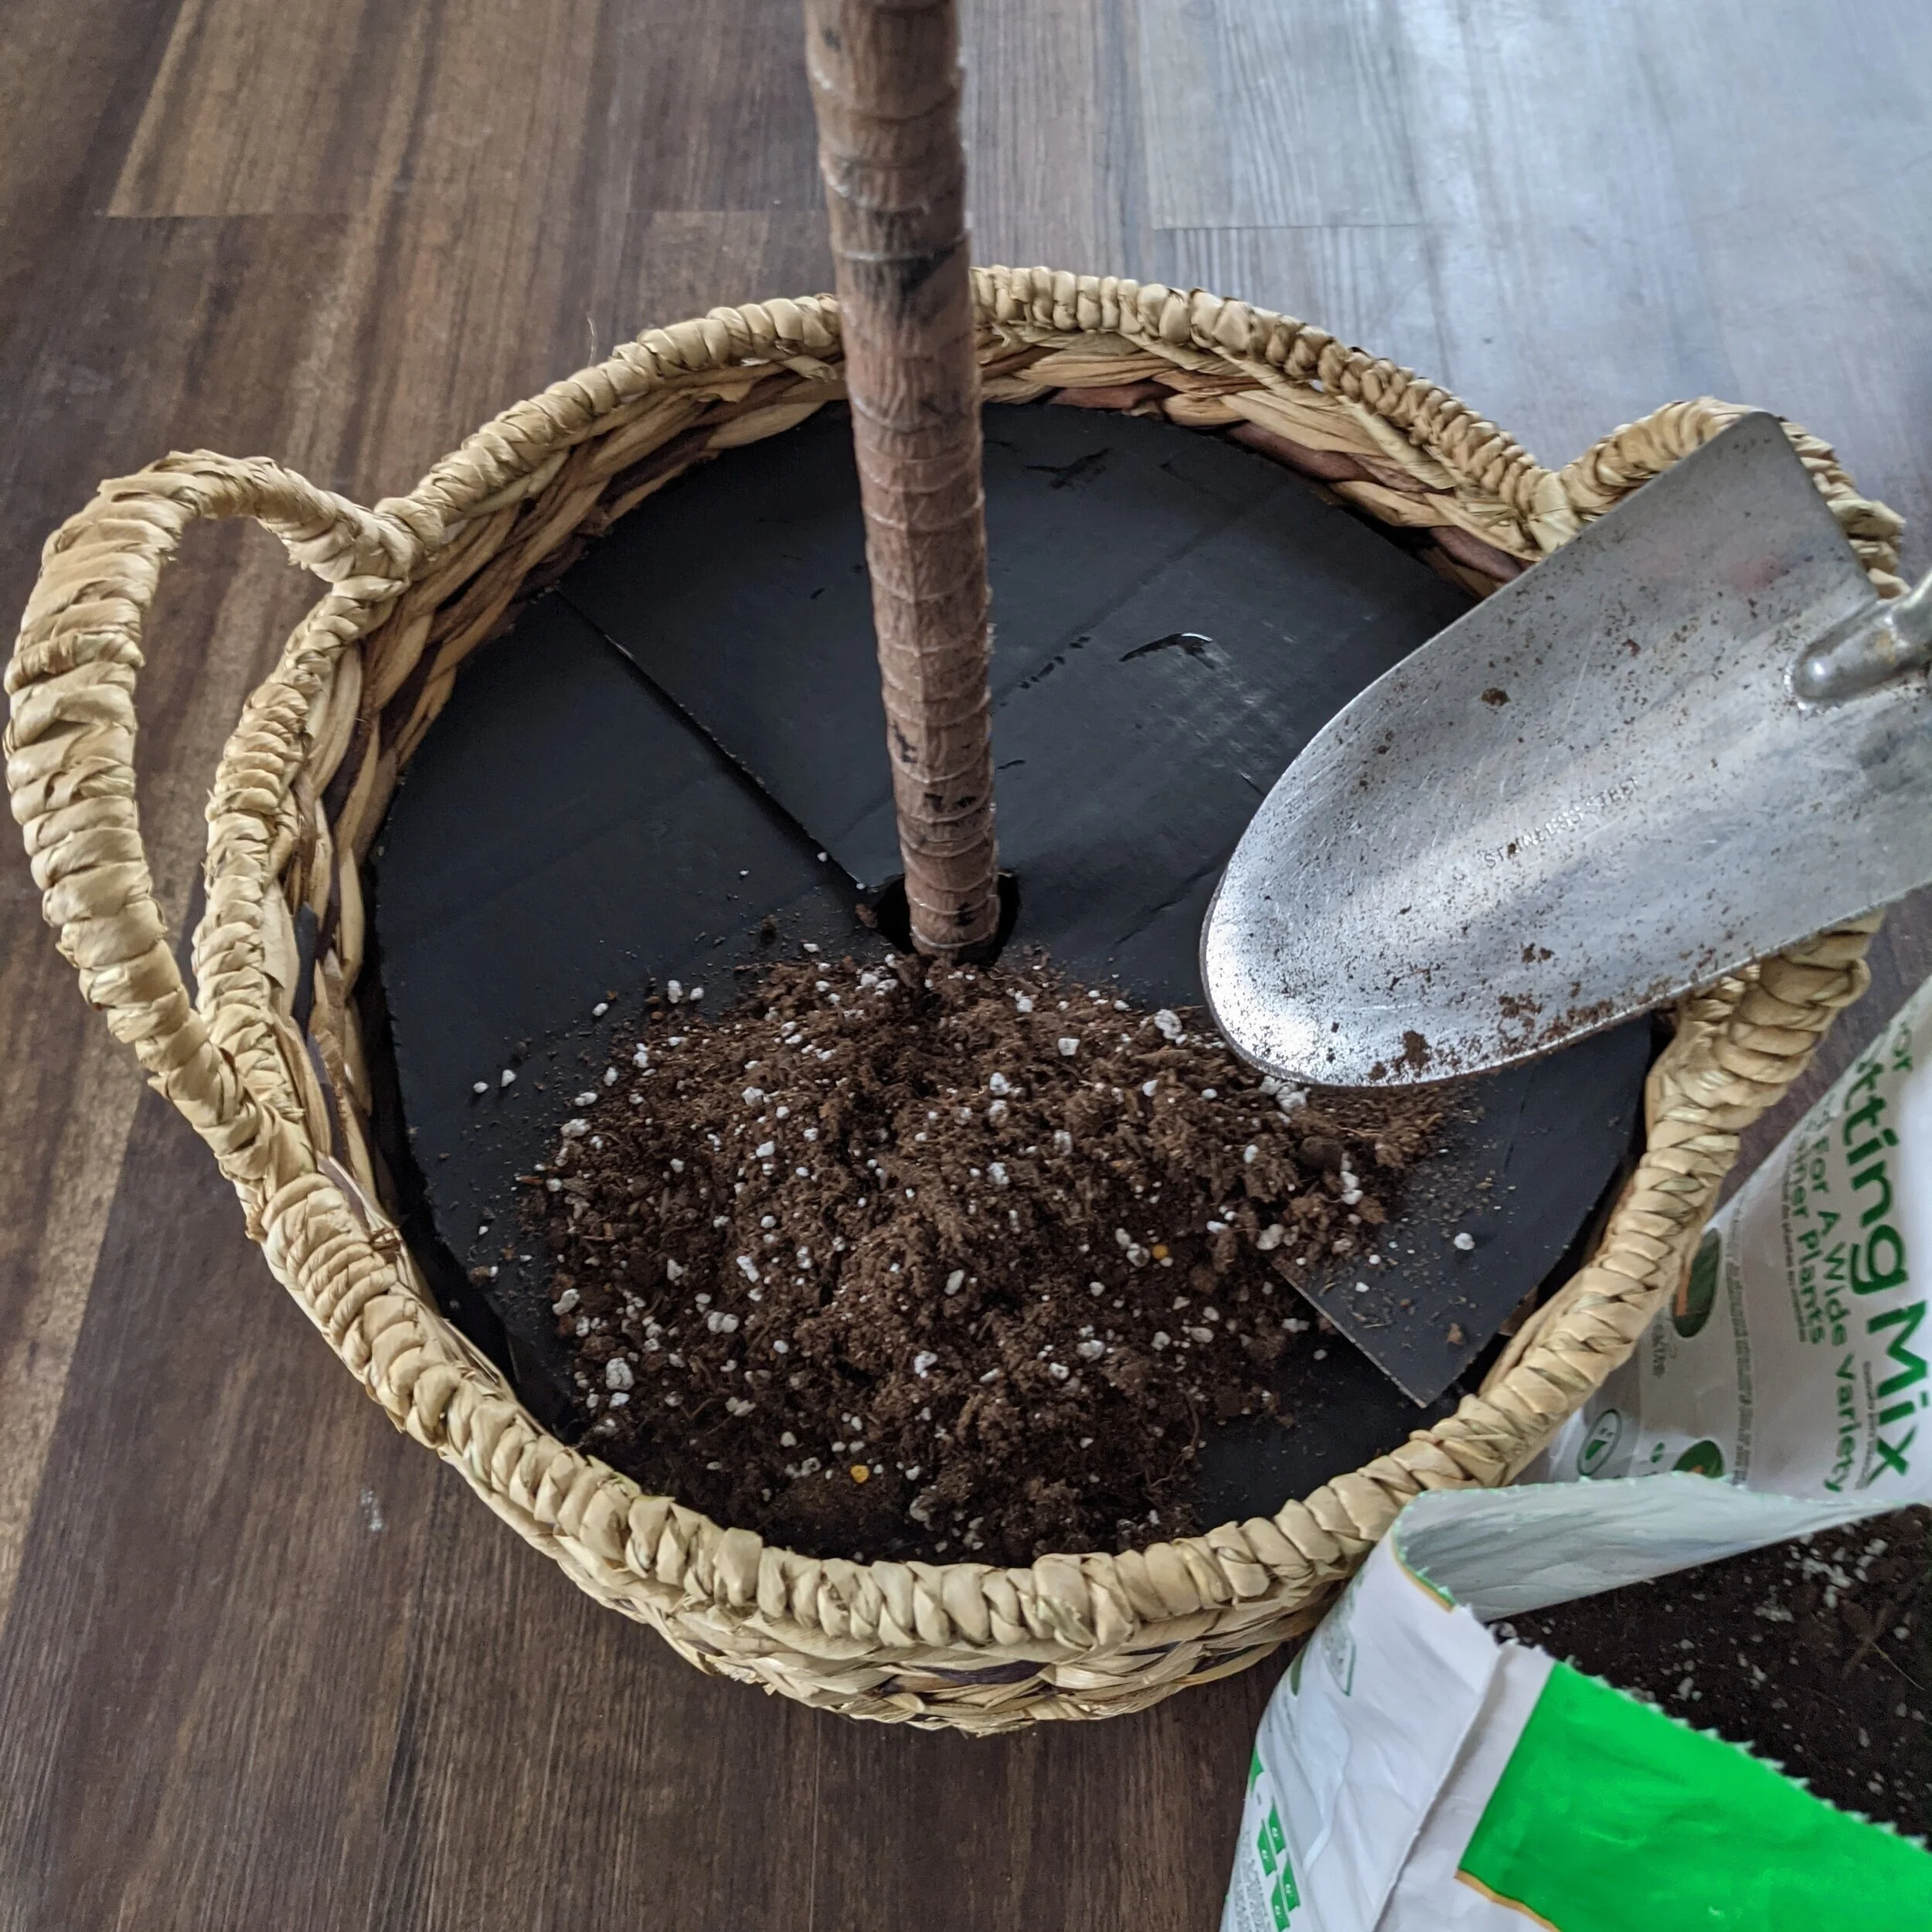
Notice how I didn’t even wait for the paint to dry?
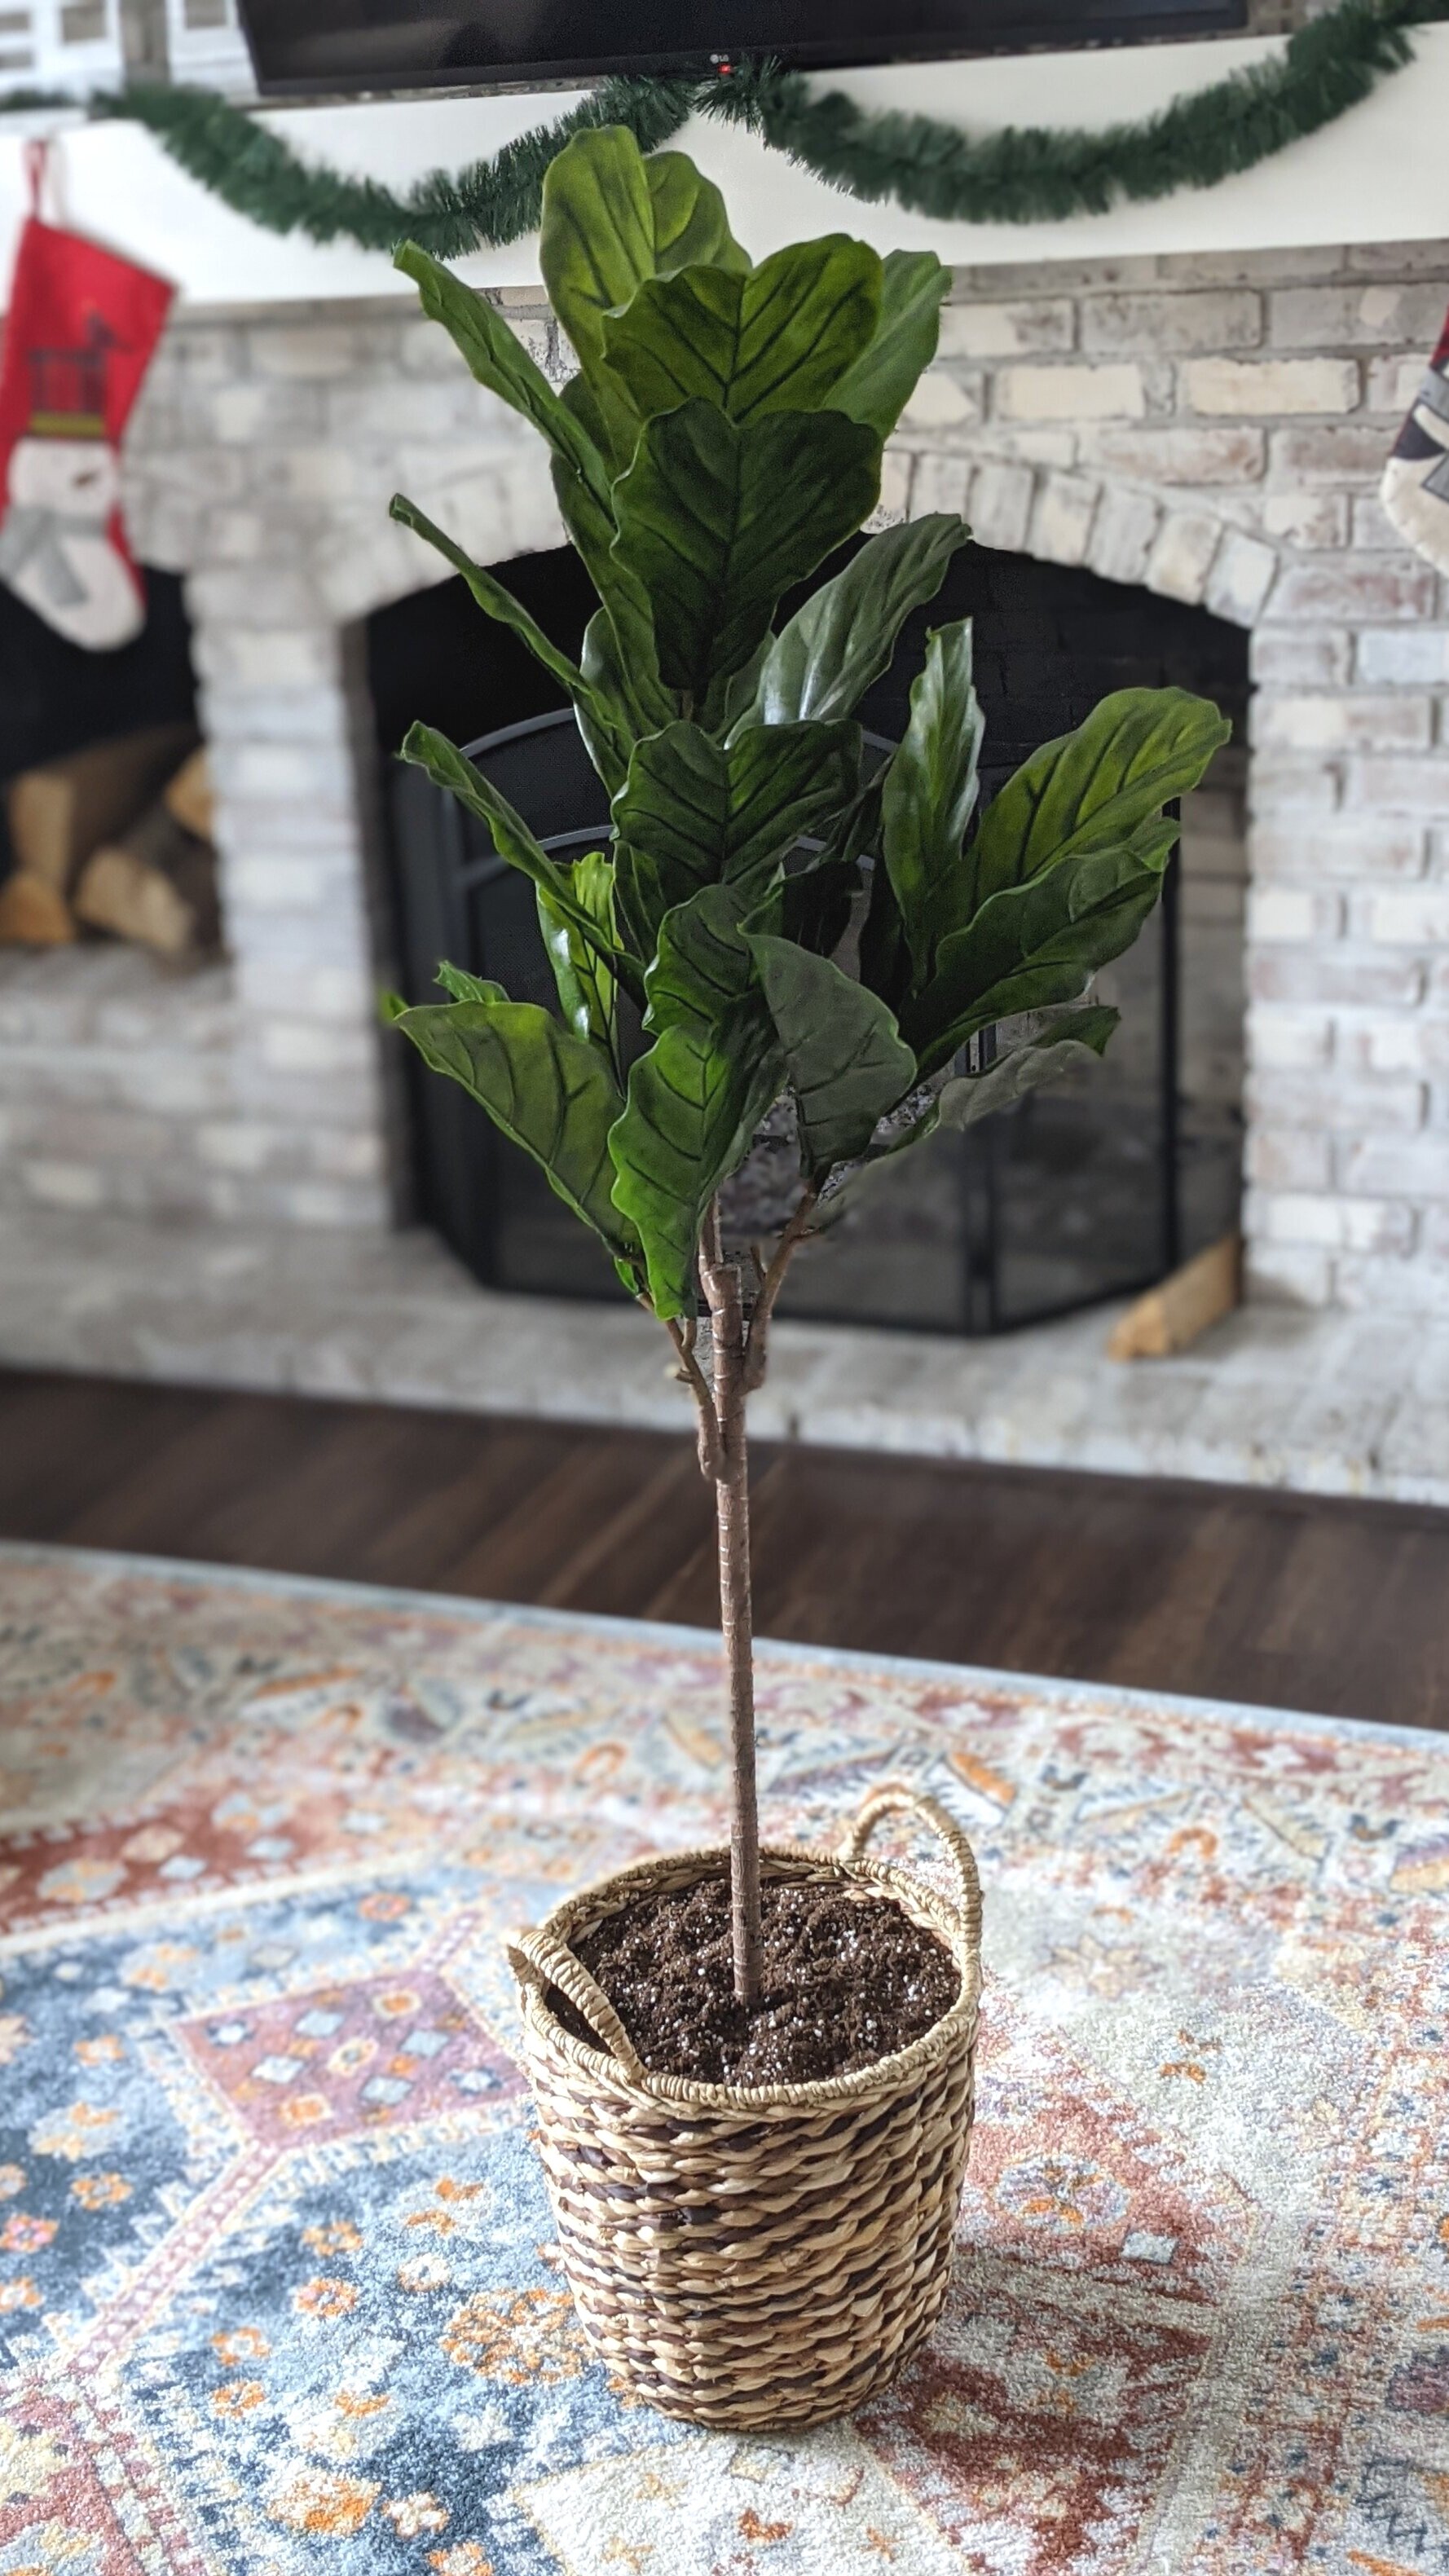
And voila! Now your fake plant looks a little less fake!
More Tips to Make Your Faux Plants Look Real
The tutorial above is just one way to help camouflage the fakeness of your plants, but here are 4 more tips you can incorporate as well!
Use a combination of real and fake plants throughout your space, or even in the same pot!
Don’t forget about them. Just because you don’t need to water your fake plants, doesn’t mean you can set them and forget them! Like real plants, fake plants will need a good dusting every once in a while to look their best.
Don’t be afraid to invest. If you’re going to buy a plant you can’t kill, you might as well spend some extra $$ and buy a good quality faux version!
On that note, look for imperfections. Plants aren’t perfect in nature, so why would you want to buy a fake plant that looks too perfect? Some fake plants even come with branches that can be repositioned - take advantage of them!
Final Thoughts
Admittedly, I was hesitant to heed my own advice and invest in my faux fiddle leaf fig - there are some out there that are way more realistic looking than my $45 IKEA version. Now that I’m getting more ideas of where I want to incorporate some faux plants, I’ll put a little more effort into shopping around for a good quality fake next time. On the bright side - one of my friends already touched this one thinking it was real!
For more plant-inspired posts, check out these articles:

Tips for Making Faux Plants Look More Realistic

Home Improvement Goals for 2021
We accomplished so much last year – it’s a little crazy to look back on. When you’re in the thick of it, sometimes it seems like projects move at a snail’s pace. Especially when I compare myself to bloggers who don’t have a separate full-time job. But considering our circumstances, DAMN, we made some progress! But of course, a house is never done! So here’s what we’re hoping to accomplish in 2021.
Home Improvement Projects to Tackle in 2021
Now that we’re already about a month into 2021, I figured we should set some home improvement goals for this year.
We accomplished so much last year – it’s a little crazy to look back on. When you’re in the thick of it, sometimes it seems like projects move at a snail’s pace. Especially when I compare myself to bloggers who don’t have a separate full-time job. But considering our circumstances, DAMN, we made some progress!
But of course, a house is never done! So here’s what we’re hoping to accomplish in 2021.
Finish the Renovation
At the top of our list is probably pretty obvious: to finish the renovation. We’re getting there! But I can’t wait to actually start utilizing these beautiful spaces we’re creating. They’re going to be SUCH a huge improvement from what we started with. I still scratch my head at why the master suite was built the way it was in the first place.
Since the renovation involved so many spaces, let’s break down the specifics, shall we?
Master Bedroom

The master bedroom is so.stinkin.close. to being completed! We FINALLY had the floors delivered and Lucius wasted no time installing them (sorry, I don’t have a good picture of them yet!). Now we just have to install the doors and trim and then I can go to town painting! After that, all that’s left is to do is move back in.
Related: Master Bedroom Mood Board
Master Bathroom
Lucius has been hitting the construction of the master bathroom really hard lately – determined to just get it done! We’ve started hanging drywall. Then it’s on to tiling, painting, and permanently installing everything.
Related: Master Bathroom Mood Board
Laundry Room
The laundry room is a pretty small space, so luckily it shouldn’t take long to finish. BUT, it’s also lower on the priority list so it may be a while before it’s actually complete. We have some of the drywall up, but still have a few sheets to hang. Then we need to install the floors and the sink. Then it’s on to paint and finishing.
Related: Creating a Functional and Stylish Laundry Room
Hallway

When we started this renovation, I don’t think I realized how impacted the hallway would be. I mean, I guess I did in a sense. Of course, I knew there would be demo and rebuilding, but it didn’t really occur to me all the drywalling we’d have to do. On the plus side, the hallway is becoming a design element of the house and a space I can actually make look good instead of the tiny, crowded landing we started with. I’m excited to start thinking of ways to make it a design element.
Related: Hallway Progress and Plans
More Posts Related to Our Renovation:
Fix Our Hot Mess of a Yard
I shared a tour of our yard several months ago and… it still looks like that. We were so focused on the master suite renovation all last summer that the yard had to take a backseat. But we’re hoping we can finish up the renovation before it gets nice out and spend the warm weather getting the exterior in shape! Again, there are a lot of spaces out there that need attention, so here we go with the subheaders!
Grass

Bottom line: we need some. Okay, the front yard has some grass, but admittedly it’s mostly weeds. Which is surprisingly better than the backyard, which has zero grass. Last fall we got a quote on how much it would cost to completely start from scratch on our yard and it was pretty reasonable. So, come spring, we’d like to follow through with that plan!
Garden Beds

I tried to weed and make our garden beds work, but by the end of the summer, I was so lost as to what was weeds and what was actually supposed to be there. I did, however, learn the hard way where we have poison ivy!
We have a few different garden areas and they were all equally overgrown when we moved in. I’d honestly like to just pull everything up and start fresh. I may not be able to tackle them all this year, but hopefully, I can get a good start!
Deck

I love having a deck in our backyard, but it is definitely due for some love.
First of all, we still have the giant hot tub hole that we need to board over (way at the end of the deck in the picture above). That’s probably at the top of our outdoors to-do list. But on top of that, the deck really needs to be painted and I’d love to get some nicer furniture to replace our cheap-o plastic Adirondack chairs. I’m picturing a table and chairs on one end of the deck and a seating area on the other end with some pretty lights strung through the pergola. And Tiki torches! (The mosquitos in our neighborhood don’t mess around!)
Front Porch/Entrance

Our front porch is… lacking. I made a minimal attempt to make it more inviting by grabbing a cute entry mat, but beyond that, I haven’t put much effort into it. I’d definitely like to figure out how to add a little more somethin’ somethin’.
The View Outside our Living Room Window

I’ve learned to love how tucked away our living room is, but the view is pretty “meh”. The fence right outside the windows above is, simply put, boring. So this summer I’d really like to grow some clematis vines along the part of the fence you see looking out the living room windows.
In the yard right outside these windows, I’d like to build a raised garden. My older daughter asked a little too late in the season last year if we could plant a garden, so this is our year!
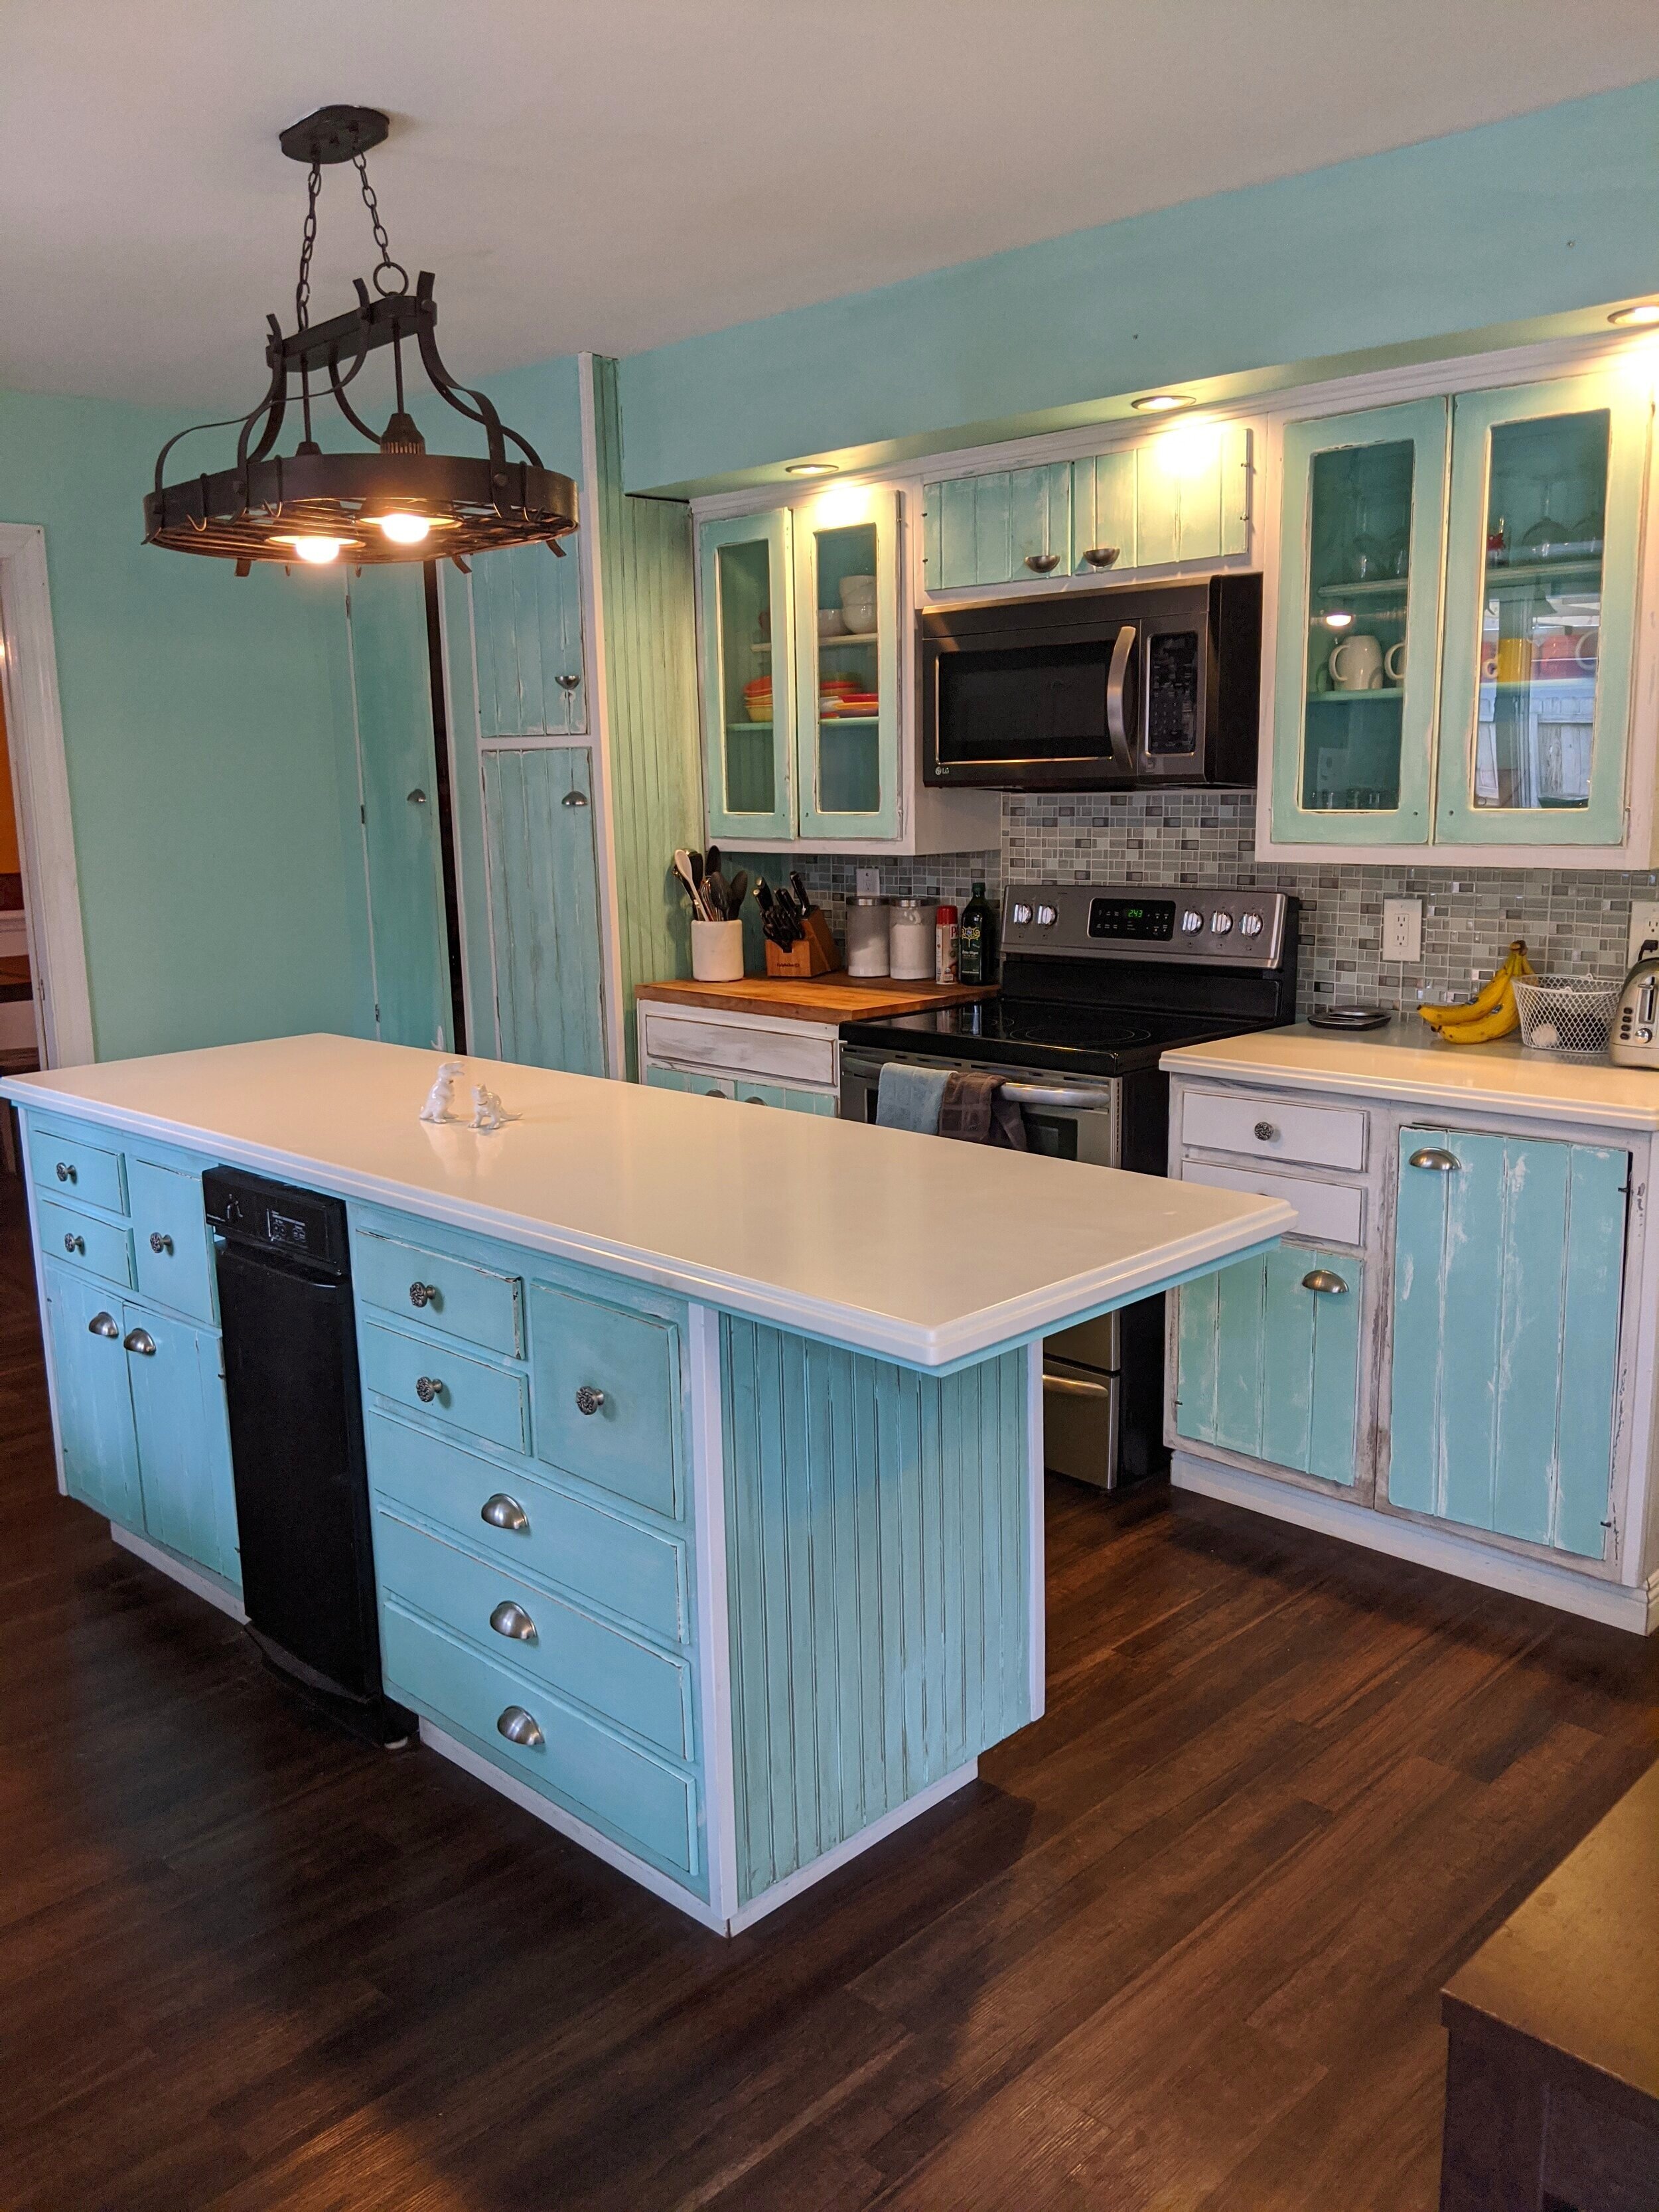
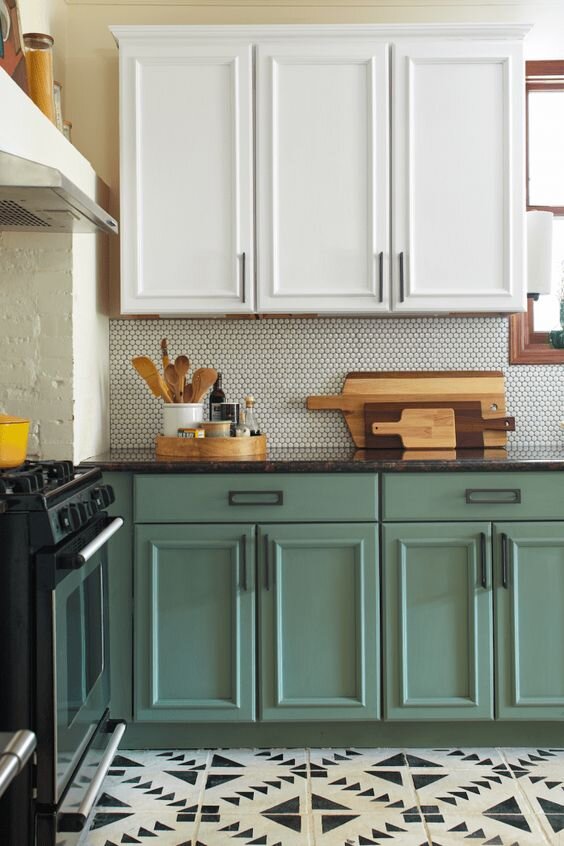
Kitchen

The kitchen is very close to being done, but I still need to install toe-kicks under the cabinets and replace the trim. In a perfect world, I’d replace the lighting in there too, but we’ll see where that falls into the grand plan.
Related: Green Cabinet Inspiration
Playroom

We have loathed the ornate design of the fireplace in the playroom since we moved in, so we’re hoping we can modernize that and the surrounding built-ins this year. I’d also like to make this room more functional for our girls. We have a lot of their toys in here, but there’s a lot of unutilized space too. We haven’t really put any thought or effort into this room thus far so it’s way past due for some attention.
Foyer

Behind the scenes, I’ve slowly been working to make the foyer a more inviting entryway. It’s one of those things that I can kind of work on between projects with no real timeline or rush. There are just a few more tweaks I’d like to make in this space before I call it “done”, and I think I can easily accomplish that this year.
Mudroom
I imagine our mudroom eventually as an insanely functional space with cubbies and storage galore! However, right now, it’s definitely looking worse for wear as we had to remove some of the drywall to get to some of the plumbing for the renovation (the master bathroom is directly above the mudroom). I doubt we’ll be able to tackle the mudroom fully this year, but I’d like to at least replace the missing drywall and hang our coat racks back up. Baby steps.
Final Thoughts
It feels like there are a lot of items on our to-do list for this year, but honestly, this is my restrained version - ha! But in all seriousness, priorities will shift and some of these items will get replaced with other projects. And that’s okay! I’m already looking forward to covering all the projects we tackled in 2021 this time next year!
Related Home Improvement Posts
2021 Design Goals

8 Big Projects We Worked On in 2020
Looking back over the last year(ish) I'm amazed at how many changes we've made throughout our home! Every day it's becoming more and more "us”, which feels amazing. So right about now seems like a good time to recap 8 big projects we worked on in 2020 - with before and after pics! Including one project I never even wrote about and the first picture I’m sharing of the kitchen since I painted it!
What We’ve Changed In Our Home Since Moving In
We moved into this house at the end of October 2019 and quickly started doing our thang and updating it to our liking. Although it's actually been a little over a year since we moved in, I think it was close enough to the end of the year that we're going to pretend we've only been here since January 2020 and make this a nice and clean starting point, cool? Cool.
Looking back over the last year(ish) I'm amazed at how many changes we've made throughout our home! Every day it's becoming more and more "us”, which feels amazing. So right about now seems like a good time to recap 8 big projects we worked on in 2020 - with before and after pics! Including one project I never even wrote about and the first picture I’m sharing of the kitchen since I painted it!
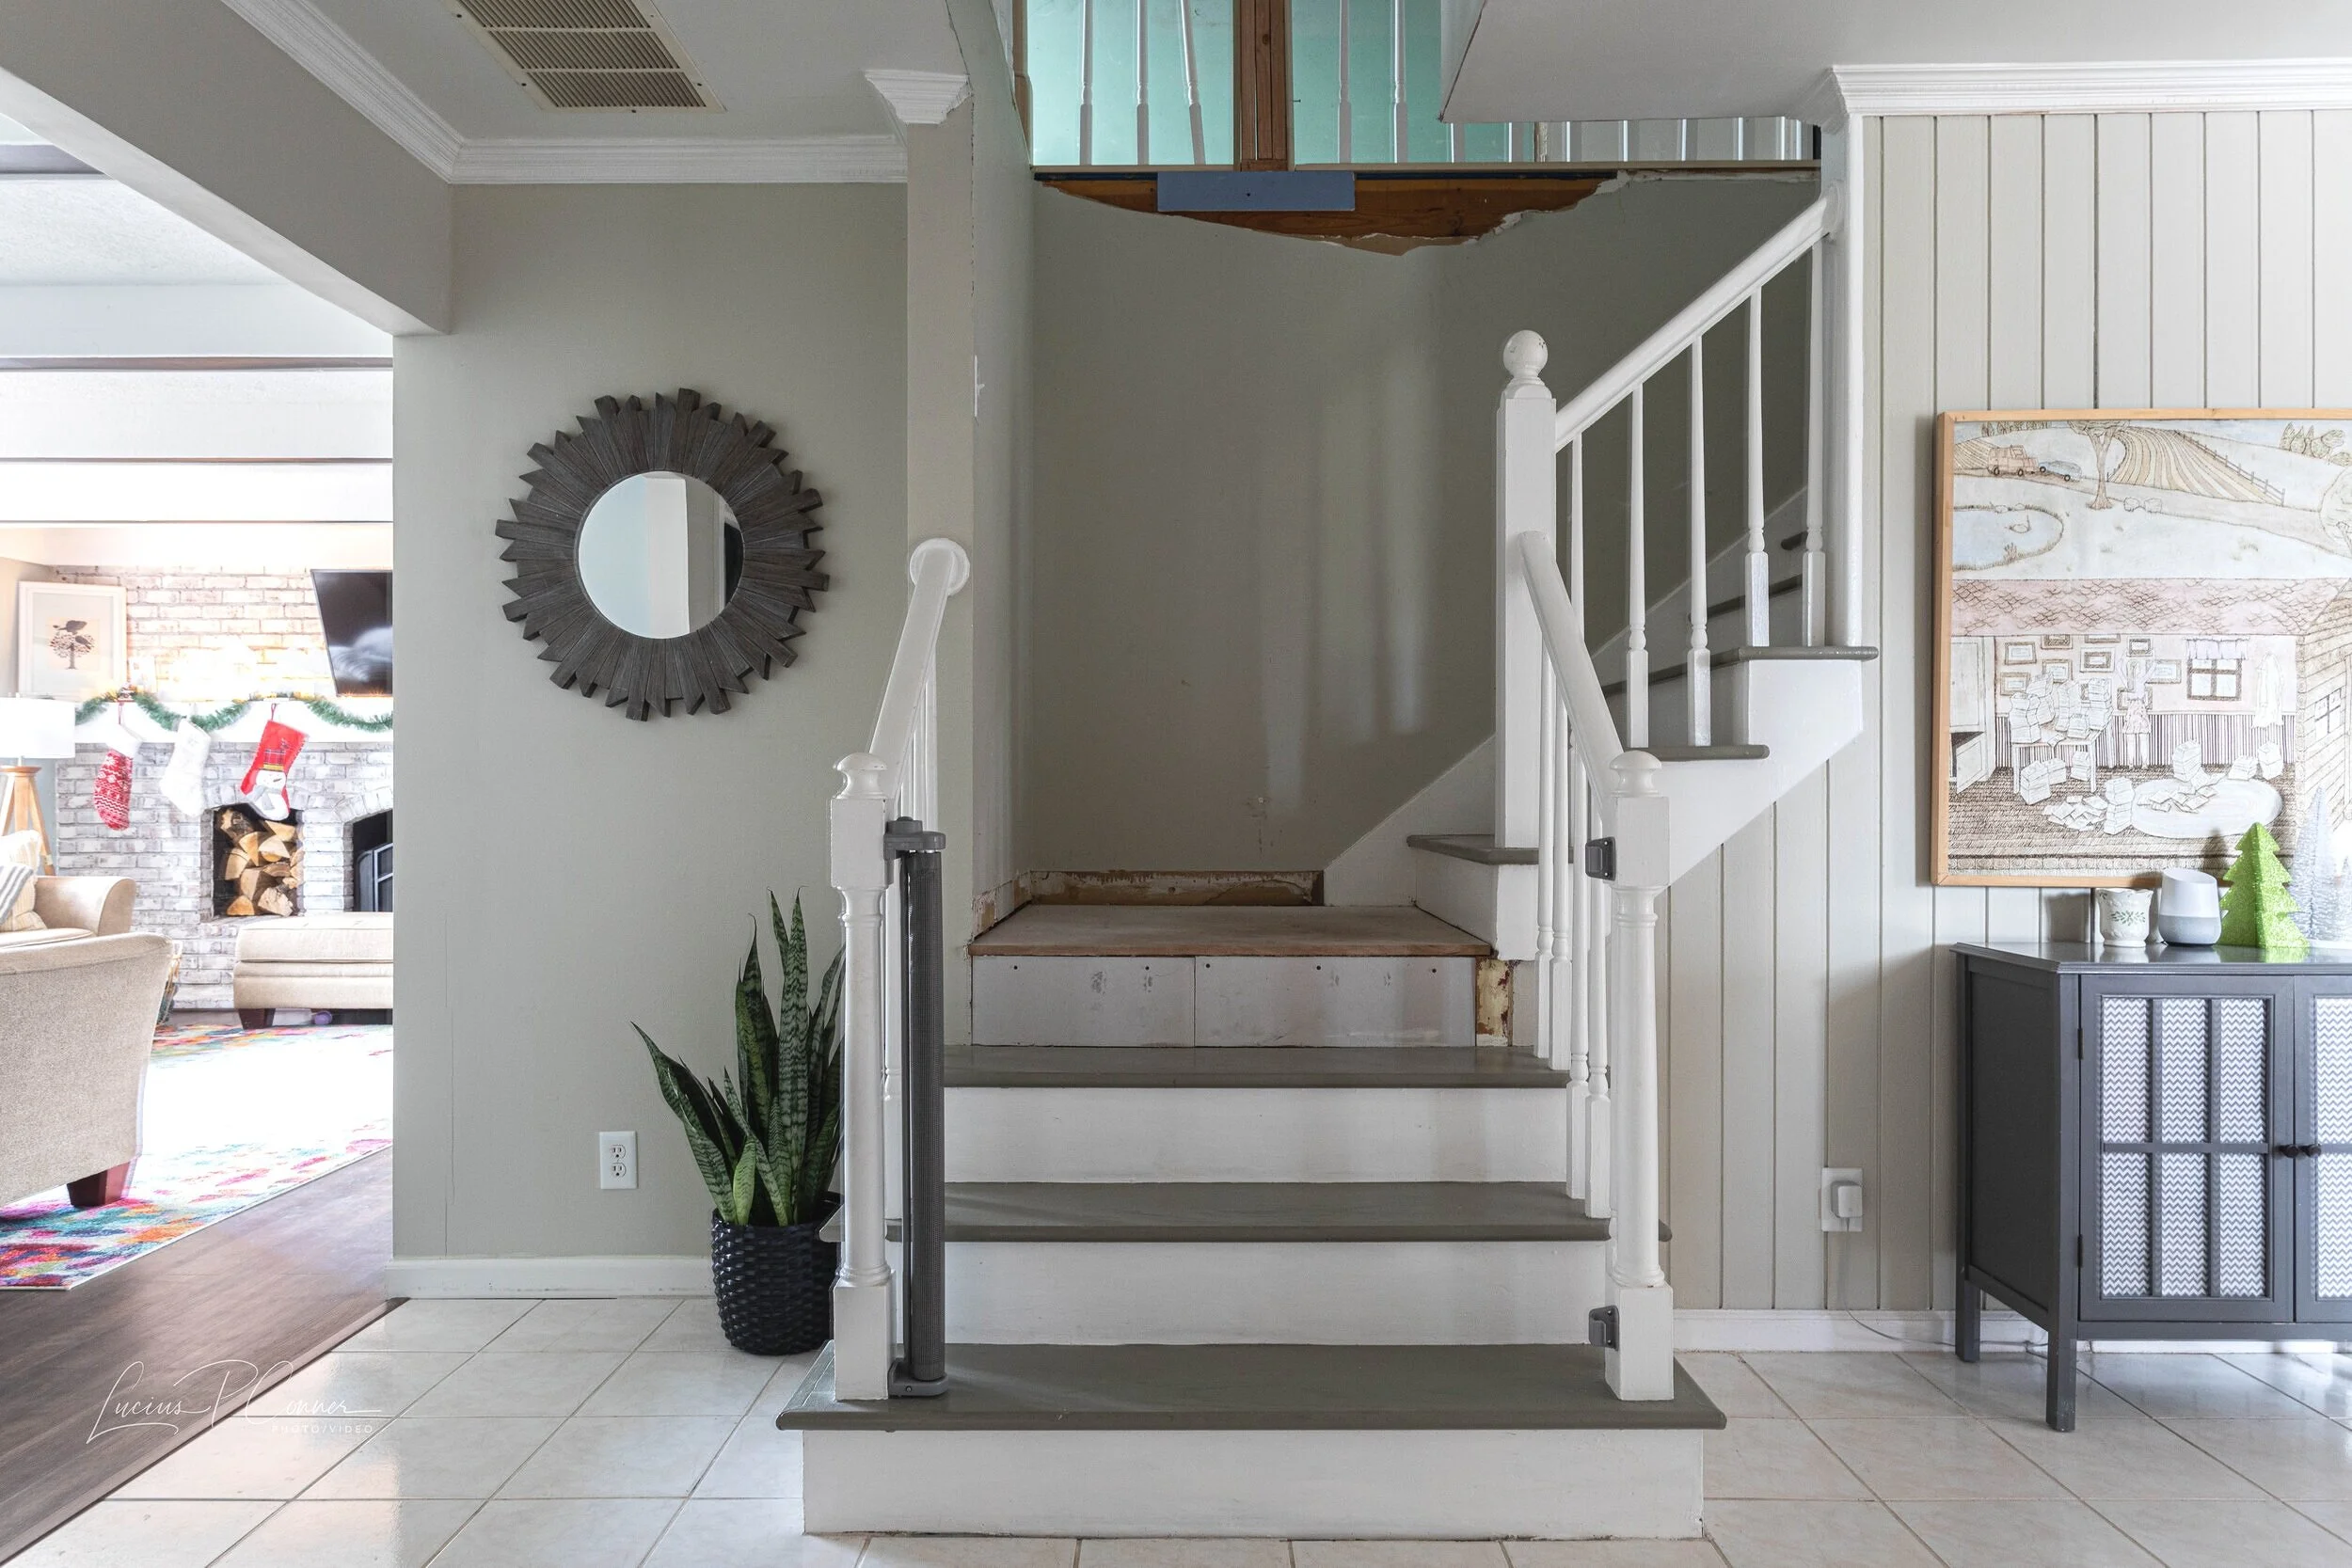
#1 - Painted the Stairs
One of the first projects I tackled when we moved in was painting the stairs. And while they not entirely complete, and definitely need touch-ups after the abuse they've received during the renovation, it was a big project to take on and made a huge impact on our foyer.

Posts Related to Painting Our Stairs
#2 - Made Over Our Oldest Daughter’s Room
Another project I completed shortly after moving in was making over our older daughter's room. I really wanted her to feel comfortable and at home when we moved into this house so it was a priority to make it "her" space asap. I love kids’ rooms and the flexibility you have with pattern and color. I had a blast making her ombre wall and love how it all came together.

Posts Related to Making Over Our Oldest Daughter’s Bedroom
#3 - Designed a Home Office
Ah yes, 2020, the year of working from home. Once I knew I wasn't going back to the office, I knew I needed to make our spare bedroom into a beautiful space I actually wanted to spend time in stat. So I got to work repainting it in a bright off-white color and drew an accent wall with a Sharpie paint pen. Now, this room makes logging into work way less of a bummer.


Related Posts About My Home Office
#4 - Renovated Our Dining Room
Like my office redesign, this room started off as a space we were anything but drawn to. It's amazing how opening the wall between the kitchen and dining room and modernizing the dining room overall actually made us want to use the room! Now we use this room every day for meals (as opposed to the eat-in kitchen) and because the buffet table houses all the kids’ craft supplies, this room gets a ton of use for coloring/crafting sessions.


Posts Related to Our Dining Room Renovation
#5 - Opened the Wall Between Our Foyer and Living Room
Speaking of opening up walls, I never actually wrote about this project, but around the same time we opened up the dining room wall, we also opened up the wall between the living room and foyer. Just like the above, it makes the spaces feel so much more connected, and we love that it allows some more light into our dark foyer. Plus, it's really handy to be able to see from the couch if our 5-year-old is trapped on the stairs by the baby gate now.


#6 - Started Our Master Suite Renovation
In case you weren’t aware, we started a huge freaking renovation last year! Obviously, this is the biggest project on our list. And while it's not done yet, these spaces look completely different from a year ago. I’ve loved watching the old layout disappear and see my vision for a more functional layout come together.


Posts Related to Our Master Suite Renovation
#7 - Painted the Kitchen Walls and Cabinets
I've shared bits and pieces here and on Instagram about how I've been working on the kitchen. And while there’s still a little work to be done before I call it finished (trim, toe kicks, replacing light fixtures), I’ll leave you with the current “after” below.


Posts Related to Painting Our Kitchen Walls and Cabinets
#8 - Flipped a House
Oh yeah, and we flipped a house last year! It feels like so long ago I almost forgot. Flipping our little house was definitely a challenge, but it was also a fun experience that I'd like to do again in the future. We just have to find that perfect flip… and some time.

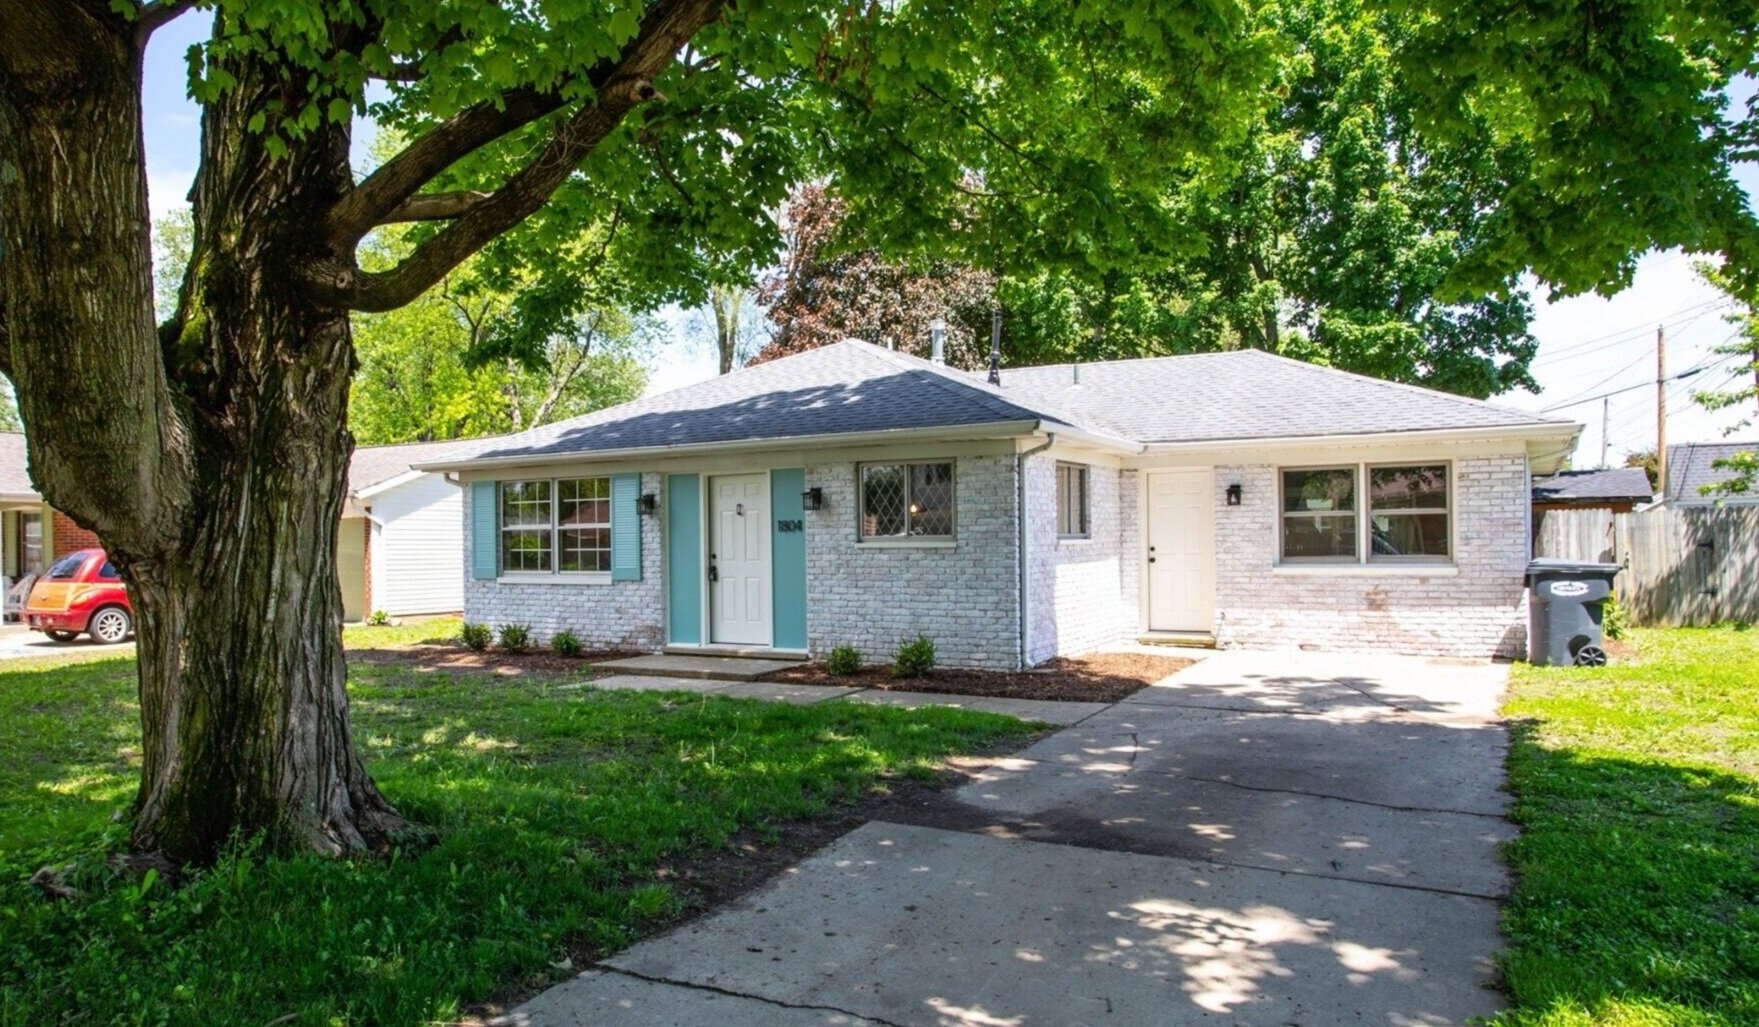


Posts Related to Our House Flip
Final Thoughts
It’s a bit of a whirlwind to think of everything we’ve updated in just a year. I think an updated house tour is in order! But we’ll cover that another day (soon!).
Want More?
Come see what we have up our sleeves for this year!
Home Projects We Tackled in 2020

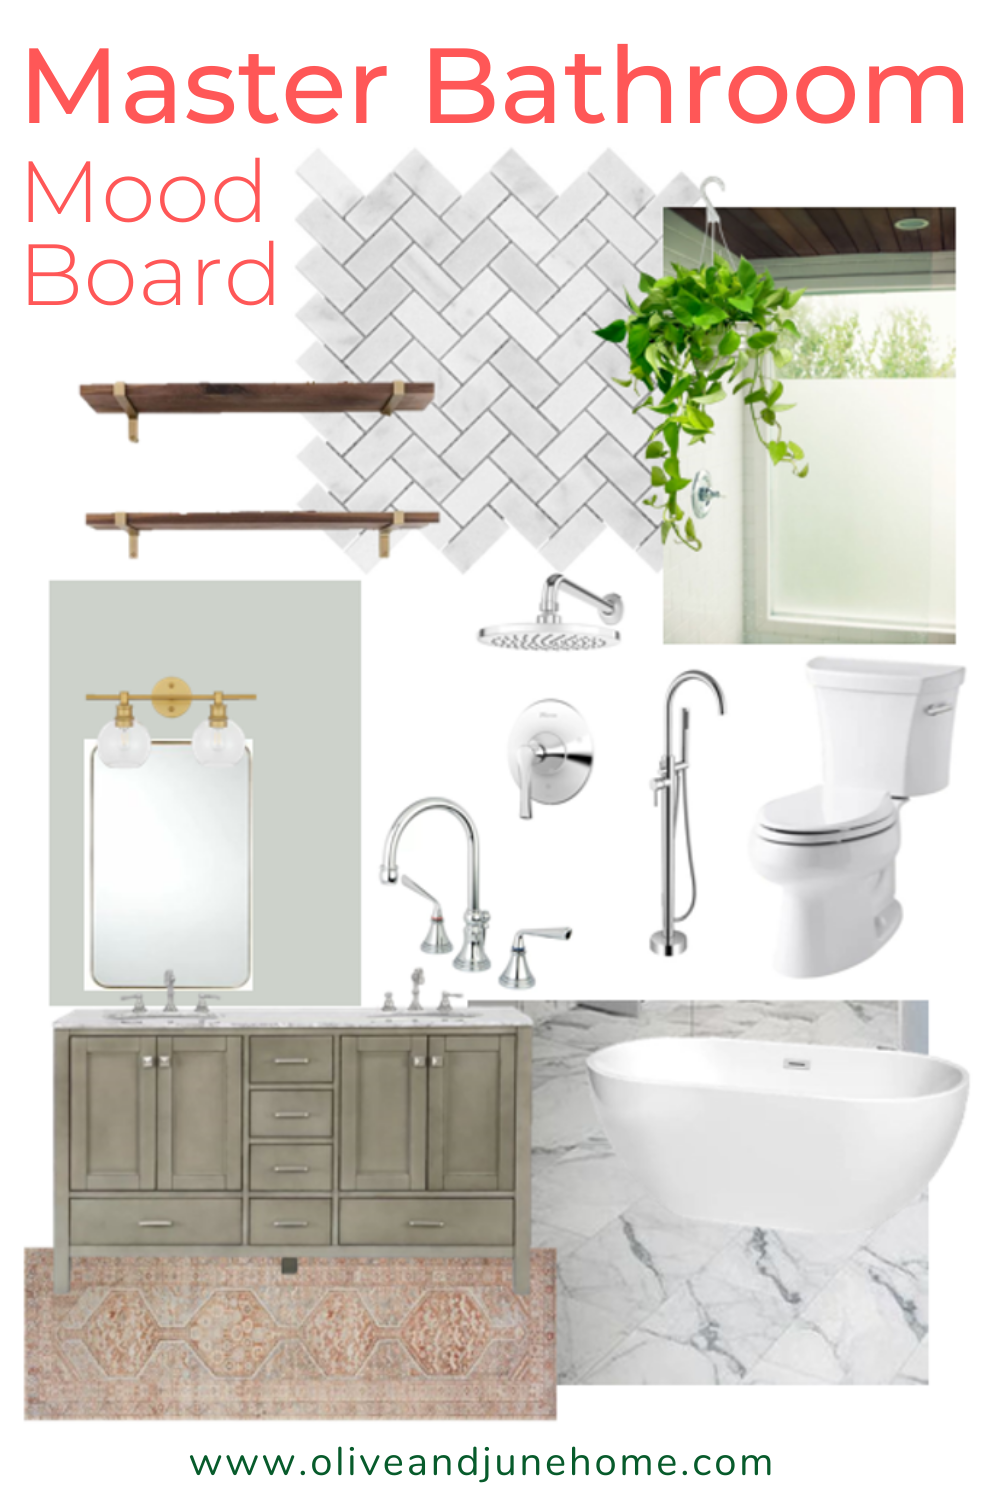
Master Bathroom Mood Board
Our master bathroom renovation is trucking along. In fact, almost everything is already ordered! So I think it’s about time I shared the design with all of you!
Master Bathroom Design Plans
As per usual, we’re up to our elbows in multiple projects at the moment. I took a break from working on the kitchen and shifted focus to finish sanding and priming the bedroom while Lucius has been working on the master bath. Needless to say, the kitchen reveal will have to wait - but I assure you it’s lookin’ goooood!
While we still have a ways to go on the bathroom, I’ve been planning the aesthetics for a while and I have a VISION. Considering the current state of the bathroom, you’ll have to use some imagination to see how it’ll all come together.
But I’ve thrown together a mood board to help! Here’s where my head is at:

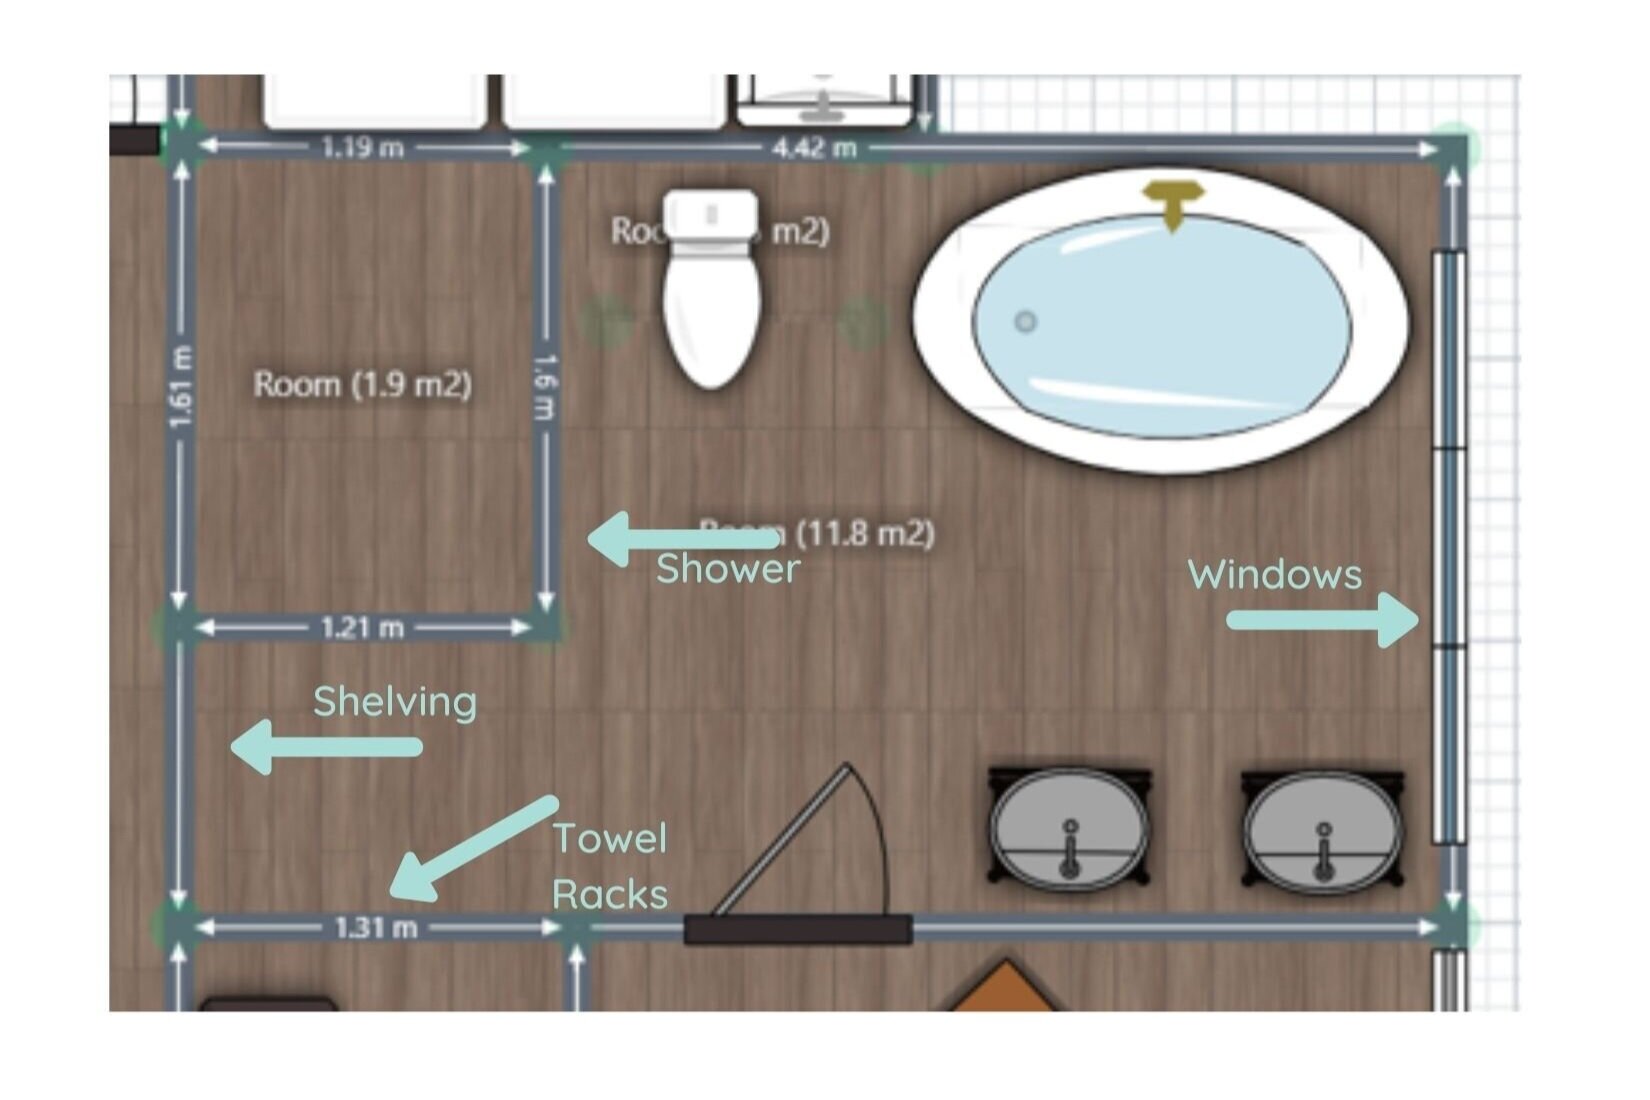
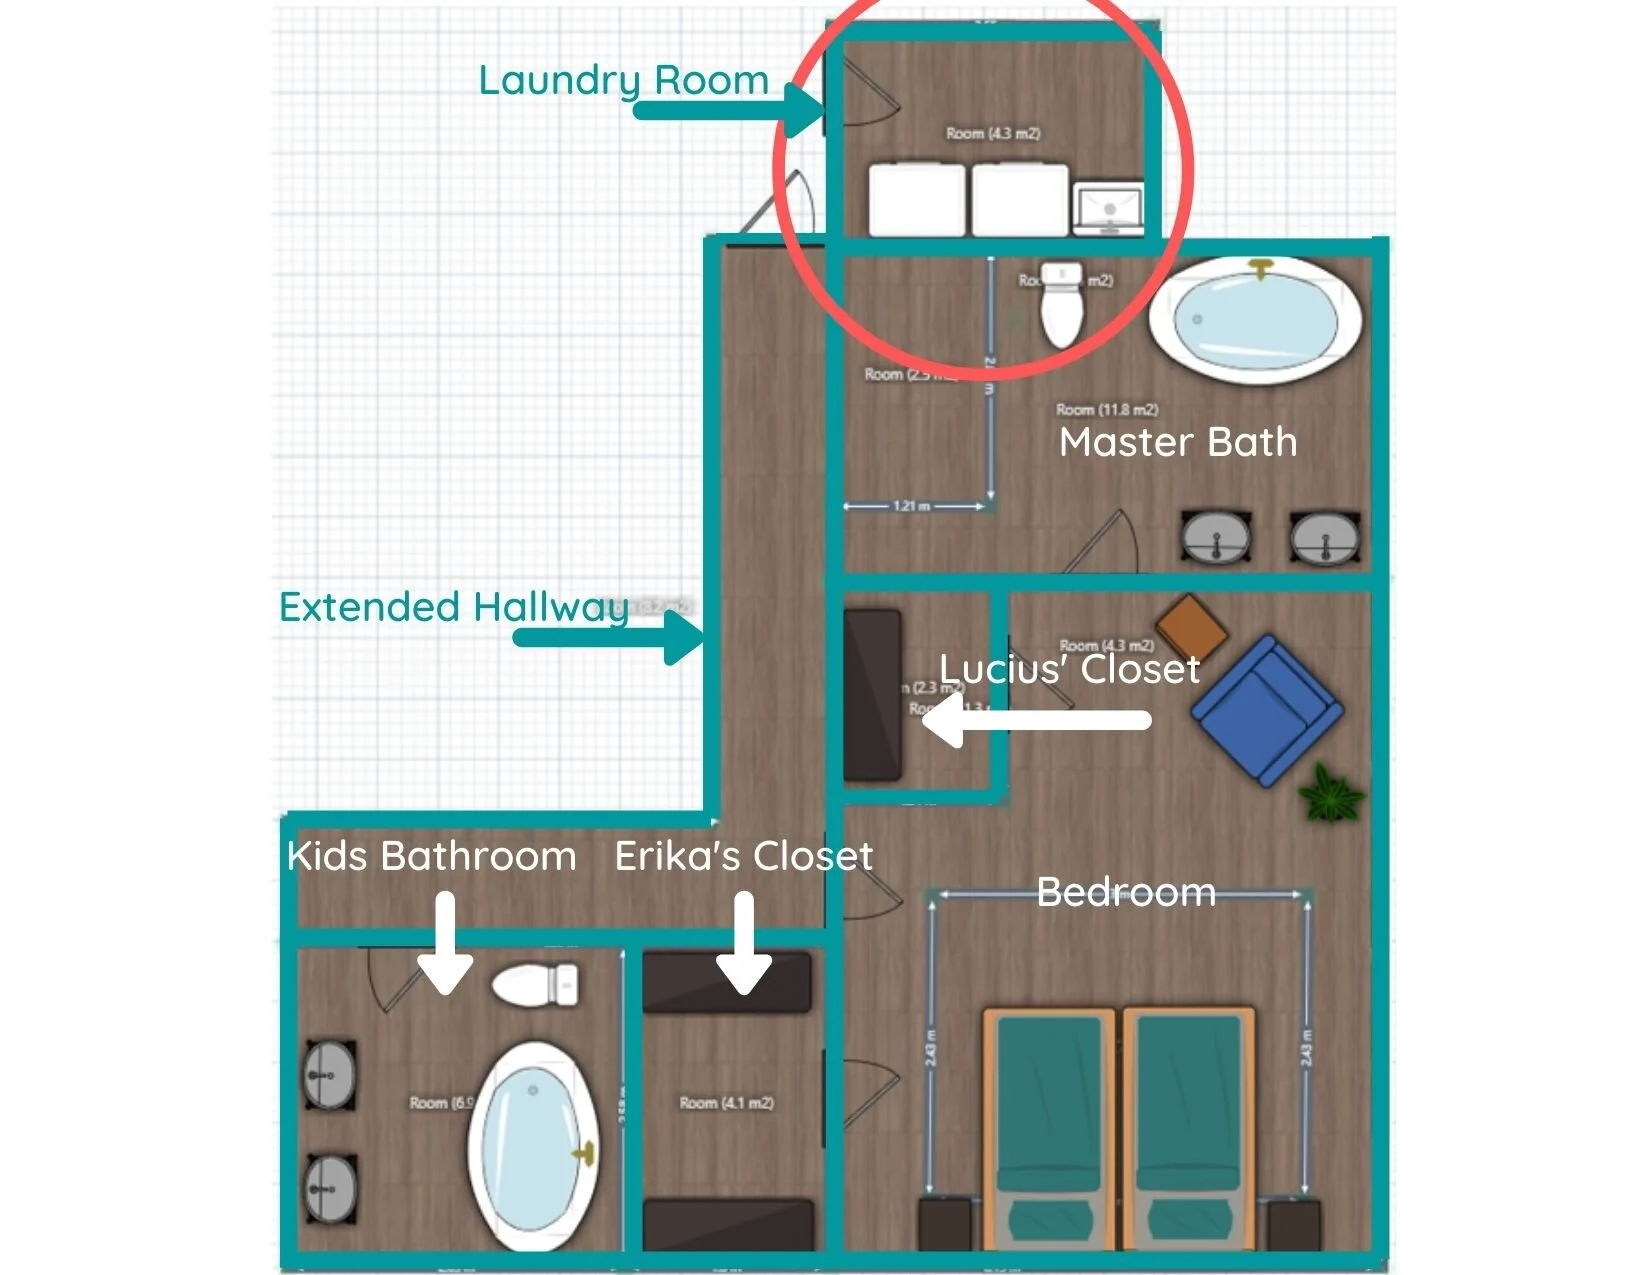
To help you get a better frame of reference for the layout, here’s the overhead floorplan.
My goal for this room is to create a space that feels luxurious, without completely blowing our budget. I spent HOURS finding just the right everything - the style of items I wanted at a decent price with good, solid reviews.
Now let’s get into the details of what I picked out, shall we?
As an Amazon Associate, and partner with other brands, I earn from qualifying purchases. This post may contain affiliate links, meaning I receive commissions for purchases made through those links at no cost to you.
Flooring
Starting with the big hitter: the floors!

Floors are a big design decision. They kind of take up a ton of visual space, after all. But they were honestly pretty easy to choose for this space.
As I started gathering ideas of elements I wanted to include in our bathroom, these tiles just seemed like the best fit for the look I was going for. I love the classic look and the flowy veins running through them. They’re not too in-your-face but definitely aren’t boring. And at less than $2 per square foot, I couldn’t resist!
The tiles are porcelain made to look like marble. There was a ceramic look-alike but after doing some research, it seems that porcelain is more durable. Plus, I like that these tiles have a matte finish, which should help decrease the risk of slipping and sliding all over a wet bathroom.
Lastly, I love the large 12x24 inch size of these tiles because we plan on using a smaller tile pattern in the shower. Varying the size of patterns in the same space keeps them from competing with one another, so the size was another bonus!
Shower
While we’re talking about tile, our shower walls will sport this gorgeous herringbone tile.

As mentioned above, the pattern of this tile is much smaller than the floor tile so I think they’ll complement each other nicely. Plus, I’m a sucker for a herringbone pattern and had to have it. In contrast, the floor tile will be laid in a staggered pattern.
Now, let me see if I can explain how it’ll all flow together…

In the picture above, I’ve outlined where the glass shower wall will be installed (green) and where the shower tile will run (orange). The shower itself will actually stop a bit before the end of the glass shower wall. But the tile is going to run floor to ceiling along the entire left-hand wall above and around the front shower wall.
Where the shower ends, we plan on adding open shelving for storage. Since there’s so much grey going on in this room, I’d love to incorporate some wood tones to warm it up. I’m thinking of rich wood shelves with pretty brass brackets.

Obviously, mine won’t be filled with kitchen supplies, but you get the drift. You’ll see how these elements will tie into other areas of the room a little further down.
Lucius has also somehow managed to talk me into a) installing a curbless shower so the floor tile will carry through seamlessly and b) not installing a shower door. My hope is that the rainfall showerhead we bought, the slope of the drain, and the depth of the shower will keep the water (and warmth!) fairly centralized. Though I did warn him that if I get goosebumps while shaving my legs he’ll hear about it forever.
Bathtub
While we’re talking about splish-splashing around, we’re installing a soaker tub and I’ve never wanted to take a bath more in my life! It’s already been delivered and roughed into place. I got to hop in for a dry test run and it’s HUGE!

Fixtures
I decided to get a bathtub with polished chrome drains, which inspired me to get polished chrome for all the fixtures - including this stylish shower head, tub filler, and vanity faucet.

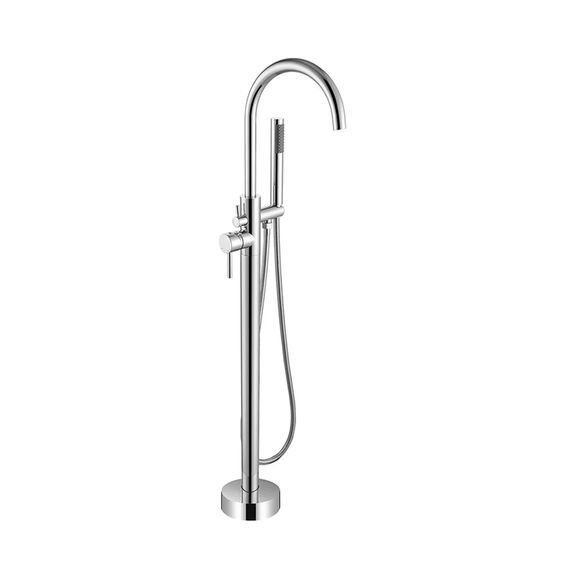

BUT, as I mentioned above, I’d like to warm this room up with some wood tones and brass accents. Here’s where those will come in:
Lighting, Mirrors, and Accessories
While we’re installing two recessed lights in the ceiling, I snagged two of these brass beauties to be installed above each of our mirrors over the vanity.

On that note, the vanity lights will be paired with a couple of these mirrors:

I don’t think these exact mirrors are sold anymore, but here’s a link to a very similar mirror with great reviews (and it’s even a couple of inches bigger!)
To add wood tones in more places than just the open shelving, I’m eyeballing some wooden hooks like the ones below to hang between the mirrors to be used for hand towels.

I couldn’t find the link for the exact hooks you see above but these hooks are similar. And there are tons of other styles of wooden hook options like these, these, and these!
Vanity
I talked a lot about what is going on around the vanity, so this feels like an appropriate time to actually talk about the vanity.
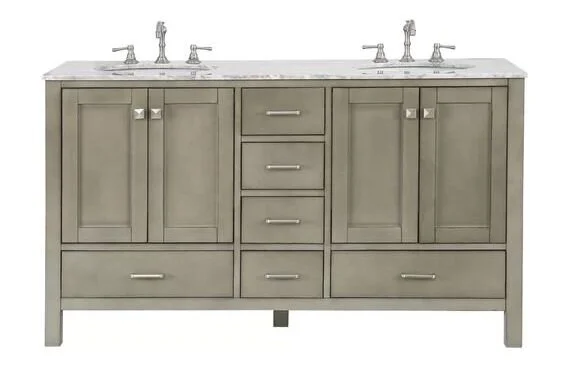
I went back and forth a lot on whether to get a basic white vanity or get one with some color. The finish actually looks more intense in the picture above than in real life. John and Sherry over at Young House Love used the same one in their master bathroom and I may have been swayed by how gorgeous it looked there. We got it with a quartz top and it’s beautiful!
The only problem is… when it arrived, both the sinks were broken. The good news is that we were able to get a full refund and don’t have to return the base! So we’re going to try our hand at ordering some new sinks and attaching them ourselves.
This one isn’t sold anymore, but here’s a very similar vanity.
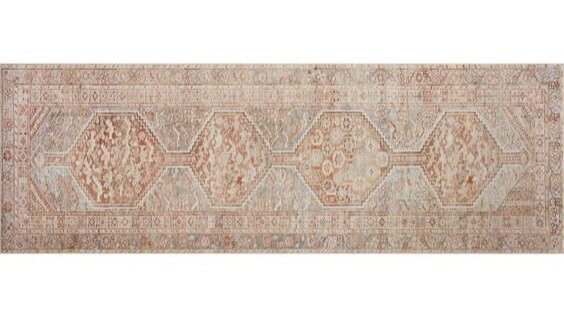
I’m imagining a pretty patterned runner in warmer colors in front of it, kinda like this one:
Wall Color
While we’re talking about color, one thing we can’t forget to mention is wall color. Depending on how everything comes together, I might paint the walls off-white. But I really love the thought of using Sherwin Williams Sea Salt in here. I used it in the bathroom at our last house and it’s such a beautiful spa-like blue/green/gray color. In fact, I used the next darker shade on the paint swatch in our living room in this house!

Windows
And lastly, from the picture of the bathroom earlier in this post, you may have noticed we have four large windows that span one entire wall… which looks straight at our neighbor’s house. So what do you do with windows in a bathroom? Well, I don’t know about you, but I plan on frosting mine!
I love how in this example they only frosted the bottom 3/4ths or so. I’d like to do something similar to ours.

Naturally, I can’t wait to add some light and humidity-loving plants to this room to really make it cozy and bright.
And since the sun blazes onto this side of the house late in the day, we plan on throwing up some blinds for those days when it’s just a little bit too intense. But most of the time, I’d love to let it shine in.
Final Thoughts
So there you have it - the full design plan for the master bathroom renovation! We should be well on our way to drywalling very soon here and then tiling, painting, and installing everything!
I can’t wait to see my vision come to life, because in my head it looks reaaaaal good. I might just end up moving a sleeping bag into this room when it’s all said and done because I think I’m going to love it way too much to ever want to leave!
For more renovation-inspired posts, check out these:
Spa Inspired Bathroom
DIY Cardboard House Luminaries
I’ve mentioned in the past that I have a bad habit of overcomplicating things. Well, not this time! I created these sweet little cardboard house luminaries in just a couple of hours (including time for the paint to dry). Let me show you how!
Easy DIY Luminaries
I’ve mentioned in the past that I have a bad habit of overcomplicating things. Well, not this time! I created these sweet little cardboard house luminaries in just a couple of hours (including time for the paint to dry). Let me show you how!

When I shared my mantel after I decorated it for Halloween, I mentioned that I didn’t have a lot of holiday decorations. Really, Christmas was the only holiday I decorated for in the past.
But after I decorated for Christmas this year and looked around, the house was looking a little… meh. To my surprise, I think I enjoyed decorating for Halloween and fall more than I realized, and now that I was decorating for Christmas I wanted more.
Yeah, yeah, yeah, it’s a little late for Christmas decorations. But who says you have to take decorations down right after Christmas!? I might just leave these bad boys up through winter. Anywho…
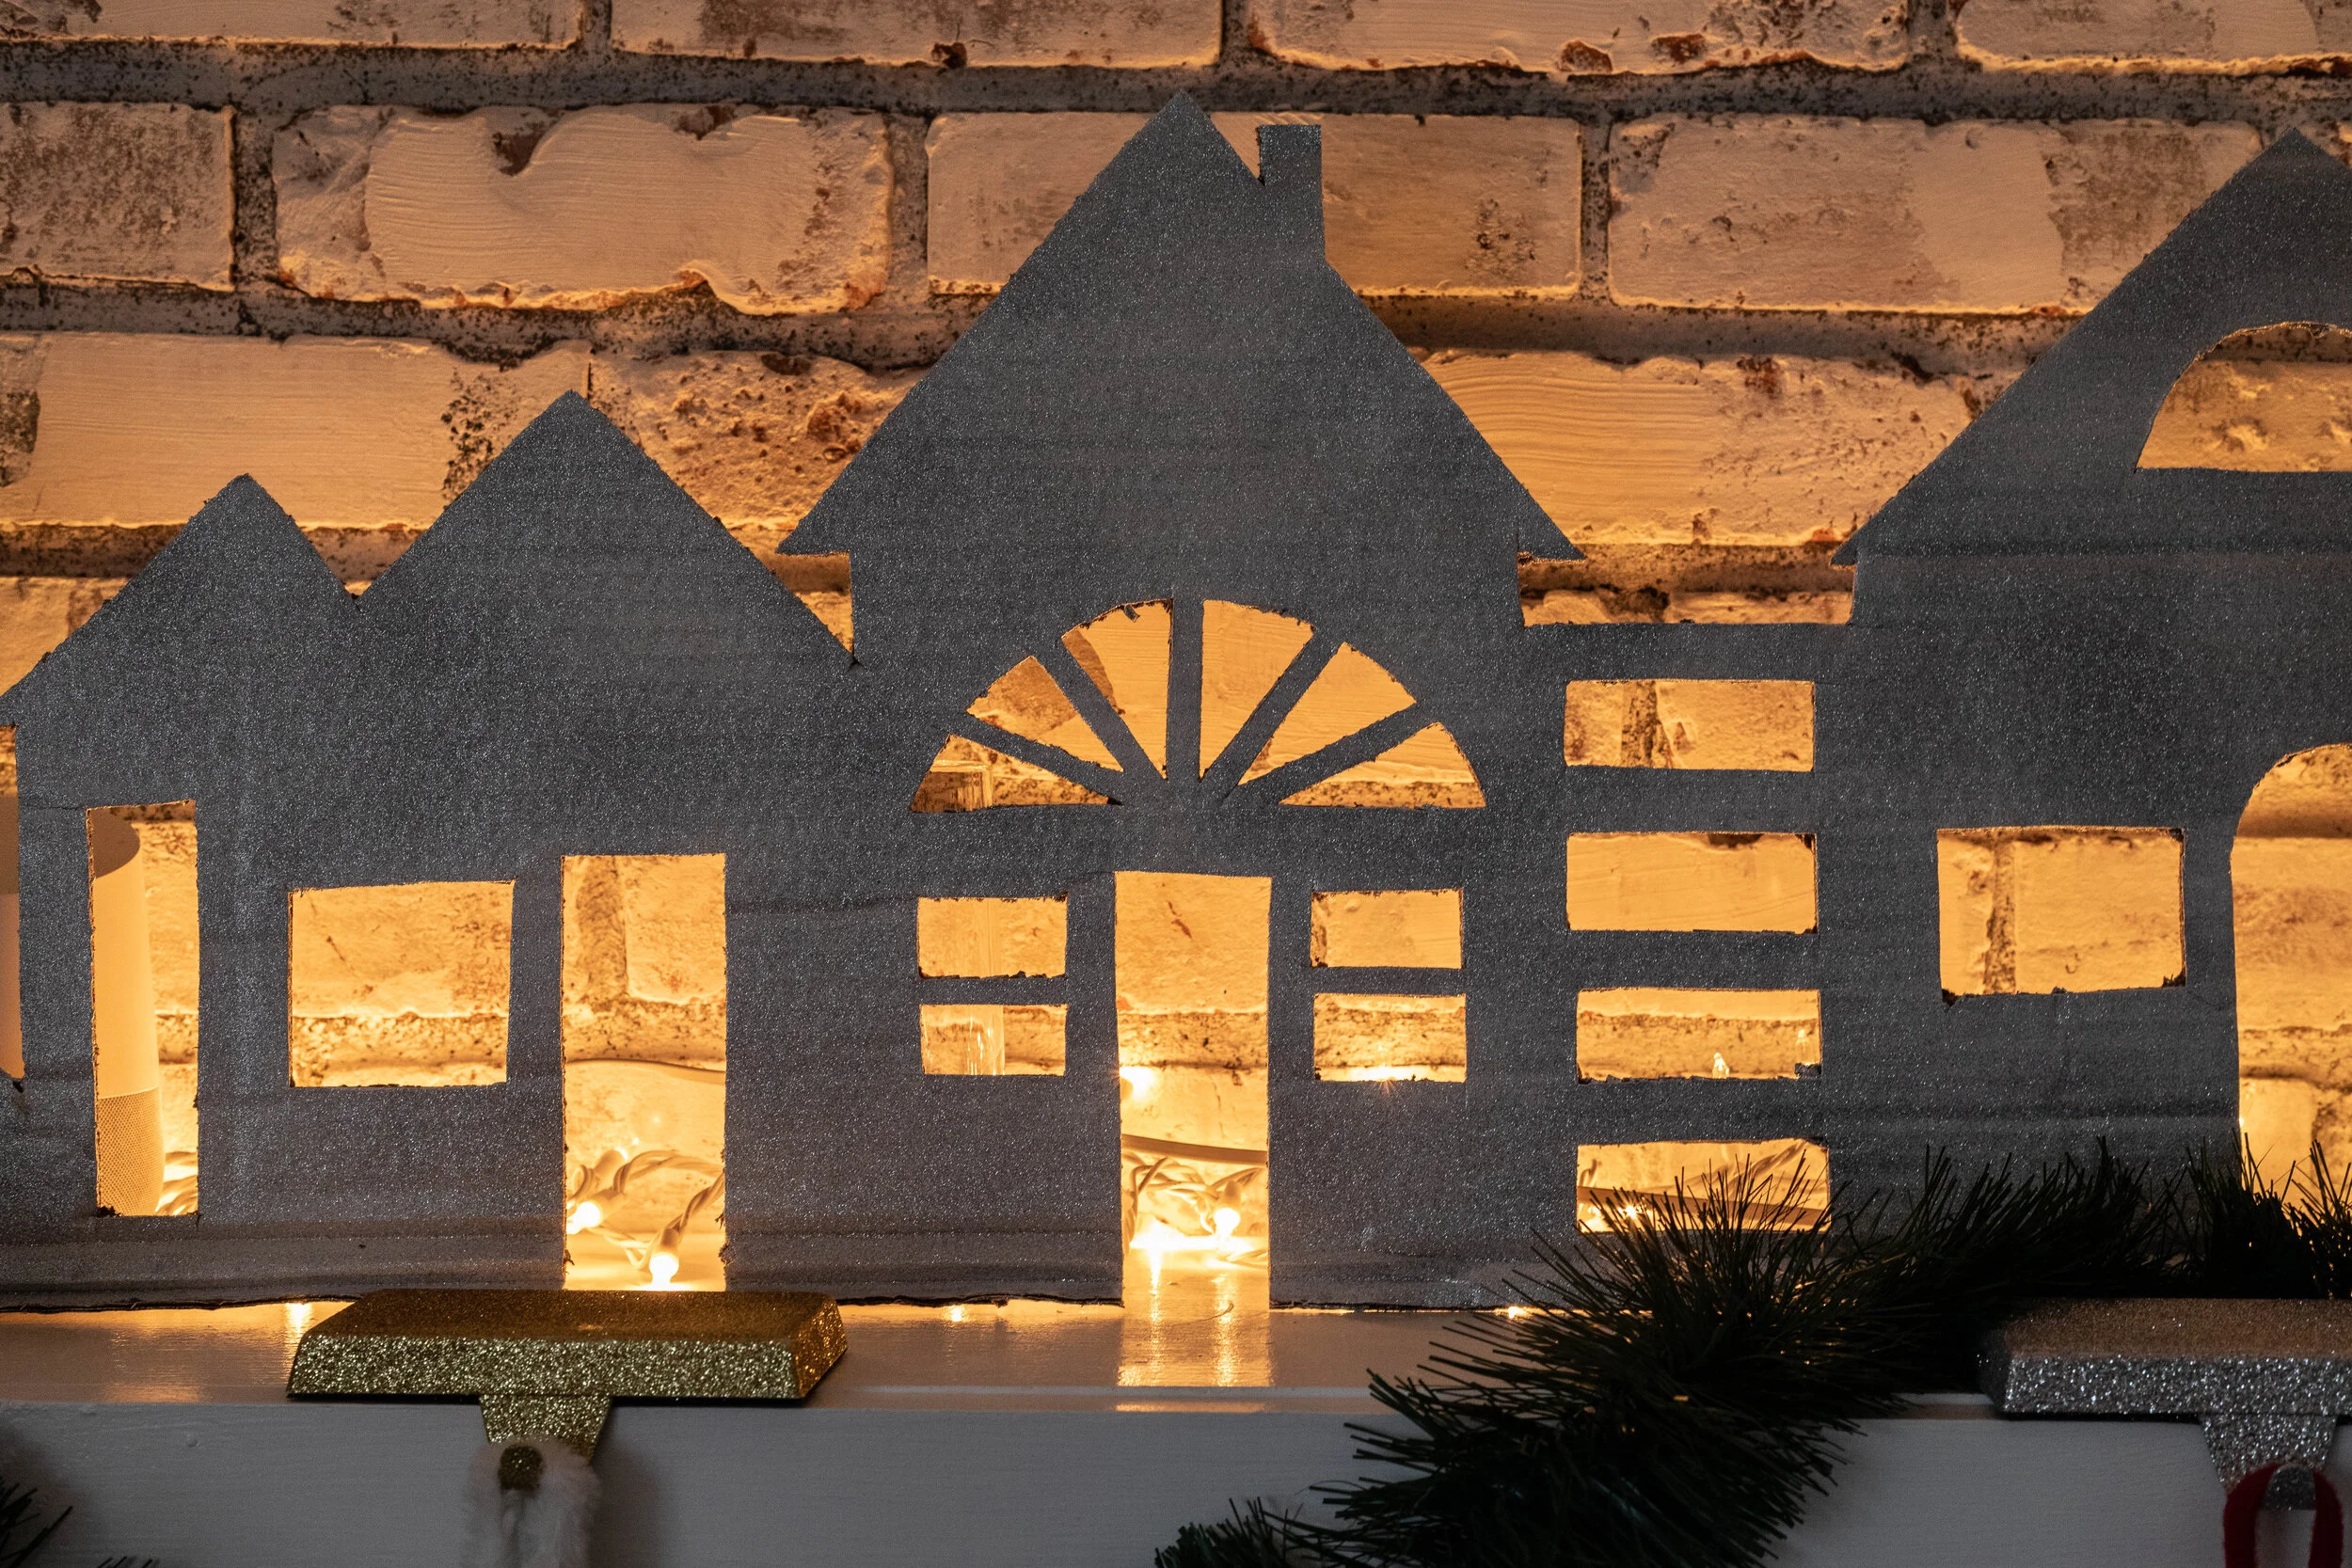
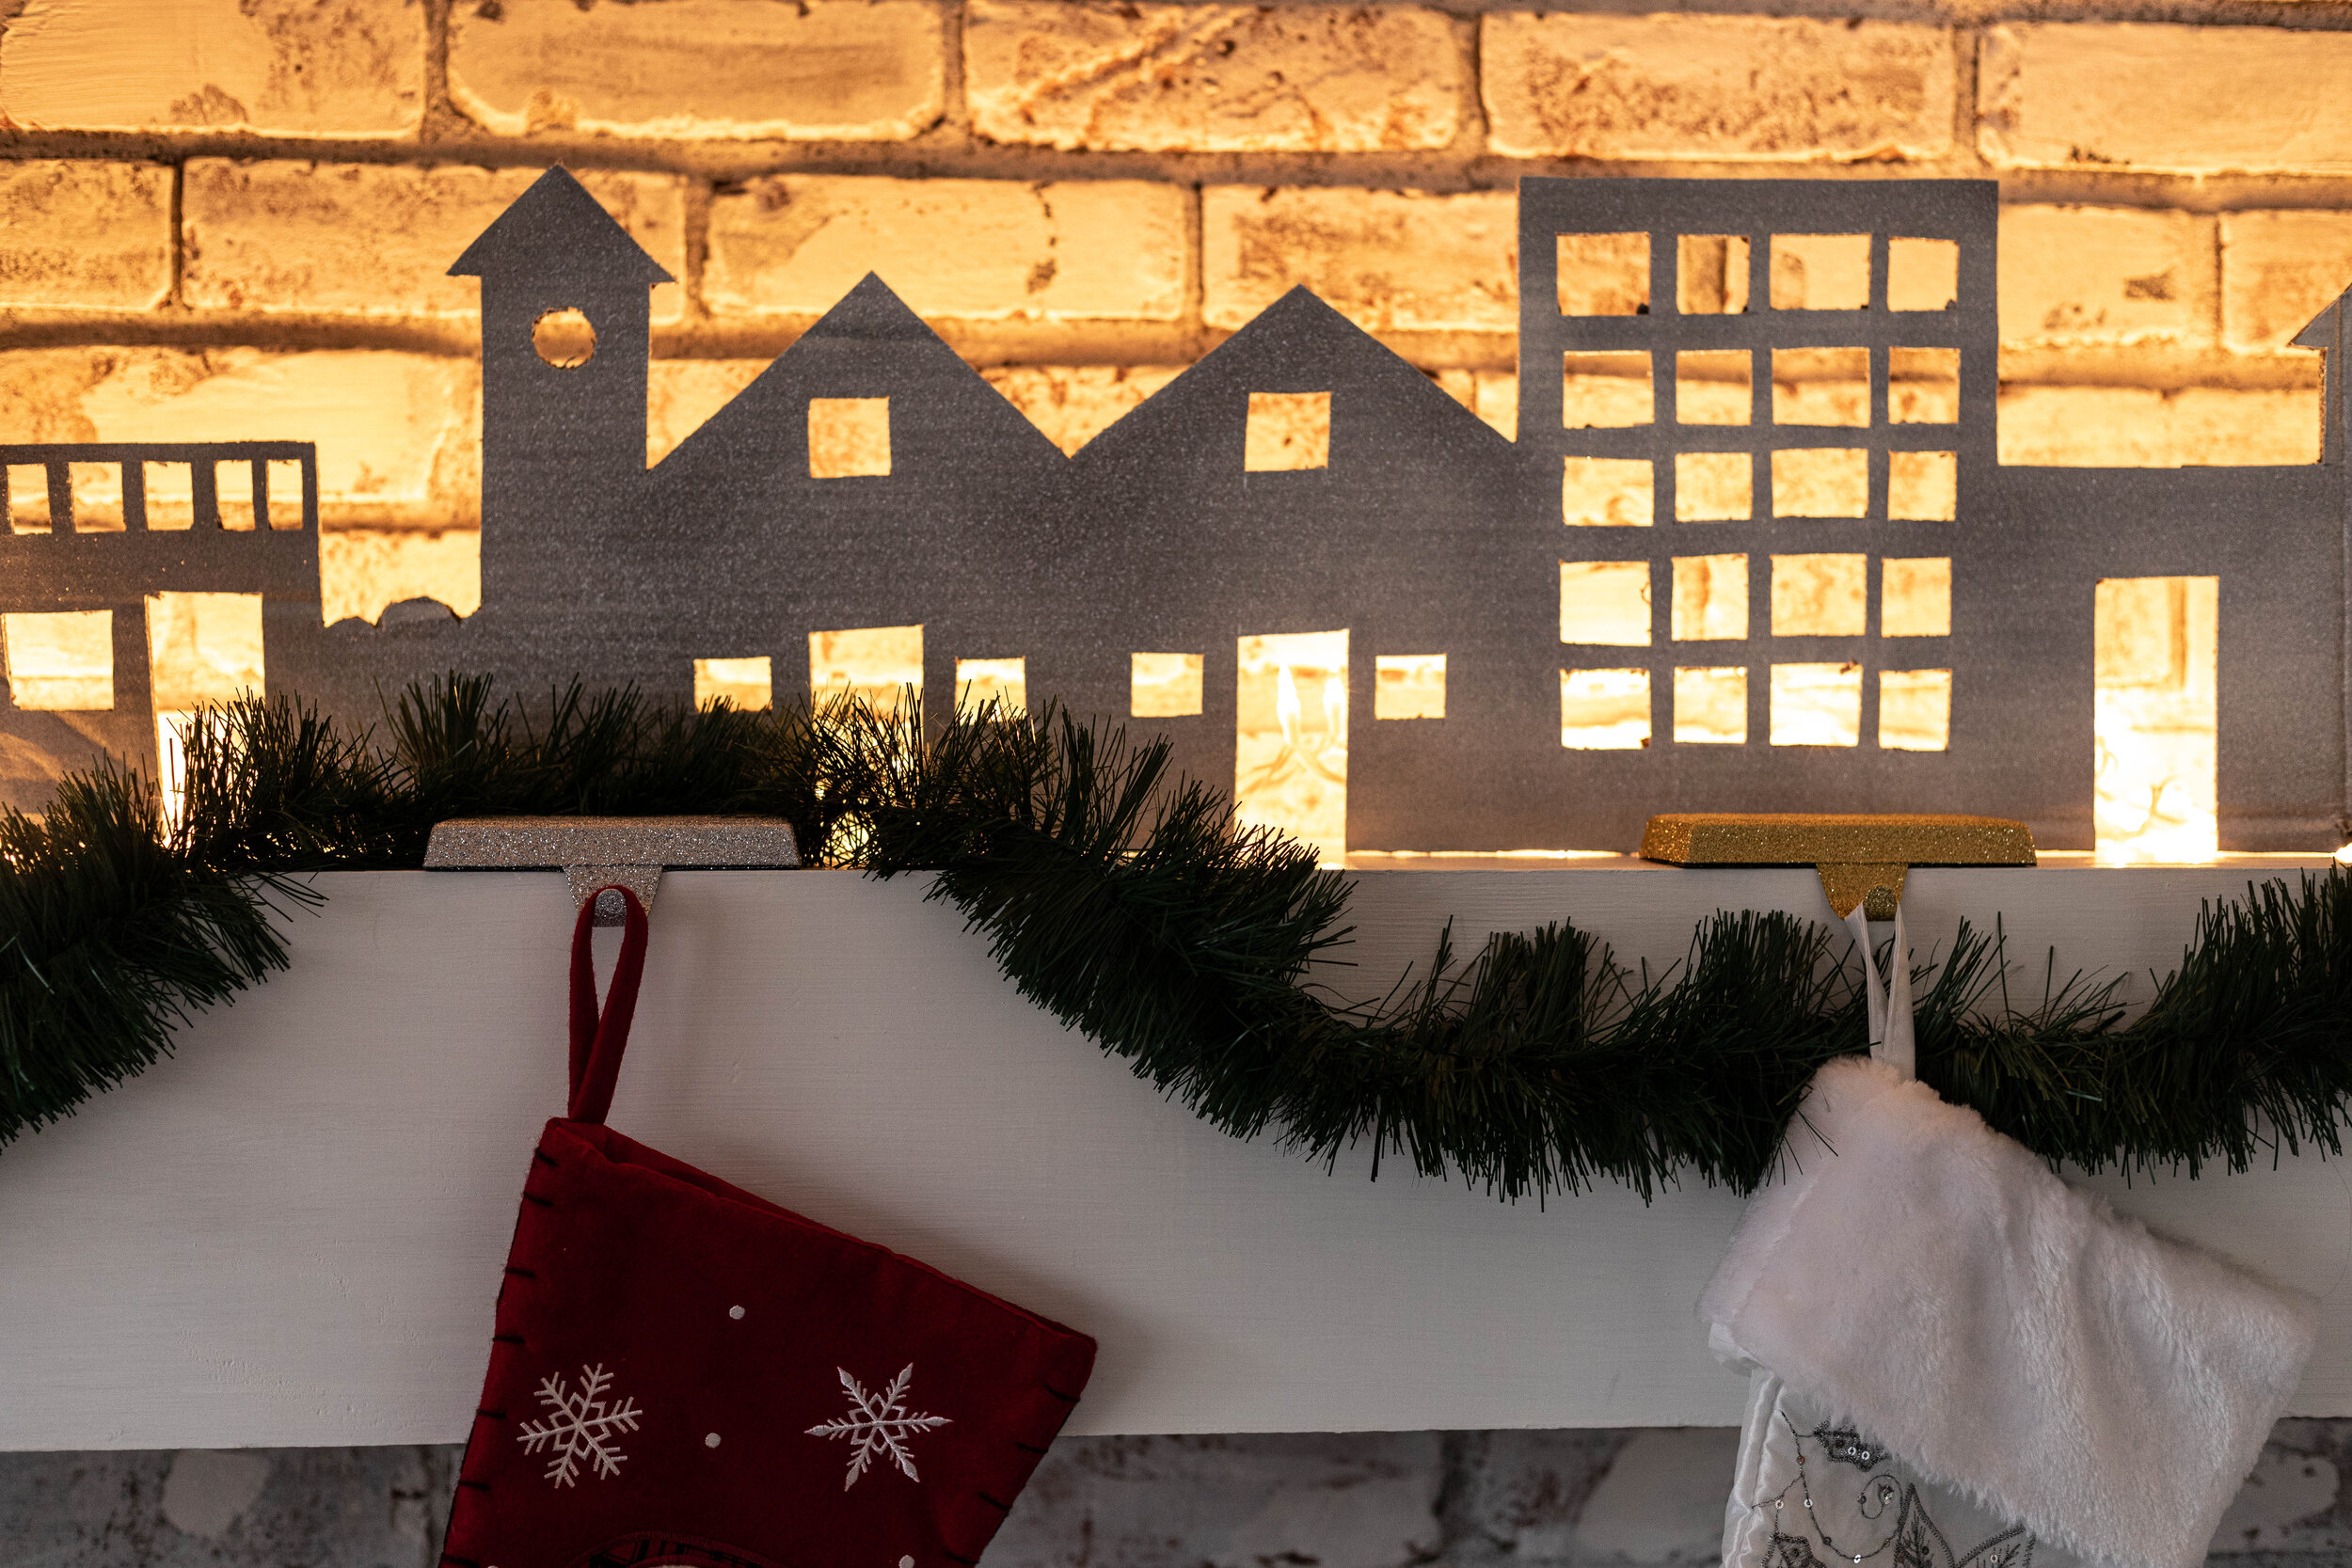
Since our mantel is giant and seems to be the star of the show, especially because that’s where our stockings hang, I felt like that was the perfect place to really add a little somethin’ somethin’. But of course, being me, I didn’t want to drop a bunch of cash on decor when I didn’t know exactly what I was looking for. Then I came across this image and my wheels began to turn:

Like many folks this time of year, I’ve definitely had an influx of cardboard boxes lying around. So why not put them to use and make some cheap and easy Christmas-inspired luminaries!?
While the tutorial from the source above shows you how to make actual little box houses, I wanted and needed something to span the length of the mantel so I left mine flat so it’s just like you’re looking at a row of houses head-on. Here’s how to make your own:

As an Amazon Associate, I earn from qualifying purchases. This post may contain affiliate links, meaning I receive commissions for purchases made through those links, at no cost to you.
Materials
- Cardboard
- Box Cutter
- Pen/Pencil
- Craft Paint
- Craft Brushes
- Lights
- Glitter Spray Paint (optional)
Draw Your Houses
First, cut your box so you have the length you want. Then, start drawing silhouettes of the front of different houses.
This is where I went really off the rails (for me) and didn't.even.use.a.ruler! (What!?) I really just wanted an easy, low-key, slightly whimsical project so I freehanded everything and didn’t mind if it wasn’t perfectly straight (or at all straight - check out that wonky door).

A couple important things to remember here:
Your houses all need to connect
You’ll be cutting all the shapes out with a box cutter in the next step so don’t torture yourself by making your designs super intricate
Cut Out Your Houses

Using a box cutter, cut out the silhouettes of the houses, and all the windows and doors. I put a cutting mat underneath mine as I cut, but if you don’t have one you could also use a scrap piece of cardboard to make sure you’re not scoring the surface underneath.
Paint
Naturally, white paint was my choice for these Christmas-inspired luminaries, but you can paint them any color you want. I picked up some cheap acrylic paint and craft brushes and applied two coats, letting them dry in between each coat.
Enjoy!

While the paint was drying, I strung Christmas lights along the top of my mantel. Happy accident - I picked up lights with white cords, which ended up being perfect for this project! 10/10 would recommend.
Then, I simply placed my houses in front of the lights and ta-da! Luminaries!
Actually, lefty over there kept tipping backward so he’s leaning against a tall glass. It’s clear, so it’s pretty unnoticeable. Except now I just told everyone. Whoops.
Bonus Step!
After I lived with my luminaries for a little while, I ended up coming across some glitter spray paint and figured I’d add a little sparkle to my luminaries - and I’m loving it!

Final Thoughts
While I may replace these down the road with some pretty, ceramic luminaries or other Christmas decorations, I’m actually loving these little houses right now! The extra glow they add to the living room is cheery and beautiful and the kids are enamored by them.
PLUS, I’d like to get at least one more use out of them for Halloween next year by painting the backside black and maybe putting some orange lights behind them. SpoooOOOOOooooky.
For other easy projects, check out these posts:
Make Your Own Luminaries - with Tutorial!

Do Painted Stairs Actually Hold Up?
Painting your stairs can be an inexpensive way to give them a completely new look, but do they actually hold up? No one wants to take the time to do a home improvement project that doesn't last. Lucky for you, in this post, I'm sharing the pros and cons of how my painted stairs are standing the test of time after 1 year so you can decide if this type of project is right for you!
The Pros and Cons of Painted Stairs
Painting your stairs can be an inexpensive way to give them a completely new look, but do they actually hold up?
No one wants to take the time to do a home improvement project that doesn't last. Lucky for you, in this post, I'm sharing the pros and cons of how my painted stairs are standing the test of time after 1 year so you can decide if this type of project is right for you!
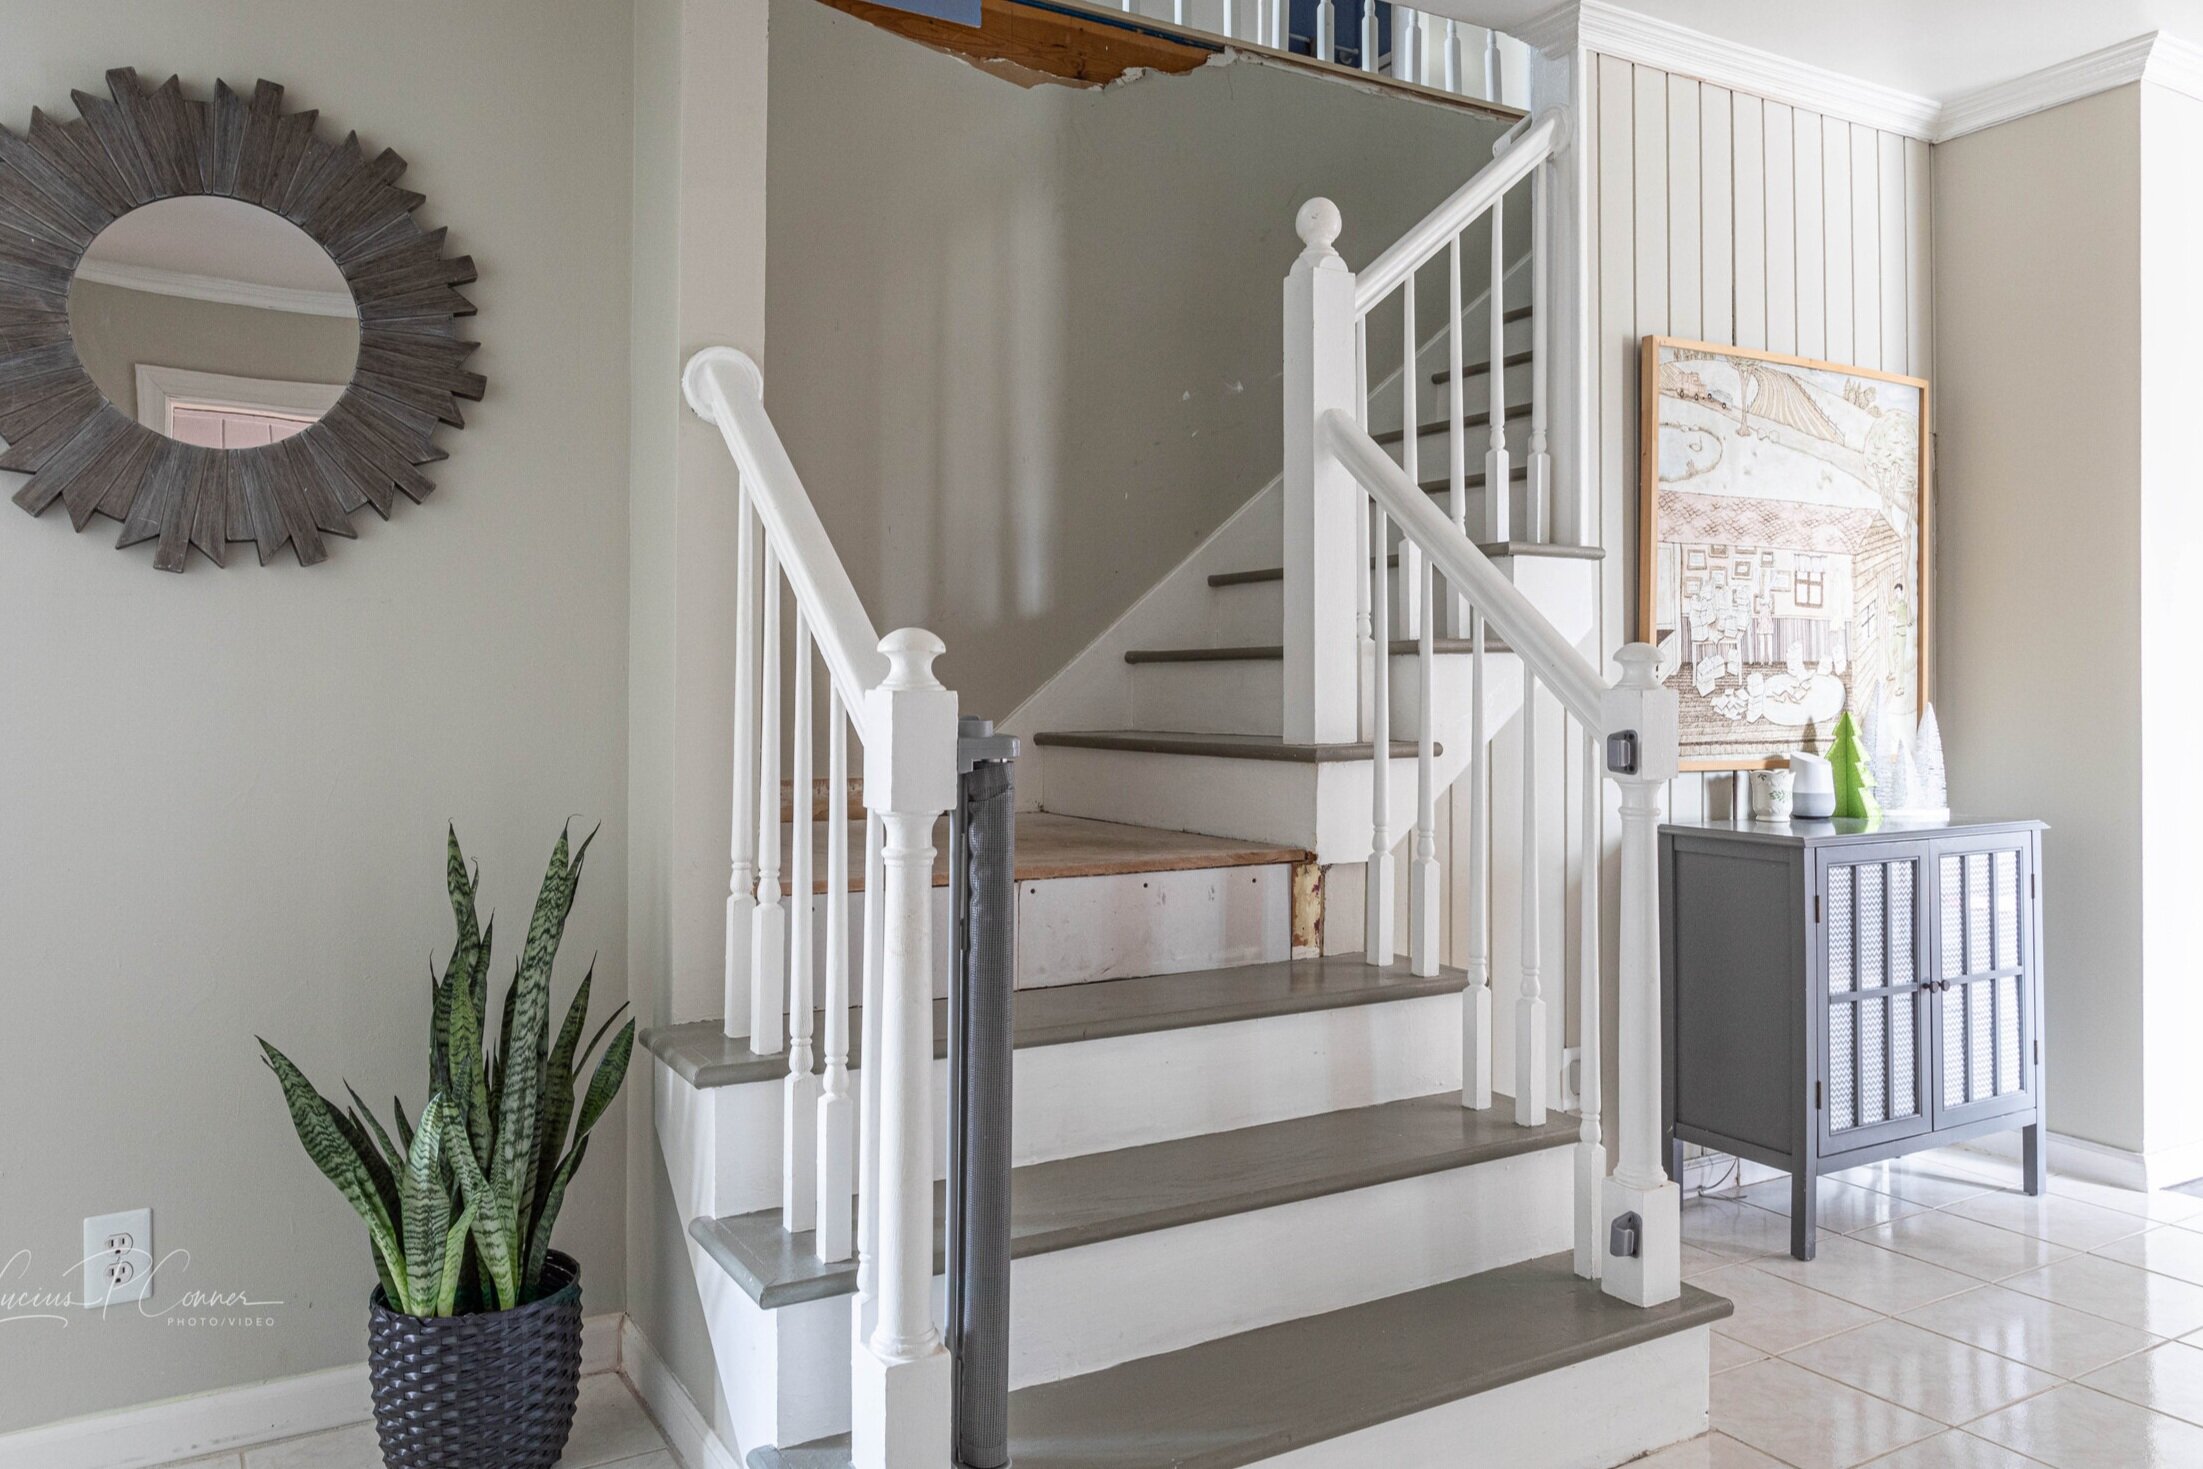
We moved into our house a little over a year ago (at the end of October 2019). I immediately knew there was no way I wanted to be met with this image when I walked in my front door:

So the first project I tackled was ripping up the gross, dingy carpet and painting the stairs. In fact, that was one of the first projects I posted about here on the blog, too!
In the original post, I wrote all about how to rip up carpet on your stairs, prep, and paint them. But today I'm giving you the skinny on the question you might be wondering about…
Do Painted Stairs Actually Hold Up?
And my answer is a resounding YES! Better than I imagined, in fact!

Now, our stairs (and the surrounding walls) aren’t looking quite as pristine as they were when I first painted them. That’s to be expected. But ours have been particularly beaten up because a few months after I painted them, we decided to start our master suite renovation (that was a pretty significant lack of planning on our part).
However, considering they've had to endure the abuse of Lucius as he has not-so-gently carried loads of construction materials up and down them, they've held up amazingly well! I really do think our stairs have held up so well because of the time I took to prep them, and because I used a good quality porch, floor, and patio paint.

So, would I do it again? Absofreakinglutely! But painted stairs aren't without their faults. Here's a breakdown of the pros and cons of painted stairs to help you decide if painted stairs are for you.
Pros of Painted Stairs
DIY
Although it can be time-consuming, painting your stairs is totally a doable DIY project. Compared to the amount of time it would have taken me to sand, stain, and protect the stairs to return them to hardwood, painting my stairs was a much quicker (and cleaner) option.
Surprisingly not slippery
I mentioned in my original post that I was concerned the glossy paint used on the stairs would be slippery. Boy, was I wrong. I've lived in houses with carpeted stairs and I can honestly say I've slipped on the carpet way more often than I've slipped on my painted stairs - and that's coming from a self-proclaimed klutz!
Cleanliness
Sweeping the stairs with a broom is so.much.easier than hauling a vacuum up and down.
Cons of Painted Stairs
Cleanliness
I know, I know, I listed this as a "pro" too, but while you don't have to vacuum painted stairs, you do have to sweep and mop them every once in a while. Not the worst job in the world, but certainly not something I look forward to.
Upkeep
While prepping your stairs and using a high-quality floor and porch paint will help keep your stairs looking nice, nicks and general wear and tear are more noticeable than on hardwood and you'll have to touch them up occasionally.
Mystery
If your stairs are carpeted and you don’t know what kind of shape they’re in underneath, you might run into some unpleasant surprises, like we did with our landing. In fact, just a few days ago I ripped up the rest of the hideous carpet that was at the top of the stairs and unearthed more things we’ll need to fix (cue the big ol’ gap between the tread and riser). Bwomp Bwomp.
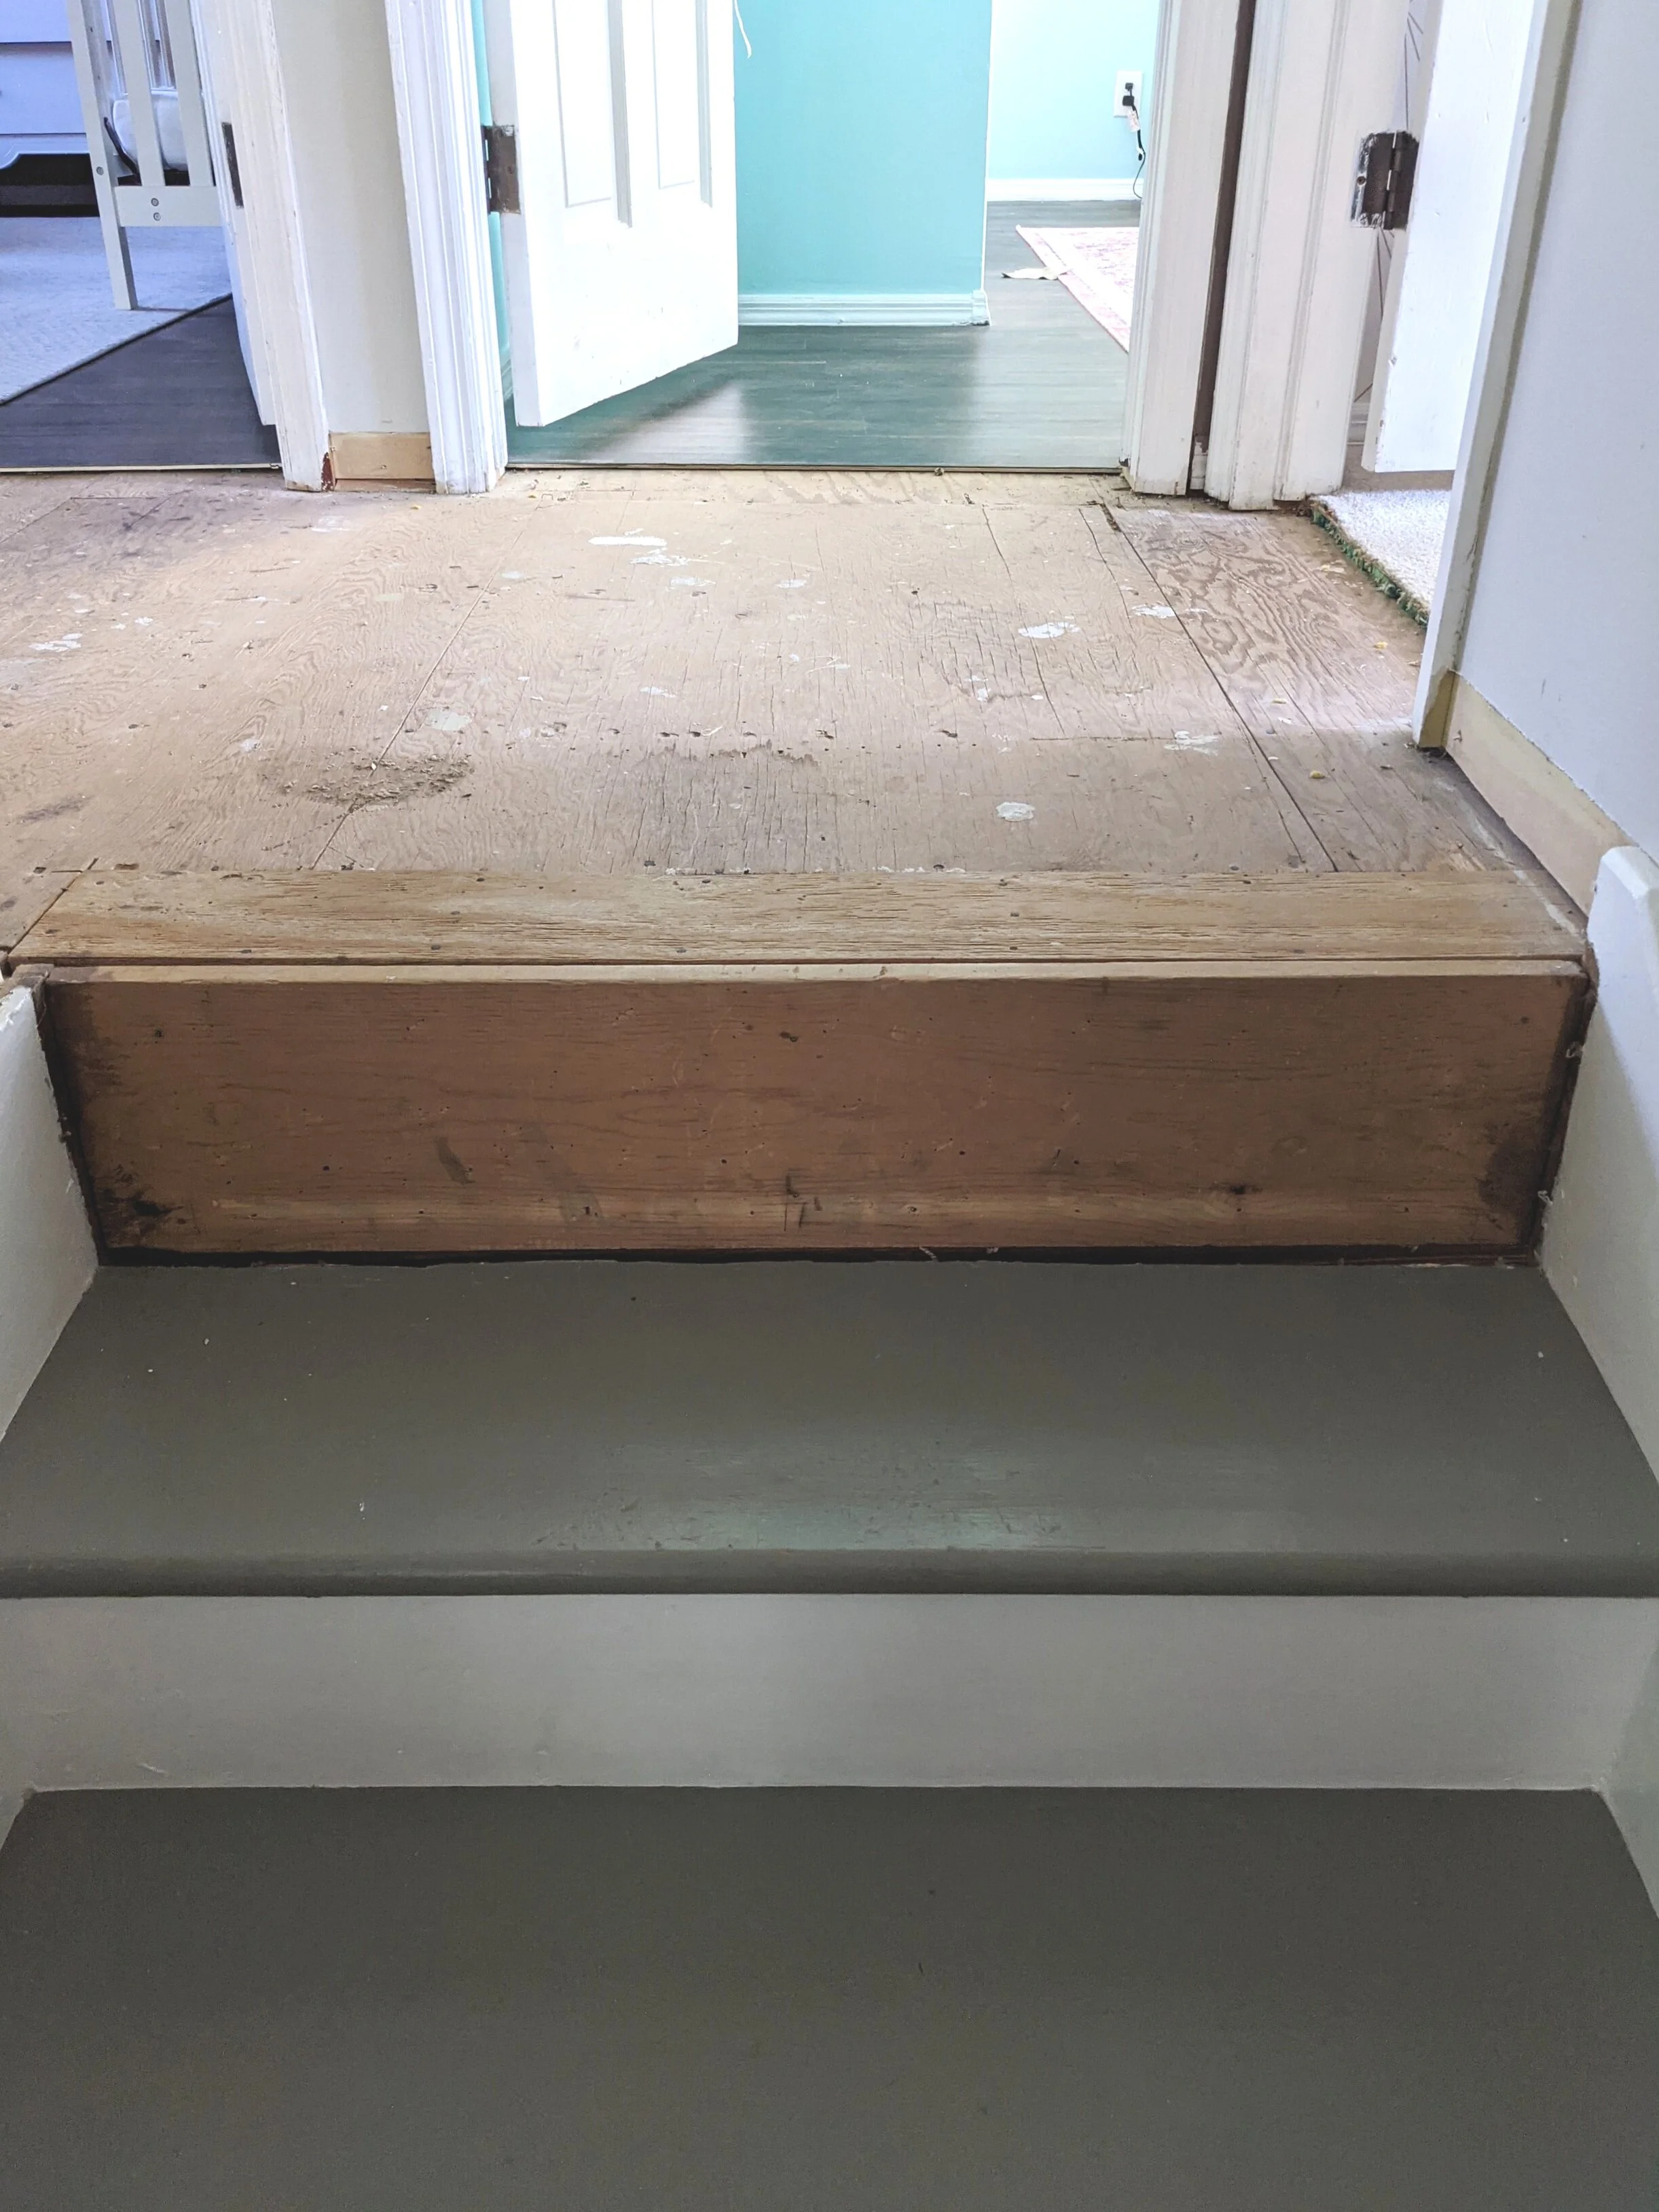
The Elephant in the Room
Since I mentioned the landing… what the heck is going on with it? (Or, in other words, “why does it still look like crap?”)

As you can see, our landing hasn’t been replaced yet. I mentioned in the original post that we installed a temporary landing made out of some thick MDF-type material until we could figure out how to replace it.
We've discovered during this process that finding stair landings is oddly difficult. I don't know if we're just not looking in the right places, but we've only found one company near us that sells solid stair landings and they're about 3 hours away. Our current plan is to wait until the master suite reno is complete and we're not running the risk of ruining the new landing, then take a little road trip to pick it up.
Is the current landing ugly? Heck yes! But it works and it's not the final version so I think we can live with it a little while longer. Plus, in case you didn’t notice, we'll have to do some other repairs once the reno is done anyway.
What About the Railing?
So while the stairs are holding up nicely, and we’ve addressed the landing situation, the handrails, balusters, and newel posts (all of which will now be referred to as “the railing” because that’s way too much stuff to list out over and over) have seen better days, and I think I know the issue. This is one of those mistakes that I’m kicking myself for because I should have known better and now I’m going to have to fix it.

When we moved in, the railings were newly repainted and already peeling a little bit. I should have bit the bullet then and stripped the paint off then, but this was at the end of prepping and painting the stairs and I was tired. Now I’m paying for it.
When I painted the railings AGAIN, the paint never seemed to fully adhere and remained a bit tacky. Because of this, anytime the railing gets nicked or looked at the wrong way, it peels some more. You can easily take a fingernail and start to peel the paint off. Ugh.
BUT, I suppose that goes to show that even those of us that do this stuff all the time still make mistakes. And on the bright side, we had to remove the railing at the top of the stairs and replace the whole thing anyway because of the new layout, so I have a little less to fix than I originally painted.
Final Thoughts
So… painted stairs - yay or nay?

Honestly, I hate vacuuming stairs so much that the surprises we uncovered under the carpet are worth it. I think it’s also worth noting that I love natural wood. If our stairs were in better condition and our house was a different style, sanding a repainting them would have been a viable option. But for our house, painting the stairs just made sense and I’m happy with the result - even if it’s not 100% finished (still).

Related Posts about Painting
How My Painted Stairs Are Holding Up After 1 Year

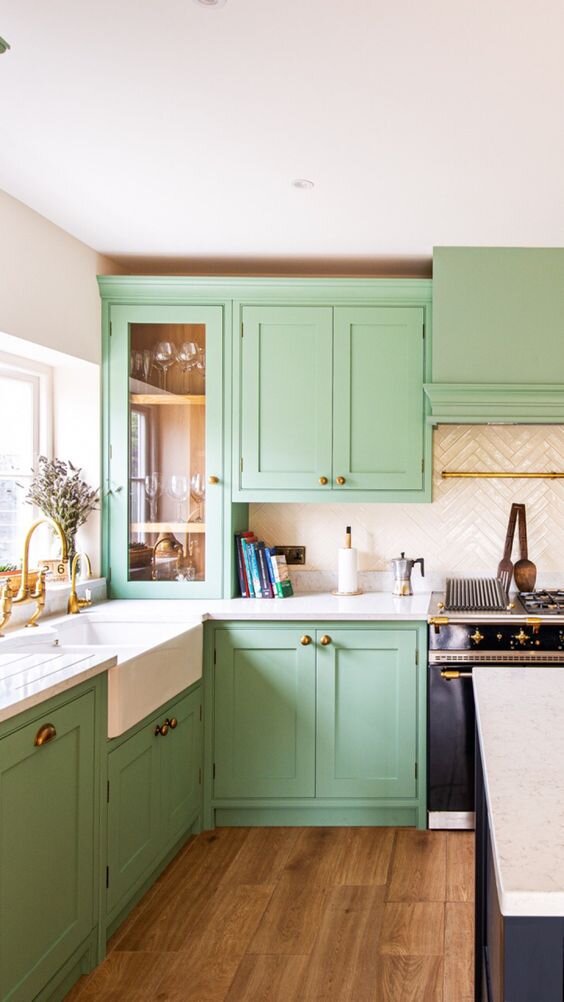
Green Kitchen Cabinet Inspiration
I'm going to share with you some of the images that have inspired me to paint my own kitchen cabinets GREEN! But not just that, we'll also cover the other elements that visually pull a kitchen together - hardware, counters, and wall color. Let's get to it!
Best Shades of Green For Your Cabinets
In case you haven't noticed, green kitchen cabinets are having a moment right now. Gone are the days when everyone painted their cabinets white (still a beautiful and classic choice for cabinets, though!). Green cabinets in every shade are popping up all over my Pinterest feed and have set my creative wheels into overdrive.
So today, I'm going to share with you some of the images that have inspired me to paint my own kitchen cabinets GREEN! But not just that, we'll also cover the other elements that visually pull a kitchen together - hardware, counters, and wall color. Let's get to it!
I first got wind of the green cabinet trend when I read a post by Sherry and John on Young House Love about their friends' kitchen makeover.
At first, I honestly had my reservations. I mean, green cabinets? Isn't that a little out there? But once I saw this image from that kitchen makeover I couldn't get it out of my brain.

Source | Color: Sherwin Williams - Halcyon green
How gorgeous is that color!? And paired with that hardware? And of course, the subway tiles! Do I even need to mention that fun yellow door?
So I did what I do and started gathering inspiration images for my own kitchen makeover because I have absolutely loathed our kitchen from the day we first looked at our house.
While it doesn’t look terrible in photos, in person our kitchen looked like the previous owners were going for what I can only imagine was “farmhouse on the beach”. The teal was much brighter than appears in pictures and the cabinets were painted to look distressed, but really just looked sloppy.
I found SO MANY beautiful kitchens online in every shade of green that I think will prove my point that green kitchens are the next big thing.
And guess what guys? I've actually already painted my cabinets - and you better believe they're green! The kitchen as a whole is still a work in progress, but there might just be a sneak peek at the end of this post for you….
Anywho, let’s check out some beautiful green kitchen inspiration, shall we?

Lovingly Lime
You probably never thought a lime green kitchen could look GOOD, did you? Wrong! Check out this beauty.
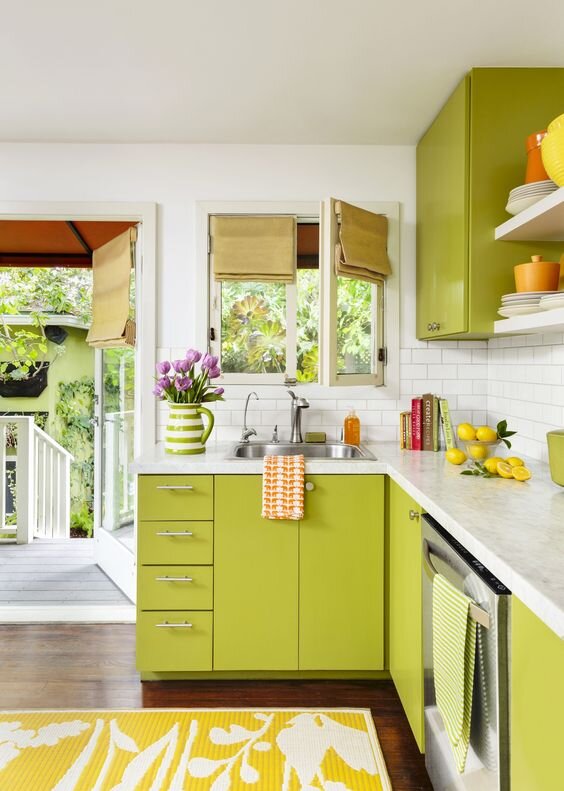
Source | Color: Dunn-Edward’s - Palm Frond
Although the cabinets in this kitchen are intense, they’re actually not overwhelming because of the more plain elements in the room: straight lines, flat cabinet fronts, classic subway tile, and white walls. They also stuck with white counters with subtle veining and complimented the cabinets with simple, modern brushed nickel hardware.
A+ for Avocado
I love avocados. I eat them for breakfast just about every day. But did I ever picture smearing them on my cabinets? NO! But now I might…

Source | cOLOR: uNKNOWN
This kitchen definitely evokes a 70’s feel with the avocado green cabinetry and clean, straight lines. In fact, I bet this is a mid-century modern house through and through (just take a look at the paneling in the adjoining room) - but it works perfectly!
Similar to the kitchen above, this kitchen understates the intensity of the paint color by keeping the surroundings simple. Plus, I can’t get enough of those looooong drawer pulls.
I Love Olive
This is another one of those images that I can’t stop looking at.
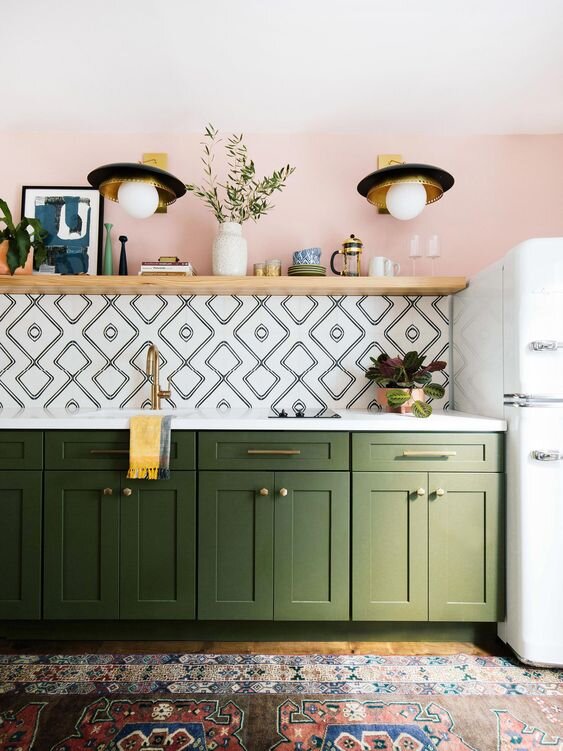
Source | COLOR: bEHr - fIG tREE
The daring use of colors and patterns in this kitchen is admirable - and totally works! Pink and green are a classic combination. The tones used here are desaturated enough so that you don’t look at this image and say, “Holy crap! That’s a green and pink kitchen!”. Instead, the pattern of the tile becomes the star of the show and then you start to realize all the other details of this kitchen.
Plus, it proves the point that just because you’re painting your cabinets a color other than white, doesn’t mean you have to stick with white walls.
Mighty Mint
When I started updating our first house, which was an older gal, I noticed that there was mint green paint under everything. In fact, it looked a lot like this:
source | cOLOR: uNKNOWN
I used to wonder how someone could love painting everything mint green. Now I know…
The mint green used in this kitchen has a softness to it. And while this minty kitchen has a classic feel, it’s modernized by the brass hardware (check out that faucet!) and the herringbone pattern in the backsplash.
Rain, Rain, (Don’t) Go Away
Scared to commit to full-on green? Try a lighter shade! Like this kitchen in Sherwin Willams Rainwashed.

Source | cOLOR: sHERWIN wILLIAMS - rAINWASHED
Just from this little photo, I can tell that this kitchen has a light and airy feel. The soft green cabinets with white walls, tile, and counters make everything feel delicate, fresh, and open. Keeping the hardware brushed nickel also helps keep the room light as your eye isn’t instantly drawn to them.
Soft Sage
I have to be honest, while I love all the green kitchens I’m sharing in this post, I’m most drawn to sage green.

source | cOLOR: bENJAMIN mOORE - rAINDANCE
If you’ve been following the blog, you’ve probably noticed that I kind of love blue/green/gray tones - and these cabinets are right up that alley! I also can’t help but swoon over all the other elements in this picture though - the brass hardware paired with the cabinet color is a match made in heaven. And the natural wood shelves really pull in some warmth and emphasize the hardware while the white counters and walls are clean and simple, letting the other elements shine. What’s not to love?
Here’s another inspiring, more modern, take on sage cabinetry.
Source | cOLOR: uNKNOWN
This kitchen is a great example of what you can do if you let your imagination run wild. Obviously, I love the cabinets, but they’ve done a few things here that I haven’t shown yet, like painting just the lower cabinets green (a good option if you’re nervous to take the leap), and using a black countertop and hardware which really ties into the pattern on the floor. On that note - take a look at that floor! I’m loving the bold pattern mixed with the subtle penny tile backsplash.
Totally Teal
If you love jewel-toned colors, why not paint your kitchen teal?

Source: Color: Unknown
From the saturated cabinets to the light fixture all the way down to the bold runner, this kitchen is dripping with fun. I love the use of bold elements and how they really went all-in with the design. To keep the cabinets from being too overwhelming, however, they left the island a matte black and used classic white subway tile on the backsplash allllll the way up to the ceiling.
Homey Hunter
Last, but certainly not least, is a beautiful deep hunter green.

Source | Color: Unknown
Using a dark color like hunter green paired with the marble backsplash brings a sort of sophistication to this space. Yet the addition of the raw wood keeps it grounded. This kitchen proves the point that dark paint doesn’t necessarily equal a dark room. By keeping the surrounding elements bright, this space still feels open.
Have I Proved My Point?
So, there’s a quick taste of some of the options for green kitchens using different shades of green with various combinations of colors used for hardware, walls, and counters. But if you want a refresher, here’s a quick rundown of good pairings for green cabinets:
What Color Hardware Should I Use?
In the examples above, I shared examples of green cabinets using brass, brushed nickel, and matte black hardware. I think it’s safe to say you can use just about any color or finish on your hardware! That includes oil rubbed bronze, gold, and polished chrome.
What Color Counter Should I Get?
Although green isn’t technically a neutral color, it acts like one. While many of the examples above had white countertops or white with grey veining, black, concrete, stainless steel, and butcher block would all look really classy next to green cabinetry, too!
What Wall Color Should I Use?
When you search for images of green cabinets, you’ll most often see them paired with white walls - but that’s not your only option! Above, I showed one example of a kitchen with pale pink walls but you can get a little crazier than that if you want to. Heck, in this laundry room, they used orange wallpaper and it looks amazing!

Source | Color: unknown
With that being said, use some wallpaper! It doesn’t have to be as bold as what’s above, but it’s a great way to add some pattern and other colors to your space. Or consider that you don’t have to stop at wall color. You can incorporate some more color and pattern by using interesting tile in your backsplash, too.
Final Thoughts
Before I go, I’ll say it again one more time for the people in the back: YOU CAN USE COLOR ON YOUR CABINETS!
Oh, and for those of you that stuck around (you fabulous people, you), here’s a sneak peek of how my kitchen makeover is coming along.

I look forward to sharing more details and the reveal in the (near?) future!
Related Room Inspiration Posts
How to Pair Other Design Elements with Green Cabinets
Creating a Functional and Stylish Laundry Room
Well, we've gone and changed our floor plan again - we're moving our laundry room upstairs! And that means I get to design another room! So I've been doing some research and finding inspiration about how to create a functional (and stylish!) laundry room.
Efficient and Stylish Laundry Room Layout
Well, we've gone and changed our floor plan again - we're moving our laundry room upstairs! And that means I get to design another room! So I've been doing some research and finding inspiration about how to create a functional (and stylish!) laundry room. What are the must-haves? What can I actually fit in the space available? How can I make the best use out of the space? But before I get into all that, let me explain how we got here.
Back when I first posted about our big renovation, I shared our original reworked layout that actually had plans to move the laundry room upstairs.

But within a few weeks, we reconfigured our master suite and the space that was going to be the laundry room became my closet after I realized I apparently don't know how rulers work (notice how the closet is MUCH smaller than the laundry room).

We decided to compromise by adding a laundry chute down to the current laundry room and moved on with the renovation.
WELL, as I mentioned recently in my post about staying positive and motivated during renovations, plans change and you just have to roll with it. So roll with it we did!
You see, in all versions of our floor plans, we figured the most logical option for the "shower room" from the original master suite layout was to turn it into a full bath for the loft.

I was okay with turning it into a half bath but definitely wasn't pumped about adding ANOTHER full bathroom to clean. I mean, who would ever use the shower in there? We already have two and a half baths - adding a third full bathroom to this four-bedroom house seemed like overkill. But the room is actually a pretty good size, so only making it into a half bath would have been a weird use of the space.
So last week while Lucius was demoing that room (ha - and I bet you thought we were done with demo), he asked me how I felt about turning that it a storage closet instead of a bathroom. For having such a large house, we actually have very little storage, so this wasn't a terrible idea. But my first reaction was, "What about turning it into a laundry room?".
After talking it through, we decided that made a lot of sense. All of our bedrooms are upstairs, so 95% of the laundry is upstairs too. Not lugging baskets of clothes up and down the stairs sounds like an absolute dream! And we figure we can turn the current laundry room into a storage closet as we had originally planned.
So here's the new (and final?) renovation layout!

Now let's get into the details - how do you create a functional and stylish laundry room? Since we’re pretty much rebuilding this room, we have a lot to think about. Here’s how I’m tackling it.
Consider Plumbing and Venting
First thing’s first - you’ll likely be somewhat constrained by the placement of your plumbing for your washer and access to venting for the dryer.
Because of the door placement and the size of the room, we really only have two options on which walls the washer and dryer can easily go. We're fortunate that we have this room and the adjacent room demoed and can see all the innards (including existing plumbing) to help us determine if either placement is out of the question. We’re also lucky that the new laundry room will be directly above the old laundry room, so we can run the venting for the dryer out of the current vent that already exists.
Think About Function
Laundry rooms might just be some of the hardest working rooms in a house. They serve so many purposes! So when designing your laundry room, it's crazy important to really think about all the things you want to use it for.
Do you store brooms, cleaning supplies, pet food, or other items there? Plan for that. Do you want to soak and/or iron your clothes in your laundry room? Plan for that too. Of course, with the space you have available, the world might not be your oyster, but it doesn't hurt to see what you can shift around to make your laundry room work for you!
In my case, we have other areas of the house where we store brooms, cleaning supplies, and pet food so there's no reason to find a place to put that stuff. However, our current laundry room doesn't have a utility sink and it's a huge pain in the behind so that's something I definitely want in the new space.
Other must-haves: maximum laundry-folding space, a shelf for typical laundry supplies, a hanging rod, a drying rack, space for a small trash can, and room for laundry baskets. Would you believe that our laundry room will only be about 6x8 feet!? That's a heck of a wish list for a pretty tight space! But I think I can make it happen. The next step is figuring out how to get it all to fit.
Lay Out Your Plans
As an Amazon Associate, I earn from qualifying purchases. This post may contain affiliate links, meaning I receive commissions for purchases made through those links, at no cost to you.
Now that you have your wants and needs hashed out, take a good look at the space you have available to see how you can make it flow.
After thinking it through, I've determined that putting our washer and dryer on the longest wall in the laundry room will make the most efficient use of the space. Here's how I see it working:

Placing the appliances on the longest wall leaves room on either side of the washer and dryer. So, why not put the utility sink to the left of the washing machine? (The image above is obviously upside-down.) That way, I can soak my clothes and easily transition them into the washer when ready.
Next, because I have a front-loading washer and dryer, building a counter to sit on top of the appliances will give me the space I need to fold laundry. And I can actually extend that to the far wall on the right. Underneath the counter on the right, next to the dryer, is the perfect spot for a small trash can.
Above the utility sink, I picture a wall-mounted drying rack. And over the counter, I plan to build a shelf to hold detergent, fabric softener, dryer sheets, and other laundry-related items.
I’m picturing a butcher block counter and open shelves above. Something kind of like the picture below. Maybe with some cool looking brackets?

This is a good example of the layout I described above, though my drying rack would be above the sink instead of cabinetry and there would be a little space on the right-hand side of the dryer for a trash can.

In front of the utility sink, there should be enough room to put some laundry baskets. And above that, I'd love to install a rod for those items that need to be hung right away. Maybe something like this:

Although I really hate ironing clothes and rarely do it, it's something I should plan for. But that doesn't mean I need to find space in the laundry room to iron. I can just as easily store the ironing board on an over the door ironing board holder and pull it into another room, preferably in front of the TV, when needed.
Style It Up
And now for the REALLY fun part - making it beautiful and stylish!
I don't know anyone who actually looks forward to doing the laundry - so why not try to make your laundry room at least somewhat enjoyable by making it a beautiful, stylish space? This is where you get to have some fun! And because laundry rooms are typically pretty small, you can even splurge a little bit.
For instance, what about installing some cool tile as an accent wall?

I love me some scalloped tile. But look how it pairs with that pretty butcher block. And hexagon tile on the floor!? Ugh, pinch me.
Speaking of hexagon tile, I’m loving the smaller pattern in this laundry room.

But let’s be real. Obviously, that cheery wallpaper is the real star of the show. It makes me so happy!
Final Thoughts
I’m still working through the details of how the laundry room will look exactly, and considering it was just demoed, I’d say I have a little bit of time to figure it out.
As we get closer to putting the room back together, I’ll be sure to share my design plan!
